Linux系统集群架构线上项目配置实战(一)
2018-04-24 11:53
465 查看
项目整体介绍
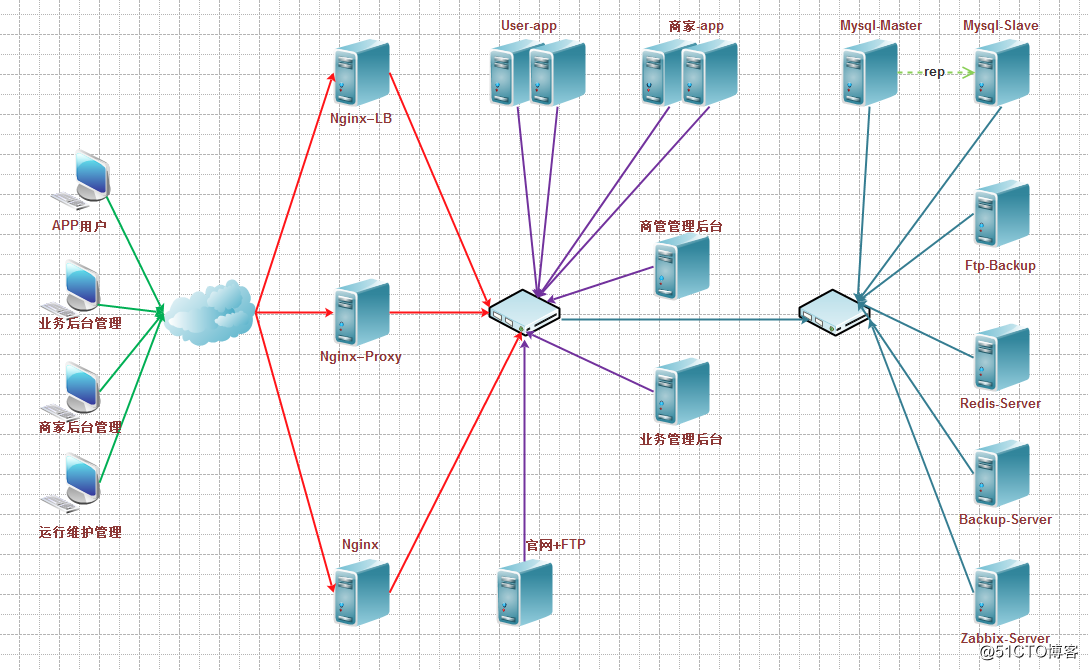
**整个项目包括以下几个应用工程**1、  用户APP
2、  商家APP
3、  业务平台管理后台
4、  商家业务管理后台
5、  官网**整体项目规划设计如下**1、  用户APP采用JAVA环境布署,初始环境两台服务器,实现负载均衡与高可用,前端负载使用nginx 做负载
2、  商家APP采用JAVA环境布署,初始环境两台服务器,实现负载均衡与高可用,前端负载使用nginx 做负载
3、  业务平台管理后台采用JAVA环境布署,初始环境一台服务器,前端使用nginx 反向代理,后续业务流量扩大,架构重新扩展
4、  商家平台管理后台采用JAVA环境布署,初始环境一台服务器,前端使用nginx 反向代理,后续业务流量扩大,架构重新扩展
5、  官方网站都是一些静态页面,采用nginx布署,WEB服务另安装FTP服务器,做为业务管理后台一些静态资源的上传
6、  数据库使用Mysql主从复制架构,程序上实现读写分享,从库开启binlog做备份使用
7、  全网所有备份数据全部同步到专业内网备份服务器,所有业务备份数据保留30天
8、  全网所有服务器监控(基本监控与服务监控)都采用zabbix监控
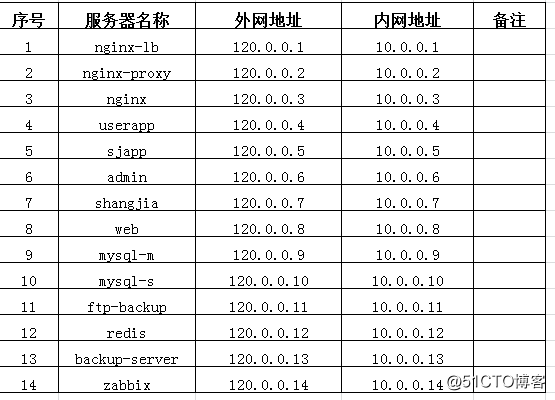
服务器IP地址规划如下
服务器环境与应用软件版本介绍
服务器环境
[root@centos ~]# cat /etc/redhat-release CentOS release 6.8 (Final)
[root@centos ~]# uname -r2.6.32-642.el6.x86_64
应用软件版本
Nginx 1.12.1 Mysql 5.7.17 Jdk 1.8Tomcat 8.5.9 Zabbix 3.0Yum 源使用163、阿里去、sohu国内的源都可以,自行选择Redis 4.0.1
服务器逻辑架构图
服务器基础环境配置
因使用云主机服务器,初始系统安装就略过了,如果需要批量安装的请参考前面的文章
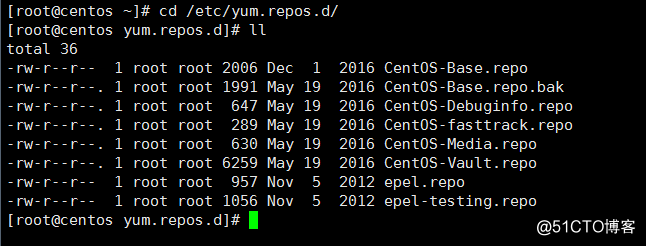
配置国内YUM源,以163为例
[root@centos ~]# cd /etc/yum.repos.d/[root@centos yum.repos.d]# wget http://mirrors.163.com/.help/CentOS6-Base-163.repo[root@centos yum.repos.d]# mv CentOS-Base.repo CentOS-Base.repo.bak[root@centos yum.repos.d]# mv CentOS6-Base-163.repo CentOS-Base.repo
安装需要的软件包
[root@centos ~]# yum install lsof vim telnet dos2unix lrzsz tree –y
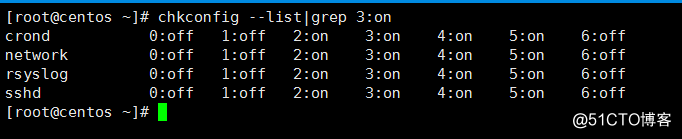
关闭不需要启动的服务
[root@centos ~]#for service in `chkconfig --list|grep 3:on|awk '{print $1}'`;do chkconfig --level 3 $service off;done[root@centos ~]#for service in crond network sshd rsyslog;do chkconfig --level 3 $service on;done[root@centos ~]# chkconfig --list|grep 3:on
修改SSH服务的默认配置
cp /etc/ssh/sshd_config /etc/ssh/sshd_config.bak
sed -i 's%#Port 22%Port 2233%g'  /etc/ssh/sshd_config
sed -i 's%#PermitRootLogin yes%PermitRootLogin no%g'  /etc/ssh/sshd_config
sed -i 's%#PermitEmptyPasswors no%PermitEmptyPasswors no%g'  /etc/ssh/sshd_config
sed -i 's%#UseDNS yes%UseDNS no%g'  /etc/ssh/sshd_config
egrep "UseDNS|2233|RootLogin|EmptyPass"  /etc/ssh/sshd_config
/etc/init.d/sshd reload
关闭selinux
配置文件/etc/selinux/config
sed -i 's#SELINUX=enforcing#SELINUX=disabled#g' /etc/selinux/config
egrep "SELINUX=" /etc/selinux/config
关闭防火墙
如果不是对外网的服务器,直接关闭防火墙,有外网地址的可建议开启,并允许相关的服务端口,并发高的服务器也不需要开启防火墙,可能会影响性能
/etc/invited/pintables stop/etc/invited/pintables statuspintables: Firewall is not running.
锁定系统关键文件
for file in /etc/passed /etc/shadow /etc/services /etc/initial /etc/rc.localdo
   chattr +i $filedone
配置普通操作用户及sudo权限
具体操作请参考公众号相关文章介绍
配置全网服务器时间同步
/usr/sbin/ntpdate time.windows.comcat>>/var/spool/cron/root<<EOF#this cron is for ntpdate */5 * * * * /usr/sbin/ntpdate time.windows.com >/dev/null 2>&1#cron config end EOF
配置全网服务器hosts文件
Cat>>/etc/hosts<<EOF
10.0.0.1      nginx-lb
10.0.0.2      nginx-proxy
10.0.0.3      nginx
10.0.0.4      userapp
10.0.0.5      sjapp
10.0.0.6      admin
10.0.0.7      shangjia
10.0.0.8      web
10.0.0.9      mysql-m
10.0.0.10     mysql-s
10.0.0.11     ftp-backup
10.0.0.12     redis
10.0.0.13     backup-server
10.0.0.14     zabbix
EOF
规范所有服务器目录
[root@centos ~]# mkdir /download/tools/ -p[root@centos ~]# mkdir /app/logs -p[root@centos ~]# mkdir /app -p[root@centos ~]# mkdir /server/{scripts,backup} –p至此基本的服务器优化配置也就结束了,接下来就是安装各类服务

相关文章推荐
- Linux系统集群架构线上项目配置实战(二)
- Linux系统集群架构线上项目配置实战
- Linux系统集群架构线上项目配置实战(二)
- [置顶] Linux系统集群架构线上项目配置实战(二)
- Linux系统集群架构线上项目配置实战(一)
- Linux系统集群架构线上项目配置实战 五(完结篇)
- [置顶] Linux系统集群架构线上项目配置实战(一)
- 企业级JAVA大型分布式电商项目实战高并发集群分布式系统架构视频教程下载
- java大型分布式电商项目实战高并发集群分布式系统架构
- Linux系统架构(LB—HA集群)-HA集群配置
- 实战Nagios NSCA方式监控Linux系统资源使用情况 -- Nagios配置篇 -- Nagios Server端
- Amazon Linux 系统安装配置zookeeper集群
- Linux高性能集群搭建(2)---NFS共享文件系统安装配置
- Linux系统构架 - HA集群配置
- 项目实战:Ubuntu系统LNMP环境下安装配置zabbix3.04
- LNAMP(Linux+Nginx+Apache+Mysql+PHP)高性能架构配置实战版
- 企业级DNS服务集群架构设计及BIND部署配置实战 推荐
- Linux负载均衡集群之LVS原理 分类: 系统架构 Linux 2015-05-27 22:16 60人阅读 评论(0) 收藏
- 红帽GFS集群文件系统配置指南 linux搭建gfs系统--iscsi+GFS实现网络存储
- 第二十二天-linux系统网络基础知识及配置实战