自动化运维工具Ansible实战(一)简介和部署
一、Ansible的介绍
Ansible是新出现的自动化运维工具,基于Python开发,集合了众多运维工具(puppet、cfengine、chef、func、fabric)的优点。实现了批量系统配置、批量程序部署、批量运行命令等功能。Ansible是基于模块工作的,本身没有批量部署的能力。真正具有批量部署的是Ansible所运行的模块,Ansible只是提供一种框架。
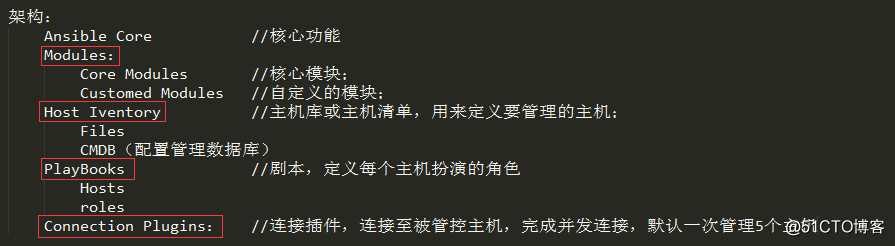
1、Ansible框架
连接插件connection plugins:负责和被监控端实现通信;
host inventory:指定操作的主机,是一个配置文件里面定义监控的主机;
各种模块核心模块、command模块、自定义模块;
借助于插件完成记录日志邮件等功能;
playbook:剧本执行多个任务时,非必需可以让节点一次性运行多个任务。
2、Ansible架构图
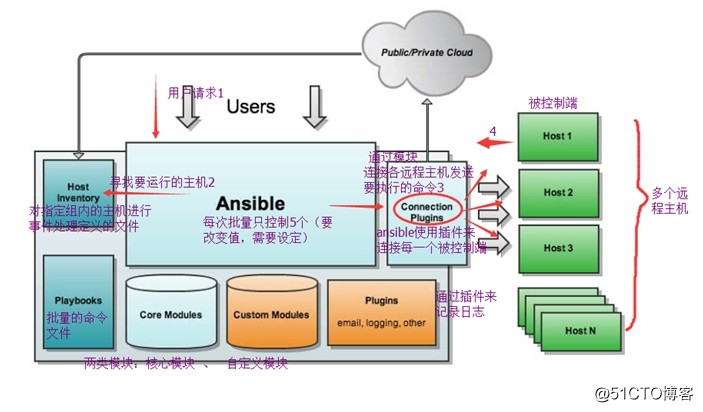
Ansible核心组件说明
Ansible:Ansible的核心程序;
Host Lnventory:记录了每一个由Ansible管理的主机信息,信息包括ssh端口,root帐号密码,ip地址等等。可以通过file来加载,可以通过CMDB加载;
Playbooks:YAML格式文件,多个任务定义在一个文件中,使用时可以统一调用,“剧本”用来定义那些主机需要调用那些模块来完成的功能;
Core Modules:Ansible执行任何管理任务都不是由Ansible自己完成,而是由核心模块完成;Ansible管理主机之前,先调用core Modules中的模块,然后指明管理Host Lnventory中的主机,就可以完成管理主机;
Custom Modules:自定义模块,完成Ansible核心模块无法完成的功能,此模块支持任何语言编写;
Connection Plugins:连接插件,Ansible和Host通信使用。
3、Ansible基本特性
no agents:不需要在被管控主机上安装任何客户端;
no server:无服务器端,使用时直接运行命令即可;
modules in any languages:基于模块工作,可使用任意语言开发模块;
yaml,not code:使用yaml语言定制剧本playbook;
ssh by default:基于SSH工作;
strong multi-tier solution:可实现多级指挥。
4、Ansible的优点
轻量级,无需在客户端安装agent,更新时,只需在操作机上进行一次更新即可;
批量任务执行可以写成脚本,而且不用分发到远程就可以执行;
使用python编写,维护更简单,ruby语法过于复杂;
支持sudo。
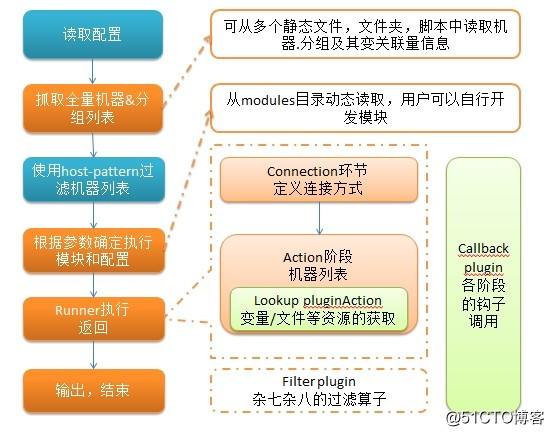
5、Ansible任务执行流程
说明:以上内容大多是基于他人分享的基础上总结而来,学习借鉴之用;
三、Ansible的安装
1、系统环境
系统平台: CentOS 7.3
Ansible Server: 192.168.8.55
Ansible Client: 192.168.8.66
(1)写hosts记录
[root@Ansible ~]# echo "192.168.8.55 Ansible" >> /etc/hosts[root@Ansible ~]# echo "192.168.8.66 Client" >> /etc/hosts
(2)关闭firewalld和selinux
[root@Ansible ~]# systemctl stop firewalld && systemctl disable firewalldRemoved symlink /etc/systemd/system/multi-user.target.wants/firewalld.service.
Removed symlink /etc/systemd/system/dbus-org.fedoraproject.FirewallD1.service.
(3)关闭selinux
[root@Ansible ~]# setenforce 0[root@Ansible ~]# sed -i 's/SELINUX=enforcing/SELINUX=disabled/g' /etc/selinux/config
2、yum源安装
(1)配置好epel yum源安装相应的基础模块,可以使用yum直接安装
[root@Ansible ~]# yum -y install python PyYAML python-paramiko python-jinja2 python-simplejson
(2)安装Ansible
[root@Ansible ~]# yum -y install ansible
3、源码包安装(推荐使用)
Ansible安装所依赖插件较多,所以首先安装插件
[root@Ansible ~]# yum -y install gcc zlib zlib-devel openssl openssl-devel libffi-devel
(1)python3.6安装
Ansible是用Python开发的,使用Ansible需要操作系统有Python,建议Python版本2.6以上。
[root@Ansible ~]# wget https://www.python.org/ftp/python/3.6.4/Python-3.6.4.tgz[root@Ansible ~]# tar xvzf Python-3.6.4.tgz -C /usr/src/[root@Ansible ~]# cd /usr/src/Python-3.6.4/[root@Ansible Python-3.6.4]# ./configure --prefix=/usr/local[root@Ansible Python-3.6.4]# make[root@Ansible Python-3.6.4]# make install
将python头文件拷贝到标准目录,以避免编译ansible时,找不到所需的头文件
[root@Ansible Python-3.6.4]# cd /usr/local/include/python3.6m/[root@Ansible python3.6m]# cp -a ./* /usr/local/include/
备份旧版本的python,并符号链接新版本的python
[root@Ansible python3.6m]# cd /usr/bin/[root@Ansible bin]# mv python python.old[root@Ansible bin]# ln -s /usr/local/bin/python3.6 /usr/local/bin/python[root@Ansible bin]# rm -rf /usr/bin/python[root@Ansible bin]# cp /usr/local/bin/python3.6 /usr/bin/python
修改yum脚本,使其指向旧版本的python,已避免其无法运行
[root@Ansible bin]# vim /usr/bin/yum
将#!/usr/bin/python修改为#!/usr/bin/python2.7

[root@Ansible bin]# vim /usr/libexec/urlgrabber-ext-down
将#!/usr/bin/python修改为#!/usr/bin/python2.7

[root@Ansible bin]# python   --测试安装版本是否为Python 3.6.4Python 3.6.4 (default, Apr 17 2018, 11:03:21)
[GCC 4.8.5 20150623 (Red Hat 4.8.5-11)] on linux
Type "help", "copyright", "credits" or "license" for more information.
>>> exit()   --退出python
(2)setuptools模块安装
[root@Ansible ~]# wget https://files.pythonhosted.org/packages/72/c2/c09362ab29338413ab687b47dab03bab4a792e2bbb727a1eb5e0a88e3b86/setuptools-39.0.1.zip[root@Ansible ~]# unzip setuptools-39.0.1.zip -d /usr/src/[root@Ansible ~]# cd /usr/src/setuptools-39.0.1/[root@Ansible setuptools-39.0.1]# python setup.py install
安装好setuptools后就可以利用easy_install这个工具安装下面的python模块了,但我的电脑是虚拟机,配置太低了,所以基本无法安装,所以只好一个一个下载下来再安装了。
(3)pycrypto模块安装
[root@Ansible ~]# wget https://pypi.python.org/packages/source/p/pycrypto/pycrypto-2.6.1.tar.gz[root@Ansible ~]# tar xvzf pycrypto-2.6.1.tar.gz -C /usr/src/[root@Ansible ~]# cd /usr/src/pycrypto-2.6.1/[root@Ansible pycrypto-2.6.1]# python setup.py install
(4) PyYAML模块安装
[root@Ansible ~]# wget http://pyyaml.org/download/libyaml/yaml-0.1.7.tar.gz[root@Ansible ~]# tar xvzf yaml-0.1.7.tar.gz -C /usr/src/[root@Ansible ~]# cd /usr/src/yaml-0.1.7/[root@Ansible yaml-0.1.7]# ./configure --prefix=/usr/local[root@Ansible yaml-0.1.7]# make --jobs=`grep processor /proc/cpuinfo | wc -l`[root@Ansible yaml-0.1.7]# make install[root@Ansible ~]# wget http://pyyaml.org/download/pyyaml/PyYAML-3.12.tar.gz[root@Ansible ~]# tar xvzf PyYAML-3.12.tar.gz -C /usr/src/[root@Ansible ~]# cd /usr/src/PyYAML-3.12/[root@Ansible PyYAML-3.12]# python setup.py install
(5)Jinja2模块安装
[root@Ansible ~]# wget https://pypi.python.org/packages/source/M/MarkupSafe/MarkupSafe-0.9.3.tar.gz[root@Ansible ~]# tar xvzf MarkupSafe-0.9.3.tar.gz -C /usr/src/[root@Ansible ~]# cd /usr/src/MarkupSafe-0.9.3/[root@Ansible MarkupSafe-0.9.3]# python setup.py install[root@Ansible ~]# wget https://files.pythonhosted.org/packages/56/e6/332789f295cf22308386cf5bbd1f4e00ed11484299c5d7383378cf48ba47/Jinja2-2.10.tar.gz[root@Ansible ~]# tar xvzf Jinja2-2.10.tar.gz -C /usr/src/[root@Ansible ~]# cd /usr/src/Jinja2-2.10/[root@Ansible Jinja2-2.10]# python setup.py install
(6)paramiko模块安装
[root@Ansible ~]# wget https://files.pythonhosted.org/packages/f9/e5/99ebb176e47f150ac115ffeda5fedb6a3dbb3c00c74a59fd84ddf12f5857/ecdsa-0.13.tar.gz[root@Ansible ~]# tar xvzf ecdsa-0.13.tar.gz -C /usr/src/[root@Ansible ~]# cd /usr/src/ecdsa-0.13/[root@Ansible ecdsa-0.13]# python setup.py install[root@Ansible ~]# https://files.pythonhosted.org/packages/29/65/83181630befb17cd1370a6abb9a87957947a43c2332216e5975353f61d64/paramiko-2.4.1.tar.gz[root@Ansible ~]# tar xvzf paramiko-2.4.1.tar.gz -C /usr/src/[root@Ansible ~]# cd /usr/src/paramiko-2.4.1/[root@Ansible paramiko-2.4.1]# python setup.py install
(7)simplejson模块安装
[root@Ansible ~]# wget https://files.pythonhosted.org/packages/0d/3f/3a16847fe5c010110a8f54dd8fe7b091b4e22922def374fe1cce9c1cb7e9/simplejson-3.13.2.tar.gz[root@Ansible ~]# tar xvff simplejson-3.13.2.tar.gz -C /usr/src/[root@Ansible src]# cd /usr/src/simplejson-3.13.2/[root@Ansible simplejson-3.13.2]# python setup.py install
(8) ansible安装
[root@Ansible ~]# wget https://files.pythonhosted.org/packages/4a/3b/9d98e132074bb6a3f18fd811db2819fbde6fc8a26fad9a40b49e53cb2455/ansible-2.5.0.tar.gz[root@Ansible ~]# tar xf ansible-2.5.0.tar.gz -C /usr/src/[root@Ansible ~]# cd /usr/src/ansible-2.5.0/[root@Ansible ansible-2.5.0]# python setup.py install
三、Ansible的配置
1、Ansible配置
注:centos7.0安装Ansible后发现找不到ansible.cfg,配置文件的路径如下图,并将配置文件拷贝过去
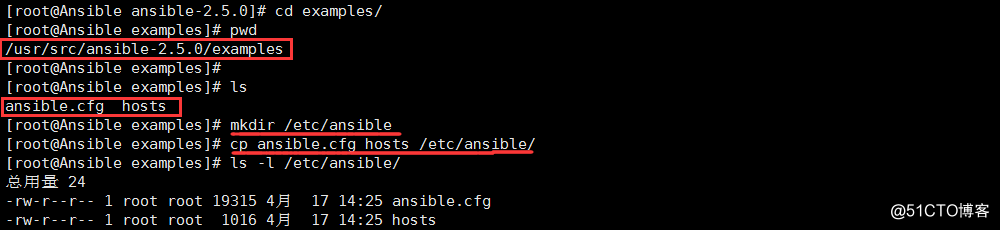
[root@Ansible ansible-2.5.0]# cd examples/[root@Ansible examples]# pwd        --注意路径/usr/src/ansible-2.5.0/examples
[root@Ansible examples]# lsansible.cfg  hosts
[root@Ansible examples]# mkdir /etc/ansible        --创建ansible目录[root@Ansible examples]# cp ansible.cfg hosts /etc/ansible/      --拷贝文件[root@Ansible examples]# ls -l /etc/ansible/总用量 24-rw-r--r-- 1 root root 19315 4月  17 14:25 ansible.cfg
-rw-r--r-- 1 root root  1016  4月  17 14:25 hosts
2、配置ssh免密登录(只在控制端使用)
[root@Ansible ~]# ssh-keygen -t rsa  --直接回车即可,不用设置密钥密码。Generating public/private rsa key pair.Enter file in which to save the key (/root/.ssh/id_rsa):
Enter passphrase (empty for no passphrase):
Enter same passphrase again:
Your identification has been saved in /root/.ssh/id_rsa.
Your public key has been saved in /root/.ssh/id_rsa.pub.
The key fingerprint is:
bc:4e:4e:5f:61:a3:37:08:b0:c4:00:98:90:5b:c6:9f root@Ansible.01.com
The key's randomart image is:
+--[ RSA 2048]----+
|o=...            |
|+ +  o           |
| + . .+          |
|.   E. +         |
|      . S   +    |
|         o + o   |
|        + o +    |
|       = . o .   |
|        o .      |
+-----------------+

[root@Ansible ~]# cat /root/.ssh/id_rsa.pub >> /root/.ssh/authorized_keys[root@Ansible ~]# chmod 600 /root/.ssh/authorized_keys
将公钥传给被管理的机器节点
[root@Ansible ~]# scp /root/.ssh/authorized_keys 192.168.8.66:/root/.ssh/root@192.168.8.66's password:
authorized_keys                      100%  401     0.4KB/s   00:00
3、远程连接测试
[root@Ansible ~]# vim /etc/ansible/hosts --文件末尾添加以下内容[web]192.168.8.55[root@Ansible ~]# ansible web -m command -a 'uptime'192.168.8.55 | SUCCESS | rc=0 >>14:56:03 up 12:53, 4 users, load average: 0.00, 0.01, 0.05

- 自动化运维工具Ansible实战(一)简介和部署
- 自动化运维工具Ansible实战安装部署
- 自动化运维工具Ansible实战(一)安装部署
- 自动化运维工具Ansible实战(一)安装部署
- 自动化运维工具--Ansible(安装部署、模块简介与操作)
- Saltstack自动化运维工具 实战与部署
- 自动化运维工具Ansible详细部署
- Ansible自动化运维工具部署及使用 推荐
- 自动化运维工具Ansible详细部署
- Linux实战教学笔记25:自动化运维工具之ansible (一)
- 自动化运维工具Ansible详细部署
- 自动化运维工具Ansible详细部署
- 自动化运维工具Ansible详细部署
- 自动化运维工具Ansible部署详解与基本使用
- 自动化运维工具Ansible详细部署
- 自动化运维工具Ansible详细部署
- 自动化运维工具Ansible(一)---安装部署
- 企业级自动化运维工具应用实战-ansible
- 比Ansible更吊的自动化运维工具,自动化统一安装部署_自动化部署udeploy1.0
- 自动化运维工具Ansible详细部署 - 人生理想在于坚持不懈 - 51CTO技术博客