自动化运维工具Ansible实战(一)安装部署
2017-08-14 00:00
1106 查看
1,基本介绍
(一)ansible简单介绍
ansible是新出现的自动化运维工具,基于Python开发,集合了众多运维工具(puppet、cfengine、chef、func、fabric)的优点,实现了批量系统配置、批量程序部署、批量运行命令等功能。
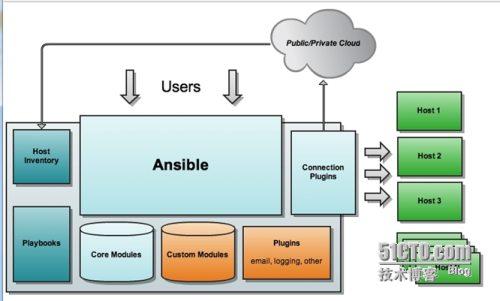
ansible是基于模块工作的,本身没有批量部署的能力。真正具有批量部署的是ansible所运行的模块,ansible只是提供一种框架。主要包括:
(1)、连接插件connection plugins:负责和被监控端实现通信;
(2)、host inventory:指定操作的主机,是一个配置文件里面定义监控的主机;
(3)、各种模块核心模块、command模块、自定义模块;
(4)、借助于插件完成记录日志邮件等功能;
(5)、playbook:剧本执行多个任务时,非必需可以让节点一次性运行多个任务。
-----来源百度百科
2,基本架构

3、基本特性
(1)、no agents:不需要在被管控主机上安装任何客户端;
(2)、no server:无服务器端,使用时直接运行命令即可;
(3)、modules in any languages:基于模块工作,可使用任意语言开发模块;
(4)、yaml,not code:使用yaml语言定制剧本playbook;
(5)、ssh by default:基于SSH工作;
(6)、strong multi-tier solution:可实现多级指挥。
4、优点
(1)、轻量级,无需在客户端安装agent,更新时,只需在操作机上进行一次更新即可;
(2)、批量任务执行可以写成脚本,而且不用分发到远程就可以执行;
(3)、使用python编写,维护更简单,ruby语法过于复杂;
(4)、支持sudo。
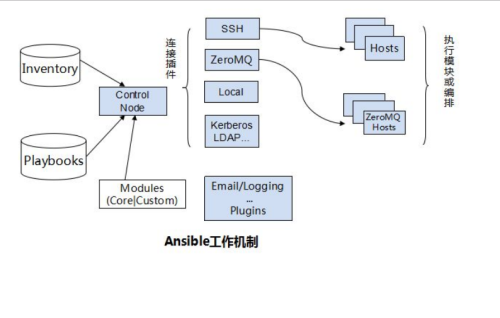
5,ansible工作机制

(二)Ansible的安装与配置
1,安装相应的基础模块,建议使用yum直接安装(yum install python26 python26-PyYAML python26-paramiko python26-jinja2 python-simplejson -y)
2.下载ansible(http://releases.ansible.com/ansible/)可在改页面选择相应的版本进行下载。
3,解压下载的文件并安装
4,ssh免密钥登录设置(只在控制端使用)
5,将加密的文件(/root/.ssh/id_rsa_web.pub)分发到其它服务器,并在其它的服务器执行如下命令
6,Ansible默认安装好后有一个配置文件/etc/ansible/ansible.cfg,该配置文件中定义了ansible的主机的默认配置部分,如默认是否需要输入密码、是否开启sudo认证、action_plugins插件的位置、hosts主机组的位置、是否开启log功能、默认端口、key文件位置等等,默认的都是关闭,现在需要开启remote_port和private_key_file两个配置。
7,定义hosts主机组(被控制主机)
(三)简单的测试
至此,ansible简单的安装配置完成,接下来进行模块的讲解。
本文出自 “清风明月” 博客,请务必保留此出处http://liqingbiao.blog.51cto.com/3044896/1875921
(一)ansible简单介绍
ansible是新出现的自动化运维工具,基于Python开发,集合了众多运维工具(puppet、cfengine、chef、func、fabric)的优点,实现了批量系统配置、批量程序部署、批量运行命令等功能。
ansible是基于模块工作的,本身没有批量部署的能力。真正具有批量部署的是ansible所运行的模块,ansible只是提供一种框架。主要包括:
(1)、连接插件connection plugins:负责和被监控端实现通信;
(2)、host inventory:指定操作的主机,是一个配置文件里面定义监控的主机;
(3)、各种模块核心模块、command模块、自定义模块;
(4)、借助于插件完成记录日志邮件等功能;
(5)、playbook:剧本执行多个任务时,非必需可以让节点一次性运行多个任务。
-----来源百度百科
2,基本架构
3、基本特性
(1)、no agents:不需要在被管控主机上安装任何客户端;
(2)、no server:无服务器端,使用时直接运行命令即可;
(3)、modules in any languages:基于模块工作,可使用任意语言开发模块;
(4)、yaml,not code:使用yaml语言定制剧本playbook;
(5)、ssh by default:基于SSH工作;
(6)、strong multi-tier solution:可实现多级指挥。
4、优点
(1)、轻量级,无需在客户端安装agent,更新时,只需在操作机上进行一次更新即可;
(2)、批量任务执行可以写成脚本,而且不用分发到远程就可以执行;
(3)、使用python编写,维护更简单,ruby语法过于复杂;
(4)、支持sudo。
5,ansible工作机制
(二)Ansible的安装与配置
1,安装相应的基础模块,建议使用yum直接安装(yum install python26 python26-PyYAML python26-paramiko python26-jinja2 python-simplejson -y)
[root@GJB-TESTING .ssh]# yum  install  python26 python26-PyYAML  python26-paramiko  python26-ji
nja2   python-simplejson
Loaded plugins: fastestmirror
Loading mirror speeds from cached hostfile
* base: mirrors.163.com
* extras: mirrors.zju.edu.cn
* updates: mirrors.163.com
Setting up Install Process
No package python26 available.
No package python26-PyYAML available.
No package python26-paramiko available.
No package python26-jinja2 available.
Resolving Dependencies
--> Running transaction check
---> Package python-simplejson.x86_64 0:2.0.9-3.1.el6 will be installed
--> Finished Dependency Resolution
Dependencies Resolved
================================================================================================
Package                      Arch              Version                   Repository       Size
================================================================================================
Installing:
python-simplejson            x86_64            2.0.9-3.1.el6             base            126 k
Transaction Summary
================================================================================================
Install       1 Package(s)
Total download size: 126 k
Installed size: 437 k
Is this ok [y/N]: y
.
2.下载ansible(http://releases.ansible.com/ansible/)可在改页面选择相应的版本进行下载。
[root@Monitor tmp]# wget http://releases.ansible.com/ansible/ansible-2.2.0.0.tar.gz --2016-11-23 18:06:35--  http://releases.ansible.com/ansible/ansible-2.2.0.0.tar.gz 正在解析主机 releases.ansible.com... 104.25.170.30, 104.25.171.30, 2400:cb00:2048:1::6819:ab1e, ...
正在连接 releases.ansible.com|104.25.170.30|:80... 已连接。
已发出 HTTP 请求,正在等待回应... 200 OK
长度:2441851 (2.3M) [application/x-gzip]
正在保存至: “ansible-2.2.0.0.tar.gz”
100%[======================================================>] 2,441,851   1.36M/s   in 1.7s
2016-11-23 18:06:42 (1.36 MB/s) - 已保存 “ansible-2.2.0.0.tar.gz” [2441851/2441851])
3,解压下载的文件并安装
[root@Monitor tmp]# tar xf ansible
ansible-2.2.0.0.tar.gz  ansible.cfg
[root@Monitor tmp]# tar xf ansible-2.2.0.0.tar.gz
[root@Monitor tmp]# cd ansible-2.2.0.0
[root@Monitor ansible-2.2.0.0]# python setup.py
bin/          COPYING       lib/          packaging/    setup.cfg
CHANGELOG.md  docs/         Makefile      PKG-INFO      setup.py
contrib/      examples/     MANIFEST.in   README.md     VERSION
[root@Monitor ansible-2.2.0.0]# python setup.py build
running build
running build_py
running build_scripts
[root@Monitor ansible-2.2.0.0]# python setup.py install
........
Using /usr/lib/python2.6/site-packages/Jinja2-2.6-py2.6.egg
Searching for paramiko==1.7.5
Best match: paramiko 1.7.5
Adding paramiko 1.7.5 to easy-install.pth file

Using /usr/lib/python2.6/site-packages
Finished processing dependencies for ansible==2.2.0.0

[root@Monitor ansible-2.2.0.0]# mkdir /etc/ansible
[root@Monitor ansible-2.2.0.0]# pwd
/tmp/ansible-2.2.0.0
[root@Monitor ansible-2.2.0.0]# cp -r examples/* /etc/ansible
4,ssh免密钥登录设置(只在控制端使用)
[root@Monitor ansible]# ssh-keygen -t rsa -P ''     #####生成公钥/私钥
Generating public/private rsa key pair.
Enter file in which to save the key (/root/.ssh/id_rsa): /root/.ssh/id_rsa_web
Your identification has been saved in /root/.ssh/id_rsa_web.
Your public key has been saved in /root/.ssh/id_rsa_web.pub.
The key fingerprint is:
41:c8:41:e7:be:32:4c:68:76:e8:9a:9c:bb:07:f0:06 root@Monitor
The key's randomart image is:
+--[ RSA 2048]----+
|     oooo        |
|      o+         |
|        o        |
|E    o . .       |
| +  = o S        |
|  ++ +   .       |
| . .. + .        |
| . +.  o         |
|  B+             |
+-----------------+
[root@Monitor ansible]# cat /root/.ssh/id_rsa_web
id_rsa_web       id_rsa_web1      id_rsa_web1.pub  id_rsa_web.pub
[root@Monitor ansible]# cat /root/.ssh/id_rsa_web.pub >> /root/.ssh/authorized_keys
5,将加密的文件(/root/.ssh/id_rsa_web.pub)分发到其它服务器,并在其它的服务器执行如下命令
########在ansible服务器上执行以下语句
[root@Monitor ansible]# scp /root/.ssh/id_rsa_web.pub root@192.168.110.5:/root/.ssh/
reverse mapping checking getaddrinfo for . [192.168.110.5] failed - POSSIBLE BREAK-IN ATTEMPT!
root@192.168.110.5's password:
id_rsa_web.pub                                                100%  394     0.4KB/s   00:00
######在客户端上执行以下语句
[root@GJB-TESTING .ssh]# cat /root/.ssh/id_rsa_web.pub >> /root/.ssh/authorized_keys
[root@GJB-TESTING .ssh]# chmod 600 /root/.ssh/authorized_keys
[root@GJB-TESTING .ssh]# ll /root/.ssh/authorized_keys
-rw-------. 1 root root 2861 11月 24 14:21 /root/.ssh/authorized_keys
6,Ansible默认安装好后有一个配置文件/etc/ansible/ansible.cfg,该配置文件中定义了ansible的主机的默认配置部分,如默认是否需要输入密码、是否开启sudo认证、action_plugins插件的位置、hosts主机组的位置、是否开启log功能、默认端口、key文件位置等等,默认的都是关闭,现在需要开启remote_port和private_key_file两个配置。
[root@Monitor ansible]# vim ansible.cfg
remote_port    = 22               ####用于连接远程ssh的端口
private_key_file = /root/.ssh/id_rsa_web    ####用于免密码登陆的
7,定义hosts主机组(被控制主机)
[root@Monitor ansible]# vim hosts
[web]
192.168.110.4
192.168.110.5
[db]
192.168.110.2
(三)简单的测试
######只测试web组的主机
[root@Monitor ansible]# ansible web -m command -a 'uptime'
192.168.110.4 | SUCCESS | rc=0 >>
14:30:31 up 47 days,  5:29,  2 users,  load average: 0.00, 0.00, 0.00
192.168.110.5 | SUCCESS | rc=0 >>
14:32:28 up 7 days, 22:26,  2 users,  load average: 0.01, 0.02, 0.00
######测试所有的主机
[root@Monitor ansible]# ansible  all -m command -a 'uptime'
192.168.110.4 | SUCCESS | rc=0 >>
14:35:51 up 47 days,  5:34,  2 users,  load average: 0.02, 0.03, 0.00
192.168.110.2 | SUCCESS | rc=0 >>
14:36:04 up 47 days,  5:47,  4 users,  load average: 0.23, 0.13, 0.10
192.168.110.5 | SUCCESS | rc=0 >>
14:37:48 up 7 days, 22:32,  2 users,  load average: 0.00, 0.00, 0.00
至此,ansible简单的安装配置完成,接下来进行模块的讲解。
本文出自 “清风明月” 博客,请务必保留此出处http://liqingbiao.blog.51cto.com/3044896/1875921

相关文章推荐
- 自动化运维工具Ansible实战安装部署
- 自动化运维工具Ansible实战(一)安装部署
- 比Ansible更吊的自动化运维工具,自动化统一安装部署_自动化部署udeploy1.0
- 自动化运维工具Ansible实战(一)简介和部署
- 自动化运维工具--Ansible(安装部署、模块简介与操作)
- 自动化运维工具Ansible(一)---安装部署
- 自动化运维工具Ansible详细部署
- 自动化运维工具Ansible详细部署
- 企业级自动化运维工具应用实战-ansible
- 自动化运维工具Ansible详细部署
- Ansible安装与配置(自动化运维管理工具)
- Ansible自动化运维工具安装及使用
- 自动化运维之详细部署安装Ansible服务(超简单)
- 自动化运维工具ansible--笔记一之简介安装/常用模块
- 自动化运维工具Ansible详细部署
- 自动化运维工具Ansible实战(二)主机清单的管理
- SUSE Linux 11编译安装Ansible自动化运维管理工具
- 自动化运维工具Ansible详细部署
- 自动化部署与统一安装升级 - 类ansible工具 udeploy0.3版本发布 (更新时间2014-12-24)