SparkStreaming项目实战系列——2.分布式日志收集框架Flume
2017-12-29 21:03
405 查看
2.分布式日志收集框架Flume
2.1业务现状分析
使用Hadoop集群和一些分布式框架来处理大量的数据如何解决我们的日志数据从其他server中移动到Hadoop集群之上??
shell cp hadoop集群的机器上,hadoop fs -put … /
存在的问题:
如何做监控,比如一个机器断了
如果采用CP的话,必须指定时间间隔,则会失去时效性
文本格式的数据直接通过网络传输,对IO开销特别大
容错和负载均衡
引入Flume后,解决以上问题
2.2Flume概述
Flume is a distributed, reliable, and available service for efficiently collecting, aggregating, and moving large amounts of log data. It has a simple and flexible architecture based on streaming data flows. It is robust and fault tolerant with tunable reliability mechanisms and many failover and recovery mechanisms. It uses a simple extensible data model that allows for online analytic application.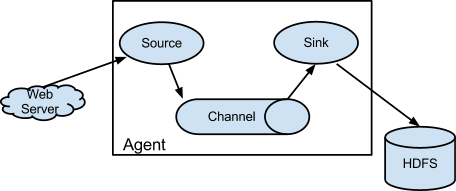
从WebServer收集数据到目标HDFS
三大组件:Source,Channel, Sink
设计目标:
可靠性
扩展性
管理性
业界同类产品对比
Flume: Cloudera/Apache Java
Scribe: Facebook C/C++ 不再维护
Chukwa: Yahoo/Apache Java 不再维护
Kafka:
Fluentd: Ruby
Logstash: ELK
2.3Flume发展史
Cloudera 0.9.2 Flume-OGflume-728 Flume-NG ==> Apache
Flume架构及核心组件
Source:指定数据源从哪里收集Channel:聚集
Sink:
2.4Flume环境部署
Java1.7+ 本机使用的是java1.8足够的内存
读写权限
环境安装过程
Java8下载
#Java安装:
1.解压jdk
tar -zxvf jdk-8u144-linux-x64.tar.gz -C ~/app/

2.配置系统环境变量到
vim ~/.bash_profile
如下:
export JAVA_HOME=/home/hadoop/app/jdk1.8.0_144
export PATH=$JAVA_HOME/bin:$PATH

3.生效配置文件
source ~/.bash_profile
java -version
[flume-ng-1.6.0-cdh5.7.0.tar.gz下载
flume-ng-1.6.0-cdh5.7.0.tar.gz安装与配置:

1.解压
tar -zxvf flume-ng-1.6.0-cdh5.7.0.tar.gz -C ~/app

2.配置系统环境变量到
export FLUME_HOME=/home/hadoop/app/apache-flume-1.6.0-cdh5.7.0-bin
export PATH=$FLUME_HOME/bin:$PATH

3.生效配置文件
source ~/.bash_profile

4.配置Flume Conf
cd ~/app/apache-flume-1.6.0-cdh5.7.0-bin/conf
cp flume-env.sh.template flume-env.sh
vim flume-env.sh
加入一行,设置JAVA_HOME
export JAVA_HOME=/home/hadoop/app/jdk1.8.0_144
2.3Flume实战
需求:从指定的网络端口采集数据输出到控制台,参考网站使用Flume的关键就是写配置文件
1.配置Source
2.配置Channel
3.配置Sink
将以上组件串起来
a1: agent名称
r1: 数据源的名称
k1: sink的名称
c1: channel的名称
netcat TCP source:会监听某个端口把每一行的数据转换成一个event(Flume数据传输的单元),相关参数是type,bing绑定主机,port指定的端口
logger sink:日志event信息通过INFO级别输出,只需要指定一个k1.type
channel:

# example.conf: A single-node Flume configuration

# Name the components on this agent
a1.sources = r1
a1.sinks = k1
a1.channels = c1

# Describe/configure the source
a1.sources.r1.type = netcat
a1.sources.r1.bind = hadoop001
a1.sources.r1.port = 44444

# Describe the sink
a1.sinks.k1.type = logger

# Use a channel which buffers events in memory
a1.channels.c1.type = memory
a1.channels.c1.capacity = 1000
a1.channels.c1.transactionCapacity = 100

# Bind the source and sink to the channel
a1.sources.r1.channels = c1
a1.sinks.k1.channel = c1
配置完后,进行启动agent
进入到bin目录执行:
flume-ng agent \
-n a1 \
-c $FLUME_HOME/conf \
-f $FLUME_HOME/conf/example.conf \
-Dflume.root.logger=INFO,console

//监听端口是44444,可以通过开启一个新窗口,通过`telnet hadoop001 44444`发送消息,观察FLume接受到的数据
```

Event: { headers:{} body: 68 65 6C 6C 6F 0D  hello. }
Event是Flume数据传输的基本单元
Event= 可选的header+ byte array
- 13691256985
需求二:监控一个文件实时采集新增的数据输出到控制台
Agent选型:exec source + memeory channel + logger sink
# Name the components on this agent
a1.sources = r1
a1.sinks = k1
a1.channels = c1

# Describe/configure the source
a1.sources.r1.type = exec
a1.sources.r1.command = tail -F /home/hadoop/data/data.log
a1.sources.r1.shell = /bin/sh -C

# Describe the sink
a1.sinks.k1.type = logger

# Use a channel which buffers events in memory
a1.channels.c1.type = memory
a1.channels.c1.capacity = 1000
a1.channels.c1.transactionCapacity = 100

# Bind the source and sink to the channel
a1.sources.r1.channels = c1
a1.sinks.k1.channel = c1
需求二:监控一个文件实时采集新增的数据输出到控制台
flume-ng agent \
-n a1 \
-c $FLUME_HOME/conf \
-f $FLUME_HOME/conf/exec-memory-logger.conf \
-Dflume.root.logger=INFO,console
flume的sink数据到hdfs
flume的sink数据到kafka
需求三:将A服务器上的日志采集到B服务器上
基本原理:将A服务器上的数据输出Avro sink作为B服务器上的输入Avro source.
#exec-memory-avro.conf
# Name the components on this agent
exec-memory-avro.sources = exec-source
exec-memory-avro.sinks = avro-sink
exec-memory-avro.channels = memory-channel

# Describe/configure the source
exec-memory-avro.sources.exec-source.type = exec
exec-memory-avro.sources.exec-source.command = tail -F /home/hadoop/data/data.log
exec-memory-avro.sources.exec-source.shell = /bin/sh -c

# Describe the sink
exec-memory-avro.sinks.avro-sink.type = avro
exec-memory-avro.sinks.avro-sink.hostname = hadoop001
exec-memory-avro.sinks.avro-sink.port = 44444

# Use a channel which buffers events in memory
exec-memory-avro.channels.memory-channel.type = memory
exec-memory-avro.channels.memory-channel.capacity = 1000
exec-memory-avro.channels.memory-channel.transactionCapacity = 100

# Bind the source and sink to the channel
exec-memory-avro.sources.exec-source.channels = memory-channel
exec-memory-avro.sinks.avro-sink.channel = memory-channel

----------------------------------------------------------------------------------
#avro-memory-logger.conf

# Name the components on this agent
avro-memory-logger.sources = avro-source
avro-memory-logger.sinks = logger-sink
avro-memory-logger.channels = memory-channel

# Describe/configure the source
avro-memory-logger.sources.avro-source.type = avro
avro-memory-logger.sources.avro-source.bind = hadoop001
avro-memory-logger.sources.avro-source.port = 44445

# Describe the sink
avro-memory-logger.sinks.logger-sink.type = logger

# Use a channel which buffers events in memory
avro-memory-logger.channels.memory-channel.type = memory
avro-memory-logger.channels.memory-channel.capacity = 1000
avro-memory-logger.channels.memory-channel.transactionCapacity = 100

# Bind the source and sink to the channel
avro-memory-logger.sources.avro-source.channels = memory-channel
avro-memory-logger.sinks.logger-sink.channel = memory-channel
* 执行
先启动avro-memory-logger
flume-ng agent \
-n avro-memory-logger \
-c $FLUME_HOME/conf \
-f $FLUME_HOME/conf/avro-memory-logger.conf \
-Dflume.root.logger=INFO,console
```

再启动exec-memory-avro.conf
flume-ng agent \
-n exec-memory-avro \
-c $FLUME_HOME/conf \
-f $FLUME_HOME/conf/exec-memory-avro.conf \
-Dflume.root.logger=INFO,console

往data.log中写数据,观察输出
echo heheheehehe4 >>  data.log

结果如下:
2017-12-29 12:33:31,925 (SinkRunner-PollingRunner-DefaultSinkProcessor) [INFO - org.apache.flume.sink.LoggerSink.process(LoggerSink.java:94)] Event: { headers:{} body: 68 65 68 65 68 65 65 68 65 68 65 34             heheheehehe4 }
日志收集过程:
机器A上监控一个文件,当我们访问主站时会有用户行为日志记录到access.log中Avro sink把新产生的日志输出到对应的avro,第二台机器接受这个avro输入作为avro source当做输入

相关文章推荐
- 从无到有系列之flume-收集日志到hdfs02
- 日志收集框架 Flume 组件之Source使用
- 大数据日志收集框架之Flume入门
- 日志收集框架flume的安装及简单使用
- 【大数据新手上路】“零基础”系列课程--Flume收集网站日志数据到MaxCompute
- 分布式日志收集框架Flume:从指定网端口采集数据输出到控制台
- 大数据系列教程_分布式日志收集flume
- 大数据日志收集框架之Flume入门
- 分布式日志收集框架Flume学习笔记
- 【大数据新手上路】“零基础”系列课程--Flume收集网站日志数据到MaxCompute
- logstash_forward+flume+elasticsearch+kibana日志收集框架
- 【大数据新手上路】“零基础”系列课程--Flume收集网站日志数据到MaxCompute
- 分布式日志收集框架Flume 部署说明
- 分布式日志收集框架flume实战
- 分布式日志收集框架Flume:监控一个文件实时采集新增的数据输出到控制台
- 分布式日志收集框架Flume
- 基于Flume的美团日志收集系统(二)改进和优化
- .NET Exceptionless 日志收集框架本地环境搭建
- FLUME日志收集
- 使用hive来分析flume收集的日志数据