分布式日志收集框架Flume
2018-10-28 23:45
676 查看
分布式日志收集框架Flume
1.业务现状分析
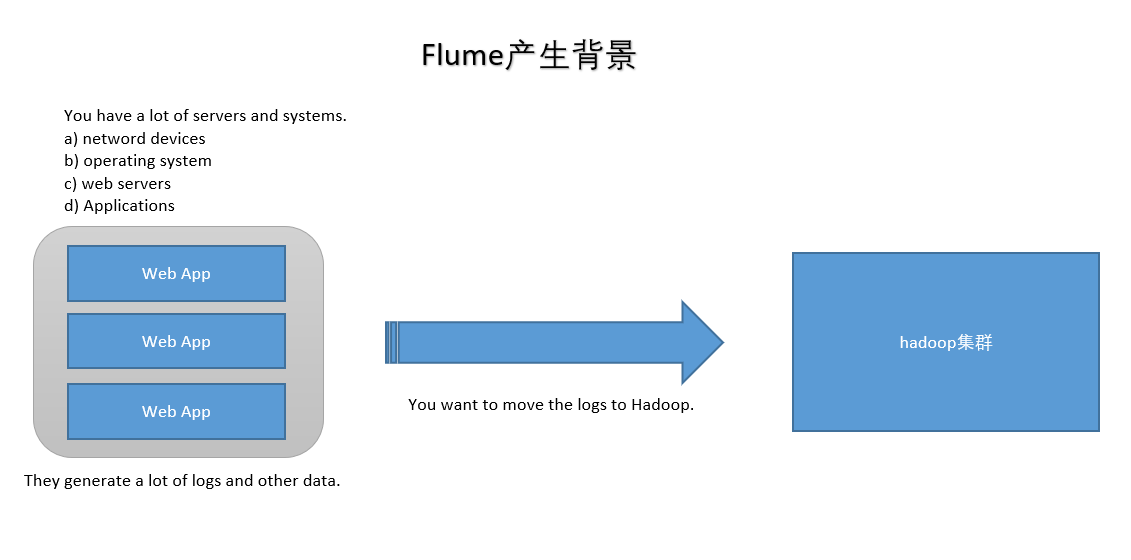
- WebServer/ApplicationServer分散在各个机器上
- 想在大数据平台Hadoop进行统计分析
- 日志如何收集到Hadoop平台上
解决方案及存在的问题
- 如何解决我们的数据从其他的server上移动到Hadoop之上?
-
shell: cp --> Hadoop集群的机器上,hdfs dfs -put ....(有很多问题不好解决,容错、负载均衡、时效性、压缩)
- Flume,从 A --> B 移动日志
2.Flume概述
Flume官网:http://flume.apache.org/
Flume is a distributed, reliable, and available service for efficiently collecting, aggregating, and moving large amounts of log data.
Flume是由Apache基金会提供的一个分布式、高可靠、高可用的服务,用于分布式的海量日志的高效收集、聚合、移动系统。- Flume设计目标
-
可靠性:高科要
- 扩展性:模块可扩展
- 管理性:agent管理
- 界同类产品对比
-
Flume: Cloudera/Apache, Java语言开发。
- Logstash: ELK(ElasticsSearch, Logstash, Kibana)
- Scribe: Facebook, 使用C/C++开发, 负载均衡不是很好, 已经不维护了。
- Chukwa: Yahoo/Apache, 使用Java语言开发, 负载均衡不是很好, 已经不维护了。
- Fluentd: 和Flume类似, Ruby开发。
- Flume发展史
-
Cloudera公司提出0.9.2,叫Flume-OG
- 2011年Flume-728编号,重要里程碑(Flume-NG),贡献给Apache社区
- 2012年7月 1.0版本
- 2015年5月 1.6版本
- ~ 1.7版本
3.Flume架构及核心组件
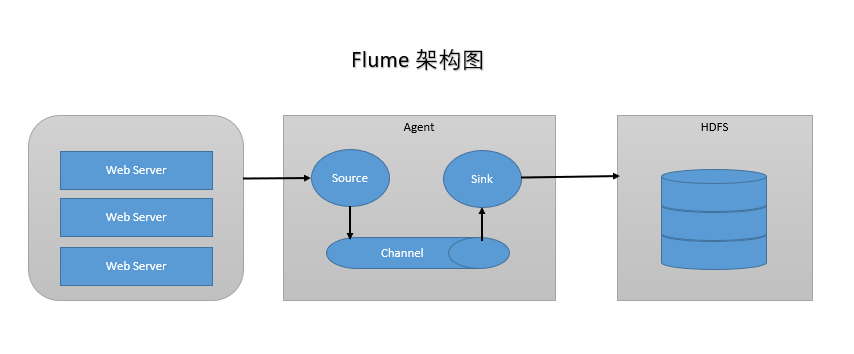
Flume有三大组件
- Source: 收集,指定数据源从哪里来(Avro, Thrift, Spooling, Kafka, Exec)
- Channel: 聚集,把数据先存在(Memory, File, Kafka等用的比较多)
- Sink: 把数据写到某个地方去(HDFS, Hive, Logger, Avro, Thrift, File, ES, HBase, Kafka等)
4.Flume环境部署
- 前置条件 Java Runtime Environment - Java 1.8 or later(安装Java)
- Memory - Sufficient memory for configurations used by sources, channels or sinks(足够内存)
- Disk Space - Sufficient disk space for configurations used by channels or sinks(足够空间)
- Directory Permissions - Read/Write permissions for directories used by agent(读写权限)
5.Flume实战
- 需求1:从指定网络端口采集数据输出到控制台 flume-conf.properties A) 配置Source
- B) 配置Channel
- C) 配置Sink
- D) 把以上三个组件串起来
# example.conf: A single-node Flume configuration

# a1: agent名称
# r1:source的名称
# k1:sink的名称
# c1:channel的名称

# Name the components on this agent
a1.sources = r1
a1.sinks = k1
a1.channels = c1

# Describe/configure the source
a1.sources.r1.type = netcat
a1.sources.r1.bind = localhost
a1.sources.r1.port = 44444

# Describe the sink
a1.sinks.k1.type = logger

# Use a channel which buffers events in memory
a1.channels.c1.type = memory
a1.channels.c1.capacity = 1000
a1.channels.c1.transactionCapacity = 100

# Bind the source and sink to the channel
a1.sources.r1.channels = c1
a1.sinks.k1.channel = c1
- 启动Agent
flume-ng agent \
--name $agent_name \
--conf conf \
--conf-file conf/flume-conf.properties \
-Dflume.root.logger=INFO,console

flume-ng agent \
--name a1 \
--conf $FLUME_HOME/conf \
--conf-file $FLUME_HOME/conf/example.conf \
-Dflume.root.logger=INFO,console
-
1.Agent选型:exec source + memory channel + logger sink
# exec-memory-logger.conf: A single-node Flume configuration

# a1: agent名称
# r1:source的名称
# k1:sink的名称
# c1:channel的名称

# Name the components on this agent
a1.sources = r1
a1.sinks = k1
a1.channels = c1

# Describe/configure the source
a1.sources.r1.type = exec
a1.sources.r1.command = tail -F /home/k.o/data/data.log
a1.sources.r1.shell = /bin/sh -c

# Describe the sink
a1.sinks.k1.type = logger

# Use a channel which buffers events in memory
a1.channels.c1.type = memory
a1.channels.c1.capacity = 1000
a1.channels.c1.transactionCapacity = 100

# Bind the source and sink to the channel
a1.sources.r1.channels = c1
a1.sinks.k1.channel = c1
- 启动Agent
flume-ng agent \
--name $agent_name \
--conf conf \
--conf-file conf/flume-conf.properties \
-Dflume.root.logger=INFO,console

flume-ng agent \
--name a1 \
--conf $FLUME_HOME/conf \
--conf-file $FLUME_HOME/conf/exec-memory-logger.conf \
-Dflume.root.logger=INFO,console
- 技术选型:
1.exec source + memory channel + avro sink
2.arro source + memory channel + logger sink
# exec-memory-avro.conf: A single-node Flume configuration

# exec-memory-avro: agent名称
# exec-source:source的名称
# avro-sink:sink的名称
# memory-channel:channel的名称

# Name the components on this agent
exec-memory-avro.sources = exec-source
exec-memory-avro.sinks = avro-sink
exec-memory-avro.channels = memory-channel

# Describe/configure the source
exec-memory-avro.sources.exec-source.type = exec
exec-memory-avro.sources.exec-source.command = tail -F /home/k.o/data/data.log
exec-memory-avro.sources.exec-source.shell = /bin/sh -c

# Describe the sink
exec-memory-avro.sinks.avro-sink.type = avro
exec-memory-avro.sinks.avro-sink.hostname = localhost
exec-memory-avro.sinks.avro-sink.port = 44444

# Use a channel which buffers events in memory
exec-memory-avro.channels.memory-channel.type = memory
exec-memory-avro.channels.memory-channel.capacity = 1000
exec-memory-avro.channels.memory-channel.transactionCapacity = 100

# Bind the source and sink to the channel
exec-memory-avro.sources.exec-source.channels = memory-channel
exec-memory-avro.sinks.avro-sink.channel = memory-channel
# avro-memory-logger.conf: A single-node Flume configuration

# avro-memory-logger: agent名称
# exec-source:source的名称
# logger-sink:sink的名称
# memory-channel:channel的名称

# Name the components on this agent
avro-memory-logger.sources = avro-source
avro-memory-logger.sinks = logger-sink
avro-memory-logger.channels = memory-channel

# Describe/configure the source
avro-memory-logger.sources.avro-source.type = avro
avro-memory-logger.sources.avro-source.bind = localhost
avro-memory-logger.sources.avro-source.port = 44444

# Describe the sink
avro-memory-logger.sinks.logger-sink.type = logger

# Use a channel which buffers events in memory
avro-memory-logger.channels.memory-channel.type = memory
avro-memory-logger.channels.memory-channel.capacity = 1000
avro-memory-logger.channels.memory-channel.transactionCapacity = 100

# Bind the source and sink to the channel
avro-memory-logger.sources.avro-source.channels = memory-channel
avro-memory-logger.sinks.logger-sink.channel = memory-channel
- 启动Agent
# 先启动 avro-memory-logger
flume-ng agent \
--name avro-memory-logger \
--conf $FLUME_HOME/conf \
--conf-file $FLUME_HOME/conf/avro-memory-logger.conf \
-Dflume.root.logger=INFO,console

# 再启动 exec-memory-avro
flume-ng agent \
--name exec-memory-avro \
--conf $FLUME_HOME/conf \
--conf-file $FLUME_HOME/conf/exec-memory-avro.conf \
-Dflume.root.logger=INFO,console
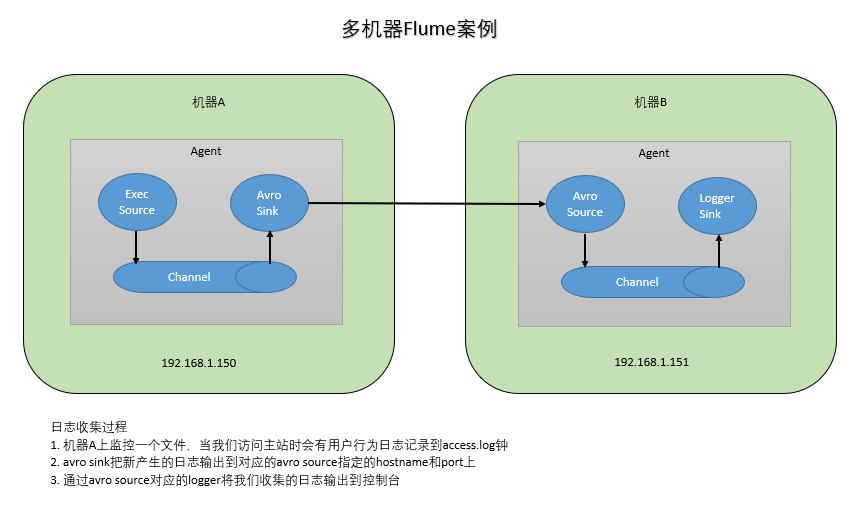
- 日志收集过程
-
机器A上监控一个文件,当我们访问主站时会有用户行为日志记录到access.log钟
- avro sink把新产生的日志输出到对应的avro source指定的hostname和port上
- 通过avro source对应的logger将我们收集的日志输出到控制台

相关文章推荐
- 分布式日志收集框架flume实战
- 分布式日志收集框架Flume学习笔记
- 分布式日志收集框架Flume 部署说明
- 分布式日志收集框架Flume:从指定网端口采集数据输出到控制台
- 分布式日志收集框架Flume:监控一个文件实时采集新增的数据输出到控制台
- 分布式日志收集系统Apache Flume的设计介绍
- Flume -- 开源分布式日志收集系统
- Flume(NG)架构设计要点及配置实践 Flume NG是一个分布式、可靠、可用的系统,它能够将不同数据源的海量日志数据进行高效收集
- 分布式日志收集收集系统:Flume(转)
- 分布式日志收集系统Flume
- 分布式日志收集系统- Cloudera Flume 介绍
- 分布式日志收集系统- Cloudera Flume 介绍
- 分布式日志收集系统Apache Flume的设计详细介绍
- 大数据系列教程_分布式日志收集flume
- Flume+Kafka收集Docker容器内分布式日志应用实践
- Alex 的 Hadoop 菜鸟教程: 第22课 分布式日志收集组件:flume
- 分布式日志收集系统Apache Flume的设计详细介绍
- Apache Flume 分布式日志收集系统学习
- 分布式日志收集收集系统:Flume
- 分布式日志收集收集系统:Flume(转)