React Native导航器之react-navigation使用
2017-07-02 19:57
651 查看
在上一节Navigation组件,我们使用系统提供的导航组件做了一个跳转的例子,不过其实战能力不强,这里推荐一个超牛逼的第三方库:react-navigation。在讲React-navigation之前,我们先看一下常用的导航组件。
转自:http://blog.csdn.NET/xiangzhihong8/article/details/71249167
常见的导航主要分为三种:
1.StackNavigator :类似于普通的Navigator,屏幕上方导航栏
2.TabNavigator:obviously, 相当于iOS里面的TabBarController,屏幕下方标签栏
3.DrawerNavigator:抽屉效果,左侧滑出这种效果。
在你使用navigation的每一个界面navigation都提供相关的属性和响应方法,常见的有:
navigate 定义跳转到另一个页面
调用此方法去链接你的其他界面,主要有以下参数:
·routeName- 目标路由名称,将在你的app router中注册
·params-将参数合并到目标router中
·action-(高级)sub-action ,如果该界面是一个navigator的话,将运行这个sub-action
例如:
2
3
4
5
6
7
8
9
10
11
12
13
14
15
1
2
3
4
5
6
7
8
9
10
11
12
13
14
15
state当前路由状态
每个界面通过this.props.navigation.state去访问它的router,state其中包括了:
·routeName - router配置的名称
·key-用来区分router的唯一标示
·params-可选的一些string参数
setParams-更改router中的参数
该方法允许界面更改router中的参数,可以用来动态的更改header的内容
goBack-返回,pop回上一级
dispatch -使用dispatch可以向任何navigation传递一些其他的action,主要支持的action有
例如:
2
3
4
5
6
7
8
9
10
1
2
3
4
5
6
7
8
9
10
Reset方法会擦除掉所有的导航状态,并且使用新的结果替代。
2
3
4
5
6
7
8
9
1
2
3
4
5
6
7
8
9
为指定的router更新参数,该参数必须是已经存在于router的param中。
2
3
4
5
6
7
8
1
2
3
4
5
6
7
8
StackNavigator使用比较简单,看一个常见的例子:
2
3
4
5
6
7
8
9
10
11
12
13
14
15
16
17
18
19
20
21
22
23
24
25
26
27
1
2
3
4
5
6
7
8
9
10
11
12
13
14
15
16
17
18
19
20
21
22
23
24
25
26
27
·initialRouteName -为stack设置默认的界面,必须和route configs里面的一个key匹配。
·initialRouteParams - 初始路由的参数。
·navigationOptions- 屏幕导航的默认选项。
·paths-route config里面路径设置的映射。
·mode- 定义渲染(rendering)和转换(transitions)的模式,两种选项:
1) card-使用标准的iOS和Android的界面切换,这是默认的。
2)modal- 仅在ios端有用,即模态出该视图。
·headerMode- 指定header应该如何被渲染,选项:
1)float- 共用一个header 意思就是有title文字渐变效果。
2)screen- 各用各的header 意思就是没有title文字渐变效果。
3)none- 没有header。
·cardStyle- 使用该属性继承或者重载一个在stack中的card的样式。
·onTransitionStart- 一个函数,在换场动画开始的时候被激活。
·onTransitionEnd- 一个函数,在换场动画结束的时候被激活。
你还可以定义一个静态的navigationOptions在你的组件之上。
2
3
4
5
6
7
8
9
10
11
12
13
14
15
16
17
18
1
2
3
4
5
6
7
8
9
10
11
12
13
14
15
16
17
18
常用的配置中,主要有以下参数需要注意:
1)visible - bool值,header是否可见。
2)title-标题 String或者是一个React 节点
3)backTitle-返回按钮在iOS平台上,默认是title的值
4)right- react 节点显示在header右边,例如右按钮
5)left- react 节点显示在header左边,例如左按钮
6)style-header的style
7)titleStyle- header的title的style (^__^) 嘻嘻……
8)tintColor- header的前景色
·cardStack- 配置card stack
说完常见的导航器,我们在看看本文的重点:react-navigation的使用。
首先看一下效果:

1,在项目目录下,安装React-navigation库
1
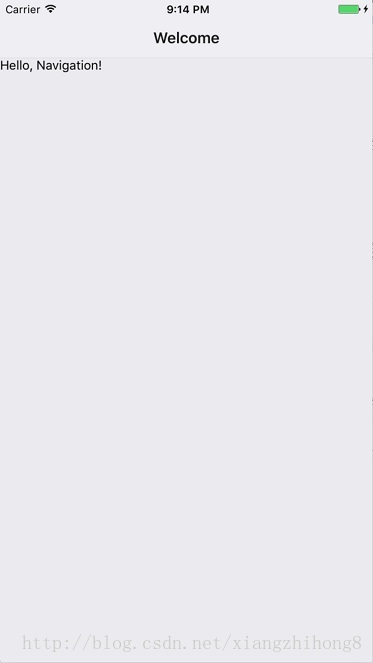
2,使用StactkNavigator来管理堆栈。暂且命名为HomeScreen.js。默认入口页面代码如下:
2
3
4
5
6
7
8
9
10
11
12
13
14
15
16
17
18
19
20
21
22
1
2
3
4
5
6
7
8
9
10
11
12
13
14
15
16
17
18
19
20
21
22
运行效果:
3,添加一个新的页面
2
3
4
5
6
7
8
9
10
11
12
1
2
3
4
5
6
7
8
9
10
11
12
4,在HomeScreen中添加一个button组件,使用routeName Chat关联到ChatScreen。
2
3
4
5
6
7
8
9
10
11
12
13
14
15
16
17
1
2
3
4
5
6
7
8
9
10
11
12
13
14
15
16
17
这段代码主要是给Button绑定onPress事件。这时候,我们使用的两个跳转的页面需要在StackNavigator进行注册:
2
3
4
1
2
3
4
所以完整的代码是:
2
3
4
5
6
7
8
9
10
11
12
13
14
15
16
17
18
19
20
21
22
23
1
2
3
4
5
6
7
8
9
10
11
12
13
14
15
16
17
18
19
20
21
22
23
在页面的跳转过程中,往往会伴随着参数的传递。
1,在第一个页面定义参数,将参数传值给需要传值的页面
2
3
4
5
6
7
8
9
10
11
12
13
14
15
1
2
3
4
5
6
7
8
9
10
11
12
13
14
15
2,如果需要监听页面的state状态
1
3,另一个页面接受参数
2
3
4
5
6
7
8
1
2
3
4
5
6
7
8
4,去的传过来的值:
1
对于 react-navigation参数的传递,使用上比较简单,只需要在navigate中加一个json格式的对象即可,如:
1
然后在接受的页面:
2
3
4
5
6
7
8
9
10
11
12
13
14
15
1
2
3
4
5
6
7
8
9
10
11
12
13
14
15
所以,你就可以看到如下的效果:

TabNavigator类似于底部导航效果
2
3
4
5
6
7
8
9
10
11
12
13
14
15
16
17
18
19
20
21
22
23
24
25
26
27
28
29
30
31
32
33
34
35
36
37
38
39
40
41
42
43
44
45
46
47
48
49
50
1
2
3
4
5
6
7
8
9
10
11
12
13
14
15
16
17
18
19
20
21
22
23
24
25
26
27
28
29
30
31
32
33
34
35
36
37
38
39
40
41
42
43
44
45
46
47
48
49
50
DrawerNavigator类似于抽屉侧滑效果。
2
3
4
5
6
7
8
9
10
11
12
13
14
15
16
17
18
19
20
21
22
23
24
1
2
3
4
5
6
7
8
9
10
11
12
13
14
15
16
17
18
19
20
21
22
23
24
在iOS中使用react-navigation需要注意以下几点:
使用Xcode设置Schemes;
在AppDelegate添加一下代码:
2
3
4
5
1
2
3
4
5
js组件在注册路由时设置唯一的路径path, 例如Home2: { screen: Home2, path:’app/Home2’ };
在手机浏览器访问demo4://app/Home2, 弹窗选择打开, 就可以打开demo4 app并进到Home2页面。

直接上代码:
2
3
4
5
6
7
8
9
10
11
12
13
14
15
16
17
18
19
20
21
22
23
24
25
26
27
28
29
30
31
32
33
34
35
36
37
38
39
40
41
42
43
44
45
46
47
48
49
50
51
52
53
54
55
56
57
58
59
60
61
62
63
64
65
66
67
68
69
70
71
72
73
74
75
76
77
78
79
80
81
82
83
84
85
86
87
88
89
90
91
92
93
94
95
96
97
98
99
100
101
102
103
104
105
106
107
108
109
110
111
112
113
114
115
116
117
118
119
120
121
122
123
124
125
126
127
128
129
130
131
132
133
134
135
136
137
138
139
140
141
142
143
144
145
146
147
148
149
150
1
2
3
4
5
6
7
8
9
10
11
12
13
14
15
16
17
18
19
20
21
22
23
24
25
26
27
28
29
30
31
32
33
34
35
36
37
38
39
40
41
42
43
44
45
46
47
48
49
50
51
52
53
54
55
56
57
58
59
60
61
62
63
64
65
66
67
68
69
70
71
72
73
74
75
76
77
78
79
80
81
82
83
84
85
86
87
88
89
90
91
92
93
94
95
96
97
98
99
100
101
102
103
104
105
106
107
108
109
110
111
112
113
114
115
116
117
118
119
120
121
122
123
124
125
126
127
128
129
130
131
132
133
134
135
136
137
138
139
140
141
142
143
144
145
146
147
148
149
150
参考:React Native页面参数传递
https://reactnavigation.org/docs/intro/
转自:http://blog.csdn.NET/xiangzhihong8/article/details/71249167
导航控件
常见的导航主要分为三种: 1.StackNavigator :类似于普通的Navigator,屏幕上方导航栏
2.TabNavigator:obviously, 相当于iOS里面的TabBarController,屏幕下方标签栏
3.DrawerNavigator:抽屉效果,左侧滑出这种效果。
Navigation 使用
在你使用navigation的每一个界面navigation都提供相关的属性和响应方法,常见的有: navigate 定义跳转到另一个页面
调用此方法去链接你的其他界面,主要有以下参数:
·routeName- 目标路由名称,将在你的app router中注册
·params-将参数合并到目标router中
·action-(高级)sub-action ,如果该界面是一个navigator的话,将运行这个sub-action
例如:
class HomeScreen extends React.Component {
render() {
const {navigate} = this.props.navigation;

return (
<View>
<Text>This is the home screen of the app</Text>
<Button
onPress={() => navigate('Profile', {name: 'Brent'})}
title="点击我跳转"
/>
</View>
)
}
}12
3
4
5
6
7
8
9
10
11
12
13
14
15
1
2
3
4
5
6
7
8
9
10
11
12
13
14
15
state当前路由状态
每个界面通过this.props.navigation.state去访问它的router,state其中包括了:
·routeName - router配置的名称
·key-用来区分router的唯一标示
·params-可选的一些string参数
setParams-更改router中的参数
该方法允许界面更改router中的参数,可以用来动态的更改header的内容
goBack-返回,pop回上一级
dispatch -使用dispatch可以向任何navigation传递一些其他的action,主要支持的action有
Navigate使用
例如:import { NavigationActions } from 'react-navigation'
const navigationAction = NavigationActions.navigate({
routeName: 'Profile',
params: {},
// navigate can have a nested navigate action that will be run inside the child router
action: NavigationActions.navigate({ routeName: 'SubProfileRoute'})
})
this.props.navigation.dispatch(navigationAction)12
3
4
5
6
7
8
9
10
1
2
3
4
5
6
7
8
9
10
Reset
Reset方法会擦除掉所有的导航状态,并且使用新的结果替代。import { NavigationActions } from 'react-navigation'
const resetAction = NavigationActions.reset({
index: 0,
actions: [
NavigationActions.navigate({ routeName: 'Profile'})
]
})
this.props.navigation.dispatch(resetAction)12
3
4
5
6
7
8
9
1
2
3
4
5
6
7
8
9
SetParams
为指定的router更新参数,该参数必须是已经存在于router的param中。import { NavigationActions } from 'react-navigation'
const setParamsAction = NavigationActions.setParams({
params: {}, // these are the new params that will be merged into the existing route params
// The key of the route that should get the new params
key: 'screen-123',
})
this.props.navigation.dispatch(setParamsAction)12
3
4
5
6
7
8
1
2
3
4
5
6
7
8
StackNavigator使用
StackNavigator使用比较简单,看一个常见的例子:class MyHomeScreen extends React.Component {
static navigationOptions = {
title: 'Home', //设置navigator的title
}
render() {
return (
//button的onPress方法,实现点击跳转界面,并且传递参数name:Lucy
<Button
onPress={() => this.props.navigation.navigate('Profile', {name: 'Lucy'})}
title="Go to Lucy's profile"
/>
);
}
}
//生成路由关系
const ModalStack = StackNavigator({
Home: {
//对应界面MyHomeScreen
screen: MyHomeScreen,
},
Profile: {
path: 'people/:name',
screen: MyProfileScreen,
},
});12
3
4
5
6
7
8
9
10
11
12
13
14
15
16
17
18
19
20
21
22
23
24
25
26
27
1
2
3
4
5
6
7
8
9
10
11
12
13
14
15
16
17
18
19
20
21
22
23
24
25
26
27
StackNavigatorConfig
option for the route(路由选项):
·initialRouteName -为stack设置默认的界面,必须和route configs里面的一个key匹配。 ·initialRouteParams - 初始路由的参数。
·navigationOptions- 屏幕导航的默认选项。
·paths-route config里面路径设置的映射。
Visual Option(视觉选项):
·mode- 定义渲染(rendering)和转换(transitions)的模式,两种选项: 1) card-使用标准的iOS和Android的界面切换,这是默认的。
2)modal- 仅在ios端有用,即模态出该视图。
·headerMode- 指定header应该如何被渲染,选项:
1)float- 共用一个header 意思就是有title文字渐变效果。
2)screen- 各用各的header 意思就是没有title文字渐变效果。
3)none- 没有header。
·cardStyle- 使用该属性继承或者重载一个在stack中的card的样式。
·onTransitionStart- 一个函数,在换场动画开始的时候被激活。
·onTransitionEnd- 一个函数,在换场动画结束的时候被激活。
Navigation Options
你还可以定义一个静态的navigationOptions在你的组件之上。lass ProfileScreen extends React.Component {
//设置navigation选项
static navigationOptions = {
//标题
title: ({ state }) => `${state.params.name}'s Profile!`,
//头部定义了一个右按钮,来改变edit的状态 ing或者完成
header: ({ state, setParams }) => ({
// Render a button on the right side of the header
// When pressed switches the screen to edit mode.
right: (
<Button
title={state.params.editing ? 'Done' : 'Edit'}
onPress={() => setParams({editing: state.params.editing ? false : true})}
/>
),
}),
};
...12
3
4
5
6
7
8
9
10
11
12
13
14
15
16
17
18
1
2
3
4
5
6
7
8
9
10
11
12
13
14
15
16
17
18
常用的配置中,主要有以下参数需要注意:
1)visible - bool值,header是否可见。
2)title-标题 String或者是一个React 节点
3)backTitle-返回按钮在iOS平台上,默认是title的值
4)right- react 节点显示在header右边,例如右按钮
5)left- react 节点显示在header左边,例如左按钮
6)style-header的style
7)titleStyle- header的title的style (^__^) 嘻嘻……
8)tintColor- header的前景色
·cardStack- 配置card stack
react-navigation
说完常见的导航器,我们在看看本文的重点:react-navigation的使用。 首先看一下效果:
1,在项目目录下,安装React-navigation库
npm install --save react-navigation1
1
2,使用StactkNavigator来管理堆栈。暂且命名为HomeScreen.js。默认入口页面代码如下:
import React from 'react';
import {
AppRegistry,
Text,
} from 'react-native';
//导入stack导航组件
import { StackNavigator } from 'react-navigation';

class HomeScreen extends React.Component {
static navigationOptions = {
title: 'Welcome',//标题
};
render() {
return <Text>Hello, Navigation!</Text>;
}
}
//导航注册
const SimpleApp = StackNavigator({
Home: { screen: HomeScreen },
});

AppRegistry.registerComponent('SimpleApp', () => SimpleApp);12
3
4
5
6
7
8
9
10
11
12
13
14
15
16
17
18
19
20
21
22
1
2
3
4
5
6
7
8
9
10
11
12
13
14
15
16
17
18
19
20
21
22
运行效果:
3,添加一个新的页面
class ChatScreen extends React.Component {
static navigationOptions = {
title: 'Chat with Lucy',
};
render() {
return (
<View>
<Text>Chat with Lucy</Text>
</View>
);
}
}12
3
4
5
6
7
8
9
10
11
12
1
2
3
4
5
6
7
8
9
10
11
12
4,在HomeScreen中添加一个button组件,使用routeName Chat关联到ChatScreen。
class HomeScreen extends React.Component {
static navigationOptions = {
title: 'Welcome',
};
render() {
const { navigate } = this.props.navigation;
return (
<View>
<Text>Hello, Chat App!</Text>
<Button
onPress={() => navigate('Chat')}
title="Chat with Lucy"
/>
</View>
);
}
}12
3
4
5
6
7
8
9
10
11
12
13
14
15
16
17
1
2
3
4
5
6
7
8
9
10
11
12
13
14
15
16
17
这段代码主要是给Button绑定onPress事件。这时候,我们使用的两个跳转的页面需要在StackNavigator进行注册:
const SimpleApp = StackNavigator({
Home: { screen: HomeScreen },
Chat: { screen: ChatScreen },//新添加的页面
});12
3
4
1
2
3
4
所以完整的代码是:
class HomeScreen extends React.Component {
static navigationOptions = {
title: 'Welcome',//设置标题内容
};

render() {
const { navigate } = this.props.navigation;
return (
<View>
<Text>Hello, Navigation!</Text>
<Button
onPress={() => navigate('Chat',{user:'Lucy'})}
title="Chat with Lucy"/>
</View>
);
}
}

const SimpleApp = StackNavigator({
Home: {screen: HomeScreen},
Chat:{screen:ChatScreen},

});12
3
4
5
6
7
8
9
10
11
12
13
14
15
16
17
18
19
20
21
22
23
1
2
3
4
5
6
7
8
9
10
11
12
13
14
15
16
17
18
19
20
21
22
23
参数传递
在页面的跳转过程中,往往会伴随着参数的传递。
navigation参数传递
1,在第一个页面定义参数,将参数传值给需要传值的页面constructor(props) {
super(props);
this.state = {};
}
...
if(navigator) {
navigator.push({
name: 'SecondPageComponent',
component: SecondPageComponent,
params:{
user:this.state.user,
pwd:this.state.pwd
}
})
}12
3
4
5
6
7
8
9
10
11
12
13
14
15
1
2
3
4
5
6
7
8
9
10
11
12
13
14
15
2,如果需要监听页面的state状态
onChangeText={(text) => this.setState({user: text})}11
3,另一个页面接受参数
componentDidMount() {
//这里获取从FirstPageComponent传递过来的参数: id
this.setState({
user:this.props.user,
pwd:this.props.pwd
});
}12
3
4
5
6
7
8
1
2
3
4
5
6
7
8
4,去的传过来的值:
value={this.state.user }11
react-navigation参数传递
对于 react-navigation参数的传递,使用上比较简单,只需要在navigate中加一个json格式的对象即可,如:navigate('Chat', { user: 'Lucy' })11
然后在接受的页面:
class ChatScreen extends React.Component {
static navigationOptions = {
// Nav options can be defined as a function of the navigation prop:
title: ({ state }) => `Chat with ${state.params.user}`,
};
render() {
// The screen's current route is passed in to `props.navigation.state`:
const { params } = this.props.navigation.state;
return (
<View>
<Text>Chat with {params.user}</Text>
</View>
);
}
}12
3
4
5
6
7
8
9
10
11
12
13
14
15
1
2
3
4
5
6
7
8
9
10
11
12
13
14
15
所以,你就可以看到如下的效果:
TabNavigator
TabNavigator类似于底部导航效果// 注册tabs
const Tabs = TabNavigator({
Home: {
screen: Home,
navigationOptions: { // 也可以写在组件的static navigationOptions内
tabBar: {
label: '首页',
icon: ({tintColor}) => (<Image source={require('./app/images/home.png')} style={[{tintColor: tintColor},styles.icon]}/>),
},
}
},
Bill: {
screen: Bill,
navigationOptions: {
tabBar: {
label: '账单',
icon: ({tintColor}) => (<Image source={require('./app/images/bill.png')} style={[{tintColor: tintColor},styles.icon]}/>),
},
}
},
Me: {
screen: Me,
navigationOptions: {
tabBar: {
label: '我',
icon: ({tintColor}) => (<Image source={require('./app/images/me.png')} style={[{tintColor: tintColor},styles.icon]}/>),
},
}
}
}, {
animationEnabled: false, // 切换页面时是否有动画效果
tabBarPosition: 'bottom', // 显示在底端,android 默认是显示在页面顶端的
swipeEnabled: false, // 是否可以左右滑动切换tab
backBehavior: 'none', // 按 back 键是否跳转到第一个Tab(首页), none 为不跳转
tabBarOptions: {
activeTintColor: '#ff8500', // 文字和图片选中颜色
inactiveTintColor: '#999', // 文字和图片未选中颜色
showIcon: true, // android 默认不显示 icon, 需要设置为 true 才会显示
indicatorStyle: {
height: 0 // 如TabBar下面显示有一条线,可以设高度为0后隐藏
},
style: {
backgroundColor: '#fff', // TabBar 背景色
// height: 44
},
labelStyle: {
fontSize: 10, // 文字大小
},
},
});12
3
4
5
6
7
8
9
10
11
12
13
14
15
16
17
18
19
20
21
22
23
24
25
26
27
28
29
30
31
32
33
34
35
36
37
38
39
40
41
42
43
44
45
46
47
48
49
50
1
2
3
4
5
6
7
8
9
10
11
12
13
14
15
16
17
18
19
20
21
22
23
24
25
26
27
28
29
30
31
32
33
34
35
36
37
38
39
40
41
42
43
44
45
46
47
48
49
50
DrawerNavigator
DrawerNavigator类似于抽屉侧滑效果。const DrawerNav = DrawerNavigator({
Home: { screen: Home },
Bill: { screen: Bill },
Me: { screen: Me },
HomeTwo: { screen: HomeTwo },
HomeThree: { screen: HomeThree },
HomeFour: { screen: HomeFour },
BillTwo: { screen: BillTwo },
BillThree: { screen: BillThree }
}, {
drawerWidth: 200, // 抽屉宽
drawerPosition: 'left', // 抽屉在左边还是右边
// contentComponent: CustomDrawerContentComponent, // 自定义抽屉组件
contentOptions: {
initialRouteName: Home, // 默认页面组件
activeTintColor: 'white', // 选中文字颜色
activeBackgroundColor: '#ff8500', // 选中背景颜色
inactiveTintColor: '#666', // 未选中文字颜色
inactiveBackgroundColor: '#fff', // 未选中背景颜色
style: { // 样式
}
}
});12
3
4
5
6
7
8
9
10
11
12
13
14
15
16
17
18
19
20
21
22
23
24
1
2
3
4
5
6
7
8
9
10
11
12
13
14
15
16
17
18
19
20
21
22
23
24
iOS版设置
在iOS中使用react-navigation需要注意以下几点: 使用Xcode设置Schemes;
在AppDelegate添加一下代码:
- (BOOL)application:(UIApplication *)application openURL:(NSURL *)url
sourceApplication:(NSString *)sourceApplication annotation:(id)annotation {
return [RCTLinkingManager application:application openURL:url
sourceApplication:sourceApplication annotation:annotation];
}12
3
4
5
1
2
3
4
5
js组件在注册路由时设置唯一的路径path, 例如Home2: { screen: Home2, path:’app/Home2’ };
在手机浏览器访问demo4://app/Home2, 弹窗选择打开, 就可以打开demo4 app并进到Home2页面。
react-native-tab-navigator
直接上代码:
/**
* Sample React Native App
* https://github.com/facebook/react-native * @flow
*/

import React, { Component } from 'react';
import TabNavigator from 'react-native-tab-navigator';
import {
AppRegistry,
StyleSheet,
Text,
Image,
View
} from 'react-native';

const TabNavigatorItem =TabNavigator.Item;
//默认选项
const TAB_HOME_NORMAL=require('./image/tabbar_homepage.png');
const TAB_MINE_NORMAL=require('./image/tabbar_mine.png');
//选中
const TAB_HOME_PRESS=require('./image/tabbar_homepage_selected.png');
const TAB_MINE_PRESS=require('./image/tabbar_mine_selected.png');

export default class HelloWord extends Component {
//默认选中
constructor(){
super();
this.state={
selectedTab:'Home',
}
}
//点击方法
onPress(tabName){
if(tabName){
this.setState({
selectedTab:tabName,
}
);
}
}

//渲染选项
renderTabView(title,tabName,tabContent,isBadge){
var tabNomal;
var tabPress;
switch (tabName) {
case 'Home':
tabNomal=TAB_HOME_NORMAL;
tabPress=TAB_HOME_PRESS;
break;
case 'Mine':
tabNomal=TAB_MINE_NORMAL;
tabPress=TAB_MINE_PRESS;
break;
default:

}
return(
<TabNavigatorItem
selected={this.state.selectedTab===tabName}
title={title}
titleStyle={styles.tabText}
selectedTitleStyle={styles.selectedTabText}
renderIcon={()=><Image style={styles.icon} source={tabNomal}/>}
renderSelectedIcon={()=><Image style={styles.icon} source={tabPress}/>}

onPress={()=>this.onPress(tabName)}
renderBadge={()=>isBadge?<View style={styles.badgeView}><Text style={styles.badgeText}>15</Text></View>:null}
>
<View style={styles.page}><Text>{tabContent}</Text></View>
</TabNavigatorItem>
);
}

//自定义TabView
tabBarView(){
return (
<TabNavigator
tabBarStyle={styles.tab}
>
{this.renderTabView('首页','Home','首页模块',true)}
{this.renderTabView('我的','Mine','我的模块',false)}
</TabNavigator>
);
}

//渲染界面
render() {
var tabView=this.tabBarView();
return (
<View style={styles.container}>
{tabView}
</View>
);
}
}

const styles = StyleSheet.create({
container: {
flex: 1
},
tabText: {
fontSize: 10,
color: 'black'
},
selectedTabText: {
fontSize: 10,
color: 'green'
},
tab:{
height: 52,
alignItems:'center',
backgroundColor:'#f4f5f6',
},
tabIcon:{
width:25,
height:25,
},
badgeView:{
width:22,
height:14 ,
backgroundColor:'#f85959',
borderWidth:1,
marginLeft:10,
marginTop:3,
borderColor:'#FFF',
alignItems:'center',
justifyContent:'center',
borderRadius:8,
},
badgeText:{
color:'#fff',
fontSize:8,
},
icon: {
width: 22,
height: 22
},
page: {
flex: 1,
justifyContent: 'center',
alignItems: 'center',
backgroundColor: '#FFFFFF'
},
});

AppRegistry.registerComponent('HelloWord', () => HelloWord);
1
2
3
4
5
6
7
8
9
10
11
12
13
14
15
16
17
18
19
20
21
22
23
24
25
26
27
28
29
30
31
32
33
34
35
36
37
38
39
40
41
42
43
44
45
46
47
48
49
50
51
52
53
54
55
56
57
58
59
60
61
62
63
64
65
66
67
68
69
70
71
72
73
74
75
76
77
78
79
80
81
82
83
84
85
86
87
88
89
90
91
92
93
94
95
96
97
98
99
100
101
102
103
104
105
106
107
108
109
110
111
112
113
114
115
116
117
118
119
120
121
122
123
124
125
126
127
128
129
130
131
132
133
134
135
136
137
138
139
140
141
142
143
144
145
146
147
148
149
150
参考:React Native页面参数传递
https://reactnavigation.org/docs/intro/

相关文章推荐
- React Native导航器之react-navigation使用
- react native使用react-navigation跳转后多页面数据传递总结
- [置顶] React Native未来导航者:react-navigation 使用详解(进阶篇)
- 【转载】React Native未来导航者:react-navigation 使用详解
- React Native未来导航者:react-navigation 使用详解
- [置顶] React Native未来导航者:react-navigation 使用详解(基础篇)
- React Native之使用导航器跳转页面(react-navigation)
- React Native未来导航者:react-navigation 使用详解
- React Native未来导航者:react-navigation 使用详解
- React Native导航器之react-navigation使用
- React Native未来导航者:react-navigation 使用详解
- React Native填坑之旅 -- 使用react-navigation代替Navigator
- React Native未来导航者:react-navigation 使用详解
- 使用Rreact Native 之Navigator导航器小结--->菜鸟学习
- 官方推荐react-navigation的使用
- React native 的轮播图组件react-native-image-carousel的使用
- react-navigation 导航栏使用
- 【React Native 安卓开发】----侧边栏的实现DrawerLayoutAndroid以及第三方框架react-native-side-menu的使用【第六篇】
- react-navigation使用及dva初探二
- react-navigation使用及dva初探一