七天接手react项目 系列 —— 尾篇(antd 和 mobx)
其他章节请看:
尾篇
前面我们依次学习了
react 基础知识、
react 脚手架创建项目、
react 路由,已经花费了不少时间,但距离接手 spug_web 项目还有一些困难。
package.json作为项目的核心,从中我们能大概知晓此项目到底用了哪些技术,所以笔者决定从其入手。
spug_web/package.json
为什么没有看见
redux,
mobx是什么?
antd是什么,
react-app-rewired、
@babel/plugin-proposal-decorators又有什么作用?—— 本篇都能找到答案
// spug_web/package.json

{
"name": "spug_web",
"version": "3.0.0",
"private": true,
"dependencies": {
"@ant-design/icons": "^4.3.0",
"ace-builds": "^1.4.13",
"antd": "^4.10.3",
"axios": "^0.21.0",
"bizcharts": "^3.5.9",
"history": "^4.10.1",
"lodash": "^4.17.19",
"mobx": "^5.15.6",
"mobx-react": "^6.3.0",
"moment": "^2.24.0",
"react": "^16.13.1",
"react-ace": "^9.5.0",
"react-dom": "^16.13.1",
"react-router-dom": "^5.2.0",
"react-scripts": "3.4.3",
"xterm": "^4.6.0",
"xterm-addon-fit": "^0.5.0"
},
"scripts": {
"start": "react-app-rewired start",
"build": "GENERATE_SOURCEMAP=false react-app-rewired build",
"test": "react-app-rewired test",
"eject": "react-scripts eject"
},
"eslintConfig": {
"extends": "react-app"
},
"browserslist": {
"production": [
">0.2%",
"not dead",
"not op_mini all"
],
"development": [
"last 1 chrome version",
"last 1 firefox version",
"last 1 safari version"
]
},
"devDependencies": {
"@babel/plugin-proposal-decorators": "^7.10.5",
"customize-cra": "^1.0.0",
"less": "^3.12.2",
"less-loader": "^7.1.0",
"react-app-rewired": "^2.1.6",
"http-proxy-middleware": "0.19.2"
}
}
antd
antd 是基于 Ant Design 设计体系的 React UI 组件库,主要用于研发企业级中后台产品。
Tip:类似的 ui 库有:element-ui、material-ui(国外比较流行)、vant-ui(移动端)
安装
react-cli-demo> npm i antd

added 58 packages, and audited 1479 packages in 27s

171 packages are looking for funding
run `npm fund` for details

8 vulnerabilities (6 moderate, 2 high)

To address issues that do not require attention, run:
npm audit fix

To address all issues (including breaking changes), run:
npm audit fix --force

Run `npm audit` for details.
使用
ui 库使用起来通常比较简单,找到需要的示例,比如按button、日期、弹框等,复制粘贴即可。
进入官网的 组件 页面:
button
以 button 为例,比如我需要使用第一个按钮(”Primary Button“):
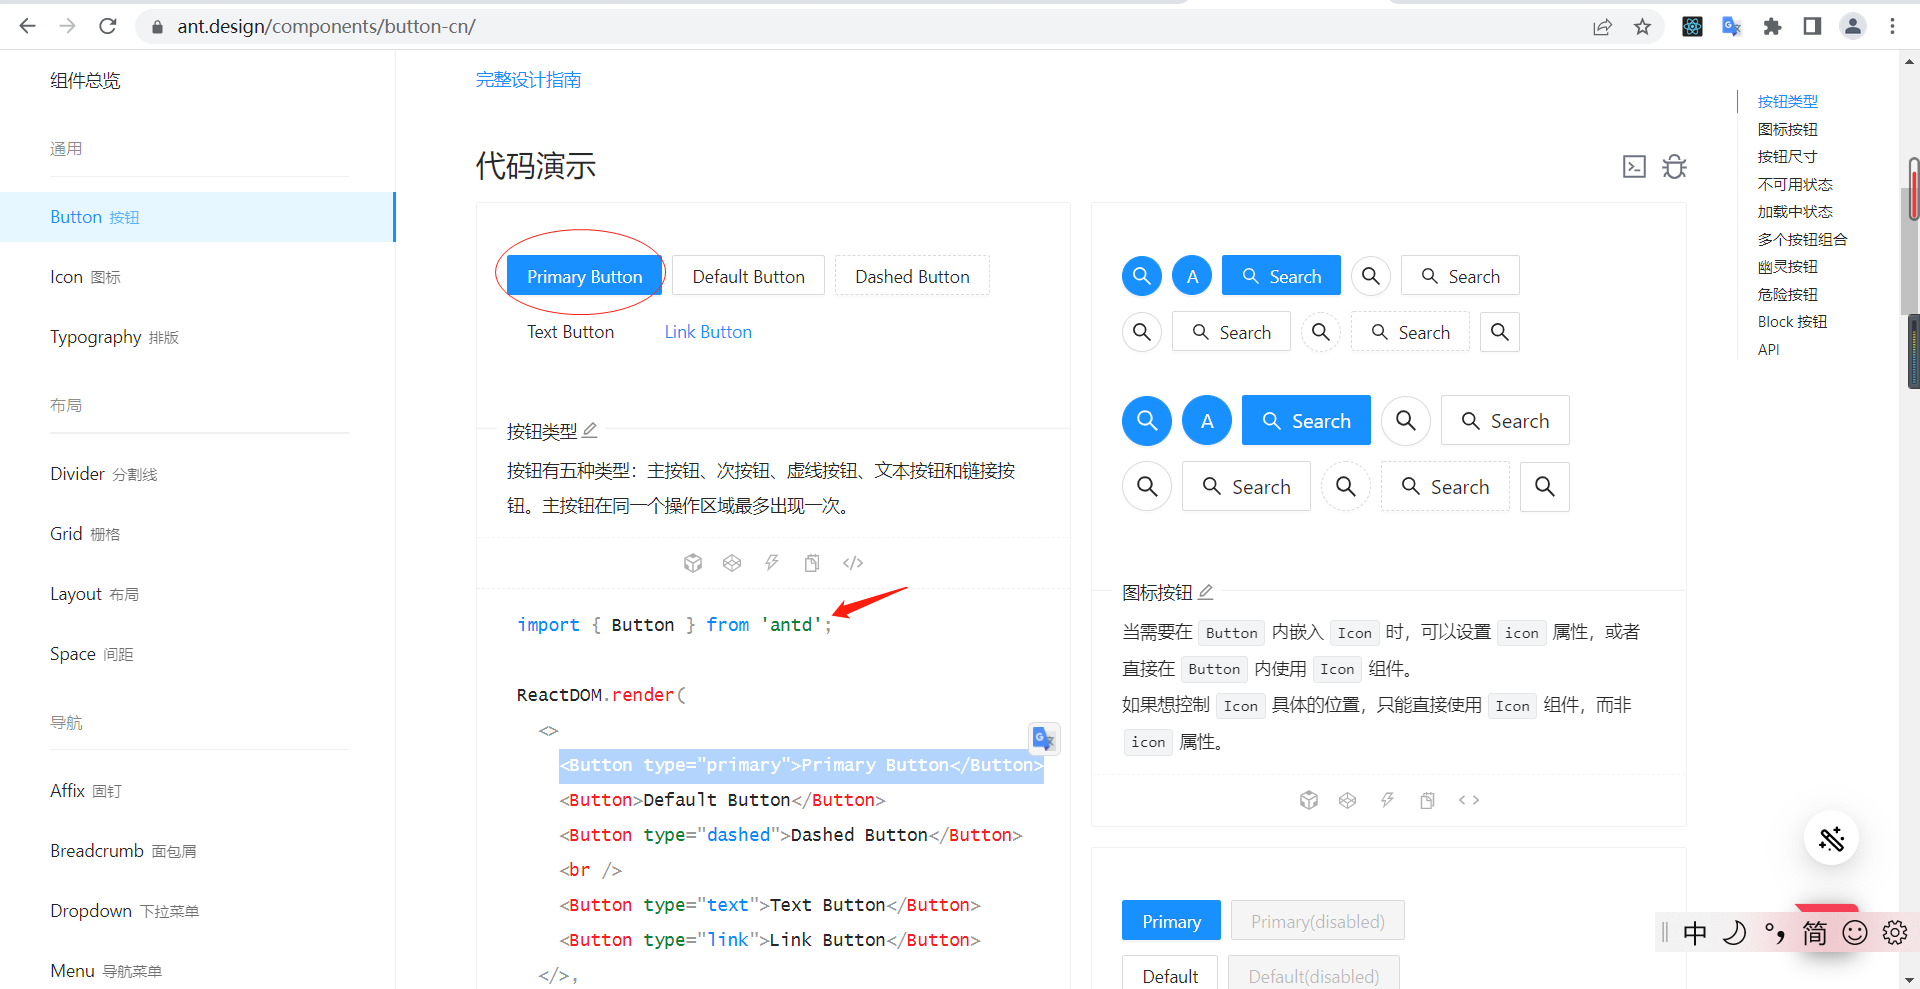
找到对应的代码片段即可:
import { Button } from 'antd';
+ import 'antd/dist/antd.css'
export default function App() {
return (
<div className="App">
<Button type="primary">Primary Button</Button>
</div >
);
}
注:需要引入 antd 的样式文件
antd.css。
倘若需要 button 更为详细的介绍,可以看底部的 api。就像这样:

icon
语义化的矢量图形。使用图标组件,你需要安装
@ant-design/icons图标组件包 —— 官网-
Icon图标
react-cli-demo> npm i @ant-design/icons

up to date, audited 1479 packages in 6s

171 packages are looking for funding
run `npm fund` for details

8 vulnerabilities (6 moderate, 2 high)

To address issues that do not require attention, run:
npm audit fix

To address all issues (including breaking changes), run:
npm audit fix --force

Run `npm audit` for details.
Tip:以前 icon 是集成在 antd 中的。有些人可能无需使用图标,所以后来就独立了出来。
按需引入 css
我们或许只使用 button 组件,却将 antd 的所有组件的样式都引入进来(gzipped 后一共大约
60kb):
import { Button } from 'antd';
+ import 'antd/dist/antd.css'
下面我们要做的就是是:按需引入 css。
Tip:类似这种需求,由于高度集成,所以怎么做通常不能自己去像,需要看对应的文档。
注:目前 antd 文档是 4.x,我们可以看 3.x 的文档,因为旧的内容或许更详细、亦或不同。
安装依赖包用于对
create-react-app的默认配置进行自定义:
- 由于需要对
create-react-app
的默认配置进行自定义,这里我们使用react-app-rewired
(一个对 create-react-app 进行自定义配置的社区解决方案) - 由于新的
react-app-rewired@2.x
版本的关系,你还需要安装customize-cra
react-cli-demo> npm i -D react-app-rewired customize-cra

added 4 packages, and audited 1483 packages in 15s

171 packages are looking for funding
run `npm fund` for details

8 vulnerabilities (6 moderate, 2 high)

To address issues that do not require attention, run:
npm audit fix

To address all issues (including breaking changes), run:
npm audit fix --force

Run `npm audit` for details.
安装依赖包用于按需加载组件样式:
babel-plugin-import
是一个用于按需加载组件代码和样式的 babel 插件
react-cli-demo> npm i babel-plugin-import

added 1 package, and audited 1484 packages in 4s

171 packages are looking for funding
run `npm fund` for details

8 vulnerabilities (6 moderate, 2 high)

To address issues that do not require attention, run:
npm audit fix

To address all issues (including breaking changes), run:
npm audit fix --force

Run `npm audit` for details.
修改 scripts:
- 通过
react-app-rewired
来启动、打包和测试
/* package.json */
"scripts": {
-   "start": "react-scripts start",
+   "start": "react-app-rewired start",
-   "build": "react-scripts build",
+   "build": "react-app-rewired build",
-   "test": "react-scripts test",
+   "test": "react-app-rewired test",
}
项目根目录创建一个
config-overrides.js用于修改默认配置:
// config-overrides.js
const { override, fixBabelImports } = require('customize-cra');

module.exports = override(
fixBabelImports('import', {
libraryName: 'antd',
libraryDirectory: 'es',
style: 'css',
}),
);
移出手动引入的 antd 样式:
- import 'antd/dist/antd.css'
重启后发现按钮样式正常。
Tip:更详细介绍请看 高级配置
主题色
antd 默认主题色是支付宝的蓝色。
按照配置主题的要求,自定义主题需要用到 less 变量覆盖功能:
react-cli-demo> npm i -D less less-loader

added 15 packages, and audited 1499 packages in 1m

173 packages are looking for funding
run `npm fund` for details

8 vulnerabilities (6 moderate, 2 high)

To address issues that do not require attention, run:
npm audit fix

To address all issues (including breaking changes), run:
npm audit fix --force

Run `npm audit` for details.
修改
config-overrides.js文件如下:
- const { override, fixBabelImports } = require('customize-cra');
+ const { override, fixBabelImports, addLessLoader } = require('customize-cra');

module.exports = override(
fixBabelImports('import', {
libraryName: 'antd',
libraryDirectory: 'es',
-   style: 'css',
+   style: true,
}),
+ addLessLoader({
+   javascriptEnabled: true,
+   modifyVars: { '@primary-color': '#1DA57A' },
+ }),
);
报错如下:
Compiled with problems:X

ERROR in ./node_modules/antd/es/button/style/index.less (./node_modules/css-loader/dist/cjs.js??ruleSet[1].rules[1].oneOf[9].use[1]!./node_modules/postcss-loader/dist/cjs.js??ruleSet[1].rules[1].oneOf[9].use[2]!./node_modules/resolve-url-loader/index.js??ruleSet[1].rules[1].oneOf[9].use[3]!./node_modules/less-loader/dist/cjs.js??ruleSet[1].rules[1].oneOf[9].use[4]!./node_modules/antd/es/button/style/index.less)

Module build failed (from ./node_modules/less-loader/dist/cjs.js):
ValidationError: Invalid options object. Less Loader has been initialized using an options object that does not match the API schema.
// options 具有未知属性“modifyVars”。 这些属性有效
- options has an unknown property 'modifyVars'. These properties are valid:
object { lessOptions?, additionalData?, sourceMap?, webpackImporter?, implementation? }
at validate (react-cli-demo\node_modules\schema-utils\dist\validate.js:105:11)
at Object.getOptions (react-cli-demo\node_modules\webpack\lib\NormalModule.js:580:19)
at Object.lessLoader (react-cli-demo\node_modules\less
根据网上资料尝试修改如下:
const { override, fixBabelImports, addLessLoader } = require('customize-cra');

module.exports = override(
fixBabelImports('import', {
libraryName: 'antd',
libraryDirectory: 'es',
style: true,
}),
addLessLoader({
lessOptions: {
javascriptEnabled: true,
modifyVars: { '@primary-color': '#1DA57A' },
}
}),
);
报错信息变成:
Compiled with problems:X

ERROR in ./node_modules/antd/es/button/style/index.less (./node_modules/css-loader/dist/cjs.js??ruleSet[1].rules[1].oneOf[9].use[1]!./node_modules/postcss-loader/dist/cjs.js??ruleSet[1].rules[1].oneOf[9].use[2]!./node_modules/resolve-url-loader/index.js??ruleSet[1].rules[1].oneOf[9].use[3]!./node_modules/less-loader/dist/cjs.js??ruleSet[1].rules[1].oneOf[9].use[4]!./node_modules/antd/es/button/style/index.less)

Module build failed (from ./node_modules/postcss-loader/dist/cjs.js):
ValidationError: Invalid options object. PostCSS Loader has been initialized using an options object that does not match the API schema.
- options has an unknown property 'plugins'. These properties are valid:
object { postcssOptions?, execute?, sourceMap?, implementation? }
at validate (react-cli-demo\node_modules\schema-utils\dist\validate.js:105:11)
at Object.getOptions (react-cli-demo\node_modules\webpack\lib\NormalModule.js:580:19)
at Object.loader (react-cli-demo\node_modules\postcss-loader\dist\index.js:40:24)
Tip:时间有限且不紧急,故笔者决定暂放。
mobx
简单、可扩展的状态管理。—— npm-mobx
Tip:文档可参考 印象中文-mobx、github-mobx-api
spug_web 状态管理没有使用 redux 而是使用 mobx。以下截取自 alarm 路由组件:
// spug_web/src/pages/alarm/alarm/index.js

/**
* Copyright (c) OpenSpug Organization. https://github.com/openspug/spug
* Copyright (c) <spug.dev@gmail.com>
* Released under the AGPL-3.0 License.
*/
import React from 'react';
import { observer } from 'mobx-react';
import { SyncOutlined } from '@ant-design/icons';
import { Input, Button } from 'antd';
import { SearchForm, AuthDiv, Breadcrumb } from 'components';
import ComTable from './Table';
import store from './store';

export default observer(function () {
return (
<AuthDiv auth="alarm.alarm.view">
<Breadcrumb>
<Breadcrumb.Item>首页</Breadcrumb.Item>
<Breadcrumb.Item>报警中心</Breadcrumb.Item>
<Breadcrumb.Item>报警历史</Breadcrumb.Item>
</Breadcrumb>
<SearchForm>
<SearchForm.Item span={8} title="任务名称">
<Input allowClear value={store.f_name} onChange={e => store.f_name = e.target.value} placeholder="请输入"/>
</SearchForm.Item>
<SearchForm.Item span={8}>
<Button type="primary" icon={<SyncOutlined/>} onClick={store.fetchRecords}>刷新</Button>
</SearchForm.Item>
</SearchForm>
<ComTable/>
</AuthDiv>
)
})
// spug_web/src/pages/alarm/alarm/store.js

/**
* Copyright (c) OpenSpug Organization. https://github.com/openspug/spug
* Copyright (c) <spug.dev@gmail.com>
* Released under the AGPL-3.0 License.
*/
import { observable, computed } from 'mobx';
import http from 'libs/http';

class Store {
@observable records = [];
@observable isFetching = false;

@observable f_name;
@observable f_status = '';

@computed get dataSource() {
let records = this.records;
if (this.f_name) records = records.filter(x => x.name.toLowerCase().includes(this.f_name.toLowerCase()));
if (this.f_status) records = records.filter(x => x.status === this.f_status);
return records
}

fetchRecords = () => {
this.isFetching = true;
http.get('/api/alarm/alarm/')
.then(res => this.records = res)
.finally(() => this.isFetching = false)
};
}

export default new Store()
主要用到
mobx-react和
mobx两个包。
具体用法请看下文。
准备环境
注:本小节有点麻烦,主要是用于让项目支持装饰器语法。但是 mobx 不使用装饰器语法照常能工作。
spug_web 中有个依赖包 @babel/plugin-proposal-decorators,用于支持 es6 中装饰器的语法。就像这样:
// spug_web/src/pages/alarm/alarm/store.js
class Store {
@observable records = [];
@observable isFetching = false;

@observable f_name;
@observable f_status = '';
...
首先安装
mobx、
mobx-react依赖包:
react-cli-demo> npm i mobx mobx-react

added 3 packages, and audited 1502 packages in 7s

176 packages are looking for funding
run `npm fund` for details

8 vulnerabilities (6 moderate, 2 high)

To address issues that do not require attention, run:
npm audit fix

To address all issues (including breaking changes), run:
npm audit fix --force

Run `npm audit` for details.
"mobx": "^6.5.0",
"mobx-react": "^7.3.0",
注:最初打算安装和 spug_web 相同的版本,但提示安装失败:
"mobx": "^5.15.6",
"mobx-react": "^6.3.0",
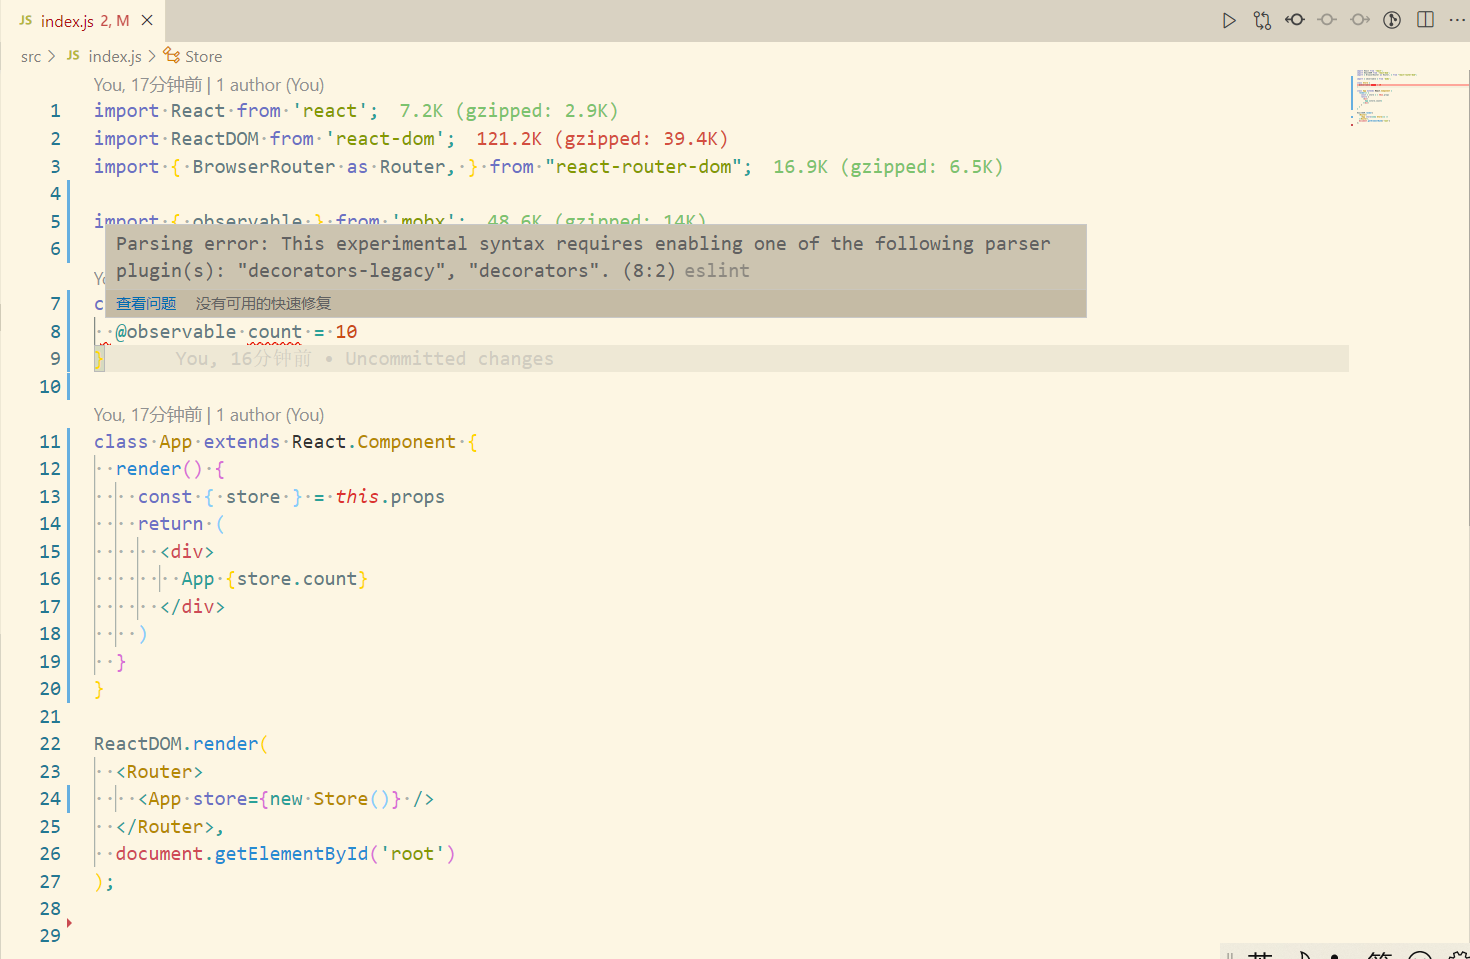
倘若将
src/index.js替换成下面代码,页面显示
App 10则说明环境准备就绪。
先替换内容启动:
// react-cli-demo/src/index.js (完整代码)
import React from 'react';
import ReactDOM from 'react-dom';
import { BrowserRouter as Router, } from "react-router-dom";

import { observable } from 'mobx';

class Store {
@observable count = 10
}

class App extends React.Component {
render() {
const { store } = this.props
return (
<div>
App {store.count}
</div>
)
}
}

ReactDOM.render(
<Router>
<App store={new Store()} />
</Router>,
document.getElementById('root')
);
Tip:为方便演示,未将 App 组件抽离出单独文件。
Compiled with problems:X

ERROR in ./src/index.js

Module build failed (from ./node_modules/babel-loader/lib/index.js):
SyntaxError: react-cli-demo\src\index.js: Support for the experimental syntax 'decorators-legacy' isn't currently enabled (8:3):

6 |
7 | class Store {
>  8 |   @observable count = 10
|   ^
9 | }
10 |
11 | class App extends React.Component {
安装 @babel/plugin-proposal-decorators:
react-cli-demo> npm i -D @babel/plugin-proposal-decorators@7

changed 1 package, and audited 1502 packages in 6s

176 packages are looking for funding
run `npm fund` for details

8 vulnerabilities (6 moderate, 2 high)

To address issues that do not require attention, run:
npm audit fix

To address all issues (including breaking changes), run:
npm audit fix --force

Run `npm audit` for details.
参考 spug_web 配置这个包:
// config-overrides.js
const { override, addDecoratorsLegacy, fixBabelImports } = require('customize-cra');
module.exports = override(
+ addDecoratorsLegacy(),
fixBabelImports('import', {
libraryName: 'antd',
libraryDirectory: 'es',
style: 'css',
}),
);
重启后发现页面能显示
App 10,但页面蒙版上报错如下:
Compiled with problems:X

ERROR

src\index.js
Line 8:2:  Parsing error: This experimental syntax requires enabling one of the following parser plugin(s): "decorators-legacy", "decorators". (8:2)

第 8:2 行:解析错误:此实验性语法需要启用以下解析器插件之一:“decorators-legacy”、“decorators”。 (8:2)
vscode 中有两个错误提示,其中之一就有上述错误:
新建
.babelrc文件
// react-cli-demo\.babelrc
{
"plugins": [
[
"@babel/plugin-proposal-decorators",
{
"legacy": true
}
]
]
}
Tip:参考 @babel/plugin-proposal-decorators
接着对 vscode 进行设置:
- 设置 -> 搜索
experimentalDecorators
-> 打上勾

重启 vscode,再次重启服务。如果幸运的话,一切都应该就正常了。
装饰器
装饰器是处理类的函数。
Tip:参考 @babel/plugin-proposal-decorators
简单的类装饰器
请看示例:
// src/decorators-test.js
@fn
class Dog {}

function fn(target) {
target.aName = 'pjl'
}

// pjl
console.log(Dog.aName)
Dog 类被 fn 装饰后,增加了一个类的属性
aName。
Tip:
src/index.js中引入此文件。就像这样:
import './decorators-test'
类装饰器
装饰器函数可以通过函数返回;装饰器也可以多个一起使用。就像这样:
@fn
@fn2(18)
class Dog {}

function fn(target) {
target.aName = 'pjl'
}

// 返回一个装饰器
function fn2(value) {
return function (target) {
target.age = value
}
}

console.log(Dog.aName) // pjl
console.log(Dog.age)   // 18
给实例添加属性
装饰器可以给实例添加属性。就像这样:
@fn3
class Dog {}

function fn3(target) {
target.prototype.c = 'cc'
}

console.log(new Dog().c) // cc
Class 成员装饰器
下面定义了一个只读装饰器:
class Dog {
@readOnly aName = 'pjl'
}

// target 目标类的 prototype
// key 类成员的名字
function readOnly(target, key, descriptor) {
descriptor.writable = false
}

let dog = new Dog()

console.log(dog.aName) // pjl

// Uncaught TypeError: Cannot assign to read only property 'aName' of object '#<Dog>'
dog.aName = 'li'
类似的有“Class function decorator”,就像这样:
class C {
@enumerable(false)
method() {}
}

function enumerable(value) {
return function(target, key, descriptor) {
descriptor.enumerable = value;
return descriptor;
};
}
第一个示例-自增
在”准备环境“章节中我们从 mobx 中读取了数字 10,现在我们要增加一个按钮,每点击一次,数字能自增1。请看实现:
// src/index.js

import React from 'react';
import ReactDOM from 'react-dom';
import { BrowserRouter as Router, } from "react-router-dom";

import { observable, action, makeObservable, computed } from 'mobx';
import { observer } from 'mobx-react';

class Store {
constructor() {
makeObservable(this, {
// 将 count 转为可观察的
count: observable,
// action,动作,用于更改状态(count)
increment: action,
// 将 total 标记为计算属性
total: computed
})
}
count = 10
increment() {
console.log('increment')
this.count++
}
get total() {
console.log('total')
return this.count * 10
}
}

// react 与 mobox 的桥梁
// 倘若注释掉 @observer,点击”自增1“,页面内容总是显示 `App 10`,尽管 increment 方法也被执行。
@observer
class App extends React.Component {
render() {
const { store } = this.props
return (
<div>
App {store.count}
<button onClick={() => store.increment()}>自增1</button>
<p>total: {store.total}</p>
<p>total: {store.total}</p>
</div>
)
}
}

ReactDOM.render(
<Router>
<App store={new Store()} />
</Router>,
document.getElementById('root')
);
页面显示:
App 10 自增1

total: 100

total: 100
控制台输出一条:
total。
observable 可观察的
observable定义了一个存储状态的可跟踪字段。
倘若将上述例子中的
count: observable注释,也就是说 count 不再是一个可跟踪的字段,接下来无论怎么点击”自增1“按钮,页面内容也只会显示”App 10“。
action
action将方法标记为将修改状态的操作。
倘若将上述例子中的
increment: action注释,再次点击”自增1“按钮,页面内容会变成”App 11“,但控制台有警告:
[MobX] Since strict-mode is enabled, changing (observed) observable values without using an action is not allowed. Tried to modify: Store@1.count
[MobX] 由于启用了严格模式,因此不允许在不使用 action 的情况下更改(观察到的)可观察值。 尝试修改:Store@1.count
提醒我们要使用
action来更改可观察值。
configure
我们可以通过
configure来关闭提示
action中的警告,但通常不推荐:
import { configure } from 'mobx'

configure({
enforceActions: 'never'
})
computed 计算属性
computed 标记了一个 getter,它将从状态中获取新的事实并缓存其输出。
Tip:类似 vue 中的计算属性,也有缓存。
上述例子初始化页面只输出一次
total,尽管我们读取了 2 次。倘若我们注释掉
total: computed这行,也就是取消 total 为计算属性,页面在初始化时就会输出 2 次
total。
this 为 undefined
上述例子将替换 button 这行代码,然后点击”自增1“按钮,控制台报错如下:
increment() {
console.log('increment')
this.count++
}

- <button onClick={() => store.increment()}>自增1</button>
+ <button onClick={store.increment}>自增1</button>
Uncaught TypeError: Cannot read properties of undefined (reading 'count')
这是因为
increment()中 this 是
undefined。可以通过以下方式解决:
- 使用
action.bound
:
makeObservable(this, {
count: observable,
- increment: action,
+ increment: action.bound,
total: computed
})
- 借助箭头函数:
increment() {
console.log('increment')
this.count++
}

改为

increment = () => {
console.log('increment')
this.count++
}
makeAutoObservable
与使用
makeObservable相比,
makeAutoObservable函数可以更紧凑且更易于维护,因为不必明确提及新成员。
所以上述例子的
constructor部分可以改为:
constructor() {
// 参数1,让哪个对象变成可观察的
// 参数2,排除变成可观察的属性或方法
// 参数3,这里是自动绑定 this
+   makeAutoObservable(this, {}, { autoBind: true })

-   makeObservable(this, {
-     count: observable,
-     increment: action,
-     total: computed
-   })
}
Tip:更多介绍请参考 makeautoobservable
监听属性
autorun
autorun接收一个函数,该函数总是立即被触发一次。并自动订阅函数中可观察属性,一旦某属性变化,则该函数会再次被执行。
请看示例:
...
import { autorun } from 'mobx'

class Store {
constructor() {
makeObservable(this, {
count: observable,
age: observable,
})

setTimeout(() => {
this.count++
this.age++
}, 1000)
autorun(() => {
console.log(this.count, this.age);
})
}
count = 10
age = 1
}
控制台输出:
// 总会执行一次
10 1
// 过一秒
11 1
11 2
默认会执行一次。由于订阅了两个可观察属性,所以只要可观察属性被修改,函数就会被执行。
倘若注释
age: observable,输出:
10 1
11 1
reaction
reaction是
autorun的变种,对于如何追踪 observable 赋予了更细粒度的控制
- 与 autorun 不同,初始化时不会执行
- 可以接收两个函数作为参数
- 参数1的返回值作为第二个参数的输入
重写上述例子,将 autorun 替换成 reaction:
import { reaction } from 'mobx'

class Store {
constructor() {
makeObservable(this, {
count: observable,
age: observable,
})

setTimeout(() => {
this.count++
this.age++
}, 1000)

reaction(
() => ({
count: this.count,
age: this.age
}),
// oldVal 是上一次的值
(val, oldVal) => {
console.log(val, oldVal)
}
)
}
count = 10
age = 1
}
// 一秒后
{count: 11, age: 1} {count: 10, age: 1}{count: 11, age: 2} {count: 11, age: 1}
倘若注释
age: observable,输出:
{count: 11, age: 1} {count: 10, age: 1}
异步处理
比如点击”自增1“按钮,一秒后修改状态,我们假如这样写:
increment() {
setTimeout(() => {
this.count++
}, 1000)
}
控制台会报警告:
[MobX] Since strict-mode is enabled, changing (observed) observable values without using an action is not allowed. Tried to modify: Store@1.count
一种方式是将
imcrement()函数拆分成两个方法,就像这样:
increment() {
this.count++
}

asyncIncrement() {
setTimeout(() => {
this.increment()
}, 1000)
}

<button onClick={() => store.asyncIncrement()}>自增1</button>
更好的方式是使用
runInAction:
import { runInAction } from 'mobx'

increment() {
setTimeout(() => {
runInAction(() => {
this.count++
})
}, 1000)
}
顾名思义,函数在 action 中运行。
新的开始
以下是剩余一些包的作用:
ace-builds,Ace 是一个用 JavaScript 编写的代码编辑器。
bizcharts,阿里通用图表组件库,致力于打造企业中后台高效、专业、便捷的数据可视化解决方案,基于 G2与G2Plot封装的React图表库,已经历阿里复杂业务场景长达三年的洗礼,在灵活性、易用性、丰富度上满足常规图表和高度自定义图表的业务实现
lodash,提供模块化、性能和附加功能的现代 JavaScript 实用程序库。
moment,用于解析、验证、操作和格式化日期的 JavaScript 日期库。
react-ace,Ace 的一组 react 组件
import Editor from 'react-ace';
- xterm,Xterm.js 是一个用 TypeScript 编写的前端组件,它允许应用程序在浏览器中将功能齐全的终端带给用户。它被 VS Code、Hyper 和 Theia 等流行项目使用。
至此,我们基本具备接手 spug_web 这个 react 前端项目的能力,但是,react 的旅途才刚刚开始。
其他章节请看:

- 七天接手react项目 系列
- 七天接手react项目 系列 —— state&事件处理&ref
- 初始化一个dva+antd的react项目时npm start出错
- react antd-mobile 项目中实现 css 与 less 局部作用域化
- 新建项目 react+dva+antd
- ReactJS & antd 环境中项目运行时错误总结
- ReactJS & antd 环境中项目上传图片后压缩(lrz的使用)
- React-Redux-Antd实现知乎日报项目(一)
- antd mobile 学习笔记 创建react 空项目
- Redux进阶系列1: React+Redux项目结构最佳实践
- mobx 在ReactJS项目中的运用
- 搭建react项目——引入antd并实现按需加载及代理设置
- React项目开发之使用less、Antd样式按需引入
- Antd-react-mobile项目学习中遇到的问题记录(持续更新)
- react项目的组件库antd-mobile
- react 项目antd 表单组件内容更新小坑记录
- 使用create-react-app或者antd创建一个React项目
- 基于webpack+react+antd 项目构建
- react项目的组件库antd-mobile
- 04-30.eri-test React,反应式微服务,Kubernetes,GraphQL和gRPC-宣布申请-Fullstack教程系列和开源项目...