七天接手react项目 系列 —— react 路由
其他章节请看:
react 路由
本篇首先讲解路由原理,接着以一个基础路由示例为起点讲述路由最基础的知识,然后讲解嵌套路由、路由传参,最后讲解路由组件和一般组件的区别,以及编程式导航。
Tip:我们要接手的 react 项目是:spug_web。
什么是路由
路由就是根据不同的 url(网址) 返回不同的页面(数据)。如果这个工作在后端做(或者说由后端程序员做),就是后端路由;在前端做就是前端路由。
平时总说的 SPA(单页面应用)就是前后端分离的基础上,再加一层前端路由。
react 路由原理
下面通过一个js 库(history)来演示一下路由的原理:
<body>
请在浏览器控制台下体验!
<!-- https://github.com/remix-run/history/blob/dev/docs/installation.md -->
<script src="https://unpkg.com/history/umd/history.production.min.js"></script>
<script>
let myHistory = window.HistoryLibrary.createBrowserHistory()
let unlisten = myHistory.listen(({ location, action }) => {
console.log(action, location.pathname)
});
</script>
</body>
访问页面,浏览器 url 为
http://127.0.0.1:5500/public/test.html
Tip:笔者在 vscode 中安装 “open in browser” 插件,直接右键选择 “Open with Live Server” 即可。
打开控制台进行测试:
> myHistory.push('/home')
PUSH /home

url 变为:http://127.0.0.1:5500/home
> myHistory.push('/about')
PUSH /about

url 变成:http://127.0.0.1:5500/about
> myHistory.back()
POP /home

url 变成:http://127.0.0.1:5500/home
> myHistory.replace('about')
REPLACE /about

url 变成:http://127.0.0.1:5500/about
> myHistory.back()
POP /public/test.html

url 变成:http://127.0.0.1:5500/public/test.html
这个流程其实就是 react 路由的基础。
hash模式:
<script>
let hashHistory = window.HistoryLibrary.createHashHistory()
hashHistory.listen(({ location, action }) => {
console.log(action, location.pathname)
});
</script>
> hashHistory.push('/home')
PUSH /home

url 变为:http://127.0.0.1:5500/public/test.html#/home
Version 5 is used in React Router version 6 —— history
Tip:react router 用到了这个包,另外这个包的作者和
react-router、
react-router-dom是同一人。
路由模式
react 中有三种模式,本篇主要研究 history 和 hash 两种模式。
官网-history:
- “browser history” - 在特定 DOM 上的实现,使用于支持 HTML5 history API 的 web 浏览器中
- “hash history” - 在特定 DOM 上的实现,使用于旧版本的 web 浏览器中
- “memory history” - 在内存中的 history 实现,使用于测试或者非 DOM 环境中,例如 React Native
环境准备
笔者使用的环境是 react 脚手架创建的项目。
Tip:详细介绍请看 react 脚手架创建项目
打开 react-router 官网。
Tip:react 有三个版本,我们学习 web 版本
5。印记中文(深入挖掘国外前端新领域,为中国 Web 前端开发...)有 react-router 中文。
基础使用
安装 react 路由依赖包:
react-cli-demo> npm i react-router-dom@5

added 13 packages, and audited 1421 packages in 6s

169 packages are looking for funding
run `npm fund` for details

6 moderate severity vulnerabilities

To address all issues (including breaking changes), run:
npm audit fix --force

Run `npm audit` for details.
注:版本是5,倘若是版本 6,下面的代码运行会报错。
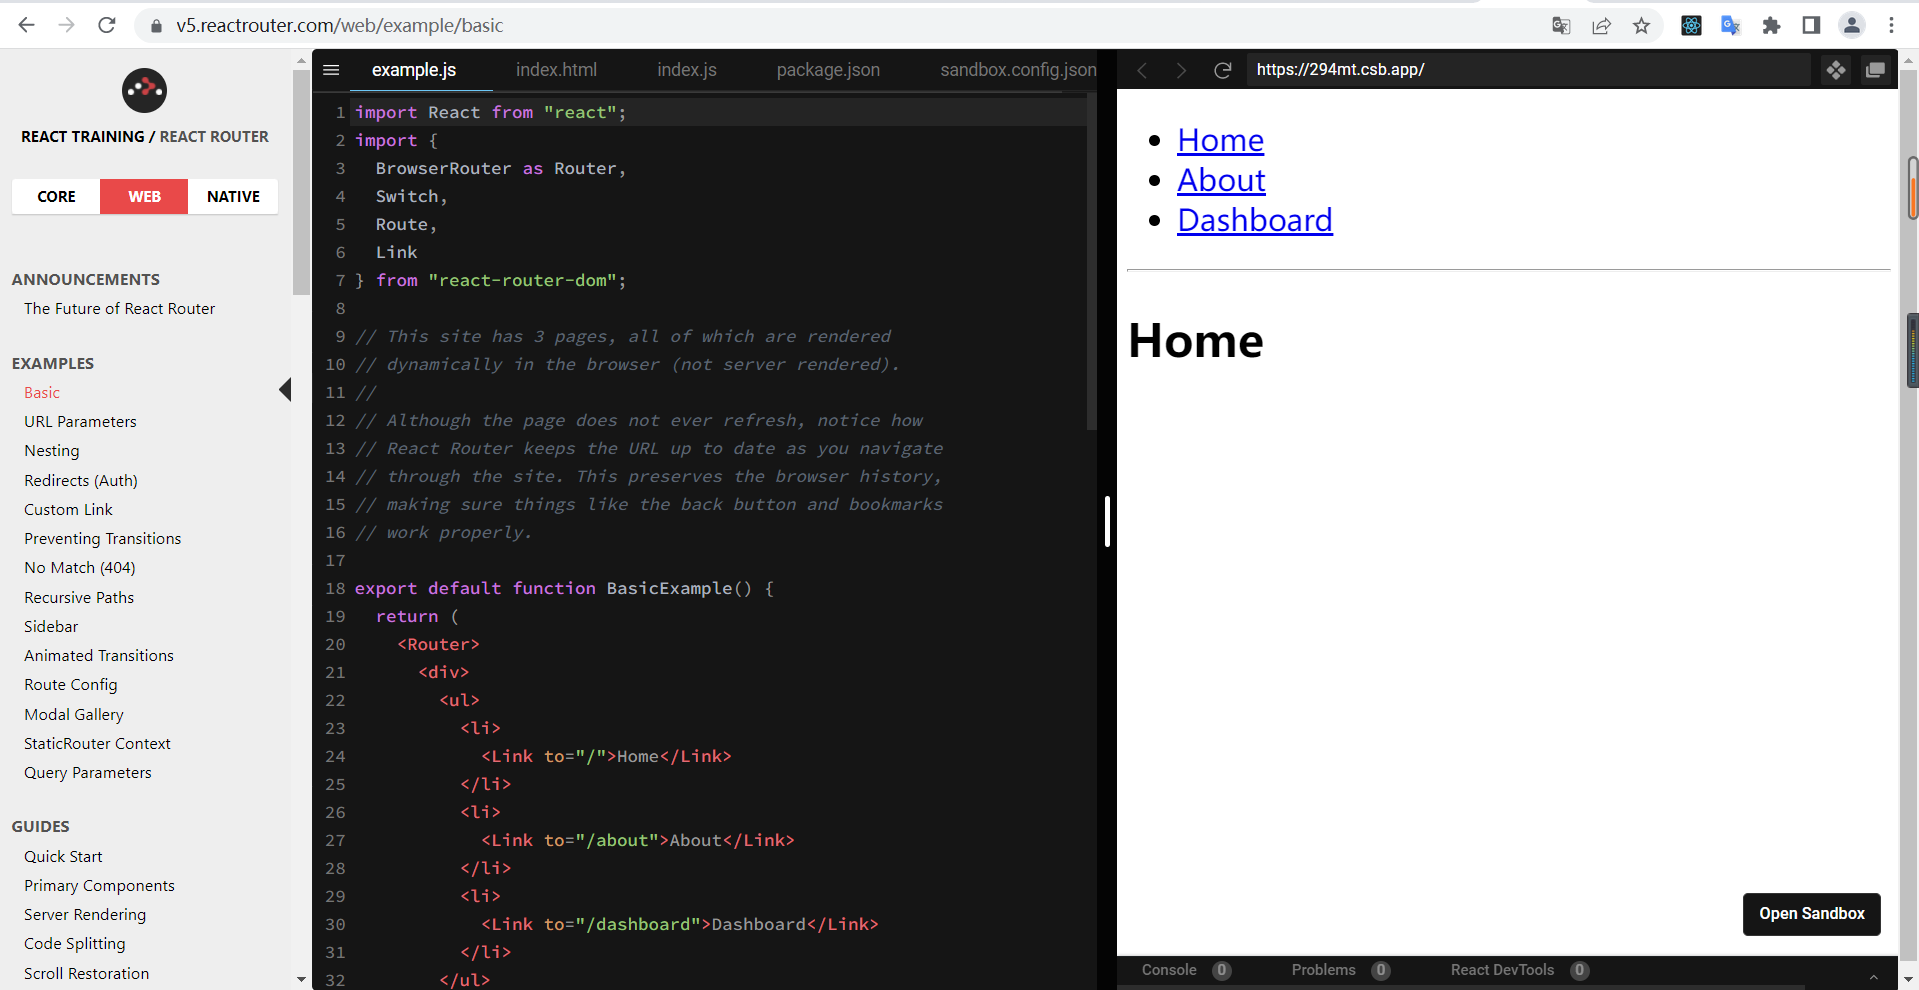
将 App.js 替换成下面代码:
// src/App.js
import React from "react";
import {
BrowserRouter as Router,
Switch,
Route,
Link
} from "react-router-dom";

export default function BasicExample() {
return (
<Router>
<div>
<ul>
<li>
<Link to="/">Home</Link>
</li>
<li>
<Link to="/about">About</Link>
</li>
<li>
<Link to="/dashboard">Dashboard</Link>
</li>
</ul>

<hr />

<Switch>
<Route exact path="/">
<Home />
</Route>
<Route path="/about">
<About />
</Route>
<Route path="/dashboard">
<Dashboard />
</Route>
</Switch>
</div>
</Router>
);
}

// Home 组件
function Home() {
return (
<div>
<h2>Home</h2>
</div>
);
}

// About 组件
function About() {
return (
<div>
<h2>About</h2>
</div>
);
}

// Dashboard 组件
function Dashboard() {
return (
<div>
<h2>Dashboard</h2>
</div>
);
}
重启服务器,页面显示:
· Home
· About
· Dashboard
________________________________

Home
注:本篇为了演示,所以将多个组件都放在一个文件中。
整个页面分上下两部分,上面是
导航区,下面是
内容区。
倘若点击导航“About”,内容区显示 About,浏览器 url 也会变化:
http://localhost:3000/

变成

http://localhost:3000/about
当我们点击
<Link to="/about">About</Link>,则会匹配上
<Route path="/about">,于是
<About />组件显示。
Tip:
Link、
exact、
<Switch>、
<Router>的作用?请接着看。
Link 和 NavLink
<Link to="/about/a">About</Link>会被渲染成
<a href="/about">About</a>,即使点击 About 导航,渲染的内容依旧不变。
一个特殊版本的 Link,当它与当前 URL 匹配时,为其渲染元素添加样式属性 —— 官网-
<NavLink>
将 About 导航改成
NavLink:
<NavLink to="/about">About</NavLink>
初始时(即未选中)依旧渲染成
<a href="/about">About</a>,但点击 About 导航后,渲染内容变成:
<a href="/about" aria-current="page" class="active">About</a>
所以我们可以给
.active增加选中效果。
如果要修改默认选中时的
active类名,可以使用
activeClassName属性。就像这样:
<NavLink to="/about" activeClassName="z-selected">About</NavLink>
封装 NavLink
- 版本1
function MyNavLink(props) {
return <NavLink to={props.to} activeClassName="z-selected">{props.children}</NavLink>
}
使用:
<MyNavLink to="/about" children="About" />
- 升级版
function MyNavLink(props) {
return <NavLink {...props} activeClassName="z-selected" />
}
当 React 元素为用户自定义组件时,它会将 JSX 所接收的属性(attributes)以及子组件(children)转换为单个对象传递给组件,这个对象被称之为 “props” —— react 官网
Router
使用 HTML5 历史 API 记录( pushState,replaceState 和 popstate 事件)的
<Router>使您的UI与URL保持同步 —— 官网-
BrowserRouter
假如将 BasicExample 组件中的
<Router>删除,浏览器控制台将报错如下:
Uncaught Error: Invariant failed: You should not use <Link> outside a <Router>

未捕获的错误:不变式失败:您不应该在 <Router> 之外使用 <Link>
倘若将
<Switch>外边的
<Router>删除,浏览器控制台将报错如下:
Uncaught Error: Invariant failed: You should not use <Switch> outside a <Router>

未捕获的错误:不变量失败:您不应该在 <Router> 之外使用 <Switch>
倘若将
<Route>(
<Switch>在这里可以删除) 外边的
<Router>删除,浏览器控制台将报错如下:
Uncaught Error: Invariant failed: You should not use <Route> outside a <Router>

未捕获的错误:不变式失败:您不应在 <Router> 之外使用 <Route>
倘若我们在 BasicExample 组件中使用两个
<Router>会发生什么?
export default function BasicExample() {
return (
<div>
<Router>
<ul>
<li>
<Link to="/">Home</Link>
</li>
...
</ul>
</Router>
<hr />

<Router>
<Switch>
<Route exact path="/">
<Home />
</Route>
...
</Switch>
</Router>
</div>
);
}
浏览器没有任何报错,点击导航“About”,url正常变化,但内容区没有跟着变。
Router 即路由器,Route 即线路,线路由路由器管理,上面用了两个路由器,你管你的,我管我的,相互间没有通信。
在 spug_web 中搜索
<Router仅出现一次:
// spug_web/src/index.js

ReactDOM.render(
<Router history={history}>
<ConfigProvider locale={zhCN} getPopupContainer={() => document.fullscreenElement || document.body}>
<App/>
</ConfigProvider>
</Router>,
document.getElementById('root')
)
我们也依葫芦画瓢,将
<Router>包裹
<App/>。
Switch
js 语法中就有
switch,类似于
if...else。我们对比有无 Switch 的两种情况:
点击 About 导航,请问内容区显示什么?
// 没有 Switch
export default function BasicExample() {
return (
<div>
<ul>
<li>
<Link to="/about">About</Link>
</li>
...
</ul>
<hr />

<Route path="/about">
<About />1
</Route>
<Route path="/about">
<About />2
</Route>
...
</div>
);
}
内容区显示:
About
1About
2
// 有 Switch
export default function BasicExample() {
return (
<div>
<ul>
<li>
<Link to="/about">About</Link>
</li>
...
</ul>
<hr />
<Switch>
<Route path="/about">
<About />1
</Route>
<Route path="/about">
<About />2
</Route>
...
</Switch>
</div>
);
}
内容区显示:
About
1
渲染与该地址匹配的第一个子节点
<Route>或者
<Redirect>—— 官网
Tip:既然只匹配第一个子节点,那么性能方面肯定会好些,因为不用在尝试匹配后面的节点。
如果 URL 是
/about,那么
<About>,
<User>,
<NoMatch>将全部渲染,因为他们都与路径匹配:
// from 官网
<Route exact path="/" component={Home}/>
<Route path="/about" component={About}/>
<Route path="/:user" component={User}/>
<Route component={NoMatch}/>
exact
exact即精确的。首先做一个小练习:
点击导航 About,下面两个例子分别输出什么,是否匹配?
export default function BasicExample() {
return (
<div>
<ul>
<li>
<Link to="/about">About</Link>
</li>
</ul>
<hr />
<Route path="/about/a">
<About />
</Route>
</div>
);
}
export default function BasicExample() {
return (
<div>
<ul>
<li>
<Link to="/about/a">About</Link>
</li>
</ul>
<hr />
<Route path="/about">
<About />
</Route>
</div>
);
}
第一个例子:内容区空白。未能匹配
第二个例子:内容区显示”About“。匹配。
下面这段代码呢?
export default function BasicExample() {
return (
<div>
<ul>
<li>
<Link to="/a/about/b">About</Link>
</li>
</ul>
<hr />
<Route path="/about">
<About />
</Route>
</div>
);
}
内容区空白。未能匹配。
总结:Link 可以多给,比如你要
/about,我给你传
/about/a,但不能少给,而且顺序不能乱,例如
/a/about/b就不能匹配
/about
我们给第二个例子加上
exact,请问输出什么?
export default function BasicExample() {
return (
<div>
<ul>
<li>
<Link to="/about/a">About</Link>
</li>
</ul>
<hr />
<Route exact path="/about">
<About />
</Route>
</div>
);
}
内容区空白。未能匹配。
如果为
true,则只有在路径完全匹配
location.pathname时才匹配 —— 官网-
exact: bool
注:只有需要的时候才开启精确匹配,也就是说页面正常,就不要去开启它。
Redirect
渲染
<Redirect>将使导航到一个新的地址。这个新的地址会覆盖 history 栈中的当前地址,类似服务器端(HTTP 3xx)的重定向 —— 官网-
<Redirect>
下面我们用
<Redirect>解决一个问题:
首先看下面这个例子:
export default function BasicExample() {
return (
<div>
<ul>
<li>
<Link to="/about">About</Link>
</li>
<li>
<Link to="/dashboard">Dashboard</Link>
</li>
</ul>
<hr />
<Switch>
<Route path="/about">
<About />
</Route>
<Route path="/dashboard">
<Dashboard />
</Route>
</Switch>
</div>
);
}
第一次来到网站(
http://localhost:3000/),内容区是空白的,因为未能匹配任何
<Route>。
现在需求:进入网站,默认显示
<Dashboard />。
只需要增加 2 行代码:
import {
+ Redirect,
...
} from "react-router-dom";

export default function BasicExample() {
return (
<div>
...
<Switch>
<Route path="/about">
<About />
</Route>
<Route path="/dashboard">
<Dashboard />
</Route>
+ <Redirect to="/dashboard" />
</Switch>
</div>
);
}
浏览器输入
http://localhost:3000/,由于前两个
<Route>未能匹配,最后就会重定向到
http://localhost:3000/dashboard。
replace
如果为 true,则单击链接将替换历史堆栈中的当前入口,而不是添加新入口 —— 官网-
replace: bool
上面 BasicExample 组件,倘若我们依次点击 About 组件、Dashboard 组件,接着点击网页左上角的返回(<-)按钮,第一次会返回到 About 组件,再次点击则会返回到 Home 组件。
如果我们给 Dashboard 组件加上 replace 属性。就像这样:
<ul>
<li>
<Link to="/">Home</Link>
</li>
<li>
<Link to="/about">About</Link>
</li>
<li>
<Link to="/dashboard" replace>Dashboard</Link>
</li>
</ul>
依次点击 About 组件、Dashboard 组件,然后第一次点击返回按钮,则回到 Home 组件。
因为点击 Dashboard 导航时,不再是入栈操作(将
/dashboard压入栈中),而是替换操作(将栈中的
/about替换成
/dashboard),再次点击返回,就回到 /。
样式丢失问题
通过一个示例演示问题:
首先在 index.html 增加样式:
// public/index.html

+ <link rel="stylesheet" href="./css/index.css" />
// public/css/index.css

body{background-color: pink;}
修改 BasicExample 组件中 About 导航的路径为多级路径(
/about非多级路径;
/about/a多级路径):
// src/App.js

export default function BasicExample() {
return (
<Router>
<div>
<ul>
<li>
<Link to="/">Home</Link>
</li>
<li>
<Link to="/about/a/b">About</Link>
</li>
</ul>

<hr />

<Switch>
<Route exact path="/">
<Home />
</Route>
<Route path="/about/a/b">
<About />
</Route>
</Switch>
</div>
</Router>
);
}
开始测试:
启动,
http://localhost:3000/背景是粉色,样式正常,点击 ”About“导航,url 变成
http://localhost:3000/about/a/b,背景依旧是粉色,刷新页面,粉色背景不见了,也就是样式丢失了!
刷新的时候,发现样式请求的地址和返回内容如下:
http://localhost:3000/about/a/css/index.css
<!DOCTYPE html>
<html lang="en">

<head>
<meta charset="utf-8" />
<link rel="icon" href="/favicon.ico" />
<meta name="viewport" content="width=device-width, initial-scale=1" />
<meta name="theme-color" content="#000000" />
<meta name="description" content="Web site created using create-react-app" />
<link rel="apple-touch-icon" href="/logo192.png" />
<link rel="stylesheet" href="./css/index.css" />
<link rel="manifest" href="/manifest.json" />
<title>React App</title>
<script defer src="/static/js/bundle.js"></script></head>

<body>
<noscript>You need to enable JavaScript to run this app.</noscript>
<div id="root"></div>
</body>

</html>
注:请求不存在的资源,服务器会将 public/index.html 返回给你。例如请求:
http://localhost:3000/a/b/c/d
我们放慢刷新这个动作:
- 刷新,给服务器发送
http://localhost:3000/about/a/b
,没有这个资源,所以服务器返回 index.html。 - 浏览器解析 index.html,遇到
<link rel="stylesheet" href="./css/index.css" />
,需要加载当前目录下的css/index.css
资源,当前目录是http://localhost:3000/about/a
,于是请求http://localhost:3000/about/a/css/index.css
- 由于存在对应资源,服务器再次返回 index.html,样式也就丢失了
既然知道问题原因,只需要让 css 资源路径正常即可:
将

<link rel="stylesheet" href="./css/index.css" />

改成

<link rel="stylesheet" href="/css/index.css" />

或

<link rel="stylesheet" href="%PUBLIC_URL%/css/index.css" />
嵌套路由
嵌套路由也叫子路由。
将 BasicExample 组件中的 About 改造成嵌套路由。
首先看效果:
初始时 Home 导航选中:
· Home
· About
· Dashboard
________________________________

Home
点击 About 导航:
· Home
· About
· Dashboard
________________________________

About
________________________________

· article1
· article2
点击 article2 导航,显示:
· Home
· About
· Dashboard
________________________________

About
________________________________

· article1
· article2
文章2...
嵌套路由相关代码如下:
// About 组件
function About() {
return (
// 新增一个路由器 Router
<Router>
<div>
<h2>About</h2>
<hr />
<ul>
<li>
<Link to="/about/article1">article1</Link>
</li>
<li>
<Link to="/about/article2">article2</Link>
</li>

</ul>
<Switch>
<Route path="/about/article1">
文章1...
</Route>
<Route path="/about/article2">
文章2...
</Route>
</Switch>
</div>
</Router>
);
}
路由组件 vs 一般组件
路由组件和一般组件最大的一个区别是:props 中是否有路由相关方法。
这里有三个组件,请观察每个组件的
props:
// src/App.js

import React from "react";
import {
Switch,
Route,
Link
} from "react-router-dom";

export default function BasicExample() {
return (
<div>
<Header />
<ul>
<li>
<Link to="/about">About</Link>
</li>
<li>
<Link to="/dashboard">Dashboard</Link>
</li>
</ul>
<hr />
<Switch>
<Route path="/about" component={About} />
<Route path="/dashboard">
<Dashboard name="pjl" />
</Route>
</Switch>
</div>
);
}

// Home 组件
function Header(props) {
console.log('Header props,', props)
return (
<h2>Header</h2>
);
}

// About 组件
function About(props) {
console.log('About props,', props)
return (
<div>
<h2>About</h2>
</div>
);
}

// Dashboard 组件
function Dashboard(props) {
console.log('Dashboard props,', props)
return (
<div>
<h2>Dashboard</h2>
</div>
);
}
初始 url 为:
http://localhost:3000/,控制台输出:
Header props, {}
点击 Dashboard 导航,控制台输出:
Dashboard props, {name: 'pjl'}
点击 About 导航,控制台输出:
About props, {history: {…}, location: {…}, match: {…}, staticContext: undefined}
三个组件只有 About 组件是路由组件,其用法不同于另外两种组件:
// 通过 component 属性指定组件
<Route path="/about" component={About} />
<Dashboard name="pjl" />

<Header />
Tip:路由组件中的 history、location、match 属性,下文都会讲到。
pages/components 目录
有人说路由组件和一般组件从项目结构上可以区分,比如将路由组件放在
src/pages文件夹中,一般组件放在
src/components中。
spug_web 中有
src/pages和
src/components目录,是否就是根据一般组件和路由组件进行区分?请看截取的代码片段:
首先是
src/routes.js,猜测与路由相关:
// src/routes.js

import HomeIndex from './pages/home';
import DashboardIndex from './pages/dashboard';
import HostIndex from './pages/host';
import ExecTask from './pages/exec/task';
import ExecTemplate from './pages/exec/template';
import DeployApp from './pages/deploy/app';
import DeployRepository from './pages/deploy/repository';
import DeployRequest from './pages/deploy/request';
import ScheduleIndex from './pages/schedule';
import ConfigEnvironment from './pages/config/environment';
import ConfigService from './pages/config/service';
import ConfigApp from './pages/config/app';
import ConfigSetting from './pages/config/setting';
import MonitorIndex from './pages/monitor';
import AlarmIndex from './pages/alarm/alarm';
import AlarmGroup from './pages/alarm/group';
import AlarmContact from './pages/alarm/contact';
import SystemAccount from './pages/system/account';
import SystemRole from './pages/system/role';
import SystemSetting from './pages/system/setting';
import WelcomeIndex from './pages/welcome/index';
import WelcomeInfo from './pages/welcome/info';
引入的都是 pages 中的组件。
src/routes.js又被
src\layout\index.js引用:
// src/layout/index.js

import routes from '../routes';

// initRoutes 的实参 routes 就是上面导入的 routes
function initRoutes(Routes, routes) {
for (let route of routes) {
if (route.component) {
if (!route.auth || hasPermission(route.auth)) {
// 通过 component 属性指定组件
Routes.push(<Route exact key={route.path} path={route.path} component={route.component}/>)
}
} else if (route.child) {
initRoutes(Routes, route.child)
}
}
}
...
至此,初步判断:spug_web 中的 pages 目录和 components 目录就是根据一般组件和路由组件进行区分的。
给路由组件传递参数
给路由组件传递参数有三种方式。
下面通过这三种方式实现同一个功能:给路由组件 About 传递
name和
age两个参数。
params 方式
export default function BasicExample() {
return (
<div>
<ul>
<li>
<Link to="/about/pjl/18">About</Link>
</li>
</ul>
<hr />
<Switch>
<Route path="/about/:name/:age" component={About}>
</Route>
</Switch>
</div>
);
}

// About 组件
function About(props) {
// {history: {…}, location: {…}, match: {…}, staticContext: undefined}
console.log(props)
// {name: 'pjl', age: '18'}
console.log(props.match.params)
return (
<div>
<h2>About</h2>
</div>
);
}
点击 About 导航组件,控制台输出:
{history: {…}, location: {…}, match: {…}, staticContext: undefined}

// 接收两个参数
{name: 'pjl', age: '18'}
一个 match 对象中包涵了有关如何匹配 URL 的信息 —— 官网-match
search 方式
以 search 方式重写 params 传递参数的例子:
export default function BasicExample() {
return (
<div>
<ul>
<li>
<Link to="/about/?name=pjl&age=18">About</Link>
</li>
</ul>
<hr />
<Switch>
<Route path="/about" component={About}>
</Route>
</Switch>
</div>
);
}

// About 组件
function About(props) {
// ?name=pjl&age=18
console.log(props.location.search)
var searchParams = new URLSearchParams(props.location.search)
const params = {}
for (const [key, value] of searchParams) {
params[key] = value
}
// params:  {name: 'pjl', age: '18'}
console.log('params: ', params);
return (
<div>
<h2>About</h2>
</div>
);
}
需要自己将接收到的数据(例如
?name=pjl&age=18)处理一下。
Tip:
params和
search传参,在地址栏中都能看见。例如 search:
http://localhost:3000/about/?name=pjl&age=18。刷新页面参数都不会丢失。
state 方式
注:与组件中的 state 没有任何关系
export default function BasicExample() {
return (
<div>
<ul>
<li>
<Link to={{ pathname: '/about', state: { name: 'pjl', age: 18 } }}>About</Link>
</li>
</ul>
<hr />
<Switch>
<Route path="/about" component={About}>
</Route>
</Switch>
</div>
);
}

// About 组件
function About(props) {
// {name: 'pjl', age: 18}
console.log(props.location.state)
return (
<div>
<h2>About</h2>
</div>
);
}
有两个特点:
- 所传参数不会再 url 中体现。比如这里仍然是
http://localhost:3000/about
- 强制刷新 url,所传参数也不会消失。
笔者尝试关闭浏览器,再次输出
http://localhost:3000/about
,控制台输出undefined
Tip:
props.location === props.history.location为
true
HashRouter 刷新会导致 state 参数丢失
HashRouter 模式下,刷新(非强刷)页面会造成 state 参数的丢失。
将 App.js 中的 BrowserRouter 切换成 HashRouter 进行自测即可。
编程式导航 history
比如过3秒需要自动跳转,这时就可以使用编程式导航。用法类似 History API。不过这里我们操作的是
props.history。
运行下面这个熟悉的例子,将会把
props.history导出给
window.aHistory,我们直接在控制台中操作
aHistory:
// src/App.js
export default function BasicExample() {
return (
<div>
<ul>
<li>
<Link to="/">Home</Link>
</li>
<li>
<Link to="/about">About</Link>
</li>
<li>
<Link to="/dashboard">Dashboard</Link>
</li>
</ul>
<hr />
<Switch>
<Route exact path="/" component={Home} />

<Route path="/about" component={About} />

<Route path="/dashboard" component={Dashboard} />
</Switch>
</div>
);
}

// Home 组件
function Home(props) {
// 将 history 导出,用于测试
window.aHistory = props.history
return (
<div>
<h2>Home</h2>
</div>
);
}

// About 组件
function About() {
return (
<div>
<h2>About</h2>
</div>
);
}

// Dashboard 组件
function Dashboard() {
return (
<div>
<h2>Dashboard</h2>
</div>
);
}
浏览器 url 是
http://localhost:3000/,页面内容如下:
· Home
· About
· Dashboard
________________________________

Home
测试开始:
> aHistory.push('/about')

url:http://localhost:3000/about
> aHistory.push('/dashboard')

url: http://localhost:3000/dashboard
> aHistory.goBack()

url: http://localhost:3000/about
// 等于 aHistory.goBack()
> aHistory.go(-1)

url: http://localhost:3000/
一般组件中使用编程式导航
一般组件中没有 history,如果需要使用编程式导航,可以借助 withRouter 将一般组件处理一下即可。请看示例:
import React from "react";
import {
Switch,
Route,
withRouter,
Link
} from "react-router-dom";

export default function BasicExample() {
return (
<div>
<ul>
<li>
<Link to="/about">About</Link>
</li>
<li>
<Link to="/new-about">NewAbout</Link>
</li>
</ul>
<hr />
<Switch>
<Route path="/about">
<About />
</Route>
<Route path="/new-about">
<NewAbout />
</Route>

</Switch>
</div>
);
}

// About 组件
function About(props) {
console.log(props)
return (
<div>
<h2>About</h2>
</div>
);
}

var NewAbout = withRouter(About)
页面显示:
About
NewAbout
________________________________
依次点击 About 导航、NewAbout 导航,控制台输出:
{}

{history: {…}, location: {…}, match: {…}, staticContext: undefined}
其他章节请看:

- 七天接手react项目 系列 —— state&事件处理&ref
- 七天接手react项目 系列 —— 尾篇(antd 和 mobx)
- 七天接手react项目 系列
- react简书项目学习笔记34性能优化及路由跳转
- React项目之BrowserRouter路由方式之-------生产环境404问题
- 试着用React写项目-利用react-router解决跳转路由等问题(二)
- 试着用React写项目-利用react-router解决跳转路由等问题(一)
- react简书项目学习笔记36页面路由参数的传递
- 试着用React写项目-利用react-router解决跳转路由等问题(一)
- 试着用React写项目-利用react-router解决跳转路由等问题(二)
- 试着用React写项目-利用react-router解决跳转路由等问题(二)
- react native 系列教程之已有项目接入React Native (转载)
- react简书项目学习笔记33react中实现路由功能
- 试着用React写项目-利用react-router解决跳转路由等问题(一)
- 试着用React写项目-利用react-router解决跳转路由等问题(三)
- 试着用React写项目-利用react-router解决跳转路由等问题(三)
- react项目实战(权限模块开发一) 配置路由
- React项目之路由:react-router
- 04-30.eri-test React,反应式微服务,Kubernetes,GraphQL和gRPC-宣布申请-Fullstack教程系列和开源项目...
- 试着用React写项目-利用react-router解决跳转路由等问题(三)