Android自定义控件——自定义属性
2014-09-18 13:02
483 查看
转载请注明出处:http://blog.csdn.net/allen315410/article/details/39343401
我们在自定义android组件的时候,除了用Java构建出组件的样子外,有时候还需要去申明一些“属性”提供给项目使用,那么什么是组件的属性呢?
例如在清单文件中,创建一个TextView的时候,这是需要制定TextView的android:layout_width="wrap_content" android:layout_height="wrap_content"等等这些都是组件的属性,TextView是android系统为我们提供好的组件,它的属性亦是android系统为我们提供了。详情查看android的源码,我这里举例android2.3的源码,路径是
/frameworks/base/core/res/res/values/attrs.xml,这个attrs.xml定义了所有android系统组件的属性。
当我们自定义组件时,除了可以使用android系统为我们提供好的属性之外,还可以自定义属性。自定义属性主要步骤如下:
一、在attrs.xml文件中声明属性,如:
reference 引用
color 颜色
boolean 布尔值
dimension 尺寸值
float 浮点值
integer 整型值
string 字符串
enum 枚举值
二、在布局文件中使用:在使用之前必须声名命名空间,xmlns:example="http://schemas.android.com/apk/res/com.example.mytogglebtn"
说明:xmlns 是XML name space 的缩写;
example 可为任意写符
http://schemas.android.com/apk/res/ 此为android固定格式;
com.example.mytogglebtn 此应用的包名,如manifest配置文件中一致。
布局文件:
三、在代码中对属性进行解析,代码如下:
以上是创建自定义属性的大致步骤。下面,我将要创建一个自定义控件的Demo,来学习学习自定义属性的相关知识点。
首先,需要创建一个自定义控件出来,并且继承View。在工程的res/values文件夹下创建attrs.xml文件:
由于创建出来的自定义组件MyView是继承于View的,所以必须得复写View的构造方法,View中有三个构造方法,先来看看复写带一个参数的构造方法:
09-17 06:52:24.389: E/AndroidRuntime(1563): Caused by: java.lang.NoSuchMethodException: <init> [class android.content.Context, interface android.util.AttributeSet]
表示没有找到某个带两个参数的构造方法,于是,知道自定义属性必须得复写父类的另外一个构造方法,修改如下:
AttributeSet:对布局文件XML解析后的结果,封装为AttributeSet对象。存储的都是原始数据,但是对数据进行了简单的加工。
由此构造器帮我们返回了布局文件XML的解析结果,拿到这个结果,我们该怎么做呢?接下来,我们来看看View类对于这个是怎么处理的:
翻看一下TypeArray的源码会发现,TypeArray是不继承任何类(除了Object)的,也就是说,TypeArray相当于一个工具类,通过context.obtainStyledAttributes方法,将AttributeSet和属性的类型传递进去,比如AttributeSet相当于原材料,属性类型相当于图纸,context.obtainStyledAttributes相当于加工厂加工成所对象的属性,封装到TypeArray这个类里。

以下是TypeArray类里的方法,这里不写注释了,见名知意:
当在构造方法中获取到这些设置好的属性值时,取出其值,就可以在代码中进行处理了。
上篇博客提到了Android自定义控件——仿ios的滑动开关按钮,接下来,就要为这个滑动开关按钮条件自定义的属性,不熟悉上篇博客Demo的,可以先去浏览器一下我的上篇博客,点这里Android自定义控件——仿ios滑动开关按钮
首先,按照上面介绍的步骤,先在res/values目录下创建一个属性文件attrs.xml:
xmlns:mytogglebtn="http://schemas.android.com/apk/res/com.example.slidebutton"
其中:mytogglebtn 是任意取名,没有强制要求,但是在控件中引用属性的时候,要保持一致,不要写错了
com.example.slidebutton 是工程的包名,千万不要弄错了,不然找不到属性文件
从上可以看到,自定义属性其实很简单。就是在构造方法中,将获取到的属性集加工成TypeArray对象,通过这个对象取出属性的id,通过id取出每个属性对应的值(毕竟Android下的布局文件XML也是key-value形式的),最后将获取到的属性值(控件用户自定义的数据)初始化到自定义控件上,这样,一个完整的自定义控件就完成。这种完整的自定义控件方式用的并不多见,因为在开发自定义控件时候,需要什么数据就直接在Java代码里设置就好了,方便多了。但是在特定的场合下,如果开发的控件某些数据不确定,或者所开发控件需要提供给其他人进行偏好设置什么的,这种自定义属性就显得非用不可了。
源码请在这里下载
我们在自定义android组件的时候,除了用Java构建出组件的样子外,有时候还需要去申明一些“属性”提供给项目使用,那么什么是组件的属性呢?
例如在清单文件中,创建一个TextView的时候,这是需要制定TextView的android:layout_width="wrap_content" android:layout_height="wrap_content"等等这些都是组件的属性,TextView是android系统为我们提供好的组件,它的属性亦是android系统为我们提供了。详情查看android的源码,我这里举例android2.3的源码,路径是
/frameworks/base/core/res/res/values/attrs.xml,这个attrs.xml定义了所有android系统组件的属性。
当我们自定义组件时,除了可以使用android系统为我们提供好的属性之外,还可以自定义属性。自定义属性主要步骤如下:
一、在attrs.xml文件中声明属性,如:
<declare-styleable name="MyToggleBtn">            // 声名属性集的名称,即这些属性是属于哪个控件的。
<attr name="current_state" format="boolean"/>   // 声名属性 current_state 格式为 boolean 类型
<attr name="slide_button" format="reference"/>   // 声名属性 slide_button格式为 reference 类型
</declare-styleable>
所有的format类型
reference 引用
color 颜色
boolean 布尔值
dimension 尺寸值
float 浮点值
integer 整型值
string 字符串
enum 枚举值
二、在布局文件中使用:在使用之前必须声名命名空间,xmlns:example="http://schemas.android.com/apk/res/com.example.mytogglebtn"
说明:xmlns 是XML name space 的缩写;
example 可为任意写符
http://schemas.android.com/apk/res/ 此为android固定格式;
com.example.mytogglebtn 此应用的包名,如manifest配置文件中一致。
布局文件:
<com.example.mytogglebtn.MyToggleButton
xmlns:example="http://schemas.android.com/apk/res/com.example.mytogglebtn"
android:layout_width="wrap_content"
android:layout_height="wrap_content"
example:slide_button="@drawable/slide_button" />
三、在代码中对属性进行解析,代码如下:
TypedArray ta = context.obtainStyledAttributes(attrs, R.styleable.MyToggleBtn);// 由attrs 获得 TypeArray
以上是创建自定义属性的大致步骤。下面,我将要创建一个自定义控件的Demo,来学习学习自定义属性的相关知识点。
首先,需要创建一个自定义控件出来,并且继承View。在工程的res/values文件夹下创建attrs.xml文件:
<?xml version="1.0" encoding="utf-8"?>
<resources>

<!-- 声明属性级的名称 -->
<declare-styleable name="MyView">

<!-- 声明一个属性,整型 -->
<attr name="test_id" format="integer" />
<!-- 声明一个属性,字符串 -->
<attr name="test_msg" format="string" />
<!-- 声明一个属性,引用,引用资源id -->
<attr name="test_bitmap" format="reference" />
</declare-styleable>

</resources>
然后在布局文件中,引用这个自定义控件MyView
<RelativeLayout xmlns:android="http://schemas.android.com/apk/res/android"
xmlns:tools="http://schemas.android.com/tools"
xmlns:example="http://schemas.android.com/apk/res/com.example.myattrs"
android:layout_width="match_parent"
android:layout_height="match_parent" >

<com.example.myattrs.MyView
android:layout_width="wrap_content"
android:layout_height="wrap_content"
android:layout_centerInParent="true"
example:test_bitmap="@drawable/ic_launcher"
example:test_msg="@string/app_name" />

</RelativeLayout>
由于创建出来的自定义组件MyView是继承于View的,所以必须得复写View的构造方法,View中有三个构造方法,先来看看复写带一个参数的构造方法:
package com.example.myattrs;

import android.content.Context;
import android.view.View;

public class MyView extends View {

public MyView(Context context) {
super(context);
// TODO Auto-generated constructor stub
}
}运行一下工程,那么工程立即崩溃了,报错也很清晰明了:09-17 06:52:24.389: E/AndroidRuntime(1563): Caused by: java.lang.NoSuchMethodException: <init> [class android.content.Context, interface android.util.AttributeSet]
表示没有找到某个带两个参数的构造方法,于是,知道自定义属性必须得复写父类的另外一个构造方法,修改如下:
package com.example.myattrs;
import android.content.Context;
import android.util.AttributeSet;
import android.view.View;
public class MyView extends View {
public MyView(Context context, AttributeSet attrs) {
super(context, attrs);
int count = attrs.getAttributeCount();
for (int index = 0; index < count; index++) {
String attributeName = attrs.getAttributeName(index);
String attributeValue = attrs.getAttributeValue(index);
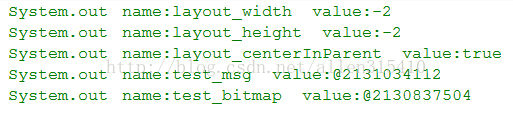
System.out.println("name:" + attributeName + " value:" + attributeValue);
}
}
}打印结果如下:AttributeSet:对布局文件XML解析后的结果,封装为AttributeSet对象。存储的都是原始数据,但是对数据进行了简单的加工。
由此构造器帮我们返回了布局文件XML的解析结果,拿到这个结果,我们该怎么做呢?接下来,我们来看看View类对于这个是怎么处理的:
public View(Context context, AttributeSet attrs) {
this(context, attrs, 0);
}
public View(Context context, AttributeSet attrs, int defStyle) {
this(context);
TypedArray a = context.obtainStyledAttributes(attrs, com.android.internal.R.styleable.View,
defStyle, 0);于是,找到一个跟属性很相关的类TypeArray,那么接下来,我在自定义控件的构造方法上也获取一下TypeArray这个类:翻看一下TypeArray的源码会发现,TypeArray是不继承任何类(除了Object)的,也就是说,TypeArray相当于一个工具类,通过context.obtainStyledAttributes方法,将AttributeSet和属性的类型传递进去,比如AttributeSet相当于原材料,属性类型相当于图纸,context.obtainStyledAttributes相当于加工厂加工成所对象的属性,封装到TypeArray这个类里。
package com.example.myattrs;
import android.content.Context;
import android.content.res.TypedArray;
import android.util.AttributeSet;
import android.view.View;
public class MyView extends View {
public MyView(Context context, AttributeSet attrs) {
super(context, attrs);
TypedArray ta = context.obtainStyledAttributes(attrs, R.styleable.MyView);
int count = ta.getIndexCount();
for (int i = 0; i < count; i++) {
int itemId = ta.getIndex(i);
System.out.println("itemId::" + itemId); // 获取属性在R.java文件中的id
switch (itemId) {
case R.styleable.MyView_test_bitmap:
int bitmapId = ta.getResourceId(itemId, 100);
System.out.println("bitmapId::" + bitmapId);
break;
case R.styleable.MyView_test_id:
int test_id = ta.getInteger(itemId, 10);
System.out.println("test_id" + test_id);
break;
case R.styleable.MyView_test_msg:
String test_msg = ta.getString(itemId);
System.out.println("test_msg::" + test_msg);
break;
default:
break;
}
}
}
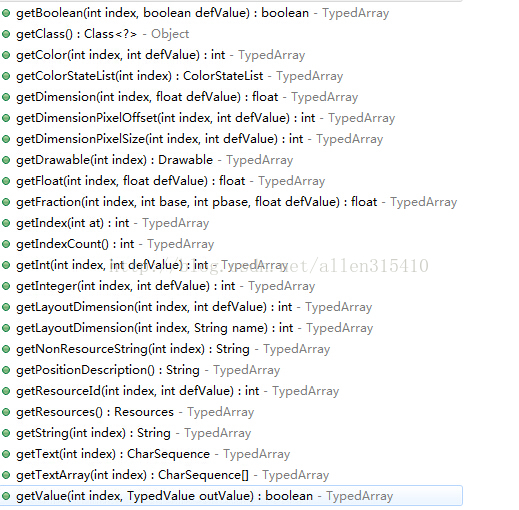
}以下是TypeArray类里的方法,这里不写注释了,见名知意:
当在构造方法中获取到这些设置好的属性值时,取出其值,就可以在代码中进行处理了。
上篇博客提到了Android自定义控件——仿ios的滑动开关按钮,接下来,就要为这个滑动开关按钮条件自定义的属性,不熟悉上篇博客Demo的,可以先去浏览器一下我的上篇博客,点这里Android自定义控件——仿ios滑动开关按钮
首先,按照上面介绍的步骤,先在res/values目录下创建一个属性文件attrs.xml:
<?xml version="1.0" encoding="utf-8"?>
<resources>

<declare-styleable name="MyToggleBtn">

<!-- 滑动按钮背景图片 -->
<attr name="switchBG" format="reference" />
<!-- 滑动块图片 -->
<attr name="slideBg" format="reference" />
<!-- 设置当前的状态 -->
<attr name="currState" format="boolean" />
</declare-styleable>

</resources>
然后,在引用自定义控件的布局文件acticity_main.xml上设置自定义属性,记住,引用这些属性之前,必须先引用命名空间:
xmlns:mytogglebtn="http://schemas.android.com/apk/res/com.example.slidebutton"
其中:mytogglebtn 是任意取名,没有强制要求,但是在控件中引用属性的时候,要保持一致,不要写错了
com.example.slidebutton 是工程的包名,千万不要弄错了,不然找不到属性文件
<RelativeLayout xmlns:android="http://schemas.android.com/apk/res/android"
xmlns:tools="http://schemas.android.com/tools"
xmlns:mytogglebtn="http://schemas.android.com/apk/res/com.example.slidebutton"
android:layout_width="match_parent"
android:layout_height="match_parent" >

<com.example.slidebutton.view.SlideButton
android:id="@+id/slidebutton"
android:layout_width="wrap_content"
android:layout_height="wrap_content"
android:layout_centerInParent="true"
mytogglebtn:currState="false"
mytogglebtn:slideBg="@drawable/slide_button_background"
mytogglebtn:switchBG="@drawable/switch_background" />

</RelativeLayout>
有了上面的步骤,我们就可以自定义组件类的构造方法中,将属性集解析成TypeArray了,从TypeArray中获取相关的属性值,并用于初始化自定义控,以下是主要代码:
public SlideButton(Context context, AttributeSet attrs) {
super(context, attrs);

// 获得自定义属性
TypedArray ta = context.obtainStyledAttributes(attrs, R.styleable.MyToggleBtn);

int count = ta.getIndexCount();
for (int i = 0; i < count; i++) {
int itemId = ta.getIndex(i); // 获取某个属性的Id值
switch (itemId) {
case R.styleable.MyToggleBtn_currState: // 设置当前按钮的状态
currentState = ta.getBoolean(itemId, false);
break;
case R.styleable.MyToggleBtn_switchBG: // 设置按钮的背景图
int backgroundId = ta.getResourceId(itemId, -1);
if (backgroundId == -1)
throw new RuntimeException("资源没有被找到,请设置背景图");
switchBG = BitmapFactory.decodeResource(getResources(), backgroundId);
break;
case R.styleable.MyToggleBtn_slideBg: // 设置按钮图片
int slideId = ta.getResourceId(itemId, -1);
if (slideId == -1)
throw new RuntimeException("资源没有找到,请设置按钮图片");
slideButtonBG = BitmapFactory.decodeResource(getResources(), slideId);
break;
default:
break;
}
}
}
从上可以看到,自定义属性其实很简单。就是在构造方法中,将获取到的属性集加工成TypeArray对象,通过这个对象取出属性的id,通过id取出每个属性对应的值(毕竟Android下的布局文件XML也是key-value形式的),最后将获取到的属性值(控件用户自定义的数据)初始化到自定义控件上,这样,一个完整的自定义控件就完成。这种完整的自定义控件方式用的并不多见,因为在开发自定义控件时候,需要什么数据就直接在Java代码里设置就好了,方便多了。但是在特定的场合下,如果开发的控件某些数据不确定,或者所开发控件需要提供给其他人进行偏好设置什么的,这种自定义属性就显得非用不可了。
源码请在这里下载

相关文章推荐
- Android自定义控件以及控件属性的自定义
- 【转】Android自定义控件中自定义属性的处理方式
- Android自定义控件并且使其可以在xml中自定义属性
- Android UI 之一步步教你自定义控件(自定义属性、合理设计onMeasure、合理设计onDraw等)
- Android自定义控件 自定义属性
- Android 自定义控件属性,自定义Dialog定位
- android 自定义控件,自定义属性设置
- Android自定义控件:如何使用自定义的XML属性
- Android 自定义控件属性,自定义Dialog定位
- Android自定义控件系列四:自定义开关按钮(三)--- 自定义属性
- android的自定义控件及自定义属性 - 相当有用呢
- android 自定义控件 自定义属性详细介绍
- Android UI 之一步步教你自定义控件(自定义属性、合理设计onMeasure、合理设计onDraw等)
- 【android自定义控件】自定义View属性
- Android自定义控件以及控件属性的自定义
- android 自定义View研究(二) — 自定义控件添加属性
- Android UI 之一步步教你自定义控件(自定义属性、合理设计onMeasure、合理设计onDraw等)
- android 自定义控件 自定义属性 自定义Style详细介绍
- Android 自定义控件属性,自定义Dialog定位
- android 自定义控件 自定义属性详细介绍