互动媒体技术——《代码本色》习作五:粒子系统
2020-01-12 15:35
302 查看
1.概念介绍
2.参考案例
3.个人作品
一、概念介绍
- 简介:粒子系统表示三维计算机图形学中模拟一些特定的模糊现象的技术,而这些现象用其它传统的渲染技术难以实现的真实感的 game physics。经常使用粒子系统模拟的现象有火、爆炸、烟、水流、火花、落叶、云、雾、雪、尘、流星尾迹或者象发光轨迹这样的抽象视觉效果等等。
- 原理:很多细小的粒子从发射器中以一定的初速度和加速度进行向外发射。达到一定的生命周期时,会自己消失。而在整个粒子系统中,还有很多新的粒子会不断地产生。
二、参考案例
1.案例一:受力作用的粒子系统- 简介
应用运动遵循牛顿第二定律原则F=M*A,同时将力的累加算法作用在粒子上,实现更好的模拟框架 - 实现步骤
1.建立单个粒子类:初始化粒子速度,加速度,绘制粒子,更新位置
2.建立粒子系统类:初始化粒子系统,添加力,绘制粒子系统。
3.实现添加力的函数(思想是将力作用在粒子系统上,系统再将力作用在每个粒子上) - 代码展示
import java.util.Iterator;
//粒子系统
ParticleSystem ps;
//排斥对象
//Repeller repeller;
void setup() {
size(400,400);
smooth();
ps=new ParticleSystem(new PVector(width/2,50));
}
void draw(){
background(0);
PVector gravity =new PVector(0,0.1);
ps.applyForce(gravity);
ps.addParticles();
ps.run();
}
//*******************************粒子系统类******************************
class ParticleSystem {
ArrayList<Particle>particles;
PVector origin;//粒子发射的起点
//构造函数
ParticleSystem(PVector location){
origin=location.get();
particles=new ArrayList<Particle>();
}
//添加粒子
void addParticles(){
particles.add(new Particle(origin));
}
//增加力:这里是通过把力作用在粒子系统上,再通过粒子系统把力作用在所有的粒子上实现的
void applyForce(PVector f){
for(Particle p:particles){
p.applyForce(f);
}
}
//绘制粒子系统
//注意:再这里不能使用改进型的for循环,因为要在遍历过程中删除元素
void run(){
//迭代器
Iterator<Particle> it =particles.iterator();
while(it.hasNext()){
Particle p=(Particle)it.next();
p.run();
if(p.isDead()){
it.remove();
}
}
}
}
//************************************粒子类*****************************
class Particle {
PVector location;//位置
PVector velocity;//速度
PVector acceleration;//加速度
float lifespan;//生命周期
float mass=1;//改变加速度
//构造函数
Particle(PVector L) {
acceleration =new PVector(0, 0);//初始加速度从0开始
velocity=new PVector(random(-1, 1), random(-2, 0));
location=L.get();
lifespan=255.0;
}
void run() {
update();
display();
}
//添加力
void applyForce(PVector force) {
PVector f =force.get();//先取出,否则会对内部进行修改
f.div(mass);
acceleration.add(f);
}
//更新粒子的位置
void update() {
velocity.add(acceleration);
location.add(velocity);
acceleration.mult(0);
lifespan-=2.0;
}
//绘制粒子
void display() {
stroke(255, lifespan);
fill(255, lifespan);
ellipse(location.x, location.y, 8, 8);
}
boolean isDead() {
if (lifespan< 0.0){
return true;
}else{
return false;
}
}
}
- 效果展示
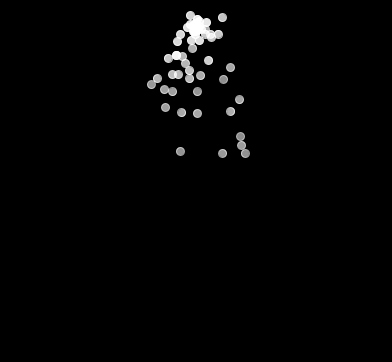
- 简介
在同一个发射器中,发射出不同的粒子,有各种形状,不同大小,不同颜色。 - 思路
用多态实现粒子系统。使得新的粒子继承原始粒子,重新display(绘制粒子)的函数,最后通过父类引用指向子类对象进行函数的调用。力的作用和使用到的公式同上一个案例

- 拓展
原始案例中没有对每一个粒子的大小形状做出改变。在这里可以使用random函数随机生成粒子的大小和形状。同时将一个粒子系统拓展为多个粒子系统。粒子系统的位置也随机指定。同时加入鼠标的交互,点击鼠标时,改变粒子系统的位置。 - 代码展示
import java.util.Iterator;
//粒子系统
ParticleSystem[] ps=new ParticleSystem[5];
void setup() {
size(800, 400);
smooth();
for (int i=0; i<5; i++) {
ps[i]=new ParticleSystem(new PVector(random(100, width), random(0, 200)));
}
}
void draw() {
background(0);
PVector gravity =new PVector(0, 0.1);
for (int i=0; i<5; i++) {
ps[i].applyForce(gravity);
ps[i].addParticles();
ps[i].run();
}
}

void mouseClicked(){
for (int i=0; i<5; i++) {
ps[i]=new ParticleSystem(new PVector(random(100, width), random(0, 200)));
}
}
//************************************粒子类*****************************
class Particle {
PVector location;//位置
PVector velocity;//速度
PVector acceleration;//加速度
float lifespan;//生命周期
float mass=1;//改变加速度
//构造函数
Particle(PVector L) {
acceleration =new PVector(0, 0);//初始加速度从0开始
velocity=new PVector(random(-1, 1), random(-2, 0));
location=L.get();
lifespan=255.0;
}
void run() {
update();
display();
}
//添加力
void applyForce(PVector force) {
PVector f =force.get();//先取出,否则会对内部进行修改
f.div(mass);
acceleration.add(f);
}
//更新粒子的位置
void update() {
velocity.add(acceleration);
location.add(velocity);
acceleration.mult(0);
lifespan-=2.0;
}
//绘制粒子
void display() {
stroke(random(125, 255), random(215, 255), random(0, 255), lifespan);
fill(random(0, 255), random(0, 255), random(0, 255), lifespan);
ellipse(location.x, location.y, random(0.5, 15), random(0.5, 15));
}
boolean isDead() {
if (lifespan< 0.0) {
return true;
} else {
return false;
}
}
}
//创建粒子类的子类
class Confetti extends Particle {
Confetti(PVector L) {
super(L);
}
//覆盖display方法
void display() {
float theta=map(location.x, 0, width, 0, TWO_PI*2);
rectMode(CENTER);
fill(random(0, 255), random(0, 255), random(0, 255), lifespan);
stroke(random(0, 255), random(0, 255), random(0, 255), lifespan);
rect(location.x, location.y, random(0.5, 15), random(0.5, 15));
}
}
//*******************************粒子系统类******************************
class ParticleSystem {
ArrayList<Particle>particles;
PVector origin;//粒子发射的起点
//构造函数
ParticleSystem(PVector location) {
origin=location.get();
particles=new ArrayList<Particle>();
}
//添加粒子
void addParticles() {
float r=random(1);
if (r<0.5) {
particles.add(new Particle(origin));
} else {
particles.add(new Confetti(origin));
}
}
//增加力:这里是通过把力作用在粒子系统上,再通过粒子系统把力作用在所有的粒子上实现的
void applyForce(PVector f) {
for (Particle p : particles) {
p.applyForce(f);
}
}
//绘制粒子系统
//注意:再这里不能使用改进型的for循环,因为要在遍历过程中删除元素
void run() {
//迭代器
Iterator<Particle> it =particles.iterator();
while (it.hasNext()) {
Particle p=it.next();
p.run();
if (p.isDead()) {
it.remove();
}
}
}
}
- 效果展示

三、个人作品
作品一:飞舞的泡泡
- 简介
该作品用利用图像纹理来模拟泡泡在空中的飘动,同时也模拟火焰的效果。可以在两种效果之间进行切换 - 步骤
1.导入图片:使用Pimage
2.为泡泡的漂浮设计规则:泡泡受到重力,浮力,空气阻力。但是整体有一个向上升的趋势。因此浮力大于空气阻力加重力。而在这里为了简化,可以把三个力合成为一个力,通过添加到粒子系统上进而添加给粒子系统中的每一个粒子。同时,泡泡也会收到风力的作用,而这里为了实现交互的话,将风力的方向与鼠标的位置关联在一起,可以实现鼠标所在之处,为泡泡所漂浮的方向。
重力:F=m*g
浮力:F浮=ρgV
阻力:f=umg

3.为火焰设计规则:火焰的话在泡泡的基础上减少一个空气阻力 - 类的设计

- 代码展示
//图像纹理
PImage img;
import java.util.Iterator;
//粒子系统
ParticleSystem ps;
boolean flag=false;
void setup() {
size(800, 400);
smooth();
ps=new ParticleSystem(new PVector(width/2, height));
img=loadImage("pao2.png");
}
void draw() {
background(0);
float dx=map(mouseX, 0, width, -0.2, 0.2);
PVector wind=new PVector(dx, 0);
PVector buoyancy=new PVector(0, random(-0.2, 0.2));
if(!flag)ps.applyForce(buoyancy);
ps.applyForce(wind);
ps.run();
ps.addParticles();
}
void mouseClicked() {
if (!flag) {
flag=true;
img=loadImage("fire5.png");
} else {
img=loadImage("pao2.png");
flag=false;
}
}
//*******************************粒子系统类******************************
class ParticleSystem {
ArrayList<Particle>particles;
PVector origin;//粒子发射的起点
//构造函数
ParticleSystem(PVector location) {
origin=location.get();
particles=new ArrayList<Particle>();
}
//添加粒子
void addParticles() {
particles.add(new Particle(origin));
}
//增加力:这里是通过把力作用在粒子系统上,再通过粒子系统把力作用在所有的粒子上实现的
void applyForce(PVector f) {
for (Particle p : particles) {
p.applyForce(f);
}
}
//绘制粒子系统
//注意:再这里不能使用改进型的for循环,因为要在遍历过程中删除元素
void run() {
//迭代器
Iterator<Particle> it =particles.iterator();
while (it.hasNext()) {
Particle p=(Particle)it.next();
p.run();
if (p.isDead()) {
it.remove();
}
}
}
}
//************************************粒子类*****************************
class Particle {
PVector location;//位置
PVector velocity;//速度
PVector acceleration;//加速度
float lifespan;//生命周期
float mass=1;//改变加速度
//构造函数
Particle(PVector L) {
acceleration =new PVector(0, 0);//初始加速度从0开始
velocity=new PVector(random(-1, 1), random(-8, 0));
location=L.get();
lifespan=255.0;
}
void run() {
update();
display();
}
//添加力
void applyForce(PVector force) {
PVector f =force.get();//先取出,否则会对内部进行修改
f.div(mass);
acceleration.add(f);
}
//更新粒子的位置
void update() {
velocity.add(acceleration);
location.add(velocity);
acceleration.mult(0);
lifespan-=2.0;
}
//绘制粒子
void display() {
//stroke(255, lifespan);
//fill(255, lifespan);
//ellipse(location.x, location.y, 8, 8);
render();
}
void render() {
imageMode(CENTER);
tint(255, lifespan);
image(img, location.x, location.y);
}
boolean isDead() {
if (lifespan< 0.0) {
return true;
} else {
return false;
}
}
}
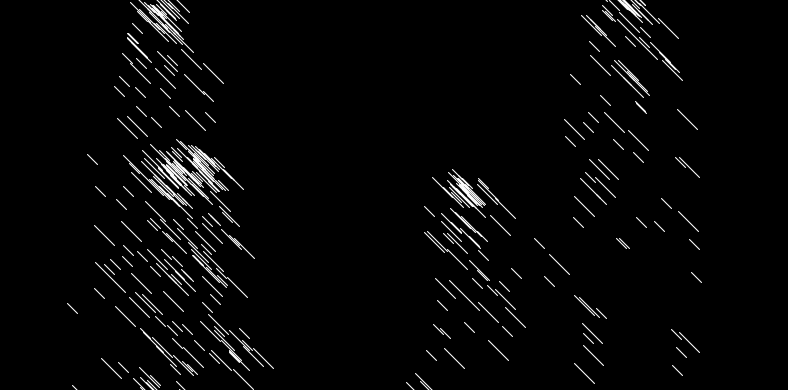
- 效果展示

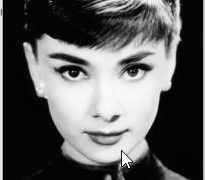
作品二:破碎的人像
- 简介
鼠标互动可以切换图片,点击鼠标后所有的小方格将会破碎,并因重力作用而向下坠落。单个粒子是由rect构成,rect的参数由粒子系统进行传递,传递的是rgb的值,单个粒子的大小可以根据实际进行调整:如果希望看起来像马赛克效果,可以增加rect的大小,这里我将rect的大小设置为了1 - 效果展示
- 代码展示(核心)
ParticleSystem ps;
PImage photo;
int index=1;//当前的图片序号
String pic[]={"heben.jpg","heben1.jpg","heben2.jpg","heben3.jpg"};
void setup() {
size(200, 200);
photo = loadImage("heben.jpg");
photo.loadPixels();
ps = new ParticleSystem(0, 0, 1, photo);
}

void draw() {
background(0);
ps.display();
ps.update();
}
void mouseClicked() {
ps.shatter();
}
void mouseWheel(){
if(index==4){
index=0;
}
photo = loadImage(pic[index]);
photo.loadPixels();
ps = new ParticleSystem(0, 0, 1, photo);
index++;

}
- 点赞
- 收藏
- 分享
- 文章举报
 不会跳舞的程序媛
发布了24 篇原创文章 · 获赞 2 · 访问量 2436
私信
关注
不会跳舞的程序媛
发布了24 篇原创文章 · 获赞 2 · 访问量 2436
私信
关注

相关文章推荐
- 互动媒体技术课程作业3 《代码本色》编程练习
- 互动媒体技术——五个小习作导航博客
- 【互动媒体技术】互动编程习作1——表现随机行为及牛顿运动学
- 互动媒体技术作业——processing码绘
- 多视角交叉认知(互动媒体技术作业)
- 互动媒体-绘画系统
- J2ME 3D粒子系统技术(3)爆炸粒子系统例子
- 十二个“一”,十二台手机(互动媒体技术作业)
- 【互动媒体习作】创意编程作业——导航
- 【互动媒体技术】十二个待选拔的“一”
- 一起谈.NET技术,Silverlight 2.5D RPG游戏技巧与特效处理:(九)粒子系统
- 【互动媒体技术】艺工交叉 作业1 实验数据分析 数据分析
- DirectX 3D_基础之粒子系统 广告牌技术 粒子和点精灵 点精灵的结构 点精灵的绘制状态 粒子及其属性
- Silverlight 2.5D RPG游戏技“.NET技术”巧与特效处理:(九)粒子系统
- 互动媒体技术,代码本色0-4
- 【互动媒体技术】艺工交叉作业1 实验数据分析 文献综述
- J2ME 3D粒子系统技术(1)概要介绍
- 【互动媒体技术】有关十二个“一”的文艺创作-拓展
- !!!系统架构好文!!!-天猫双11晚会和狂欢城的互动技术方案
- 【互动媒体技术】《你能“行”吗》问卷测试心得