【TensorFlow系列】【一】利用TFRecordDataset读取图片数据
2018-03-17 00:00
766 查看
本文转自个人微信公众号,主要讲述如下三个问题:
如何将原始图片数据与label转化为TFRecords格式的数据?
如何利用TFRecordDataset读取TFRecords格式的数据?
如何从TFRecordDataset中获取数据进行NN训练?
整体思路为:
jpg---->train.tfrecords----->dataset------>NN
【一】TFReocrd综述
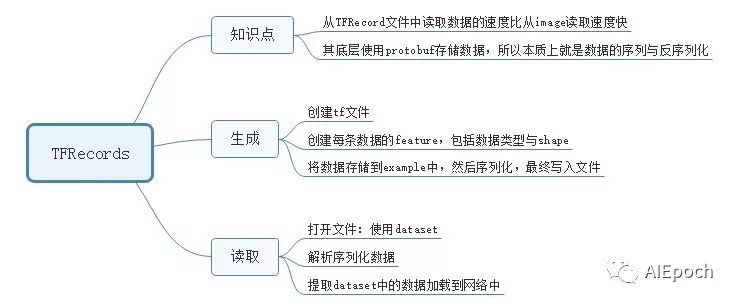
【二】生成TFRecords文件
【三】解析TFrecord文件
【四】利用TFRecordDataset读取数据并进行NN训练
此处,依旧以LeNet为例。


如何将原始图片数据与label转化为TFRecords格式的数据?
如何利用TFRecordDataset读取TFRecords格式的数据?
如何从TFRecordDataset中获取数据进行NN训练?
整体思路为:
jpg---->train.tfrecords----->dataset------>NN
【一】TFReocrd综述
【二】生成TFRecords文件
def image2tfrecord(image_list,label_list):
len2 = len(image_list)
print("len=",len2)
writer = tf.python_io.TFRecordWriter("train.tfrecords")
for i in range(len2):
#读取图片并解码
image = Image.open(image_list[i])
image = image.resize((28,28))
#转化为原始字节
image_bytes = image.tobytes()
#创建字典
features = {}
#用bytes来存储image
features['image'] = tf.train.Feature(bytes_list=tf.train.BytesList(value=[image_bytes]))
# 用int64来表达label
features['label'] = tf.train.Feature(int64_list=tf.train.Int64List(value=[int(label_list[i])]))
#将所有的feature合成features
tf_features = tf.train.Features(feature=features)
#转成example
tf_example = tf.train.Example(features=tf_features)
#序列化样本
tf_serialized = tf_example.SerializeToString()
#将序列化的样本写入rfrecord
writer.write(tf_serialized)
writer.close()
【三】解析TFrecord文件
定义解析数据函数
#入参example_proto也就是tf_serialized
def pares_tf(example_proto):
#定义解析的字典
dics = {}
dics['label'] = tf.FixedLenFeature(shape=[],dtype=tf.int64)
dics['image'] = tf.FixedLenFeature(shape=[],dtype=tf.string)
#调用接口解析一行样本
parsed_example = tf.parse_single_example(serialized=example_proto,features=dics)
image = tf.decode_raw(parsed_example['image'],out_type=tf.uint8)
image = tf.reshape(image,shape=[28*28])
#这里对图像数据做归一化,是关键,没有这句话,精度不收敛,为0.1左右,
# 有了这里的归一化处理,精度与原始数据一致
image = tf.cast(image,tf.float32)*(1./255)-0.5
label = parsed_example['label']
label = tf.cast(label,tf.int32)
label = tf.one_hot(label, depth=10, on_value=1)
return image,label
【四】利用TFRecordDataset读取数据并进行NN训练
此处,依旧以LeNet为例。
import tensorflow as tf
from PIL import Image
def paths2list(path_file_name):
list = []
for line in open(path_file_name):
list.append(line[0:len(line)-1])
return list
def pathslabel2list(path_file_name):
list = []
for line in open(path_file_name):
#存储是label是string格式,这里需要强转一下
list.append(int(line[0:len(line)-1]))
return list
def one_hot_2_int(one_hot):
for i in range(10):
if one_hot[i] == 1:
return i
else:
continue
return 0
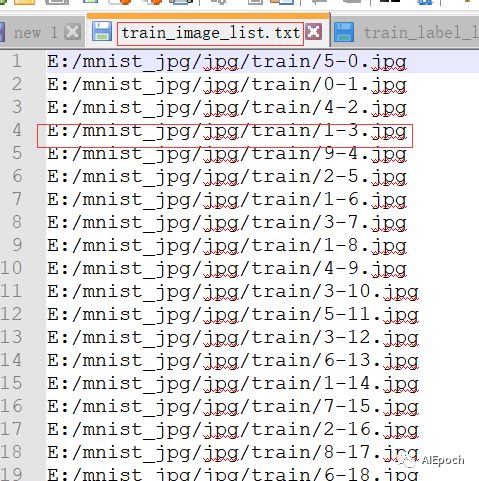
train_image_list = paths2
7fe0
list(r"E:\mnist_jpg\jpg\train\train_image_list.txt")
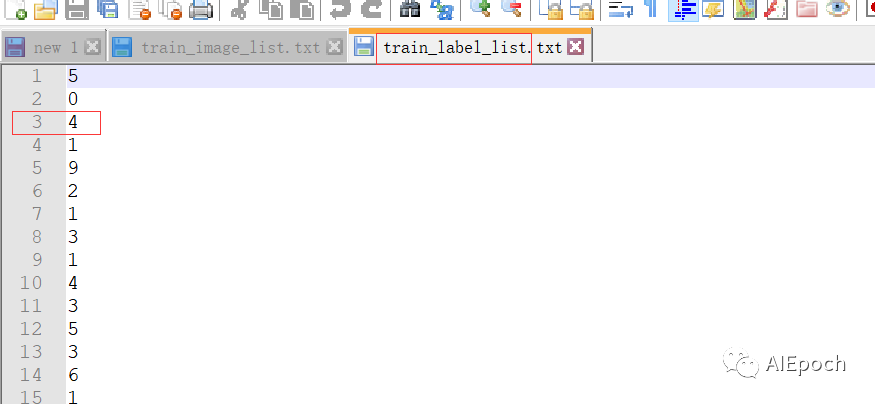
train_image_label_list = pathslabel2list(r"E:\mnist_jpg\jpg\train\train_label_list.txt")
#定义创建TFRcord的文件
def image2tfrecord(image_list,label_list): len2 = len(image_list) print("len=",len2) writer = tf.python_io.TFRecordWriter("train.tfrecords") for i in range(len2): #读取图片并解码 image = Image.open(image_list[i]) image = image.resize((28,28)) #转化为原始字节 image_bytes = image.tobytes() #创建字典 features = {} #用bytes来存储image features['image'] = tf.train.Feature(bytes_list=tf.train.BytesList(value=[image_bytes])) # 用int64来表达label features['label'] = tf.train.Feature(int64_list=tf.train.Int64List(value=[int(label_list[i])])) #将所有的feature合成features tf_features = tf.train.Features(feature=features) #转成example tf_example = tf.train.Example(features=tf_features) #序列化样本 tf_serialized = tf_example.SerializeToString() #将序列化的样本写入rfrecord writer.write(tf_serialized) writer.close()
#调用上述接口,将image与label数据转化为tfrecord格式的数据
image2tfrecord(train_image_list,train_image_label_list)
#定义解析数据函数 #入参example_proto也就是tf_serialized def pares_tf(example_proto): #定义解析的字典 dics = {} dics['label'] = tf.FixedLenFeature(shape=[],dtype=tf.int64) dics['image'] = tf.FixedLenFeature(shape=[],dtype=tf.string) #调用接口解析一行样本 parsed_example = tf.parse_single_example(serialized=example_proto,features=dics) image = tf.decode_raw(parsed_example['image'],out_type=tf.uint8) image = tf.reshape(image,shape=[28*28]) #这里对图像数据做归一化,是关键,没有这句话,精度不收敛,为0.1左右, # 有了这里的归一化处理,精度与原始数据一致 image = tf.cast(image,tf.float32)*(1./255)-0.5 label = parsed_example['label'] label = tf.cast(label,tf.int32) label = tf.one_hot(label, depth=10, on_value=1) return image,label
dataset = tf.data.TFRecordDataset(filenames=['train.tfrecords'])
dataset = dataset.map(pares_tf)
dataset = dataset.batch(32).repeat(1)
iterator = dataset.make_one_shot_iterator()
next_element = iterator.get_next()
#定义输入数据mnist图片大小28*28*1=784,None表示batch_size
x = tf.placeholder(dtype=tf.float32,shape=[None,28*28],name="x")
#定义标签数据,mnist共10类
y_ = tf.placeholder(dtype=tf.float32,shape=[None,10],name="y_")
#将数据调整为二维数据,w*H*c---> 28*28*1,-1表示N张
image = tf.reshape(x,shape=[-1,28,28,1])
#第一层,卷积核={5*5*1*32},池化核={2*2*1,1*2*2*1}
w1 = tf.Variable(initial_value=tf.random_normal(shape=[5,5,1,32],stddev=0.1,dtype=tf.float32,name="w1"))
b1= tf.Variable(initial_value=tf.zeros(shape=[32]))
conv1 = tf.nn.conv2d(input=image,filter=w1,strides=[1,1,1,1],padding="SAME",name="conv1")
relu1 = tf.nn.relu(tf.nn.bias_add(conv1,b1),name="relu1")
pool1 = tf.nn.max_pool(value=relu1,ksize=[1,2,2,1],strides=[1,2,2,1],padding="SAME")
#shape={None,14,14,32}
#第二层,卷积核={5*5*32*64},池化核={2*2*1,1*2*2*1}
w2 = tf.Variable(initial_value=tf.random_normal(shape=[5,5,32,64],stddev=0.1,dtype=tf.float32,name="w2"))
b2 = tf.Variable(initial_value=tf.zeros(shape=[64]))
conv2 = tf.nn.conv2d(input=pool1,filter=w2,strides=[1,1,1,1],padding="SAME")
relu2 = tf.nn.relu(tf.nn.bias_add(conv2,b2),name="relu2")
pool2 = tf.nn.max_pool(value=relu2,ksize=[1,2,2,1],strides=[1,2,2,1],padding="SAME",name="pool2")
#shape={None,7,7,64}
#FC1
w3 = tf.Variable(initial_value=tf.random_normal(shape=[7*7*64,1024],stddev=0.1,dtype=tf.float32,name="w3"))
b3 = tf.Variable(initial_value=tf.zeros(shape=[1024]))
#关键,进行reshape
input3 = tf.reshape(pool2,shape=[-1,7*7*64],name="input3")
fc1 = tf.nn.relu(tf.nn.bias_add(value=tf.matmul(input3,w3),bias=b3))
#shape={None,1024}
#FC2
w4 = tf.Variable(initial_value=tf.random_normal(shape=[1024,10],stddev=0.1,dtype=tf.float32,name="w4"))
b4 = tf.Variable(initial_value=tf.zeros(shape=[10]))
fc2 = tf.nn.bias_add(value=tf.matmul(fc1,w4),bias=b4)
#shape={None,10}
#定义交叉熵损失
# 使用softmax将NN计算输出值表示为概率
y = tf.nn.softmax(fc2)
# 定义交叉熵损失函数
cross_entropy = tf.reduce_mean(-tf.reduce_sum(y_ * tf.log(y)))
#定义solver
train = tf.train.AdamOptimizer(learning_rate=0.0001).minimize(loss=cross_entropy)
#定义正确值,判断二者下表index是否相等
correct_predict = tf.equal(tf.argmax(y,1),tf.argmax(y_,1))
#定义如何计算准确率
accuracy = tf.reduce_mean(tf.cast(correct_predict,dtype=tf.float32),name="accuracy")
#定义初始化op
init = tf.global_variables_initializer()
with tf.Session() as sess:
print("start")
sess.run(fetches=init)
i = 0
try:
while True:
#通过session每次从数据集中取值
image,label= sess.run(fetches=next_element)
sess.run(fetches=train, feed_dict={x: image, y_: label})
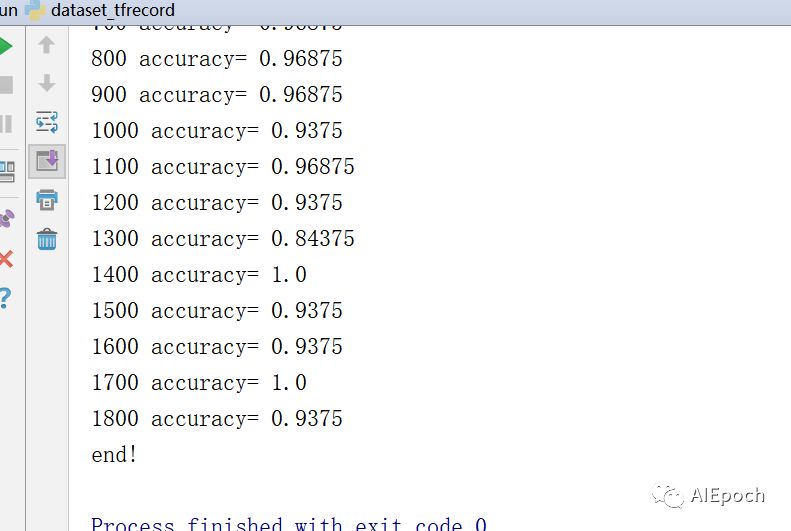
if i % 100 == 0:
train_accuracy = sess.run(fetches=accuracy, feed_dict={x: image, y_: label})
print(i, "accuracy=", train_accuracy)
i = i + 1
except tf.errors.OutOfRangeError:
print("end!")
数据来源如下图:
训练结果如下图:
【五】总结
1.图片数据进行与处理时,一定要归一化,即将0-255处理到0-1
2.TFRcord文件的生成与读取,原理就是序列化与反序列化的过程,名字、类型对上即可。
3.TFRcord可以保存多个feature,只解析其中感兴趣的部分。
4.使用TFRecordDataset读取数据,其底层封装了多线程,队列等操作,简单、便捷。
5.使用dataset读取数据,不用修改网络,只需要将数据送入网络中用placeholder代替的输入与标签数据即可。
6.尽量将原始数据转化为TFRecord格式的数据,并用dataset进行读取。速度快、方便、简单。

相关文章推荐
- [TFRecord格式数据]利用TFRecords存储与读取带标签的图片
- tensorflow读取数据-tfrecord格式
- TensorFlow全新的数据读取方式:Dataset API——tf.data.Dataset
- Tensorflow中使用tfrecord方式读取数据的方法
- TensorFlow入门(十-III)tfrecord 图片数据 读写
- tensorflow读取数据-tfrecord格式
- Tensorflow中使用tfrecord方式读取数据
- TensorFlow学习记录-- 7.TensorFlow高效读取数据之tfrecord详细解读
- TensorFlow高效读取数据——TFRecord
- tensorflow入门:TFRecordDataset变长数据的batch读取
- Tensorflow读取数据2-tfrecord
- 利用tensorflow训练自己的图片数据(5)——测试训练网络
- 利用tensorflow训练自己的图片数据(2)——输入图片处理
- TensorFlow全新的数据读取方式:Dataset API入门教程
- TensorFlow 学习(二) 制作自己的TFRecord数据集,读取,显示及代码详解
- TensorFlow 制作自己的TFRecord数据集
- tensorflow 读取图片数据---读本地图片
- tensorflow实战系列(二)TFRecordReader
- How to transform our data into TFRecord(怎样将自己的图片数据转换成TF的格式)
- TFRecord —— tensorflow 下的统一数据存储格式