利用tensorflow训练自己的图片数据(5)——测试训练网络
2017-11-24 16:57
761 查看
一.说明
上一篇博客中,我们已经将建立好的网络模型训练好了,并将训练的网络参数保存在相应的文件中;下面我们就开始测试网络,验证网络的训练效果;本次测试为随机的单图片测试,即随机的从训练集或测试集中读取一张图片,送入到神经网络中进行识别,打印识别率及识别的图像。二. 编程实现
#=============================================================================
from PIL import Image
import numpy as np
import tensorflow as tf
import matplotlib.pyplot as plt
import model
from input_data import get_files

#=======================================================================
#获取一张图片
def get_one_image(train):
#输入参数:train,训练图片的路径
#返回参数:image,从训练图片中随机抽取一张图片
n = len(train)
ind = np.random.randint(0, n)
img_dir = train[ind]   #随机选择测试的图片

img = Image.open(img_dir)
plt.imshow(img)
imag = img.resize([64, 64])  #由于图片在预处理阶段以及resize,因此该命令可略
image = np.array(imag)
return image

#--------------------------------------------------------------------
#测试图片
def evaluate_one_image(image_array):
with tf.Graph().as_default():
BATCH_SIZE = 1
N_CLASSES = 4

image = tf.cast(image_array, tf.float32)
image = tf.image.per_image_standardization(image)
image = tf.reshape(image, [1, 64, 64, 3])

logit = model.inference(image, BATCH_SIZE, N_CLASSES)

logit = tf.nn.softmax(logit)

x = tf.placeholder(tf.float32, shape=[64, 64, 3])

# you need to change the directories to yours.
logs_train_dir = 'E:/Re_train/image_data/inputdata/'

saver = tf.train.Saver()

with tf.Session() as sess:

print("Reading checkpoints...")
ckpt = tf.train.get_checkpoint_state(logs_train_dir)
if ckpt and ckpt.model_checkpoint_path:
global_step = ckpt.model_checkpoint_path.split('/')[-1].split('-')[-1]
saver.restore(sess, ckpt.model_checkpoint_path)
print('Loading success, global_step is %s' % global_step)
else:
print('No checkpoint file found')

prediction = sess.run(logit, feed_dict={x: image_array})
max_index = np.argmax(prediction)
if max_index==0:
print('This is a husky with possibility %.6f' %prediction[:, 0])
elif max_index==1:
print('This is a jiwawa with possibility %.6f' %prediction[:, 1])
elif max_index==2:
print('This is a poodle with possibility %.6f' %prediction[:, 2])
else:
print('This is a qiutian with possibility %.6f' %prediction[:, 3])

#------------------------------------------------------------------------

if __name__ == '__main__':

train_dir = 'E:/Re_train/image_data/inputdata'
train, train_label, val, val_label = get_files(train_dir, 0.3)
img = get_one_image(val)  #通过改变参数train or val,进而验证训练集或测试集
evaluate_one_image(img)
#===========================================================================
其中,checkpoint文件会记录保存信息,通过它可以定位最新保存的模型。
注:可参考博客http://blog.csdn.net/jyshee/article/details/52563444
三. 测试结果
下面是训练200次时,随机从测试集和训练集中读取一张图片,分别测试验证集和训练集的识别效果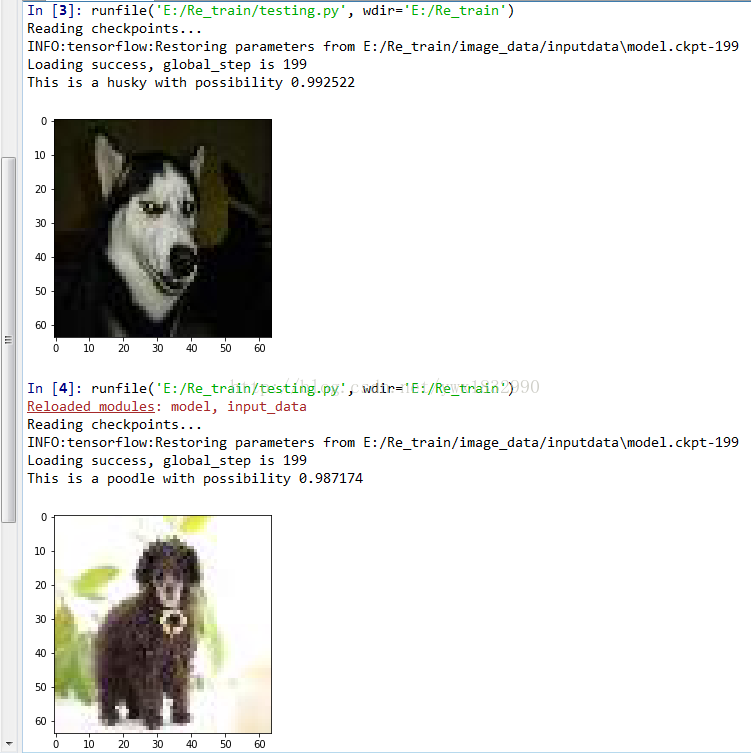

相关文章推荐
- 利用tensorflow训练自己的图片数据(3)——建立网络模型
- 利用tensorflow训练自己的图片数据(4)——神经网络训练
- Tensorflow学习笔记:用minst数据集训练卷积神经网络并用训练后的模型测试自己的BMP图片
- 利用tensorflow训练自己的图片数据(1)——预处理
- 利用tensorflow训练自己的图片——2、网络搭建(AlexNet)
- 利用tensorflow训练自己的图片数据(1)——预处理
- 利用tensorflow训练自己的图片数据(2)——输入图片处理
- 利用tensorflow训练自己的图片数据(2)——输入图片处理
- pytorch: 准备、训练和测试自己的图片数据
- matconvnet环境下训练自己的数据集及模型测试-mnist网络结构-cifar10部分数据集
- 使用自己的图片测试MNIST训练效果(TensorFlow1.5+CNN)
- Caffe初试(三)使用caffe的cifar10网络模型训练自己的图片数据
- Caffe windows下入门级别的从编译到训练然后到分类(用python接口)测试自己的图片数据(四)
- 深度学习-CAFFE利用CIFAR10网络模型训练自己的图像数据获得模型-1.制作自己的数据集
- tensorflow训练自己的数据集实现CNN图像分类2(保存模型&测试单张图片)
- caffe利用caffenet训练自己的图片数据
- 用tensorflow训练自己的图片——1、读取数据
- 深度学习-CAFFE利用CIFAR10网络模型训练自己的图像数据获得模型-2生成图像库的均值文件
- Caffe深度学习入门—— caffenet 微调网络 训练自己的数据并测试训练的模型
- Tensorflow学习精要版I---MNIST的训练附加测试自己的图片