react-native,redux,redux-saga组合开发实现
2017-12-24 23:11
711 查看
简单的说搞react开发的痛点之一,单向数据流的传递,redux统一管理数据,redux-saga又处理管理了异步调用。
要实现的内容如下,界面

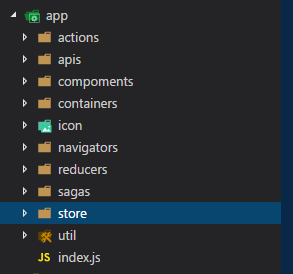
目录结构
首先从请求接口入手,用axios封装请求接口,统一处理请求 axios.js
reducers 文件下的 index.js, combineReducers各个模块的 reducer
接下来就是 各个模块的 reducer了,接受action 返回的 state 或者data,由于都是get请求,各个模块的请求都大同小异,以最新模块为例, latestNewsReducer.js 如下
type 为常理单独写出来的 理应 单独新建 const 目录用于放各个模块的 type,图快就都挨着action放了
还是 以 最新模块 为例子 type.js
现在开始sagas的编写
-------------------------------------------------嗯··---------------------------------------------

-------------------------------------------------辣眼睛---------------------------------------------
sagas目录下index 统一引入各个模块 对应的 请求方法
index.js
还是以最新为例:
现在到容器了
container, 对应的 最新模块的container
latestnews.js 是嵌套在第个 tabNavigator 里的 ,和热门平级, tabNavigator 配置都大同小异 此处省略···
进行到这里,配置react-navigation,

tabNavigator.js
三个大模块,最新,主题和专栏都放在 一个tabNavigator里,再配置到StackNavigator,最新里还嵌套一个 tabNavigator, 也可以把三个主题都放 stackNavigator里。放在stackNavigator,某些方面会更简单也更直观
当页面滑动离开当前模块 进入下一个模块 ,减小开支,可以选择把离开模块的store 清空,修改入口文件如下
调用onNavigationStateChange 方法
本来想在页面离开,组件销毁时 在componentWillUnmount 里调用 destoryLatesNews() 这些方法的,但是滑动切换的时候组件并不会销毁,那么只有更新周期函入手了。
---------------------------------------------------------------------
ps: 知道怎么在componentWillUnmount 里调用 destoryLatesNews 方法或者 进入到此函数的敬请指点,求告知呀
---------------------------------------------------------------------
那么就需要修改一下 latestnews 进入到在更新周期函数中如下写入
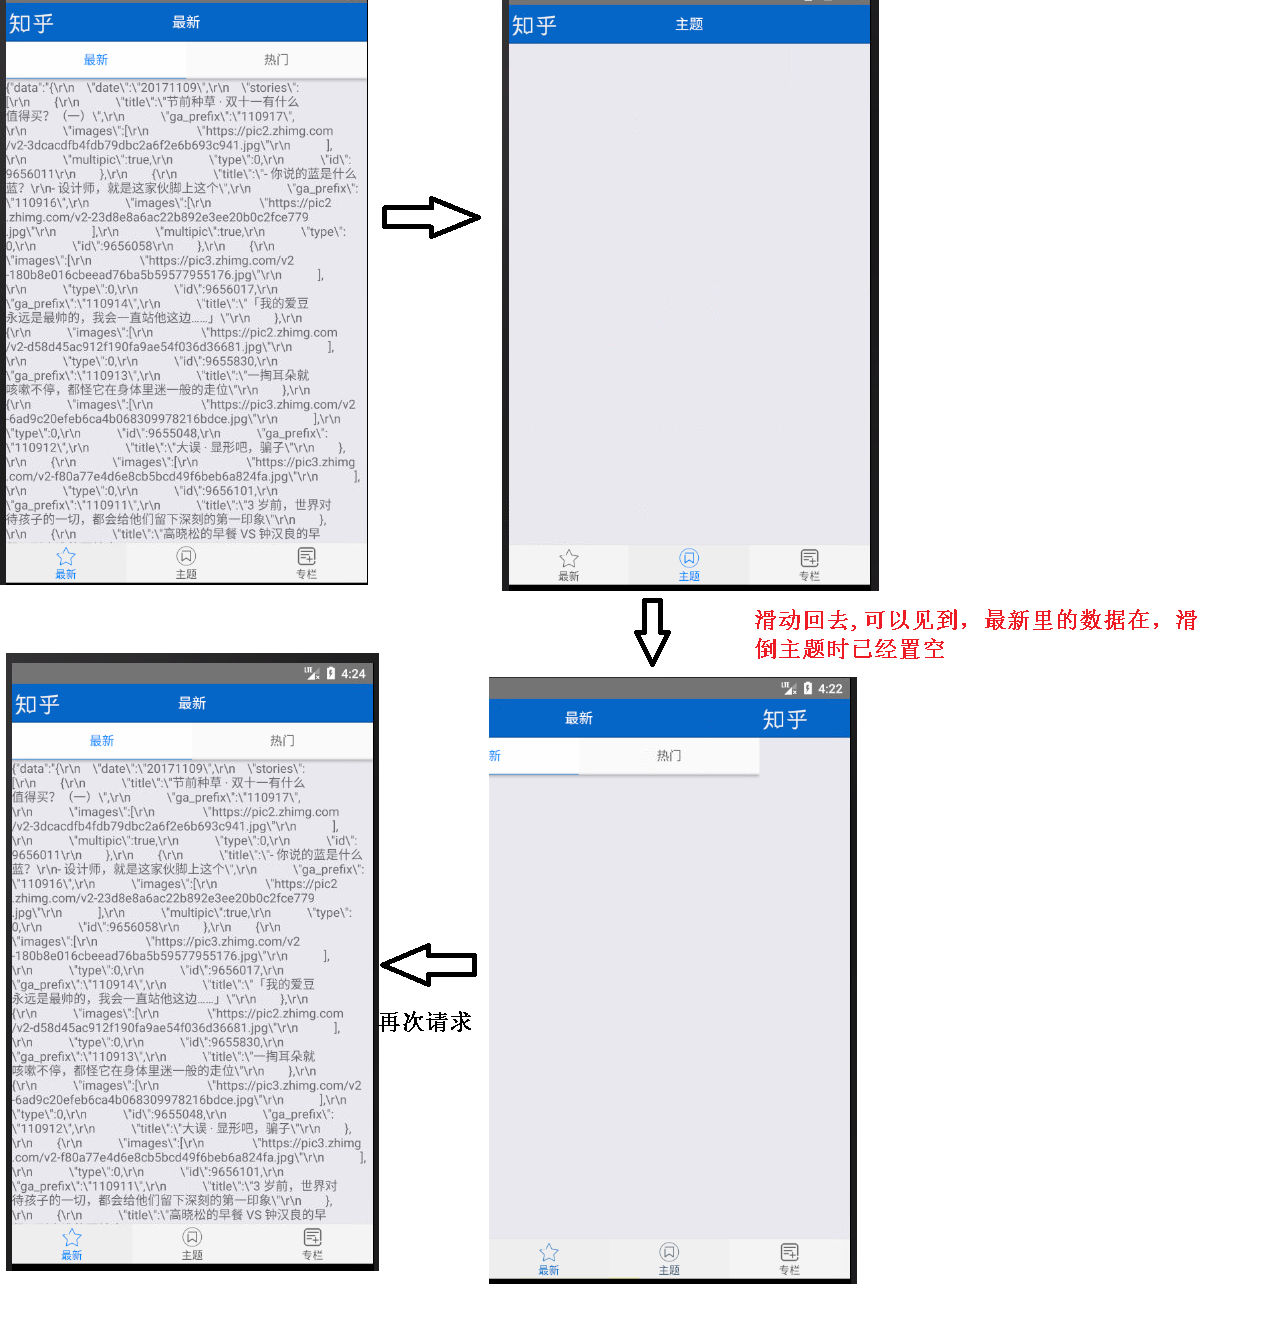
大体流程就这样了,当然redux-saga 各个函数方法的用途还需多理解,为什么 没进入 componentWillUnmount
是为什么呢·····哈哈哈哈· 等告知·····
有需要的交流的可以加个好友
要实现的内容如下,界面
目录结构
首先从请求接口入手,用axios封装请求接口,统一处理请求 axios.js
import axios from 'axios'

let defaultConfig = {
timeout: 3000,
}
let instance = axios

class Axios {
constructor(props) {
if (props && typeof props == 'object') {
instance = axios.create(props)
} else {
instance = axios.create(defaultConfig);
}

//拦截
instance.interceptors.request.use((config) => {
return config;
}, (error) => {
console.log(error)
return Promise.reject(error);
});

//日志 响应结果
instance.interceptors.response.use((response) => {
return response.data;
}, (error) => {
console.log(error)
return Promise.reject(error);
})
}

send(params) {
if (!params || typeof params != 'object') {
throw new Error('params is undefined or not an object')
}
if (params.method == 'GET') {
return get(params.url)
} else if (params.method == 'POST') {
return post(params.url, params)
}
}
}

async function get(url, callback) {
try {
let response = await instance.get(url)
return response
} catch (e) {
console.log(e)
}
}

async function post(url, params, callback) {
try {
let response = await instance.post(url)
//eturn callback(response)
return response
} catch (e) {
console.log(e)
}
}

export default Instance = new Axios();
store.js 管理以及开发环境下的及时更新const sagamiddleware = createSagaMiddleware();
export default function configureStore(initStore = {}) {
const middlewares = [sagamiddleware];
if (__DEV__) {
middlewares.push(logger)
}
const createStoreMiddleware = applyMiddleware(...middlewares)(createStore);
const store = createStoreMiddleware(
createReducer(), initStore
);
store.runSaga = sagamiddleware.run;
store.close = () => store.dispatch(END);
// Make reducers hot reloadable, see http://mxs.is/googmo /* istanbul ignore next */
if (module.hot) {
module.hot.accept(() => {
const nextRootReducer = require('../reducers/index').default; //reducers 文件下的 index
store.replaceReducer(createReducer(nextRootReducer))
}, )
}
return store
}reducers 文件下的 index.js, combineReducers各个模块的 reducer
import { combineReducers } from 'redux';
import { latestNews } from './latestNewsReducer';
import { special } from "./specialReducer";
import { themes } from "./themesReducer";

export default createReducer = (injectedReducers) => {
return combineReducers({
latestNews: latestNews,
special: special,
themes: themes,
router: router,
...injectedReducers
})
}
接下来就是 各个模块的 reducer了,接受action 返回的 state 或者data,由于都是get请求,各个模块的请求都大同小异,以最新模块为例, latestNewsReducer.js 如下
import { RQUEST_LATESTNEWS, SUC_LATESTNEWS, DESTORY_LATESTNEWS } from '../actions/latestnews/types';

export const latestNews = (state = null, action) => {
switch (action.type) {
case RQUEST_LATESTNEWS:
return state
case SUC_LATESTNEWS:
return Object.assign({}, state, {
data: action.data
})
case DESTORY_LATESTNEWS:
return null
default:
return state;
}
}
type 为常理单独写出来的 理应 单独新建 const 目录用于放各个模块的 type,图快就都挨着action放了
还是 以 最新模块 为例子 type.js
//进入请求请求
export const FETCHED_LATESTNEWS = 'fetched_latestnews'
//发送请求
export const RQUEST_LATESTNEWS = 'request_latestnews'
//请求成功 返回数据
export const SUC_LATESTNEWS = 'suc_latestnews'
//销毁
export const DESTORY_LATESTNEWS = 'destory_latestnews' //当离开当前页面时 返回此  置空stroe对应的值
latestNews的action 也很简单
import { RQUEST_LATESTNEWS, SUC_LATESTNEWS, FETCHED_LATESTNEWS, DESTORY_LATESTNEWS } from './types';

//初始请求
export const fetchedLatestNews = () => {
return {
type: FETCHED_LATESTNEWS
}
}
//开始发送请求
export const requestLatestNews = () => {
return {
type: RQUEST_LATESTNEWS
}
}

//请求成功
export const sucLatestNews = (data) => {
return {
type: SUC_LATESTNEWS,
data
}
}

//销毁
export const destoryLatestnews = () => {
return {
type: DESTORY_LATESTNEWS
}
}
现在开始sagas的编写
-------------------------------------------------嗯··---------------------------------------------
-------------------------------------------------辣眼睛---------------------------------------------
sagas目录下index 统一引入各个模块 对应的 请求方法
index.js
import { all, takeEvery, fork } from 'redux-saga/effects';

import { FETCHED_LATESTNEWS } from '../actions/latestnews/types'
import { getLatestNews } from './latestnews';

import { FETCHED_SPECICAL } from '../actions/special/types';
import { getSpecial } from './special';

import { FETCHED_THEMES } from '../actions/themes/types';
import { getThemes } from './themes';

export default function* rootSaga() {

yield takeEvery(FETCHED_LATESTNEWS, getLatestNews);
yield takeEvery(FETCHED_THEMES, getThemes);
yield takeEvery(FETCHED_SPECICAL, getSpecial);
}
还是以最新为例:
import { put, call } from 'redux-saga/effects';
import { SUC_LATESTNEWS } from '../actions/latestnews/types';
import { repoLoadingError, requestLatestNews, sucLatestNews } from "../actions/latestnews/index";
import { GetLatestNews } from '../apis/latestnews/fetch';

export function* getLatestNews() {
try {
yield put(requestLatestNews())
const data = yield call(GetLatestNews);
yield put({type: SUC_LATESTNEWS, data});

} catch (error) {
yield put(repoLoadingError(error));
}
}
现在到容器了
container, 对应的 最新模块的container
latestnews.js 是嵌套在第个 tabNavigator 里的 ,和热门平级, tabNavigator 配置都大同小异 此处省略···
import React, { Component } from 'react';
import { View, Text } from 'react-native';
import { bindActionCreators } from 'redux';
import { connect } from 'react-redux';
import { requestLatestNews, sucLatestNews, fetchedLatestNews } from '../../actions/latestnews/index';

class LatestNews extends Component {
componentDidMount() {
this.props.fetchedLatestNews()
}

render() {
let list = this.props.latestNews;
return (
<View>
{list ? <Text>{JSON.stringify(this.props.latestNews)}
</Text> :  <Text>LOADING</Text>
}
</View>
)
}
}

const mapStateToProps = (state) => {
return {
latestNews: state.latestNews
}
}

const matchDispatchToProps = (dispatch) => {
return bindActionCreators({
fetchedLatestNews: fetchedLatestNews,
}, dispatch)
}

export default connect(mapStateToProps, matchDispatchToProps)(LatestNews);
进行到这里,配置react-navigation,
tabNavigator.js
import React, { Component } from 'react';
import { View, Image, StyleSheet } from "react-native";
import { TabNavigator } from "react-navigation";
import News from '../containers/latestnews';
import Themes from '../containers/themes';
import Special from '../containers/special';

export default tabNavigator = TabNavigator(
{
newsTab: {
screen: News,
navigationOptions: {
tabBarLabel: '最新',
tabBarIcon: ({ tintColor, focused }) => (
<Image resizeMode='contain'
source={require('../icon/icon_latestnews.png')}
style={[style.footImage, {tintColor: tintColor}]}
/>
)
}
},
Themes: {
screen: Themes,
navigationOptions: {
tabBarLabel: '主题',
tabBarIcon: ({ tintColor, focused }) => (
<Image resizeMode='contain'
source={require('../icon/icon_themes.png')}
style={[style.footImage, {tintColor: tintColor}]}
/>
)
}
},
Special: {
screen: Special,
navigationOptions: {
tabBarLabel: '专栏',
tabBarIcon: ({ tintColor, focused }) => (
<Image resizeMode='contain'
source={require('../icon/icon_special.png')}
style={[style.footImage, {tintColor: tintColor}]}
/>
)
}
},
}, {
backBehavior: 'none',
tabBarPosition: 'bottom',
lazy: true,
lazyLoad: true,
initialRouteName: 'newsTab',
tabBarOptions: {
showIcon: true,
pressOpacity: 0.8,
style: {
height: 45,
backgroundColor: '#ffffff',
zIndex: 0,
position: 'relative'
},
labelStyle: {
fontSize: 12,
paddingVertical: 0,
marginTop: 0
},
iconStyle: {
marginTop: -5
},
tabStyle: {
backgroundColor: '#eeeeee',
},
inactiveTintColor: '#212121',
activeTintColor: '#0084ff'
}
}
)

let style = StyleSheet.create({
footImage: {
width: 24,
height: 24
},
});
三个大模块,最新,主题和专栏都放在 一个tabNavigator里,再配置到StackNavigator,最新里还嵌套一个 tabNavigator, 也可以把三个主题都放 stackNavigator里。放在stackNavigator,某些方面会更简单也更直观
import React, { Component } from 'react';
import { bindActionCreators } from 'redux';
import { connect } from 'react-redux';
import { addNavigationHelpers, StackNavigator } from 'react-navigation';
import tabNavigator from './tabNavigator';

export const Navigator = StackNavigator({
tab: { screen: tabNavigator }
},{
navigationOptions: {
header: null,
headerBackTitle: null,
headerTintColor: '#333333',
showIcon: false,
swipeEnabled: false,
animationEnabled: false,
initialRouteName: 'tab',
lazy: true,
},
mode: 'card',
lazy: true,
});
export default Navigator;
当页面滑动离开当前模块 进入下一个模块 ,减小开支,可以选择把离开模块的store 清空,修改入口文件如下
调用onNavigationStateChange 方法
class Index extends Component {
_onNavigationStateChange = (prevState, nextState) => {
let prev = prevState.routes[0],
preIndex = prev.index,
preRouteName = prev.routes[preIndex].key,

switch (preRouteName) {
case 'newsTab':
store.dispatch(destoryLatestnews())
break;
case 'Themes':
store.dispatch(destoryThemes())
break;
default:
store.dispatch(destorySpecial())
break;
}
}

render() {
return (
<Provider store={store}>
<AppStackNavigator onNavigationStateChange={(prevState, currentState) => {
this._onNavigationStateChange(prevState, currentState)
}}/>
</Provider>
);
}

}

export default Index;
本来想在页面离开,组件销毁时 在componentWillUnmount 里调用 destoryLatesNews() 这些方法的,但是滑动切换的时候组件并不会销毁,那么只有更新周期函入手了。
---------------------------------------------------------------------
ps: 知道怎么在componentWillUnmount 里调用 destoryLatesNews 方法或者 进入到此函数的敬请指点,求告知呀
---------------------------------------------------------------------
那么就需要修改一下 latestnews 进入到在更新周期函数中如下写入
shouldComponentUpdate(nextProps, nextState) {
if (nextProps.navigation.state.routeName === 'newsTab' && this.props.latestNews == null) {
this.props.fetchedLatestNews()
return true;
}
return false;

}
大体流程就这样了,当然redux-saga 各个函数方法的用途还需多理解,为什么 没进入 componentWillUnmount
是为什么呢·····哈哈哈哈· 等告知·····
有需要的交流的可以加个好友

相关文章推荐
- 基于Redux的ReactNative项目开发总结(二)
- React-Native开发总结-前端常规需求实现方案
- react-native如何将UI设计稿上的原型的大小转换为开发大小,还能实现各种屏幕自适应
- React-Native开发iOS篇-热更新的代码实现
- 基于Redux的ReactNative项目开发总结(二)
- react native开发:实现点击左侧选择项,右侧显示内容的功能
- 基于 react-native+redux 开发的高仿 V2EX 客户端
- 基于Redux的ReactNative项目开发总结(一)
- ReactMix框架是基于ReactNative框架实现的,目标是完全兼容现有的H5开发方式的新一代框架ReactMix
- React-Native开发总结-redux层面上的问题
- React-Native 开发(二) 在react-native 中 运用 redux
- 基于Redux的ReactNative项目开发总结(一)
- 【React Native 安卓开发】----侧边栏的实现DrawerLayoutAndroid以及第三方框架react-native-side-menu的使用【第六篇】
- react-native,react-redux和redux配合开发
- 【React Native开发】React Native控件之TextInput组件讲解与QQ登录界面实现(11)
- 基于Redux的ReactNative项目开发总结(一)
- react结合redux和react-router开发大型应用实现按需加载(code splitting)
- 基于React Native + redux 开发的客户端(适配IOS和Android),可查看保存妹纸,收藏分享文章等
- 【React Native 安卓开发】----第三方框架的引用之React-native-Swiper框架实现欢迎页【第五篇】
- React Native 实现热部署、差异化增量热更新