Unity 编辑器扩展教程
2017-12-07 13:06
1126 查看
来自:candycat1992
http://blog.csdn.net/candycat1992/article/details/52067975
写在前面
Unity最强大的地方之一是它扩展性非常强的编辑器。Unite Europe 2016上有一个视频专门讲编辑器编程的:https://www.youtube.com/watch?v=9bHzTDIJX_Q
这里大概记录一下里面的关键点。
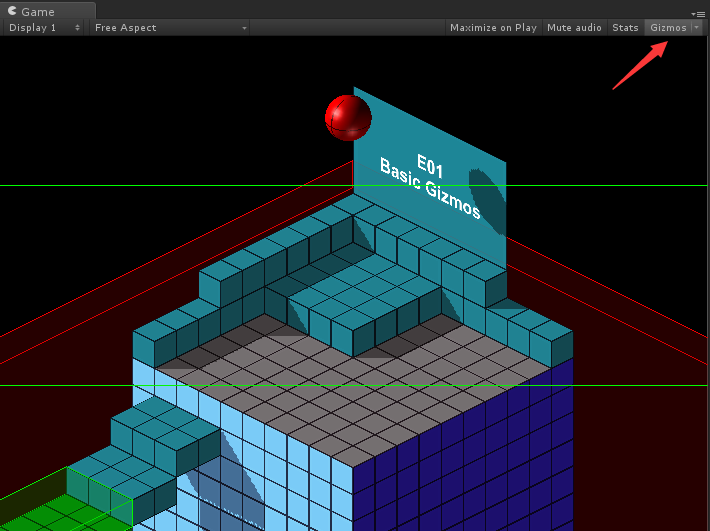
场景一
关注点:绘制重要区域,Gizmos.DrawXXX
OnDrawGizmos和OnDrawGizmosSelected回调函数
点击Gizmos按钮就可以在Game视图也看到线框了
// OnDrawGizmos()会在编辑器的Scene视图刷新的时候被调用
// 我们可以在这里绘制一些用于Debug的数据
void OnDrawGizmos()
{
Gizmos.color = new Color( 1f, 0f, 0f, 1f );
Gizmos.DrawWireCube( transform.position + BoxCollider.center, BoxCollider.size );

Gizmos.color = new Color( 1f, 0f, 0f, 0.3f );
Gizmos.DrawCube( transform.position + BoxCollider.center, BoxCollider.size );
}

// OnDrawGizmosSelect()类似于OnDrawGizmos(),它会在当该组件所属的物体被选中时被调用
void OnDrawGizmosSelected()
{
Gizmos.color = new Color( 1f, 1f, 0f, 1f );
Gizmos.DrawWireCube( transform.position + BoxCollider.center, BoxCollider.size );

Gizmos.color = new Color( 1f, 1f, 0f, 0.3f );
Gizmos.DrawCube( transform.position + BoxCollider.center, BoxCollider.size );
}12
3
4
5
6
7
8
9
10
11
12
13
14
15
16
17
18
19
20
场景二
关注点:组织面板上的参数,添加滑动条、Header、空白等

[Space( 10 )]
public float MaximumHeight;
public float MinimumHeight;

[Header( "Safe Frame" )]
[Range( 0f, 1f )]
public float SafeFrameTop;
[Range( 0f, 1f )]
public float SafeFrameBottom;
1
2
3
4
5
6
7
8
9
注意到上面面板的最小面有个Camera Height,调节它可以改变摄像机的高度。这个改变是可以发生在编辑器模式下的,而且也不需要脚本添加ExecuteInEditor。这是通过实现自定义的Editor脚本来实现的:
using UnityEngine;
using UnityEditor;
using System.Collections;

// 我们可以通过为一个类定义它的Editor类型的[CustomEditor]来自定义该类的绘制界面
// 这需要把这个文件放在Editor目录下
[CustomEditor( typeof( GameCamera ) )]
public class GameCameraEditor : Editor
{
GameCamera m_Target;

// 重载OnInspectorGUI()来绘制自己的编辑器
public override void OnInspectorGUI()
{
// target可以让我们得到当前绘制的Component对象
m_Target = (GameCamera)target;

// DrawDefaultInspector告诉Unity按照默认的方式绘制面板,这种方法在我们仅仅想要自定义某几个属性的时候会很有用
DrawDefaultInspector();
DrawCameraHeightPreviewSlider();
}

void DrawCameraHeightPreviewSlider()
{
GUILayout.Space( 10 );

Vector3 cameraPosition = m_Target.transform.position;
cameraPosition.y = EditorGUILayout.Slider( "Camera Height", cameraPosition.y, m_Target.MinimumHeight, m_Target.MaximumHeight );

if( cameraPosition.y != m_Target.transform.position.y )
{
// 改变状态前,使用该方法来记录操作,以便之后Undo
Undo.RecordObject( m_Target, "Change Camera Height" );
m_Target.transform.position = cameraPosition;
}
}
}12
3
4
5
6
7
8
9
10
11
12
13
14
15
16
17
18
19
20
21
22
23
24
25
26
27
28
29
30
31
32
33
34
35
36
37
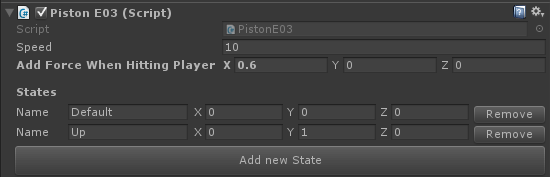
场景三
关注点:自定义绘制List对象
使用serializedObject来修改参数的话Unity会自动有各种帮助函数,例如自动添加Undo功能
如果直接修改参数的话,需要使用EditorUtility.SetDirty来告诉Unity需要保存数据
BeginChangeCheck()和EndChangeCheck()会检测它们之间的GUI有没有被修改,如果修改了的话可以据此修改参数
Undo.RecordObject可以为下一步修改添加Undo/Redo
EditorUtility.DisplayDialog可以打开内置对话框
首先在面板上隐藏默认的List绘制方法,使用HideInInspector隐藏属性:
public class PistonE03 : MonoBehaviour
{
public float Speed;
public Vector3 AddForceWhenHittingPlayer;

//We are hiding this in the inspector because we want to draw our own custom
//inspector for it.
[HideInInspector]
public List<PistonState> States = new List<PistonState>();
......12
3
4
5
6
7
8
9
10
为了让PistonState可以显示在面板上,需要序列化PistonState:
//[System.Serializable] tells unity to serialize this class if
//it's used in a public array or as a public variable in a component
[System.Serializable]
public class PistonState
{
public string Name;
public Vector3 Position;
}12
3
4
5
6
7
8
实现自定义的绘制方程:
[CustomEditor( typeof( PistonE03 ) )]
public class PistonE03Editor : Editor
{
PistonE03 m_Target;

public override void OnInspectorGUI()
{
m_Target = (PistonE03)target;

DrawDefaultInspector();
DrawStatesInspector();
}

//Draw a beautiful and useful custom inspector for our states array
void DrawStatesInspector()
{
GUILayout.Space( 5 );
GUILayout.Label( "States", EditorStyles.boldLabel );

for( int i = 0; i < m_Target.States.Count; ++i )
{
DrawState( i );
}

DrawAddStateButton();
}12
3
4
5
6
7
8
9
10
11
12
13
14
15
16
17
18
19
20
21
22
23
24
25
26
DrawDefaultInspector:先绘制默认的,DrawStatesInspector:自定义绘制面板函数。1
2
DrawState函数:
void DrawState( int index )
{
if( index < 0 || index >= m_Target.States.Count )
{
return;
}

// 在我们的serializedObject中找到States变量
// serializedObject允许我们方便地访问和修改参数,Unity会提供一系列帮助函数。例如,我们可以通过serializedObject来修改组件值,而不是直接修改,Unity会自动创建Undo和Redo功能
SerializedProperty listIterator = serializedObject.FindProperty( "States" );

GUILayout.BeginHorizontal();
{
// 如果是在实例化的prefab上修改参数,我们可以模仿Unity默认的途径来让修改过的而且未被Apply的值显示成粗体
if( listIterator.isInstantiatedPrefab == true )
{
//The SetBoldDefaultFont functionality is usually hidden from us but we can use some tricks to
//access the method anyways. See the implementation of our own EditorGUIHelper.SetBoldDefaultFont
//for more info
EditorGUIHelper.SetBoldDefaultFont( listIterator.GetArrayElementAtIndex( index ).prefabOverride );
}

GUILayout.Label( "Name", EditorStyles.label, GUILayout.Width( 50 ) );

// BeginChangeCheck()和EndChangeCheck()会检测它们之间的GUI有没有被修改
EditorGUI.BeginChangeCheck();
string newName = GUILayout.TextField( m_Target.States[ index ].Name, GUILayout.Width( 120 ) );
Vector3 newPosition = EditorGUILayout.Vector3Field( "", m_Target.States[ index ].Position );

// 如果修改了的话EndChangeCheck()就会返回true,此时我们就可以进行一些操作例如存储变化的数值
if( EditorGUI.EndChangeCheck() )
{
//Create an Undo/Redo step for this modification
Undo.RecordObject( m_Target, "Modify State" );

m_Target.States[ index ].Name = newName;
m_Target.States[ index ].Position = newPosition;

// 如果我们直接修改属性,而没有通过serializedObject,那么Unity并不会保存这些数据,Unity只会保存那些标识为dirty的属性
EditorUtility.SetDirty( m_Target );
}

EditorGUIHelper.SetBoldDefaultFont( false );

if( GUILayout.Button( "Remove" ) )
{
EditorApplication.Beep();

// 可以很方便的显示一个包含特定按钮的对话框,例如是否同意删除
if( EditorUtility.DisplayDialog( "Really?", "Do you really want to remove the state '" + m_Target.States[ index ].Name + "'?", "Yes", "No" ) == true )
{
Undo.RecordObject( m_Target, "Delete State" );
m_Target.States.RemoveAt( index );
EditorUtility.SetDirty( m_Target );
}
}
}
GUILayout.EndHorizontal();12
3
4
5
6
7
8
9
10
11
12
13
14
15
16
17
18
19
20
21
22
23
24
25
26
27
28
29
30
31
32
33
34
35
36
37
38
39
40
41
42
43
44
45
46
47
48
49
50
51
52
53
54
55
56
57
58
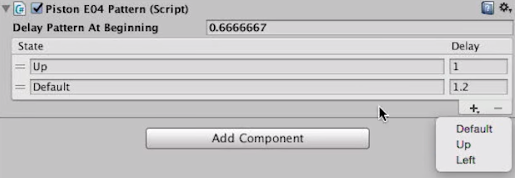
场景四
关注点:可排序的数组面板,通过使用ReorderableList来实现的,以及它的各个回调函数
using UnityEngine;
using UnityEditor;
// UnityEditorInternal是Unity内部使用、还未开放给用用户的一些库,可能有一些很有意思的类,例如ReorderableList,但注意可能会随着新版本发生变化
using UnityEditorInternal;
using System.Collections;

// CanEditMultipleObjects告诉Unity,当我们选择同一种类型的多个组件时,我们自定义的面板是可以支持同时修改所有选中的组件的
// 如果我们在修改参数时使用的是serializedObject,那么这个功能Unity会自动完成的
// 但如果我们是直接使用"target"来访问和修改参数的话,这个变量只能访问到选中的第一个组件
// 此时我们可以使用"targets"来得到所有选中的相同组件
[CanEditMultipleObjects]
[CustomEditor( typeof( PistonE04Pattern ) )]
public class PistonE04PatternEditor : Editor
{
// UnityEditorInternal中提供了一种可排序的列表面板显示类
ReorderableList m_List;
PistonE03 m_Piston;

// OnEnable会在自定义面板被打开的时候调用,例如当选中一个包含了PistonE04Pattern的gameobject时
void OnEnable()
{
if( target == null )
{
return;
}

FindPistonComponent();
CreateReorderableList();
SetupReoirderableListHeaderDrawer();
SetupReorderableListElementDrawer();
SetupReorderableListOnAddDropdownCallback();
}

void FindPistonComponent()
{
m_Piston = ( target as PistonE04Pattern ).GetComponent<PistonE03>();
}

void CreateReorderableList()
{
// ReorderableList是一个非常棒的查看数组类型变量的实现类。它位于UnityEditorInternal中,这意味着Unity并没有觉得该类足够好到可以开放给公众
// 更多关于ReorderableLists的内容可参考:
// http://va.lent.in/unity-make-your-lists-functional-with-reorderablelist/ m_List = new ReorderableList(
serializedObject,
serializedObject.FindProperty( "Pattern" ),
true, true, true, true );
}

void SetupReoirderableListHeaderDrawer()
{
// ReorderableList有一系列回调函数来让我们重载绘制这些数组
// 这里我们使用drawHeaderCallback来绘制表格的头headers
// 每个回调会接受一个Rect变量,它包含了该元素绘制的位置
// 因此我们可以使用这个变量来决定我们把当前的元素绘制在哪里
m_List.drawHeaderCallback =
( Rect rect ) =>
{
EditorGUI.LabelField(
new Rect( rect.x, rect.y, rect.width - 60, rect.height ),
"State" );
EditorGUI.LabelField(
new Rect( rect.x + rect.width - 60, rect.y, 60, rect.height ),
"Delay" );
};
}

void SetupReorderableListElementDrawer()
{
// drawElementCallback会定义列表中的每个元素是如何被绘制的
// 同样,保证我们绘制的元素是相对于Rect参数绘制的
m_List.drawElementCallback =
( Rect rect, int index, bool isActive, bool isFocused ) =>
{
var element = m_List.serializedProperty.GetArrayElementAtIndex( index );
rect.y += 2;

float delayWidth = 60;
float nameWidth = rect.width - delayWidth;

EditorGUI.PropertyField(
new Rect( rect.x, rect.y, nameWidth - 5, EditorGUIUtility.singleLineHeight ),
element.FindPropertyRelative( "Name" ), GUIContent.none );

EditorGUI.PropertyField(
new Rect( rect.x + nameWidth, rect.y, delayWidth, EditorGUIUtility.singleLineHeight ),
element.FindPropertyRelative( "DelayAfterwards" ), GUIContent.none );
};
}

void SetupReorderableListOnAddDropdownCallback()
{
// onAddDropdownCallback定义当我们点击列表下面的[+]按钮时发生的事件
// 在本例里,我们想要显示一个下拉菜单来给出预定义的一些States
m_List.onAddDropdownCallback =
( Rect buttonRect, ReorderableList l ) =>
{
if( m_Piston.States == null || m_Piston.States.Count == 0 )
{
EditorApplication.Beep();
EditorUtility.DisplayDialog( "Error", "You don't have any states defined in the PistonE03 component", "Ok" );
return;
}

var menu = new GenericMenu();

foreach( PistonState state in m_Piston.States )
{
menu.AddItem( new GUIContent( state.Name ),
false,
OnReorderableListAddDropdownClick,
state );
}

menu.ShowAsContext();
};
}

// 这个回调函数会在用户选择了[+]下拉菜单中的某一项后调用
void OnReorderableListAddDropdownClick( object target )
{
PistonState state = (PistonState)target;

int index = m_List.serializedProperty.arraySize;
m_List.serializedProperty.arraySize++;
m_List.index = index;

SerializedProperty element = m_List.serializedProperty.GetArrayElementAtIndex( index );
element.FindPropertyRelative( "Name" ).stringValue = state.Name;
element.FindPropertyRelative( "DelayAfterwards" ).floatValue = 0f;

serializedObject.ApplyModifiedProperties();
}

public override void OnInspectorGUI()
{
GUILayout.Space( 5 );

EditorGUILayout.PropertyField( serializedObject.FindProperty( "DelayPatternAtBeginning" ) );

serializedObject.ApplyModifiedProperties();
serializedObject.Update();

m_List.DoLayoutList();
serializedObject.ApplyModifiedProperties();
}
}12
3
4
5
6
7
8
9
10
11
12
13
14
15
16
17
18
19
20
21
22
23
24
25
26
27
28
29
30
31
32
33
34
35
36
37
38
39
40
41
42
43
44
45
46
47
48
49
50
51
52
53
54
55
56
57
58
59
60
61
62
63
64
65
66
67
68
69
70
71
72
73
74
75
76
77
78
79
80
81
82
83
84
85
86
87
88
89
90
91
92
93
94
95
96
97
98
99
100
101
102
103
104
105
106
107
108
109
110
111
112
113
114
115
116
117
118
119
120
121
122
123
124
125
126
127
128
129
130
131
132
133
134
135
136
137
138
139
140
141
142
143
144
145
146
147
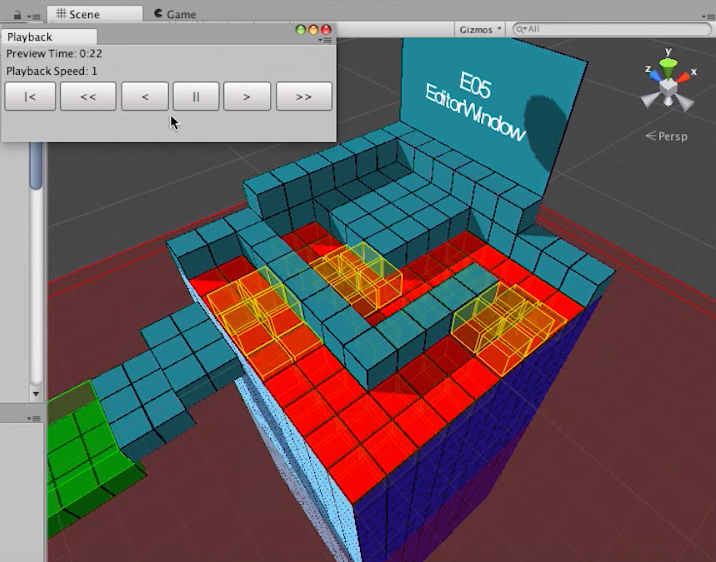
场景五
关注点:实现了一个可以在编辑器状态下预览效果的编辑器窗口
using UnityEngine;
// 要实现自定义窗口需要包含进来UnityEditor
using UnityEditor;
using System.Collections;

// EditorWindow是另一个非常有用的Editor类。我们可以靠它来定义自己的窗口
public class PreviewPlaybackWindow : EditorWindow
{
// MenuItem可以让我们在菜单栏中打开这个窗口
[MenuItem( "Window/Preview Playback Window" )]
static void OpenPreviewPlaybackWindow()
{
EditorWindow.GetWindow<PreviewPlaybackWindow>( false, "Playback" );
// 另一个有用的写法是下面这样
// 可以让我们访问到窗口的属性,例如定义最小尺寸等
//EditorWindow window = EditorWindow.GetWindow<PreviewPlaybackWindow>( false, "Playback" );
//window.minSize = new Vector2(100.0f, 100.0f);
}

float m_PlaybackModifier;
float m_LastTime;

void OnEnable()
{
// Update函数会每秒调用30次来刷新编辑器界面
// 我们可以据此来注册自己的编辑器Update函数
EditorApplication.update -= OnUpdate;
EditorApplication.update += OnUpdate;
}

void OnDisable()
{
EditorApplication.update -= OnUpdate;
}

void OnUpdate()
{
if( m_PlaybackModifier != 0f )
{
// PreviewTime是自定义的一个类:
//public class PreviewTime
//{
//    public static float Time
//    {
//        get
//        {
//            if( Application.isPlaying == true )
//            {
//                return UnityEngine.Time.timeSinceLevelLoad;
//            }

//            // EditorPrefsle类似于PlayerPrefs但只在编辑器状态下工作
//            // 我们可以据此来存储变量,基本我们关闭了编辑器该变量也可以长久保存
//            return EditorPrefs.GetFloat( "PreviewTime", 0f );
//        }
//        set
//        {
//            EditorPrefs.SetFloat( "PreviewTime", value );
//        }
//    }
//}

// m_PlaybackModifier是用于控制预览播放速率的变量
// 当它不为0的时候,说明需要刷新界面,更新时间
PreviewTime.Time += ( Time.realtimeSinceStartup - m_LastTime ) * m_PlaybackModifier;

// 当预览时间改变时,我们需要确保重绘这个窗口以便我们可以立即看到它的更新
// 而Unity只会在它认为该窗口需要重绘时(例如我们移动了窗口)才会重绘
// 因此我们可以调用Repaint函数来强制马上重绘
Repaint();

// 由于预览时间发生了变化,我们也希望可以立刻重绘Scene视图的界面
SceneView.RepaintAll();
}

m_LastTime = Time.realtimeSinceStartup;
}

void OnGUI()
{
// 绘制各个按钮来控制预览时间
float seconds = Mathf.Floor( PreviewTime.Time % 60 );
float minutes = Mathf.Floor( PreviewTime.Time / 60 );

GUILayout.Label( "Preview Time: " + minutes + ":" + seconds.ToString( "00" ) );
GUILayout.Label( "Playback Speed: " + m_PlaybackModifier );

GUILayout.BeginHorizontal();
{
if( GUILayout.Button( "|<", GUILayout.Height( 30 ) ) )
{
PreviewTime.Time = 0f;
SceneView.RepaintAll();
}

if( GUILayout.Button( "<<", GUILayout.Height( 30 ) ) )
{
m_PlaybackModifier = -5f;
}

if( GUILayout.Button( "<", GUILayout.Height( 30 ) ) )
{
m_PlaybackModifier = -1f;
}

if( GUILayout.Button( "||", GUILayout.Height( 30 ) ) )
{
m_PlaybackModifier = 0f;
}

if( GUILayout.Button( ">", GUILayout.Height( 30 ) ) )
{
m_PlaybackModifier = 1f;
}

if( GUILayout.Button( ">>", GUILayout.Height( 30 ) ) )
{
m_PlaybackModifier = 5f;
}
}
GUILayout.EndHorizontal();
}
}12
3
4
5
6
7
8
9
10
11
12
13
14
15
16
17
18
19
20
21
22
23
24
25
26
27
28
29
30
31
32
33
34
35
36
37
38
39
40
41
42
43
44
45
46
47
48
49
50
51
52
53
54
55
56
57
58
59
60
61
62
63
64
65
66
67
68
69
70
71
72
73
74
75
76
77
78
79
80
81
82
83
84
85
86
87
88
89
90
91
92
93
94
95
96
97
98
99
100
101
102
103
104
105
106
107
108
109
110
111
112
113
114
115
116
117
118
119
120
121
122
123
为了在编辑器状态下可以查看到cube的运动,我们还需要实现OnDrawGizmos来绘制一些线框表示运动。原理就是使用PreviewTime.Time来控制运动。
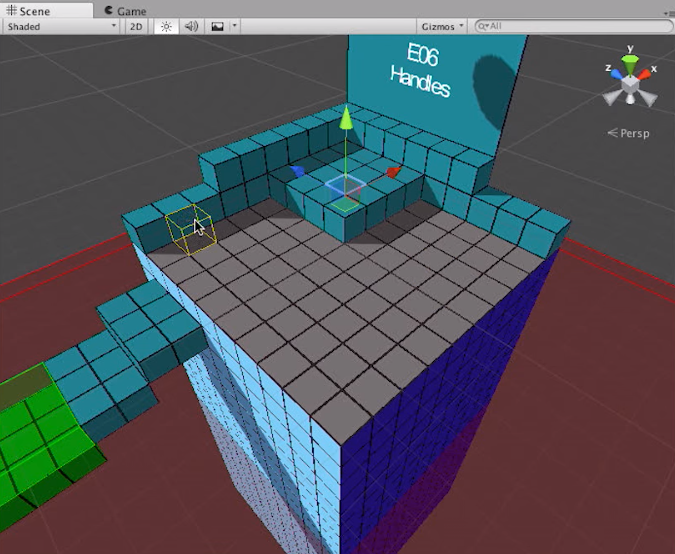
场景六
关注点:在Scene视图中,鼠标的位置绘制特定的Handle
using UnityEngine;
using UnityEditor;
using System.Collections;

// [InitializeOnLoad]可以确保这个类的构造器在编辑器加载时就被调用
[InitializeOnLoad]
public class LevelEditorE06CubeHandle : Editor
{
public static Vector3 CurrentHandlePosition = Vector3.zero;
public static bool IsMouseInValidArea = false;

static Vector3 m_OldHandlePosition = Vector3.zero;

static LevelEditorE06CubeHandle()
{
//The OnSceneGUI delegate is called every time the SceneView is redrawn and allows you
//to draw GUI elements into the SceneView to create in editor functionality
// OnSceneGUI委托在Scene视图每次被重绘时被调用
// 这允许我们可以在Scene视图绘制自定义的GUI元素
SceneView.onSceneGUIDelegate -= OnSceneGUI;
SceneView.onSceneGUIDelegate += OnSceneGUI;
}

void OnDestroy()
{
SceneView.onSceneGUIDelegate -= OnSceneGUI;
}

static void OnSceneGUI( SceneView sceneView )
{
if( IsInCorrectLevel() == false )
{
return;
}

bool isLevelEditorEnabled = EditorPrefs.GetBool( "IsLevelEditorEnabled", true );

//Ignore this. I am using this because when the scene GameE06 is opened we haven't yet defined any On/Off buttons
//for the cube handles. That comes later in E07. This way we are forcing the cube handles state to On in this scene
{
if( UnityEditor.SceneManagement.EditorSceneManager.GetActiveScene().name == "GameE06" )
{
isLevelEditorEnabled = true;
}
}

if( isLevelEditorEnabled == false )
{
return;
}

// 更新Handle的位置
UpdateHandlePosition();
// 检查鼠标所在的位置是否有效
UpdateIsMouseInValidArea( sceneView.position );
// 检测是否需要重新绘制Handle
UpdateRepaint();

DrawCubeDrawPreview();
}

//I will use this type of function in many different classes. Basically this is useful to
//be able to draw different types of the editor only when you are in the correct scene so we
//can have an easy to follow progression of the editor while hoping between the different scenes
static bool IsInCorrectLevel()
{
return UnityEditor.SceneManagement.EditorSceneManager.GetActiveScene().name == "GameE06"
|| UnityEditor.SceneManagement.EditorSceneManager.GetActiveScene().name == "GameE07"
|| UnityEditor.SceneManagement.EditorSceneManager.GetActiveScene().name == "GameE08"
|| UnityEditor.SceneManagement.EditorSceneManager.GetActiveScene().name == "GameE09";
}

static void UpdateIsMouseInValidArea( Rect sceneViewRect )
{
// 确保cube handle只在需要的区域内绘制
// 在本例我们就是当鼠标移动到自定义的GUI上或更低的位置上时,就简单地隐藏掉handle
bool isInValidArea = Event.current.mousePosition.y < sceneViewRect.height - 35;

if( isInValidArea != IsMouseInValidArea )
{
IsMouseInValidArea = isInValidArea;
SceneView.RepaintAll();
}
}

static void UpdateHandlePosition()
{
if( Event.current == null )
{
return;
}

Vector2 mousePosition = new Vector2( Event.current.mousePosition.x, Event.current.mousePosition.y );

Ray ray = HandleUtility.GUIPointToWorldRay( mousePosition );
RaycastHit hit;

if( Physics.Raycast( ray, out hit, Mathf.Infinity, 1 << LayerMask.NameToLayer( "Level" ) ) == true )
{
Vector3 offset = Vector3.zero;

if( EditorPrefs.GetBool( "SelectBlockNextToMousePosition", true ) == true )
{
offset = hit.normal;
}

CurrentHandlePosition.x = Mathf.Floor( hit.point.x - hit.normal.x * 0.001f + offset.x );
CurrentHandlePosition.y = Mathf.Floor( hit.point.y - hit.normal.y * 0.001f + offset.y );
CurrentHandlePosition.z = Mathf.Floor( hit.point.z - hit.normal.z * 0.001f + offset.z );

CurrentHandlePosition += new Vector3( 0.5f, 0.5f, 0.5f );
}
}

static void UpdateRepaint()
{
//If the cube handle position has changed, repaint the scene
if( CurrentHandlePosition != m_OldHandlePosition )
{
SceneView.RepaintAll();
m_OldHandlePosition = CurrentHandlePosition;
}
}

static void DrawCubeDrawPreview()
{
if( IsMouseInValidArea == false )
{
return;
}

Handles.color = new Color( EditorPrefs.GetFloat( "CubeHandleColorR", 1f ), EditorPrefs.GetFloat( "CubeHandleColorG", 1f ), EditorPrefs.GetFloat( "CubeHandleColorB", 0f ) );

DrawHandlesCube( CurrentHandlePosition );
}

static void DrawHandlesCube( Vector3 center )
{
Vector3 p1 = center + Vector3.up * 0.5f + Vector3.right * 0.5f + Vector3.forward * 0.5f;
Vector3 p2 = center + Vector3.up * 0.5f + Vector3.right * 0.5f - Vector3.forward * 0.5f;
Vector3 p3 = center + Vector3.up * 0.5f - Vector3.right * 0.5f - Vector3.forward * 0.5f;
Vector3 p4 = center + Vector3.up * 0.5f - Vector3.right * 0.5f + Vector3.forward * 0.5f;

Vector3 p5 = center - Vector3.up * 0.5f + Vector3.right * 0.5f + Vector3.forward * 0.5f;
Vector3 p6 = center - Vector3.up * 0.5f + Vector3.right * 0.5f - Vector3.forward * 0.5f;
Vector3 p7 = center - Vector3.up * 0.5f - Vector3.right * 0.5f - Vector3.forward * 0.5f;
Vector3 p8 = center - Vector3.up * 0.5f - Vector3.right * 0.5f + Vector3.forward * 0.5f;

// 我们可以使用Handles类来在Scene视图绘制3D物体
// 如果实现恰当的话,我们甚至可以和handles进行交互,例如Unity的移动工具
Handles.DrawLine( p1, p2 );
Handles.DrawLine( p2, p3 );
Handles.DrawLine( p3, p4 );
Handles.DrawLine( p4, p1 );

Handles.DrawLine( p5, p6 );
Handles.DrawLine( p6, p7 );
Handles.DrawLine( p7, p8 );
Handles.DrawLine( p8, p5 );

Handles.DrawLine( p1, p5 );
Handles.DrawLine( p2, p6 );
Handles.DrawLine( p3, p7 );
Handles.DrawLine( p4, p8 );
}
}12
3
4
5
6
7
8
9
10
11
12
13
14
15
16
17
18
19
20
21
22
23
24
25
26
27
28
29
30
31
32
33
34
35
36
37
38
39
40
41
42
43
44
45
46
47
48
49
50
51
52
53
54
55
56
57
58
59
60
61
62
63
64
65
66
67
68
69
70
71
72
73
74
75
76
77
78
79
80
81
82
83
84
85
86
87
88
89
90
91
92
93
94
95
96
97
98
99
100
101
102
103
104
105
106
107
108
109
110
111
112
113
114
115
116
117
118
119
120
121
122
123
124
125
126
127
128
129
130
131
132
133
134
135
136
137
138
139
140
141
142
143
144
145
146
147
148
149
150
151
152
153
154
155
156
157
158
159
160
161
162
163
164
165
166
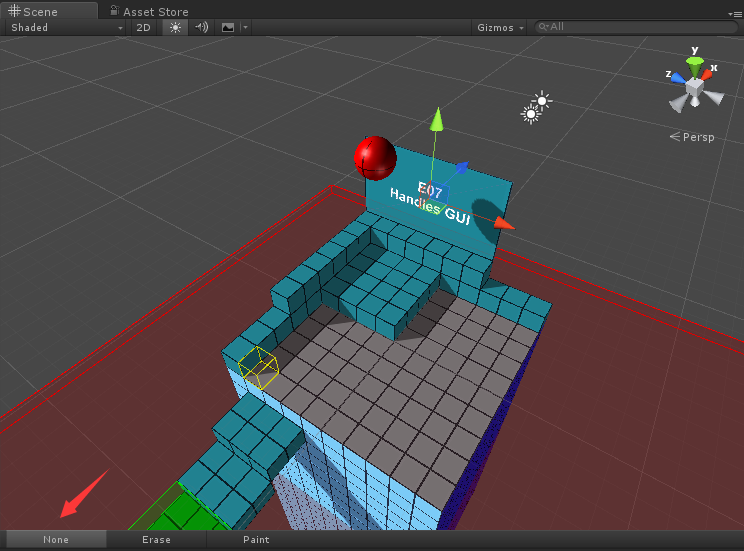
场景七
关注点:在Scene视图绘制自定义的工具条
using UnityEngine;
using UnityEditor;
using System.Collections;

[InitializeOnLoad]
public class LevelEditorE07ToolsMenu : Editor
{
//This is a public variable that gets or sets which of our custom tools we are currently using
//0 - No tool selected
//1 - The block eraser tool is selected
//2 - The "Add block" tool is selected
public static int SelectedTool
{
get
{
return EditorPrefs.GetInt( "SelectedEditorTool", 0 );
}
set
{
if( value == SelectedTool )
{
return;
}

EditorPrefs.SetInt( "SelectedEditorTool", value );

switch( value )
{
case 0:
EditorPrefs.SetBool( "IsLevelEditorEnabled", false );

Tools.hidden = false;
break;
case 1:
EditorPrefs.SetBool( "IsLevelEditorEnabled", true );
EditorPrefs.SetBool( "SelectBlockNextToMousePosition", false );
EditorPrefs.SetFloat( "CubeHandleColorR", Color.magenta.r );
EditorPrefs.SetFloat( "CubeHandleColorG", Color.magenta.g );
EditorPrefs.SetFloat( "CubeHandleColorB", Color.magenta.b );

//Hide Unitys Tool handles (like the move tool) while we draw our own stuff
Tools.hidden = true;
break;
default:
EditorPrefs.SetBool( "IsLevelEditorEnabled", true );
EditorPrefs.SetBool( "SelectBlockNextToMousePosition", true );
EditorPrefs.SetFloat( "CubeHandleColorR", Color.yellow.r );
EditorPrefs.SetFloat( "CubeHandleColorG", Color.yellow.g );
EditorPrefs.SetFloat( "CubeHandleColorB", Color.yellow.b );

//Hide Unitys Tool handles (like the move tool) while we draw our own stuff
Tools.hidden = true;
break;
}
}
}

static LevelEditorE07ToolsMenu()
{
SceneView.onSceneGUIDelegate -= OnSceneGUI;
SceneView.onSceneGUIDelegate += OnSceneGUI;

// EditorApplication.hierarchyWindowChanged可以让我们知道是否在编辑器加载了一个新的场景
EditorApplication.hierarchyWindowChanged -= OnSceneChanged;
EditorApplication.hierarchyWindowChanged += OnSceneChanged;
}

void OnDestroy()
{
SceneView.onSceneGUIDelegate -= OnSceneGUI;

EditorApplication.hierarchyWindowChanged -= OnSceneChanged;
}

static void OnSceneChanged()
{
if( IsInCorrectLevel() == true )
{
Tools.hidden = LevelEditorE07ToolsMenu.SelectedTool != 0;
}
else
{
Tools.hidden = false;
}
}

static void OnSceneGUI( SceneView sceneView )
{
if( IsInCorrectLevel() == false )
{
return;
}

DrawToolsMenu( sceneView.position );
}

static bool IsInCorrectLevel()
{
return UnityEditor.SceneManagement.EditorSceneManager.GetActiveScene().name == "GameE07"
|| UnityEditor.SceneManagement.EditorSceneManager.GetActiveScene().name == "GameE08"
|| UnityEditor.SceneManagement.EditorSceneManager.GetActiveScene().name == "GameE09";
}

static void DrawToolsMenu( Rect position )
{
// 通过使用Handles.BeginGUI(),我们可以开启绘制Scene视图的GUI元素
Handles.BeginGUI();

//Here we draw a toolbar at the bottom edge of the SceneView
// 这里我们在Scene视图的底部绘制了一个工具条
GUILayout.BeginArea( new Rect( 0, position.height - 35, position.width, 20 ), EditorStyles.toolbar );
{
string[] buttonLabels = new string[] { "None", "Erase", "Paint" };

// GUILayout.SelectionGrid提供了一个按钮工具条
// 通过把它的返回值存储在SelectedTool里可以让我们根据不同的按钮来实现不同的行为
SelectedTool = GUILayout.SelectionGrid(
SelectedTool,
buttonLabels,
3,
EditorStyles.toolbarButton,
GUILayout.Width( 300 ) );
}
GUILayout.EndArea();

Handles.EndGUI();
}
}12
3
4
5
6
7
8
9
10
11
12
13
14
15
16
17
18
19
20
21
22
23
24
25
26
27
28
29
30
31
32
33
34
35
36
37
38
39
40
41
42
43
44
45
46
47
48
49
50
51
52
53
54
55
56
57
58
59
60
61
62
63
64
65
66
67
68
69
70
71
72
73
74
75
76
77
78
79
80
81
82
83
84
85
86
87
88
89
90
91
92
93
94
95
96
97
98
99
100
101
102
103
104
105
106
107
108
109
110
111
112
113
114
115
116
117
118
119
120
121
122
123
124
125
126
127
128
场景八
关注点:可以在场景七的基础上,点击相应按钮后增加或删除Cube
新的编辑器脚本逻辑和场景七类似,重点在于回调函数OnSceneGUI:
static void OnSceneGUI(SceneView sceneView)
{
if (IsInCorrectLevel() == false)
{
return;
}

if (LevelEditorE07ToolsMenu.SelectedTool == 0)
{
return;
}

// 通过创建一个新的ControlID我们可以把鼠标输入的Scene视图反应权从Unity默认的行为中抢过来
// FocusType.Passive意味着这个控制权不会接受键盘输入而只关心鼠标输入
int controlId = GUIUtility.GetControlID(FocusType.Passive);

// 如果是鼠标左键被点击同时没有其他特定按键按下的话
if (Event.current.type == EventType.mouseDown &&
Event.current.button == 0 &&
Event.current.alt == false &&
Event.current.shift == false &&
Event.current.control == false)
{
if (LevelEditorE06CubeHandle.IsMouseInValidArea == true)
{
if (LevelEditorE07ToolsMenu.SelectedTool == 1)
{
// 如果选择的是erase按键(从场景七的静态变量SelectedTool判断得到),移除Cube
RemoveBlock(LevelEditorE06CubeHandle.CurrentHandlePosition);
}

if (LevelEditorE07ToolsMenu.SelectedTool == 2)
{
/// 如果选择的是add按键(从场景七的静态变量SelectedTool判断得到),添加Cube
AddBlock(LevelEditorE06CubeHandle.CurrentHandlePosition);
}
}
}

// 如果按下了Escape,我们就自动取消选择当前的按钮
if (Event.current.type == EventType.keyDown &&
Event.current.keyCode == KeyCode.Escape)
{
LevelEditorE07ToolsMenu.SelectedTool = 0;
}

// 把我们自己的controlId添加到默认的control里,这样Unity就会选择我们的控制权而非Unity默认的Scene视图行为
HandleUtility.AddDefaultControl(controlId);
}12
3
4
5
6
7
8
9
10
11
12
13
14
15
16
17
18
19
20
21
22
23
24
25
26
27
28
29
30
31
32
33
34
35
36
37
38
39
40
41
42
43
44
45
46
47
48
49
场景九
关注点:使用Scriptable Object把一些Prefab预览在Scene视图上
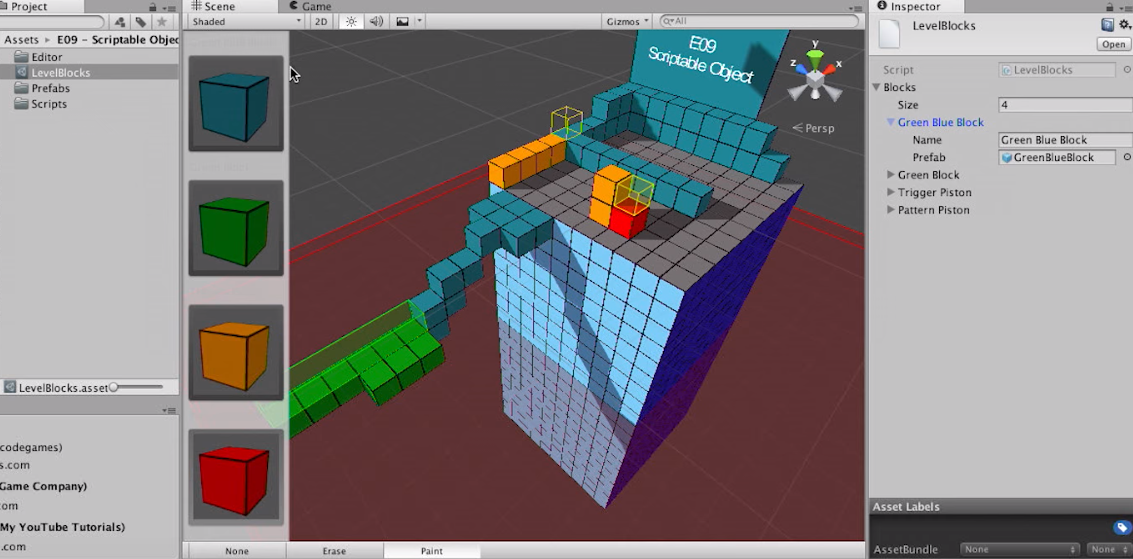
Scriptable Object是一个相当于自定义Assets对象的类。下面是LevelBlocks的定义。它包含了一个LevelBlockData的数组来存储可选的Prefab对象。
using UnityEngine;
using System.Collections;
using System.Collections.Generic;

//[System.Serializable] tells unity to serialize this class if
//it's used in a public array or as a public variable in a component
[System.Serializable]
public class LevelBlockData
{
public string Name;
public GameObject Prefab;
}

//[CreateAssetMenu] creates an entry in the default Create menu of the ProjectView so you can easily create an instance of this ScriptableObject
[CreateAssetMenu]
public class LevelBlocks : ScriptableObject
{
//This ScriptableObject simply stores a list of blocks. It kind of acts like a database in that it stores rows of data
public List<LevelBlockData> Blocks = new List<LevelBlockData>();
}12
3
4
5
6
7
8
9
10
11
12
13
14
15
16
17
18
19
20
我们之后就可以在Hierency视图创建一个LevelBlock资源,Editor类则会加载这个资源来得到相应的数据。
static LevelEditorE09ScriptableObject()
{
SceneView.onSceneGUIDelegate -= OnSceneGUI;
SceneView.onSceneGUIDelegate += OnSceneGUI;

//Make sure we load our block database. Notice the path here, which means the block database has to be in this specific location so we can find it
//LoadAssetAtPath is a great way to load an asset from the project
m_LevelBlocks = AssetDatabase.LoadAssetAtPath<LevelBlocks>( "Assets/E09 - Scriptable Object/LevelBlocks.asset" );
}12
3
4
5
6
7
8
9
Unite 2016上还有另一个专门讲Scriptable Object的视频,强烈建议看一下:
https://www.youtube.com/watch?v=VBA1QCoEAX4

相关文章推荐
- Unity 3D编辑器扩展介绍、教程(二) —— 创建窗口
- unity编辑器扩展--AssetBundle菜单
- unity编辑器扩展
- Unity编辑器扩展
- Unity编辑器扩展之RequireComponent等详解
- [cb]Unity Editor Toolbar 编辑器扩展
- Unity编辑器扩展之Gizmos的学习(线框)
- Unity编辑器扩展学习笔记(二)——给创建的菜单选项添加快捷键
- unity编辑器扩展篇-快速设置sprite
- Unity编辑器扩展
- Unity 3D - 编辑器扩展之修改PackingTag
- unity 扩展编辑器一(修改编辑器名称)
- Unity 扩展编辑器
- 【unity】编辑器基本扩展(一)
- Unity编辑器的扩展,MenuItem的使用整理
- 【Unity编辑器】UVPreview扩展
- Unity编辑器扩展
- unity 编辑器扩展 扩展assert编辑器
- 【Unity编辑器扩展简介】存储数据
- Unity编辑器扩展-ConsoleWindow中的双击日志定位