配置Keepalived单实例高可用LVS集群
2017-08-08 10:03
507 查看
本篇主要演示通过Keepalived配置管理LVS集群,并对后端RealServer进行健康状态检测(应用层检测),具体工作原理可以见上一篇博客《Keepalived学习总结》。
实验要求 ==> 将两台前端调度器node1和node2配置为一组VRRP示例(即单实例Keepalived),VIP是192.168.10.7。node1和node2根据请求报文的目标IP和目标PORT,按照一定的调度算法,实现将其调度至后端的RealServer,由后端RealServer响应请求报文。
实验环境 ==> CentOS 7.x
实验目的 ==> 通过Keepalived配置管理LVS,并对后端RealServer进行健康状态检测
实验主机 ==> 一共四台主机,分别如下。
192.168.10.6(主机名:node1)
192.168.10.8(主机名:node2)
192.168.10.11(主机名:rs1)
192.168.10.12(主机名:rs2)
[b]实验前提 [/b]==> 高可用对之间时间同步(可通过周期性任务来实现)
实验操作如下。
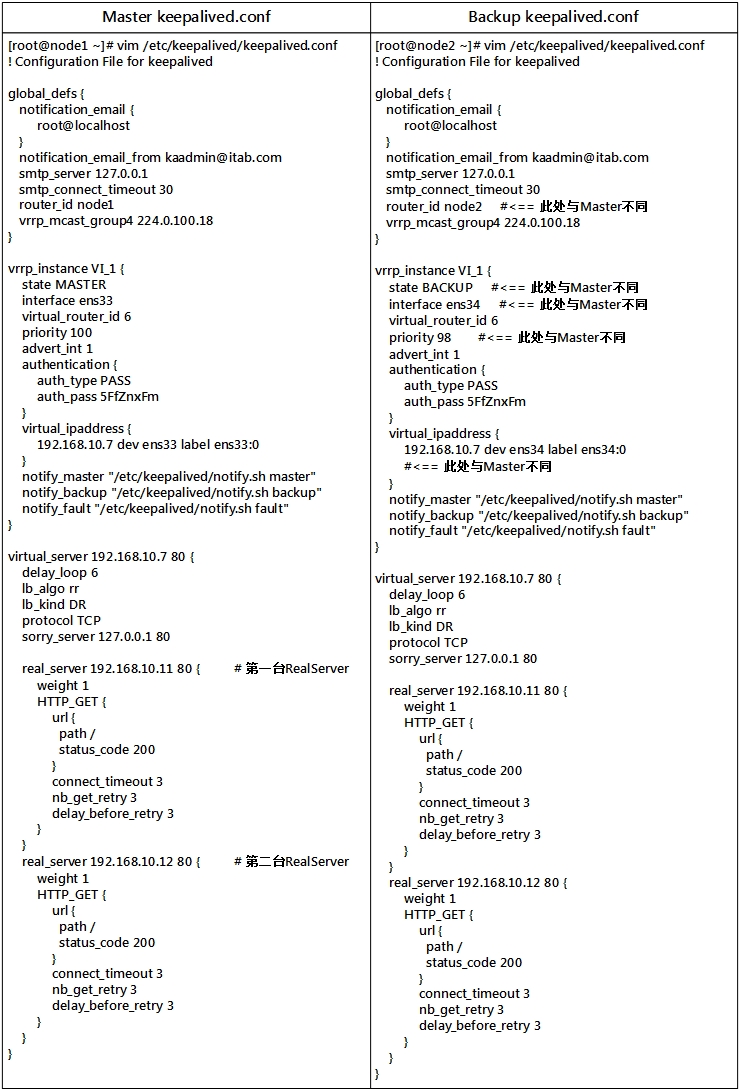
1、编译Keepalived配置文件
2、启动Keepalived服务
(1) 在node2(192.168.10.8)上
(2) 在node1(192.168.10.6)上
2、配置RealServer的服务资源
(1) 在rs1(192.168.10.11)上
(2) 在rs2(192.168.10.12)上
3、配置Director为Sorry Server
(1) 在node1(192.168.10.6)上
(2) 在node2(192.168.10.8)上
4、测试
(1) 在主机(192.168.10.99 ==> FTP服务器)上测试访问VIP(192.168.10.7)的80端口
此时在node1(192.168.10.6)上用ipvsadm命令查看集群服务。
(2) 停止RealServer 1上的Web服务,再进行测试
在192.168.10.99上再次请求,结果如下。
实验要求 ==> 将两台前端调度器node1和node2配置为一组VRRP示例(即单实例Keepalived),VIP是192.168.10.7。node1和node2根据请求报文的目标IP和目标PORT,按照一定的调度算法,实现将其调度至后端的RealServer,由后端RealServer响应请求报文。
实验环境 ==> CentOS 7.x
实验目的 ==> 通过Keepalived配置管理LVS,并对后端RealServer进行健康状态检测
实验主机 ==> 一共四台主机,分别如下。
192.168.10.6(主机名:node1)
192.168.10.8(主机名:node2)
192.168.10.11(主机名:rs1)
192.168.10.12(主机名:rs2)
[b]实验前提 [/b]==> 高可用对之间时间同步(可通过周期性任务来实现)
实验操作如下。
1、编译Keepalived配置文件
2、启动Keepalived服务
(1) 在node2(192.168.10.8)上
[root@node2 ~]# systemctl start keepalived.service
[root@node2 ~]# ifconfig
ens34: flags=4163<UP,BROADCAST,RUNNING,MULTICAST>  mtu 1500
inet 192.168.10.8  netmask 255.255.255.0  broadcast 192.168.10.255
ether 00:0c:29:ef:52:87  txqueuelen 1000  (Ethernet)
RX packets 17975  bytes 6997522 (6.6 MiB)
RX errors 0  dropped 0  overruns 0  frame 0
TX packets 2636  bytes 275578 (269.1 KiB)
TX errors 0  dropped 0 overruns 0  carrier 0  collisions 0

ens34:0: flags=4163<UP,BROADCAST,RUNNING,MULTICAST>  mtu 1500
inet 192.168.100.7  netmask 255.255.255.255  broadcast 0.0.0.0
ether 00:0c:29:ef:52:87  txqueuelen 1000  (Ethernet)

lo: flags=73<UP,LOOPBACK,RUNNING>  mtu 65536
inet 127.0.0.1  netmask 255.0.0.0
inet6 ::1  prefixlen 128  scopeid 0x10<host>
loop  txqueuelen 0  (Local Loopback)
RX packets 0  bytes 0 (0.0 B)
RX errors 0  dropped 0  overruns 0  frame 0
TX packets 0  bytes 0 (0.0 B)
TX errors 0  dropped 0 overruns 0  carrier 0  collisions 0
由于此时只有node2节点开启keepalived服务,因此VIP配置在node2节点上。现在在node1节点上也开启keepalived服务,由于node1的优先级比node2高,因此VIP会漂移到node1节点上。
(2) 在node1(192.168.10.6)上
[root@node1 ~]# systemctl start keepalived.service
[root@node1 ~]# ifconfig
ens33: flags=4163<UP,BROADCAST,RUNNING,MULTICAST>  mtu 1500
inet 192.168.10.6  netmask 255.255.255.0  broadcast 192.168.10.255
ether 00:0c:29:f7:b3:4e  txqueuelen 1000  (Ethernet)
RX packets 13628  bytes 8098564 (7.7 MiB)
RX errors 0  dropped 0  overruns 0  frame 0
TX packets 11863  bytes 1007226 (983.6 KiB)
TX errors 0  dropped 0 overruns 0  carrier 0  collisions 0

ens33:0: flags=4163<UP,BROADCAST,RUNNING,MULTICAST>  mtu 1500
inet 192.168.100.7  netmask 255.255.255.255  broadcast 0.0.0.0
ether 00:0c:29:f7:b3:4e  txqueuelen 1000  (Ethernet)

lo: flags=73<UP,LOOPBACK,RUNNING>  mtu 65536
inet 127.0.0.1  netmask 255.0.0.0
inet6 ::1  prefixlen 128  scopeid 0x10<host>
loop  txqueuelen 0  (Local Loopback)
RX packets 9  bytes 600 (600.0 B)
RX errors 0  dropped 0  overruns 0  frame 0
TX packets 9  bytes 600 (600.0 B)
TX errors 0  dropped 0 overruns 0  carrier 0  collisions 0
2、配置RealServer的服务资源
(1) 在rs1(192.168.10.11)上
[root@rs1 ~]# yum -y install httpd
[root@rs1 ~]# echo "<h1>RealServer 1</h1>" > /var/www/html/index.html
[root@rs1 ~]# systemctl start httpd.service                                                     :::*
[root@rs1 ~]# ss -tnl | grep :80
LISTEN     0      128         :::80                      :::*
(2) 在rs2(192.168.10.12)上
[root@rs2 ~]# yum -y install httpd
[root@rs2 ~]# echo "<h1>RealServer 2</h1>" > /var/www/html/index.html
[root@rs2 ~]# systemctl start httpd.service
[root@rs2 ~]# ss -tnl | grep :80
LISTEN     0      128         :::80                      :::*
3、配置Director为Sorry Server
(1) 在node1(192.168.10.6)上
[root@node1 ~]# yum -y install httpd
[root@node1 ~]# echo "<h1>Sorry Server 1</h1>" > /var/www/html/index.html
[root@node1 ~]# systemctl start httpd.service
[root@node1 ~]# ss -tnl | grep :80
LISTEN     0      128          *:80                       *:*
(2) 在node2(192.168.10.8)上
[root@node2 ~]# yum -y install httpd
[root@node2 ~]# echo "<h1>Sorry Server 2</h1>" > /var/www/html/index.html
[root@node2 ~]# systemctl start httpd.service
[root@node2 ~]# ss -tnl | grep :80
LISTEN     0      128          *:80                       *:*
4、测试
(1) 在主机(192.168.10.99 ==> FTP服务器)上测试访问VIP(192.168.10.7)的80端口
[root@ftp ~]# curl http://192.168.10.7/index.html <h1>RealServer 1</h1>
[root@ftp ~]# curl http://192.168.10.7/index.html <h1>RealServer 2</h1>
[root@ftp ~]# curl http://192.168.10.7/index.html <h1>RealServer 1</h1>
[root@ftp ~]# curl http://192.168.10.7/index.html <h1>RealServer 2</h1>
[root@ftp ~]# curl http://192.168.10.7/index.html <h1>RealServer 1</h1>
[root@ftp ~]# curl http://192.168.10.7/index.html <h1>RealServer 2</h1>
结果为根据rr调度算法将请求报文转发至RealServer1和RealServer2.
此时在node1(192.168.10.6)上用ipvsadm命令查看集群服务。
[root@node1 keepalived]# ipvsadm -Ln
IP Virtual Server version 1.2.1 (size=4096)
Prot LocalAddress:Port Scheduler Flags
-> RemoteAddress:Port           Forward Weight ActiveConn InActConn
TCP  192.168.10.7:80 rr
-> 192.168.10.11:80             Route   1      0          3
-> 192.168.10.12:80             Route   1      0          3
(2) 停止RealServer 1上的Web服务,再进行测试
[root@rs2 ~]# systemctl stop httpd.service
在192.168.10.99上再次请求,结果如下。
[root@ftp ~]# curl http://192.168.10.7/index.html <h1>RealServer 1</h1> [root@ftp ~]# curl http://192.168.10.7/index.html <h1>RealServer 1</h1> [root@ftp ~]# curl http://192.168.10.7/index.html <h1>RealServer 1</h1> [root@ftp ~]# curl http://192.168.10.7/index.html[/code]
此时在node1(192.168.10.6)上用ipvsadm命令查看集群服务。[root@node1 ~]# ipvsadm -Ln IP Virtual Server version 1.2.1 (size=4096) Prot LocalAddress:Port Scheduler Flags -> RemoteAddress:Port Forward Weight ActiveConn InActConn TCP 192.168.10.7:80 rr -> 192.168.10.11:80 Route 1 0 3可以发现,Keepalived服务通过IPVS Wrapper这个底层接口分许Keepalived配置文件,并将RealServer 2移除了。
(3) 停止RealServer 2上的Web服务,再进行测试[root@rs1 ~]# systemctl stop httpd.service
在192.168.10.99上再次请求,结果如下。[root@ftp ~]# curl http://192.168.10.7/index.html <h1>Sorry Server 1</h1> [root@ftp ~]# curl http://192.168.10.7/index.html <h1>Sorry Server 1</h1> [root@ftp ~]# curl http://192.168.10.7/index.html <h1>Sorry Server 1</h1>
此时在node1(192.168.10.6)上用ipvsadm命令查看。[root@node1 ~]# ipvsadm -Ln IP Virtual Server version 1.2.1 (size=4096) Prot LocalAddress:Port Scheduler Flags -> RemoteAddress:Port Forward Weight ActiveConn InActConn TCP 192.168.10.7:80 rr -> 127.0.0.1:80 Route 1 0 3可以发现,Keepalived服务已经将RealServer 1移除了,这时已经没有一台RealServer提供Web服务了。而当Keepalived检测到所有RealServer都故障时,会由Sorry Server对客户端请求进行响应。
(4) 让node1节点下线,测试node2节点是否能够接管node1的VIP和服务资源[root@node1 ~]# systemctl stop keepalived.service
在node2节点上查看IP,如下。[root@node2 ~]# ifconfig ens34: flags=4163<UP,BROADCAST,RUNNING,MULTICAST> mtu 1500 inet 192.168.10.8 netmask 255.255.255.0 broadcast 192.168.10.255 ether 00:0c:29:ef:52:87 txqueuelen 1000 (Ethernet) RX packets 23876 bytes 7443422 (7.0 MiB) RX errors 0 dropped 0 overruns 0 frame 0 TX packets 5114 bytes 527694 (515.3 KiB) TX errors 0 dropped 0 overruns 0 carrier 0 collisions 0 ens34:0: flags=4163<UP,BROADCAST,RUNNING,MULTICAST> mtu 1500 inet 192.168.10.7 netmask 255.255.255.255 broadcast 0.0.0.0 ether 00:0c:29:ef:52:87 txqueuelen 1000 (Ethernet) lo: flags=73<UP,LOOPBACK,RUNNING> mtu 65536 inet 127.0.0.1 netmask 255.0.0.0 inet6 ::1 prefixlen 128 scopeid 0x10<host> loop txqueuelen 0 (Local Loopback) RX packets 19 bytes 1252 (1.2 KiB) RX errors 0 dropped 0 overruns 0 frame 0 TX packets 19 bytes 1252 (1.2 KiB) TX errors 0 dropped 0 overruns 0 carrier 0 collisions 0可以发现,node2已经接管了node1的工作。
此时仍然没有一台RealServer提供服务,调度器的VIP漂移至node2节点上,我们在192.168.10.99主机上再进行测试。[root@ftp ~]# curl http://192.168.10.7/index.html <h1>Sorry Server 2</h1> [root@ftp ~]# curl http://192.168.10.7/index.html <h1>Sorry Server 2</h1> [root@ftp ~]# curl http://192.168.10.7/index.html <h1>Sorry Server 2</h1>此时Say sorry的web服务器是node2。
(5) 再次启动rs1和rs2,并进行测试
启动完rs1和rs2上的Web服务后,在node2(192.168.10.8)节点上使用ipvsadm命令查看集群服务。[root@node2 ~]# ipvsadm -Ln IP Virtual Server version 1.2.1 (size=4096) Prot LocalAddress:Port Scheduler Flags -> RemoteAddress:Port Forward Weight ActiveConn InActConn TCP 192.168.10.7:80 rr -> 192.168.10.11:80 Route 1 0 0 -> 192.168.10.12:80 Route 1 0 0可以发现,一旦rs1和rs2故障修复完成,能够正常提供服务时,会立即被Keepalived服务检测到,并将其添加到调度器的正常转发队列中。此时前端调度器由node2接管资源。在192.168.10.99主机上再进行测试。[root@ftp ~]# curl http://192.168.10.7/index.html <h1>RealServer 1</h1> [root@ftp ~]# curl http://192.168.10.7/index.html <h1>RealServer 2</h1> [root@ftp ~]# curl http://192.168.10.7/index.html <h1>RealServer 1</h1> [root@ftp ~]# curl http://192.168.10.7/index.html <h1>RealServer 2</h1> [root@ftp ~]# curl http://192.168.10.7/index.html <h1>RealServer 1</h1> [root@ftp ~]# curl http://192.168.10.7/index.html <h1>RealServer 2</h1>实验完成!

相关文章推荐
- 配置LVS + Keepalived高可用负载均衡集群之图文教程
- apache+inotify-tools+keepalived+lvs-NAT模式配置高可用负载均衡集群 推荐
- Keepalived+LVS-DR模式配置高可用负载均衡集群
- 配置LVS + Keepalived高可用负载均衡集群之图文教程
- 配置LVS + Keepalived高可用负载均衡集群
- 配置LVS + Keepalived高可用负载均衡集群之图文教程
- 实例:LVS+Keepalived配置LVS的高可用
- 配置LVS + Keepalived高可用负载均衡集群之图文教程
- LVS+Keepalived+Nginx+Tomcat高可用负载均衡集群配置(DR模式,一个VIP,多个端口)
- keepalived详解 及 keepalived配置LVS高可用负载均衡集群
- Linux下Keepalived+LVS-DR模式配置高可用负载均衡集群
- Keepalived+LVS-DR模式配置高可用负载均衡集群
- 配置LVS+keepalived 高可用负载均衡集群
- 配置LVS + Keepalived高可用负载均衡集群之图文教程
- Keepalived+LVS-DR模式配置高可用负载均衡集群
- apache+inotify-tools+keepalived+lvs-DR模式配置高可用负载均衡集群
- LVS+keepalived DR模式配置高可用负载均衡集群
- 配置LVS + Keepalived高可用负载均衡集群之图文教程
- 配置LVS + Keepalived高可用负载均衡集群之图文教程
- LVS+Keepalived实现高可用集群