keepalived高可用haproxy配合varnish实现wordpress的动静分离
2017-07-22 14:08
806 查看
haproxy和nginx都可以作为七层和四层反代服务器对外提供服务,此文通过haproxy和keealived配置varnish搭建wordpress的动静分离站点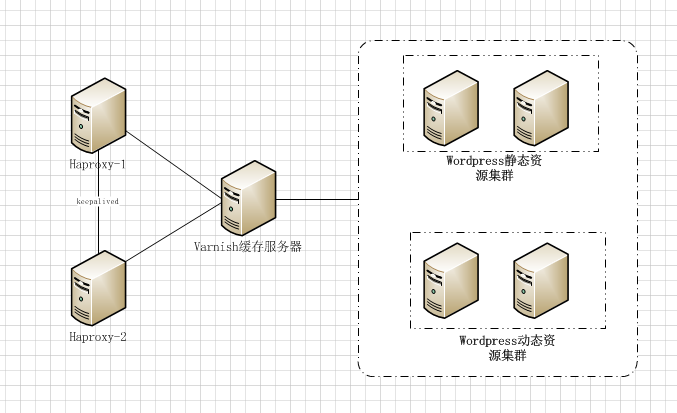
 keepalived配置:修改/etc/keepalived/keepalived.conf配置文件,内容如下:
一、实验环境
五台虚拟机:haproxy-1:搭建haproxy和keepalived服务,ip地址:192.168.11.176haproxy-2:搭建haproxy和keepalived服务,ip地址:192.168.11.172varnish服务器ip地址:192.168.11.173wordpress静态服务器:搭建httpd,ip地址:192.168.11.177wordpress动态服务器,搭建httpd+php+mariadb,ip地址:192.168.11.178实验目的:通过haproxy访问到后台网站,并且varnish为网站提供缓存,提升网站性能。实验拓扑:此处虚拟机数量不够,就不采用动静分离集群了,而是分别采用一台虚拟机部署:二、实验步骤
wordpress配置:动态服务器配置:安装httpd,mariadb,php服务,此处php作为httpd的模块进行动态php文件处理:yum install -y httpd mariadb-server php php-mysql php-mbstring上传wordpress到/var/www/html路径下并修改属主属组为apache,此处不做详细演示;静态服务器配置:安装httpd服务并上传wordpress到/var/www/html,修改属主属组为apache;varnish配置:安装varnish服务并修改varnish的配置文件default.vcl,修改内容如下:
vcl 4.0; #声明为varnish4.0
import directors; #调用多个后端主机做集群#
probe health_check { #定义健康状态检测机制#
.url = "/.health_check.html"; #定义检测文件#
.window = 5; #定义一共检测几次#
.threshold = 3; #定义检测几次失败则认为后端主机失效#
.interval = 2s; #每隔2秒检测一次#
.timeout = 3s; #连接超时时长为3秒#
}
backend dynamic { #定义后端动态主机#
.host = "192.168.11.178";
.port = "80";
.probe = health_check;
}
backend static { #定义前端主机#
.host = "192.168.11.177";
.port = "80";
.probe = health_check;
}
sub vcl_recv {
# Happens before we check if we have this in cache already.
#
# Typically you clean up the request here, removing cookies you don't need,
# rewriting the request, etc.
if (req.url ~ "(?i).*php.*") { #当访问的url包括php,则转到动态服务器,否则所有请求转到静态服务器,实现动静分离#
set req.backend_hint = dynamic;
} else {
set req.backend_hint = static;
}
if (req.url ~ "(?i)(register|login)$") { #如果请求地址结尾为register或者login,注册和登录页面,则不查缓存,,直接从后端服务器获取内容#
return (pass);
}
}
sub vcl_backend_response {
# Happens after we have read the response headers from the backend.
#
# Here you clean the response headers, removing silly Set-Cookie headers
# and other mistakes your backend does.
#当后端服务器回复给varnish的响应如果不包含公共缓存信息,而且请求为jpg等静态资源,则卸载cookie信息并缓存资源1小时#
if (beresp.http.cache-control !~ "s-maxage") {
if (bereq.url ~ "(?i)\.(jpg|jpeg|png|gif|css|js|xml)$") {
unset beresp.http.Set-Cookie;
set beresp.ttl = 3600s;
}
}
#当varnish请求后端服务器的url包括php,则卸载cookie信息并缓存资源1小时#
if (bereq.url ~ "(?i).*php.*") {
unset beresp.http.Set-Cookie;
set beresp.ttl = 3600s;
}
}
sub vcl_deliver {
# Happens when we have all the pieces we need, and are about to send the
# response to the client.
#
# You can do accounting or modifying the final object here.
if (obj.hits>0) {
set resp.http.X-Cache = "HIT via "+server.ip;
} else {
set resp.http.X-Cache = "MISS via "+server.ip;
}
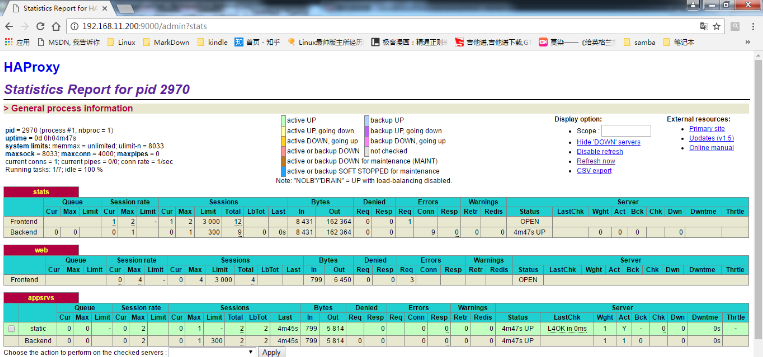
} 注意: varnish在探测到请求和响应报文头部有cookie信息的时候是不缓存的,所以缓存命中率会非常低。这就是为什么要卸载php页面和jpg等动态资源cookie的原因。然后通过varnishadm登录varnish并加载配置项,用ab进行压测会发现启用和不启用缓存的性能差出数倍,而且启用和不启用缓存后端服务器压力也差出数倍;haproxy配置:修改/etc/haproxy/haproxy.cfg配置文件,内容如下:global #全局配置# log 127.0.0.1 local2 #log记录到rsyslog服务器,此处需要在rsyslog进行配置# chroot /var/lib/haproxy #把haproxy禁锢到/var/lib/haproxy,防止haproxy被劫持后破坏系统 pidfile /var/run/haproxy.pid #pid文件位置# maxconn 4000 #每个进程最大连接数为4000# user haproxy group haproxy daemon #以服务方式运行# stats socket /var/lib/haproxy/stats defaults #默认配置# mode http #默认为http七层代理# log global #日志采用global配置# option httplog #以http方式记录日志# option dontlognull #不记录健康状态检测日志# option http-server-close option forwardfor except 127.0.0.0/8 #传递客户端ip到后端服务器,需要在后端服务器修改日志样式# option redispatch retries 3 #最大尝试3次连接# timeout http-request 10s #等待http请求时间为10s# timeout queue 1m # timeout connect 10s #等待建立连接时间为10s# timeout client 1m #等待客户端连接时间# timeout server 1m #等待服务端连接时间# timeout http-keep-alive 10s #长连接时长# timeout check 10s #检测间隔# maxconn 3000 listen stats #定义状态页# bind *:9000 stats enable stats auth admin:admin stats uri /admin?stats #定义stats url路径# stats refresh 30s stats realm "status-page" stats hide-version #隐藏版本信息# stats admin if TRUE #开启后端管理功能# frontend web #定义前端服务器名为web# bind *:80 default_backend appsrvs #绑定的后端服务器# backend appsrvs #定义后端服务器名为appsrvs# server static 192.168.11.173:80 check #定义后端服务器,static为名字,check表示进行健康状态检测,也可以添加其他值进来,如检测间隔等信息#状态页面如下:
keepalived配置:修改/etc/keepalived/keepalived.conf配置文件,内容如下:! Configuration File for keepalived
global_defs {
notification_email {
acassen@firewall.loc
failover@firewall.loc
sysadmin@firewall.loc
}
notification_email_from Alexandre.Cassen@firewall.loc
smtp_server 192.168.200.1
smtp_connect_timeout 30
router_id node1
vrrp_mcast_group4 224.0.115.15
}
vrrp_script chk_haproxy {
script "pkill -0 haproxy && exit 0 || exit 1"
interval 1
weight -5
fall 2
rise 1
}
vrrp_instance VI_1 {
state BACKUP
interface ens33
virtual_router_id 10
priority 96
advert_int 1
authentication {
auth_type PASS
auth_pass hello
}
virtual_ipaddress {
192.168.11.200 label ens33:0
}
track_script {
chk_haproxy
}
notify_master "/etc/keepalived/notify.sh master"
notify_backup "/etc/keepalived/notify.sh backup"
notify_fault "/etc/keepalived/notify.sh fault"
}写notify脚本,内容如下:#!/bin/bash#contact='root@localhost'notify() {local mailsubject="$(hostname) to be $1,vip floating."local mailbody="$(date + '%F %T'):vrrp transition,$(hostname) changed to be $1."echo "$mailbody" | mail -s "$mailsubject" $contact}case $1 inmaster)notify master;;backup)notify backup;;fault)notify fault;;*)echo "Usage: $(basename $0) {master|backup|fault}"exit 1;;esac定义的haproxy的虚拟ip为192.168.11.200,此时任何一个haproxy主机或者haproxy服务故障都不会影响网站的正常访问,通过192.168.11.200即可访问到网站。此时实验配置成功,而且网站通过varnish可承载大量并发,但是仍有问题,前台haproxy为高可用,但是后台varnish和动静服务器均是单点,为单点故障,所以还需要进一步完善。网站访问流程为:client –> 前端MASTER haproxy –> varnish –> 后端动静服务器。

相关文章推荐
- haproxy实现的web反向代理,动静分离,以及基于keepalived实现的haproxy的高可用
- HAProxy+KeepAlived实现web服务高可用、动静分离等 推荐
- Keepalived实现Haproxy高可用实现Web动静分离
- HAProxy+Varnish+LNMP实现高可用负载均衡动静分离集群部署
- HAProxy基于KeepAlived实现Web高可用及动静分离
- HAProxy+Varnish+LNMP实现高可用负载均衡动静分离集群部署
- HAProxy基于KeepAlived实现Web高可用及动静分离 推荐
- HAProxy+Varnish+LNMP实现高可用负载均衡动静分离集群部署 推荐
- Nginx LB+keepalived+varnish+NAMP架构部署wordpress实现动静分离
- Haproxy+Keepalived+Varnish+LAMP+Memcacked+NFS 实现web站点的动静分离
- 基于HAProxy+Varnish实现动静分离、负载均衡的高可用集群
- 如何构建Keepalived+HAProxy实现高可用,负载均衡,动静分离。
- KeepAlived实现HAProxy双主并实现资源的动静分离
- 高可用haproxy调度varnish服务器缓存后端动静分离集群架构
- haproxy+varnish+amp集群实现动静分离
- keepalived+haproxy 实现对web的动静分离和负载均衡
- haproxy高可用实现 和 动静资源的调度分离
- Keepalived+Haproxy双主高可用负载均衡代理动静分离web服务器
- haproxy+varnish实现discuz论坛的动静分离以及静态缓存
- LAMP+haproxy+varnish实现网站访问的动静分离及静态资源缓存