前端基础快速学习-CSS(2)
2017-03-29 00:00
651 查看
继续CSS的常见使用。
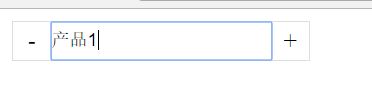
例1. 输出一个购物车效果的text对话框
例2 如果图片挂了,可以通过<alt>自动用文字显示内容

例3 设置input标签的默认值

例4 !important 强制覆盖, 当冲突时,以!important的设置为准

例5 class选择器还可以进一步根据属性选择,比如只有class='c1',alex='a'的标签才是红色

例6 当一个标签使用fixed的时候,他会和没有使用的重叠在一起,因此在.pg-body里面指定了margin-top 48px (第一个标签的高度)以便隔开

例7 利用外部relative,内部absolute的特性在input后面加个小图标

例8 after和 before的使用
当我们使用hover,after或者before的时候,当选择了对应的class,他会自动应用;一个常见场景是外部的div没有float,而内部的div有float,导致外部不能撑开,这个时候可以考虑在后面加个隐形的点,然后设置clear:both来取消漂浮
如果不使用clearfix,那么外层的div其实被绿色部分撑住了,不会包括2;可以在F12下面选中div查看范围来确认
列9 巧妙的设置小三角,注意inline-block的使用,把块级标签当做内联标签使用,同时又能设置高度


登录乐搏学院官网http://www.learnbo.com/
或关注我们的官方微博微信,还有更多惊喜哦~

例1. 输出一个购物车效果的text对话框
| 1 2 3 4 5 6 7 8 9 10 11 12 13 14 15 16 17 18 19 20 21 22 23 24 25 26 27 28 29 30 31 32 33 | <!DOCTYPE html> < html lang = "en" > < head > < meta charset = "UTF-8" > < title ></ title > < style > .inp{border: 0; border-left: 1px solid #dddddd; border-right: 1px solid #dddddd; height: 25px; margin: 0; padding: 0; float: left; } .sp{display: inline-block; height: 25px; width: 25px; text-align: center; line-height: 25px; float: left; } </ style > </ head > < body > < div style = "border: 1px solid #dddddd;display: inline-block;" > < div class = "sp" >-</ div > < input class = "inp" type = "text" /> < div class = "sp" >+</ div > </ div > </ body > </ html > |
| 1 | <br> |
例2 如果图片挂了,可以通过<alt>自动用文字显示内容
| 1 2 3 4 5 6 7 8 9 10 11 12 13 14 15 16 17 18 19 20 21 | <!DOCTYPE html> < html lang = "en" > < head > < meta charset = "UTF-8" > < title ></ title > < style > img{border: 0; } </ style > </ head > < body > < div > < div class = "item" > < a href = "http://www.etiantian.org" > < img src = "2.jp" alt = "图片" > </ a > </ div > </ div > </ body > </ html > |
效果图
例3 设置input标签的默认值
| 1 2 3 4 5 6 7 8 9 10 11 12 13 14 15 16 17 18 19 20 21 22 | <!DOCTYPE html> < html lang = "en" > < head > < meta charset = "UTF-8" > < title ></ title > </ head > < body > < textarea >123</ textarea > < input type = "text" value = "222" /> < select > < option >上海</ option > < option selected = "selected" >广州</ option > < option >北京</ option > </ select > 男:< input type = "radio" name = "g1" /> 女:< input type = "radio" name = "g1" checked = "checked" /> < input type = "checkbox" name = "c1" checked = "checked" /> < input type = "checkbox" name = "c1" /> < input type = "checkbox" name = "c1" checked = "checked" /> < input type = "checkbox" name = "c1" /> </ body > </ html > |
例4 !important 强制覆盖, 当冲突时,以!important的设置为准
| 1 2 3 4 5 6 7 8 9 10 11 12 13 14 15 16 17 18 19 20 21 | <!DOCTYPE html> < html lang = "en" > < head > < meta charset = "UTF-8" > < title ></ title > < style > .hide{display: none !important; } .c1{color: red !important; } .c2{color: green; } </ style > </ head > < body > < div class = "c1 c2" >red</ div > </ body > </ html > |
例5 class选择器还可以进一步根据属性选择,比如只有class='c1',alex='a'的标签才是红色
| 1 2 3 4 5 6 7 8 9 10 11 12 13 14 15 16 17 18 19 20 | <!DOCTYPE html> < html lang = "en" > < head > < meta charset = "UTF-8" > < title ></ title > < style > .c1[alex='a']{color: red; } </ style > </ head > < body > < div > < div class = "c1" alex = "a" >1</ div > < div class = "c1" alex = "b" >2</ div > < div class = "c1" >3</ div > < div class = "c1" alex = "a" >4</ div > </ div > </ body > </ html > |
例6 当一个标签使用fixed的时候,他会和没有使用的重叠在一起,因此在.pg-body里面指定了margin-top 48px (第一个标签的高度)以便隔开
| 1 2 3 4 5 6 7 8 9 10 11 12 13 14 15 16 17 18 19 20 21 22 23 24 25 | <!DOCTYPE html> < html lang = "en" > < head > < meta charset = "UTF-8" > < title ></ title > < style > .pg-header{position: fixed; top: 0; left: 0; right: 0; height: 48px; background-color: #2459a2; } .pg-body{height: 2000px; margin-top: 48px; } </ style > </ head > < body > < div class = "pg-header" >header</ div > < div class = "pg-body" >body</ div > </ body > </ html > |
例7 利用外部relative,内部absolute的特性在input后面加个小图标
| 1 2 3 4 5 6 7 8 9 10 11 12 13 14 15 16 17 18 19 20 21 22 23 24 25 26 27 28 29 30 31 32 | <!DOCTYPE html> < html lang = "en" > < head > < meta charset = "UTF-8" > < title ></ title > < style > .icon-name{background-image: url('i_name.jpg');height: 16px; width: 16px; display: inline-block; } .icon-pwd{background-image: url('i_pwd.jpg');height: 16px; width: 16px; display: inline-block; } </ style > </ head > < body > < div style = "width: 200px;position: relative" > < input style = "width: 180px;padding-right: 20px;" /> < span class = "icon-name" style = "position: absolute;top:2px;right: 0;" ></ span > </ div > < div style = "width: 200px;position: relative" > < input style = "width: 180px;padding-right: 20px;" /> < span class = "icon-pwd" style = "position: absolute;top:2px;right: 0;" ></ span > </ div > </ body > </ html > |
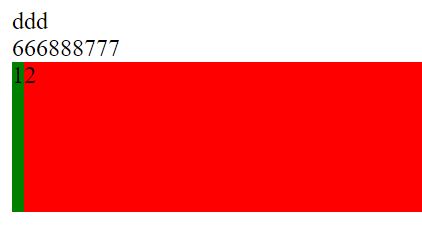
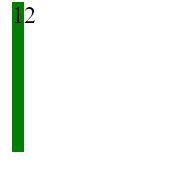
例8 after和 before的使用
当我们使用hover,after或者before的时候,当选择了对应的class,他会自动应用;一个常见场景是外部的div没有float,而内部的div有float,导致外部不能撑开,这个时候可以考虑在后面加个隐形的点,然后设置clear:both来取消漂浮
| 1 2 3 4 5 6 7 8 9 10 11 12 13 14 15 16 17 18 19 20 21 22 23 24 25 26 27 28 29 30 31 32 33 34 35 36 37 38 39 | <!DOCTYPE html> < html lang = "en" > < head > < meta charset = "UTF-8" > < title ></ title > < style > .c1:hover{background-color: #2459a2; } .c2:before{content: '666'; } .c2:after {content: '777'; } .left{float: left; } .item{background-color: red; } .clearfix:after{content: '.'; clear: both; display: block; visibility: hidden; height: 0; } </ style > </ head > < body > < div class = "c1" >ddd</ div > < div class = "c2" >888</ div > < div style = "background-color: red" class = "clearfix" > < div class = "left" style = "height: 100px;background-color: green" >1</ div > < div class = "left" >2</ div > </ div > </ body > </ html > |
如果不使用clearfix,那么外层的div其实被绿色部分撑住了,不会包括2;可以在F12下面选中div查看范围来确认
列9 巧妙的设置小三角,注意inline-block的使用,把块级标签当做内联标签使用,同时又能设置高度
| 1 2 3 4 5 6 7 8 9 10 11 12 13 14 15 16 17 18 19 | <!DOCTYPE html> < html lang = "en" > < head > < meta charset = "UTF-8" > < title ></ title > < style > .icon{display: inline-block; border-top: 15px solid green; border-right: 15px solid red; border-bottom: 15px solid transparent; border-left: 15px solid transparent; } </ style > </ head > < body > < div class = "icon" ></ div > </ body > </ html > |
登录乐搏学院官网http://www.learnbo.com/
或关注我们的官方微博微信,还有更多惊喜哦~

相关文章推荐
- 前端基础快速学习-CSS(3)
- 前端基础快速学习-CSS(1)
- 前端学习之CSS基础知识(2)
- 前端基础快速学习-Dom
- 前端基础快速学习- HTML
- 前端学习 HTML、CSS、JS基础
- web前端基础入门学习第三天css
- 阿里免费教你学习前端开发CSS基础
- 前端学习之路css(05)-基础知识
- 前端基础快速学习- JQuery
- 李洪强和你一起学习前端之(3)Css基础和选择器
- 前端学习2(css基础巩固)
- 这几天买了很多书,最近这2个月的学习目标是:熟悉Linux、C、Python、Web前端基础(HTML、XHTML,CSS)
- python之 前端HTML/CSS基础知识学习笔记
- 前端基础学习-css基础笔记
- 学习笔记-《零基础学习HTML5—html+css基础 》1.前端认知
- 前端学习基础课程回顾-CSS
- 从零开始学习前端开发 — 2、CSS基础
- 前端学习——css基础知识与html模板
- python之 前端HTML/CSS基础知识学习笔记