MySQL高可用性之MHA
2017-02-28 19:30
399 查看
防伪码:举杯邀明月,对影成三人。
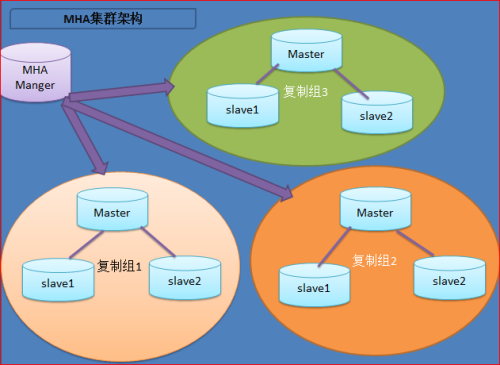
MHA(Master High Availability)目前在MySQL高可用方面是一个相对成熟的解决方案,它由日本DeNA公司youshimaton(现就职于Facebook公司)开发,是一套优秀的作为MySQL高可用性环境下故障切换和主从提升的高可用软件。在MySQL故障切换过程中,MHA能做到在0~30秒之内自动完成数据库的故障切换操作,并且在进行故障切换的过程中,MHA能在最大程度上保证数据的一致性,以达到真正意义上的高可用。MHA里有两个角色一个是MHA Node(数据节点)另一个是MHA Manager(管理节点)。MHA Manager可以单独部署在一台独立的机器上管理多个master-slave集群,也可以部署在一台slave节点上。MHA Node运行在每台MySQL服务器上,MHA Manager会定时探测集群中的master节点,当master出现故障时,它可以自动将最新数据的slave提升为新的master,然后将所有其他的slave重新指向新的master。整个故障转移过程对应用程序完全透明。
在MHA自动故障切换过程中,MHA试图从宕机的主服务器上保存二进制日志,最大程度的保证数据的不丢失,但这并不总是可行的。例如,如果主服务器硬件故障或无法通过ssh访问,MHA没法保存二进制日志,只进行故障转移而丢失了最新的数据。使用MySQL
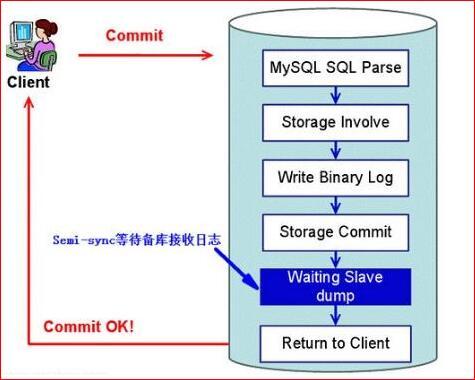
5.5的半同步复制,可以大大降低数据丢失的风险。MHA可以与半同步复制结合起来。如果只有一个slave已经收到了最新的二进制日志,MHA可以将最新的二进制日志应用于其他所有的slave服务器上,因此可以保证所有节点的数据一致性。注:从MySQL5.5开始,MySQL以插件的形式支持半同步复制。如何理解半同步呢?首先我们来看看异步,全同步的概念:异步复制(Asynchronous replication)MySQL默认的复制即是异步的,主库在执行完客户端提交的事务后会立即将结果返给给客户端,并不关心从库是否已经接收并处理,这样就会有一个问题,主如果crash掉了,此时主上已经提交的事务可能并没有传到从上,如果此时,强行将从提升为主,可能导致新主上的数据不完整。全同步复制(Fully synchronous replication)指当主库执行完一个事务,所有的从库都执行了该事务才返回给客户端。因为需要等待所有从库执行完该事务才能返回,所以全同步复制的性能必然会收到严重的影响。半同步复制(Semisynchronous replication)介于异步复制和全同步复制之间,主库在执行完客户端提交的事务后不是立刻返回给客户端,而是等待至少一个从库接收到并写到relay log中才返回给客户端。相对于异步复制,半同步复制提高了数据的安全性,同时它也造成了一定程度的延迟,这个延迟最少是一个TCP/IP往返的时间。所以,半同步复制最好在低延时的网络中使用。下面来看看半同步复制的原理图:
总结:异步与半同步异同默认情况下MySQL的复制是异步的,Master上所有的更新操作写入Binlog之后并不确保所有的更新都被复制到Slave之上。异步操作虽然效率高,但是在Master/Slave出现问题的时候,存在很高数据不同步的风险,甚至可能丢失数据。
MySQL5.5引入半同步复制功能的目的是为了保证在master出问题的时候,至少有一台Slave的数据是完整的。在超时的情况下也可以临时转入异步复制,保障业务的正常使用,直到一台salve追赶上之后,继续切换到半同步模式。 工作原理相较于其它HA软件,MHA的目的在于维持MySQL Replication中Master库的高可用性,其最大特点是可以修复多个Slave之间的差异日志,最终使所有Slave保持数据一致,然后从中选择一个充当新的Master,并将其它Slave指向它。-从宕机崩溃的master保存二进制日志事件(binlogevents)。-识别含有最新更新的slave。-应用差异的中继日志(relay log)到其它slave。-应用从master保存的二进制日志事件(binlogevents)。-提升一个slave为新master。-使其它的slave连接新的master进行复制。 目前MHA主要支持一主多从的架构,要搭建MHA,要求一个复制集群中必须最少有三台数据库服务器,一主二从,即一台充当master,一台充当备用master,另外一台充当从库,因为至少需要三台服务器。 接下来部署MHA,具体的搭建环境如下
其中master对外提供写服务,备选master(实际的slave,主机名centos3)提供读服务,slave也提供相关的读服务,一旦master宕机,将会把备选master提升为新的master,slave指向新的master,manager作为管理服务器。一、基础环境准备1、 在配置好IP地址后检查selinux,iptables设置,关闭 selinux ,iptables 服务以便后期主从同步不出错注:时间要同步2、在四台机器都配置epel源
3、建立ssh无交互登录环境Manager主机:
Master主机:同上。Candicatemaster主机:
Slave主机:
测试ssh无交互登录
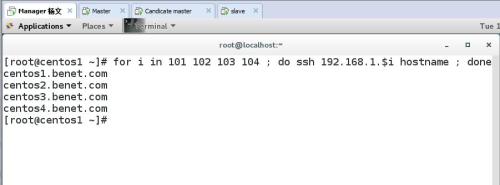
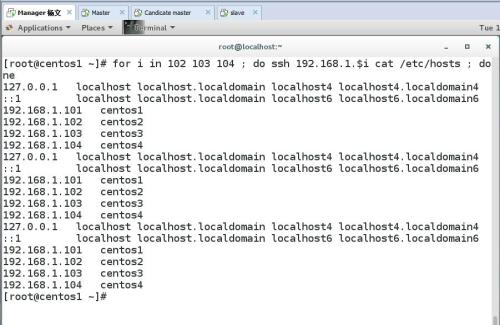
在其他主机上执行同样的测试操作。4、配置hosts环境
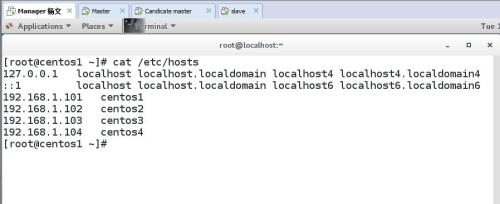
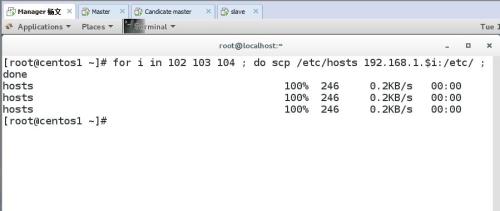
查看每台主机的hosts文件
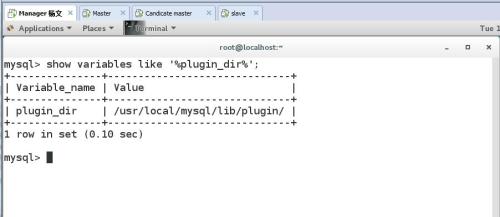
二、配置mysql半同步复制为了尽可能的减少主库硬件损坏宕机造成的数据丢失,因此在配置MHA的同时建议配置成MySQL的半同步复制。注:mysql半同步插件是由谷歌提供,具体位置/usr/local/mysql/lib/plugin/下,一个是master用的semisync_master.so,一个是slave用的semisync_slave.so,下面我们就来具体配置一下。如果不清楚Plugin的目录,用如下查找:
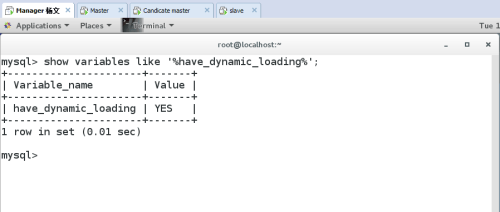
1、分别在主从节点上安装相关的插件(master,Candicatemaster,slave)在MySQL上安装插件需要数据库支持动态载入。检查是否支持,用如下检测:
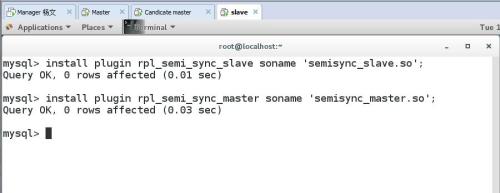
所有mysql数据库服务器,安装半同步插件(semisync_master.so,semisync_slave.so)
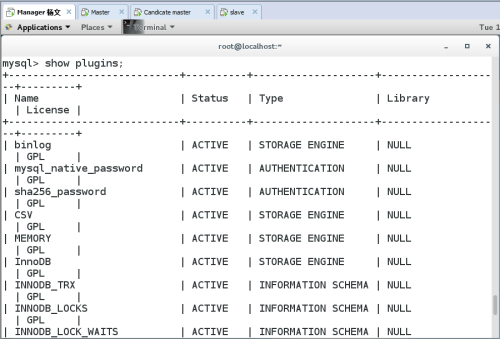
其他mysql主机采用同样的方法安装检查Plugin是否已正确安装:
mysql> show plugins;
或
mysql> select * from information_schema.plugins;
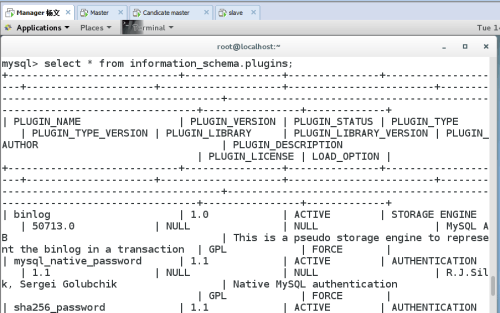
查看半同步相关信息

上图可以看到半同复制插件已经安装,只是还没有启用,所以是off2、修改my.cnf文件,配置主从同步:注:若主MYSQL服务器已经存在,只是后期才搭建从MYSQL服务器,在置配数据同步前应先将主MYSQL服务器的要同步的数据库拷贝到从MYSQL服务器上(如先在主MYSQL上备份数据库,再用备份在从MYSQL服务器上恢复)master mysql主机:server-id = 1
log-bin=mysql-bin
binlog_format=mixedlog-bin-index=mysql-bin.indexrpl_semi_sync_master_enabled=1rpl_semi_sync_master_timeout=1000rpl_semi_sync_slave_enabled=1relay_log_purge=0relay-log = relay-binrelay-log-index = slave-relay-bin.index注:rpl_semi_sync_master_enabled=1 1表是启用,0表示关闭rpl_semi_sync_master_timeout=10000:毫秒单位,该参数主服务器等待确认消息10秒后,不再等待,变为异步方式。 Candicate master主机:server-id = 2
log-bin=mysql-bin
binlog_format=mixedlog-bin-index=mysql-bin.indexrelay_log_purge=0relay-log = relay-binrelay-log-index = slave-relay-bin.indexrpl_semi_sync_master_enabled=1rpl_semi_sync_master_timeout=10000rpl_semi_sync_slave_enabled=1注:relay_log_purge=0,禁止 SQL 线程在执行完一个 relay log 后自动将其删除,对于MHA场景下,对于某些滞后从库的恢复依赖于其他从库的relay
log,因此采取禁用自动删除功能 Slave主机:Server-id = 3log-bin = mysql-binrelay-log = relay-binrelay-log-index = slave-relay-bin.index
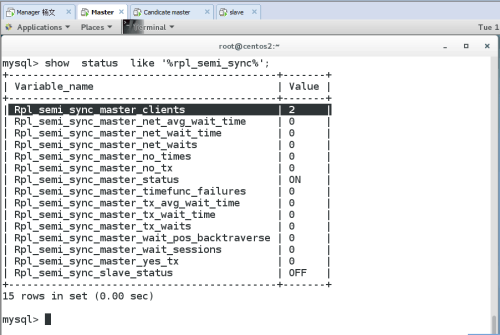
read_only = 1rpl_semi_sync_slave_enabled=1 查看半同步相关信息mysql>show variables like ‘%查看半同步状态:mysql>show status like ‘%rpl_semi_sync%’;有几个状态参数值得关注的:rpl_semi_sync_master_status :显示主服务是异步复制模式还是半同步复制模式 rpl_semi_sync_master_clients :显示有多少个从服务器配置为半同步复制模式 rpl_semi_sync_master_yes_tx :显示从服务器确认成功提交的数量 rpl_semi_sync_master_no_tx :显示从服务器确认不成功提交的数量 rpl_semi_sync_master_tx_avg_wait_time :事务因开启 semi_sync ,平均需要额外等待的时间 rpl_semi_sync_master_net_avg_wait_time :事务进入等待队列后,到网络平均等待时间 master主机:
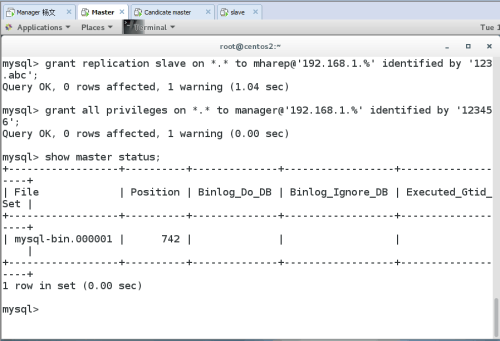
第一条grant命令是创建一个用于主从复制的帐号,在master和candicate master的主机上创建即可。第二条grant命令是创建MHA管理账号,所有mysql服务器上都需要执行。MHA会在配置文件里要求能远程登录到数据库,所以要进行必要的赋权。Candicate master主机:

查看从的状态,以下两个值必须为yes,代表从服务器能正常连接主服务器Slave_IO_Running:YesSlave_SQL_Running:Yes
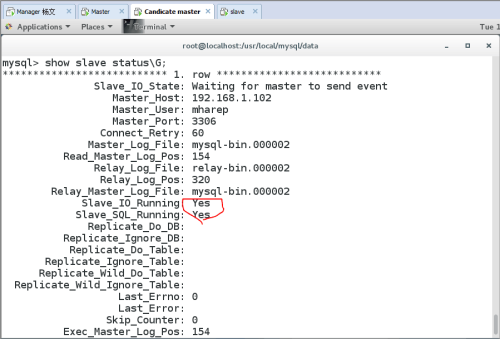
查看从的状态,以下两个值必须为yes,代表从服务器能正常连接主服务器
Slave_IO_Running:YesSlave_SQL_Running:Yes查看master服务器的半同步状态:mysql>show status like ‘%rpl_semi_sync%’;
三、配置mysql-mhamha包括manager节点和data节点,data节点包括原有的MySQL复制结构中的主机,至少3台,即1主2从,当masterfailover后,还能保证主从结构;只需安装node包。manager server:运行监控脚本,负责monitoring
和 auto-failover;需要安装node包和manager包。1、 在所有主机上安装mha所依赖的软件包
2、 以下操作管理节点需要两个都安装, 在3台数据库节点只要安装MHA的node节点:在所有数据库节点上安装mha4mysql-node-0.56.tar.gz
其他两个数据节点也安装mha4mysql-node-0.56.tar.gz(过程略)在管理节点需要两个都安装:mha4mysql-node-0.56.tar.gz和mha4mysql-manager-0.56.tar.gz安装mha4mysql-node-0.56.tar.gz
make && make install根据提示输入。

3、 配置mha与绝大多数Linux应用程序类似,MHA的正确使用依赖于合理的配置文件。MHA的配置文件与mysql的my.cnf文件配置相似,采取的是param=value的方式来配置,配置文件位于管理节点,通常包括每一个mysql
server的主机名,mysql用户名,密码,工作目录等等。编辑/etc/masterha/app1.conf,内容如下:
此处补加一下:[server3]hostname=192.168.1.104port=3306master_binlog_dir=/usr/local/mysql/data/candidate_master=1保存退出
配关配置项的解释:manager_workdir=/masterha/app1 //设置manager的工作目录manager_log=/masterha/app1/manager.log //设置manager的日志user=manager//设置监控用户managerpassword=123456 //监控用户manager的密码ssh_user=root //ssh连接用户repl_user=mharep //主从复制用户repl_password=123.abc //主从复制用户密码ping_interval=1 //设置监控主库,发送ping包的时间间隔,默认是3秒,尝试三次没有回应的时候自动进行railovermaster_binlog_dir=/usr/local/mysql/data //设置master 保存binlog的位置,以便MHA可以找到master的日志,我这里的也就是mysql的数据目录candidate_master=1//设置为候选master,如果设置该参数以后,发生主从切换以后将会将此从库提升为主库。 SSH 有效性验证:[root@centos1 ~]# masterha_check_ssh --global_conf=/etc/masterha/masterha_default.cnf --conf=/etc/masterha/app1.cnfWed Sep 28 21:34:50 2016 - [info] Reading default configuration from /etc/masterha/masterha_default.cnf..Wed Sep 28 21:34:50 2016 - [info] Reading application default configuration from /etc/masterha/app1.cnf..Wed Sep 28 21:34:50 2016 - [info] Reading server configuration from /etc/masterha/app1.cnf..Wed Sep 28 21:34:50 2016 - [info] Starting SSH connection tests..Wed Sep 28 21:34:50 2016 - [debug]Wed Sep 28 21:34:50 2016 - [debug] Connecting via SSH from root@192.168.1.102(192.168.1.102:22) to root@192.168.1.103(192.168.1.103:22)..Wed Sep 28 21:34:50 2016 - [debug] ok.Wed Sep 28 21:34:50 2016 - [debug] Connecting via SSH from root@192.168.1.102(192.168.1.102:22) to root@192.168.1.104(192.168.1.104:22)..Wed Sep 28 21:34:50 2016 - [debug] ok.Wed Sep 28 21:34:51 2016 - [debug]Wed Sep 28 21:34:50 2016 - [debug] Connecting via SSH from root@192.168.1.103(192.168.1.103:22) to root@192.168.1.102(192.168.1.102:22)..Wed Sep 28 21:34:50 2016 - [debug] ok.Wed Sep 28 21:34:50 2016 - [debug] Connecting via SSH from root@192.168.1.103(192.168.1.103:22) to root@192.168.1.104(192.168.1.104:22)..Wed Sep 28 21:34:51 2016 - [debug] ok.Wed Sep 28 21:34:51 2016 - [debug]Wed Sep 28 21:34:51 2016 - [debug] Connecting via SSH from root@192.168.1.104(192.168.1.104:22) to root@192.168.1.102(192.168.1.102:22)..Wed Sep 28 21:34:51 2016 - [debug] ok.Wed Sep 28 21:34:51 2016 - [debug] Connecting via SSH from root@192.168.1.104(192.168.1.104:22) to root@192.168.1.103(192.168.1.103:22)..Wed Sep 28 21:34:51 2016 - [debug] ok.Wed Sep 28 21:34:51 2016 - [info] All SSH connection tests passed successfully.集群复制的有效性验证:mysql必须都启动[root@centos1 ~]# masterha_check_repl --global_conf=/etc/masterha/masterha_default.cnf --conf=/etc/masterha/app1.cnfWed Sep 28 21:38:21 2016 - [info] Reading default configuration from /etc/masterha/masterha_default.cnf..Wed Sep 28 21:38:21 2016 - [info] Reading application default configuration from /etc/masterha/app1.cnf..Wed Sep 28 21:38:21 2016 - [info] Reading server configuration from /etc/masterha/app1.cnf..Wed Sep 28 21:38:21 2016 - [info] MHA::MasterMonitor version 0.56.Wed Sep 28 21:38:21 2016 - [info] GTID failover mode = 0Wed Sep 28 21:38:21 2016 - [info] Dead Servers:Wed Sep 28 21:38:21 2016 - [info] Alive Servers:Wed Sep 28 21:38:21 2016 - [info] 192.168.1.102(192.168.1.102:3306)Wed Sep 28 21:38:21 2016 - [info] 192.168.1.103(192.168.1.103:3306)Wed Sep 28 21:38:21 2016 - [info] 192.168.1.104(192.168.1.104:3306)Wed Sep 28 21:38:21 2016 - [info] Alive Slaves:Wed Sep 28 21:38:21 2016 - [info] 192.168.1.103(192.168.1.103:3306) Version=5.5.38-log (oldest major version between slaves) log-bin:enabledWed Sep 28 21:38:21 2016 - [info] Replicating from 192.168.1.102(192.168.1.102:3306)Wed Sep 28 21:38:21 2016 - [info] Primary candidate for the new Master (candidate_master is set)Wed Sep 28 21:38:21 2016 - [info] 192.168.1.104(192.168.1.104:3306) Version=5.5.38-log (oldest major version between slaves) log-bin:enabledWed Sep 28 21:38:21 2016 - [info] Replicating from 192.168.1.102(192.168.1.102:3306)Wed Sep 28 21:38:21 2016 - [info] Not candidate for the new Master (no_master is set)Wed Sep 28 21:38:21 2016 - [info] Current Alive Master: 192.168.1.102(192.168.1.102:3306)Wed Sep 28 21:38:21 2016 - [info] Checking slave configurations..Wed Sep 28 21:38:21 2016 - [info] read_only=1 is not set on slave 192.168.1.103(192.168.1.103:3306).Wed Sep 28 21:38:21 2016 - [warning] relay_log_purge=0 is not set on slave 192.168.1.104(192.168.1.104:3306).Wed Sep 28 21:38:21 2016 - [info] Checking replication filtering settings..Wed Sep 28 21:38:21 2016 - [info] binlog_do_db= , binlog_ignore_db=Wed Sep 28 21:38:21 2016 - [info] Replication filtering check ok.Wed Sep 28 21:38:21 2016 - [info] GTID (with auto-pos) is not supportedWed Sep 28 21:38:21 2016 - [info] Starting SSH connection tests..Wed Sep 28 21:38:23 2016 - [info] All SSH connection tests passed successfully.Wed Sep 28 21:38:23 2016 - [info] Checking MHA Node version..Wed Sep 28 21:38:23 2016 - [info] Version check ok.Wed Sep 28 21:38:23 2016 - [info] Checking SSH publickey authentication settings on the current master..Wed Sep 28 21:38:23 2016 - [info] HealthCheck: SSH to 192.168.1.102 is reachable.Wed Sep 28 21:38:23 2016 - [info] Master MHA Node version is 0.56.Wed Sep 28 21:38:23 2016 - [info] Checking recovery script configurations on 192.168.1.102(192.168.1.102:3306)..Wed Sep 28 21:38:23 2016 - [info] Executing command: save_binary_logs --command=test --start_pos=4 --binlog_dir=/usr/local/mysql/data --output_file=/var/tmp/save_binary_logs_test --manager_version=0.56
--start_file=mysql-bin.000010Wed Sep 28 21:38:23 2016 - [info] Connecting to root@192.168.1.102(192.168.1.102:22).. Creating /var/tmp if not exists..ok. Checking output directory is accessible or not..ok.Binlog found at /usr/local/mysql/data, up to mysql-bin.000010Wed Sep 28 21:38:23 2016 - [info] Binlog setting check done.Wed Sep 28 21:38:23 2016 - [info] Checking SSH publickey authentication and checking recovery script configurations on all alive slave servers..Wed Sep 28 21:38:23 2016 - [info] Executing command :apply_diff_relay_logs --command=test --slave_user='manager' --slave_host=192.168.1.103 --slave_ip=192.168.1.103 --slave_port=3306 --workdir=/var/tmp
--target_version=5.5.38-log --manager_version=0.56 --relay_log_info=/usr/local/mysql/data/relay-log.info --relay_dir=/usr/local/mysql/data/ --slave_pass=xxxWed Sep 28 21:38:23 2016 - [info] Connecting to root@192.168.1.103(192.168.1.103:22).. Checking slave recovery environment settings..Opening /usr/local/mysql/data/relay-log.info ... ok. Relay log found at /usr/local/mysql/data, up to relay-bin.000007 Temporary relay log file is /usr/local/mysql/data/relay-bin.000007 Testing mysql connection and privileges..done. Testing mysqlbinlog output..done. Cleaning up test file(s)..done.Wed Sep 28 21:38:24 2016 - [info] Executing command :apply_diff_relay_logs --command=test --slave_user='manager' --slave_host=192.168.1.104 --slave_ip=192.168.1.104 --slave_port=3306 --workdir=/var/tmp
--target_version=5.5.38-log --manager_version=0.56 --relay_log_info=/usr/local/mysql/data/relay-log.info --relay_dir=/usr/local/mysql/data/ --slave_pass=xxxWed Sep 28 21:38:24 2016 - [info] Connecting to root@192.168.1.104(192.168.1.104:22).. Checking slave recovery environment settings..Opening /usr/local/mysql/data/relay-log.info ... ok. Relay log found at /usr/local/mysql/data, up to relay-bin.000007 Temporary relay log file is /usr/local/mysql/data/relay-bin.000007 Testing mysql connection and privileges..done. Testing mysqlbinlog output..done. Cleaning up test file(s)..done.Wed Sep 28 21:38:24 2016 - [info] Slaves settings check done.Wed Sep 28 21:38:24 2016 - [info]192.168.1.102(192.168.1.102:3306) (current master) +--192.168.1.103(192.168.1.103:3306) +--192.168.1.104(192.168.1.104:3306) Wed Sep 28 21:38:24 2016 - [info] Checking replication health on 192.168.1.103..Wed Sep 28 21:38:24 2016 - [info] ok.Wed Sep 28 21:38:24 2016 - [info] Checking replication health on 192.168.1.104..Wed Sep 28 21:38:24 2016 - [info] ok.Wed Sep 28 21:38:24 2016 - [warning] master_ip_failover_script is not defined.Wed Sep 28 21:38:24 2016 - [warning] shutdown_script is not defined.Wed Sep 28 21:38:24 2016 - [info] Got exit code 0 (Not master dead).MySQL Replication Health is OK.验证成功的话会自动识别出所有服务器和主从状况注:验证成功的话会自动识别出所有服务器和主从状况在验证时,若遇到这个错误:Can't exec "mysqlbinlog" ......解决方法是在所有服务器上执行:ln -s /usr/local/mysql/bin/* /usr/local/bin/启动 manager:
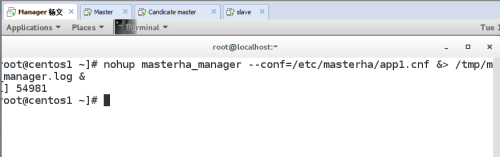
注:在应用Unix/Linux时,我们一般想让某个程序在后台运行,于是我们将常会用&在程序结尾来让程序自动运行。比如我们要运行mysql在后台:
/usr/local/mysql/bin/mysqld_safe –user=mysql&。可是有很多程序并不想mysqld一样,这样我们就需要nohup命令,状态检查:nohup masterha_check_status --conf=/etc/masterha/app1.cnf
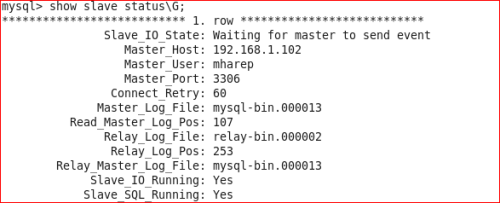
故障转移验证:(自动failover)master dead后,MHA当时已经开启,候选Master库(Slave)会自动failover为Master.验证的方式是先停掉 master(centos2),因为之前的配置文件中,把Candicatemaster(centos3)作为了候选人,那么就到 slave(centos4) 上查看 master 的 IP 是否变为了
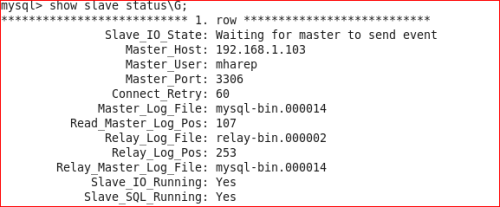
centos3 的 IP1)停掉 master在 master(192.168.1.102)上把mysql停掉2)查看 MHA 日志上面的配置文件中指定了日志位置为 /masterha/app1/manager.log[root@centos1 ~]# cat /masterha/app1/manager.log----- Failover Report ----- app1: MySQL Master failover 192.168.1.102(192.168.1.102:3306) to 192.168.1.103(192.168.1.103:3306) succeeded Master 192.168.1.102(192.168.1.102:3306) is down! Check MHA Manager logs at centos1.benet.com:/masterha/app1/manager.log for details. Started automated(non-interactive) failover.The latest slave 192.168.1.103(192.168.1.103:3306) has all relay logs for recovery.Selected 192.168.1.103(192.168.1.103:3306) as a new master.192.168.1.103(192.168.1.103:3306): OK: Applying all logs succeeded.192.168.1.104(192.168.1.104:3306): This host has the latest relay log events.Generating relay diff files from the latest slave succeeded.192.168.1.104(192.168.1.104:3306): OK: Applying all logs succeeded. Slave started, replicating from 192.168.1.103(192.168.1.103:3306)192.168.1.103(192.168.1.103:3306): Resetting slave info succeeded.Master failover to 192.168.1.103(192.168.1.103:3306) completed successfully.从日志信息中可以看到 master failover 已经成功了,并可以看出故障转移的大体流程3)检查 slave2 的复制登录 slave(192.168.1.104)的Mysql,查看 slave 状态mysql> show slave status\G;*************************** 1. row ***************************Slave_IO_State: Waiting for master to send eventMaster_Host: 192.168.1.103Master_User: mharepMaster_Port: 3306Connect_Retry: 60Master_Log_File: mysql-bin.000009Read_Master_Log_Pos: 107Relay_Log_File: relay-bin.000002Relay_Log_Pos: 253Relay_Master_Log_File: mysql-bin.000009Slave_IO_Running: YesSlave_SQL_Running: Yes可以看到 master 的 IP 现在为 192.168.1.103,已经切换到和192.168.1.103同步了,本来是和192.168.1.102同步的,说明 MHA 已经把Candicatemaster(centos3)提升为了新的 master,IO线程和SQL线程也正确运行,MHA 搭建成功MHA Manager 端日常主要操作步骤1)检查是否有下列文件,有则删除。发生主从切换后,MHAmanager服务会自动停掉,且在manager_workdir(/masterha/app1)目录下面生成文件app1.failover.complete,若要启动MHA,必须先确保无此文件)如果有这个提示,那么删除此文件/masterha/app1/app1.failover.complete[error][/usr/share/perl5/vendor_perl/MHA/MasterFailover.pm, ln298] Last failover was done at 2015/01/09 10:00:47. Current time is too early to do failover again.
If you want to do failover, manually remove /masterha/app1/app1.failover.complete and run this script again. # ll /masterha/app1/app1.failover.complete # ll /masterha/app1/app1.failover.error 2)检查MHA当前置: # masterha_check_repl --conf=/etc/masterha/app1.cnf 3)启动MHA: #nohup masterha_manager --conf=/etc/masterha/app1.cnf&>/tmp/mha_manager.log &当有slave 节点宕掉时,默认是启动不了的,加上 --ignore_fail_on_start即使有节点宕掉也能启动MHA,如下: #nohupmasterha_manager --conf=/etc/masterha/app1.cnf--ignore_fail_on_start&>/tmp/mha_manager.log & 4)停止MHA: masterha_stop --conf=/etc/masterha/app1.cnf 5)检查状态:# masterha_check_status --conf=/etc/masterha/app1.cnf 6)检查日志:#tail -f /masterha/app1/manager.log 7)主从切换后续工作重构:重构就是你的主挂了,切换到Candicate master上,Candicate master变成了主,因此重构的一种方案原主库修复成一个新的slave 主库切换后,把原主库修复成新从库,然后重新执行以上5步。原主库数据文件完整的情况下,可通过以下方式找出最后执行的CHANGE MASTER命令:[root@centos1 ~]# grep "CHANGE MASTER TO MASTER" /masterha/app1/manager.log | tail -1Wed Sep 28 22:36:41 2016 - [info] All other slaves should start replication from here. Statement should be: CHANGE MASTER TO MASTER_HOST='192.168.1.103', MASTER_PORT=3306, MASTER_LOG_FILE='mysql-bin.000009', MASTER_LOG_POS=107, MASTER_USER='mharep', MASTER_PASSWORD='xxx'; [root@centos2 ~]# mysql -uroot -ppwd123mysql> CHANGE MASTER TO MASTER_HOST='192.168.1.103', MASTER_PORT=3306, MASTER_LOG_FILE='mysql-bin.000009', MASTER_LOG_POS=107, MASTER_USER='mharep', MASTER_PASSWORD='123.abc';Query OK, 0 rows affected (0.06 sec) mysql> start slave;Query OK, 0 rows affected (0.00 sec) mysql> show slave status\G;*************************** 1. row ***************************Slave_IO_State: Waiting for master to send eventMaster_Host: 192.168.1.103Master_User: mharepMaster_Port: 3306Connect_Retry: 60Master_Log_File: mysql-bin.000011Read_Master_Log_Pos: 107Relay_Log_File: relay-bin.000005Relay_Log_Pos: 253Relay_Master_Log_File: mysql-bin.000011Slave_IO_Running: YesSlave_SQL_Running: Yes启动manager
注意:如果正常,会显示"PING_OK",否则会显示"NOT_RUNNING",这代表MHA监控没有开启。 定期删除中继日志在配置主从复制中,slave上设置了参数relay_log_purge=0,所以slave节点需要定期删除中继日志,建议每个slave节点删除中继日志的时间错开。corntab -e0 5 * * * /usr/local/bin/purge_relay_logs - -user=root --password=pwd123 --port=3306 --disable_relay_log_purge>> /var/log/purge_relay.log 2>&1 四、配置VIP:vip配置可以采用两种方式,一种通过keepalived的方式管理虚拟ip的浮动;另外一种通过脚本方式启动虚拟ip的方式(即不需要keepalived或者heartbeat类似的软件)。1、keepalived方式管理虚拟ip,keepalived配置方法如下:下载软件进行并进行安装(两台master,准确的说一台是master,另外一台是备选master,在没有切换以前是slave)在centos2和centos3上安装软件包keepalived安装keepalived软件包与服务控制在编译安装Keepalived之前,必须先安装内核开发包kernel-devel以及openssl-devel、popt-devel等支持库。
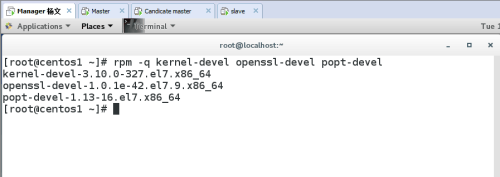
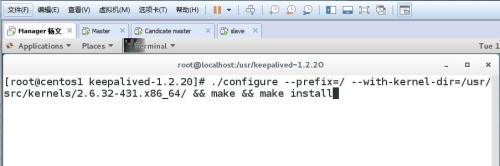
若没有安装则通过rpm或yum工具进行安装编译安装Keepalived使用指定的linux内核位置对keepalived进行配置,并将安装路径指定为根目录,这样就无需额外创建链接文件了,配置完成后,依次执行make、make install进行安装。
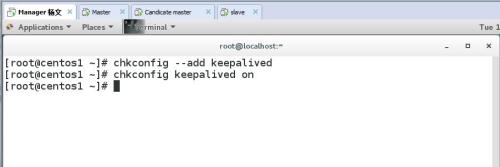
使用keepalived服务执行make install操作之后,会自动生成/etc/init.d/keepalived脚本文件,但还需要手动添加为系统服务,这样就可以使用service、chkconfig工具来对keepalived服务程序进行管理了。
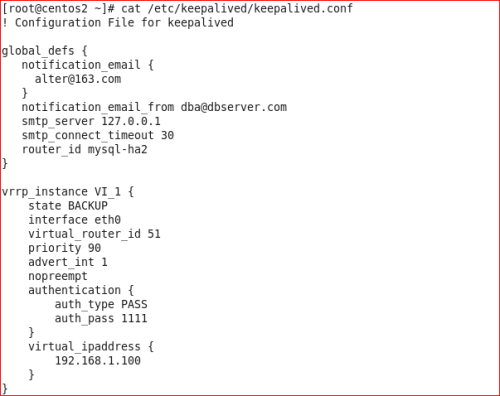
Centos3主机也完成keepalived安装,与master1一样,安装过程略注:若开启了防火墙,需要关闭防火墙或创建规则。修改Keepalived的配置文件(在master上配置)
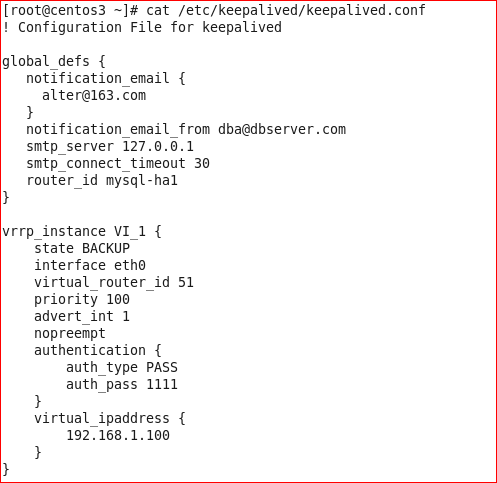
在候选master上配置
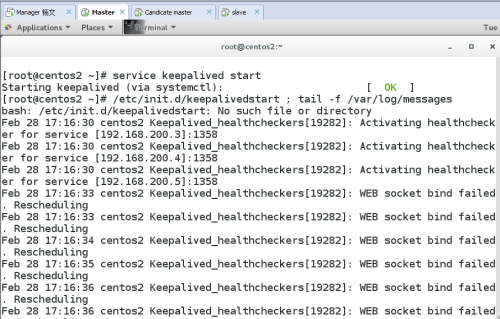
启动keepalived服务,在master上启动并查看日志#/etc/init.d/keepalivedstart ; tail -f /var/log/messages
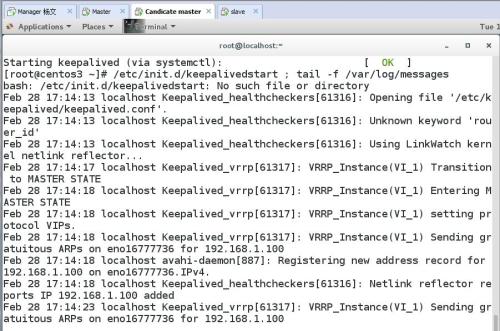
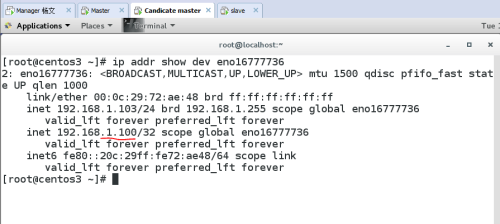
发现已经将虚拟ip 192.168.1.100绑定了网卡eth0上
# tail -f /var/log/messages查看eth0网卡是否绑定了VIP
在另外一台服务器,候选master上启动keepalived服务,并观察#/etc/init.d/keepalivedstart ; tail -f /var/log/messages
查看eth0网卡绑定情况
从上面的信息可以看到keepalived已经配置成功注意:上面两台服务器的keepalived都设置为了BACKUP模式,在keepalived中2种模式,分别是master->backup模式和backup->backup模式。这两种模式有很大区别。在master->backup模式下,一旦主库宕机,虚拟ip会自动漂移到从库,当主库修复后,keepalived启动后,还会把虚拟ip抢占过来,即使设置了非抢占模式(nopreempt)抢占ip的动作也会发生。在backup->backup模式下,当主库宕机后虚拟ip会自动漂移到从库上,当原主库恢复和keepalived服务启动后,并不会抢占新主的虚拟ip,即使是优先级高于从库的优先级别,也不会发生抢占。为了减少ip漂移次数,通常是把修复好的主库当做新的备库。 2、MHA引入keepalived(MySQL服务进程挂掉时通过MHA 停止keepalived):要想把keepalived服务引入MHA,我们只需要修改切换时触发的脚本文件master_ip_failover即可,在该脚本中添加在master发生宕机时对keepalived的处理。编辑脚本/scripts/master_ip_failover,修改后如下。[root@centos1 ~]# cat /scripts/master_ip_failover#!/usr/bin/envperl use strict;use warnings FATAL => 'all'; useGetopt::Long; my ( $command, $ssh_user, $orig_master_host, $orig_master_ip, $orig_master_port, $new_master_host, $new_master_ip, $new_master_port); my $vip = '192.168.1.100';my $ssh_start_vip = "/etc/init.d/keepalived start";my $ssh_stop_vip = "/etc/init.d/keepalived stop"; GetOptions( 'command=s' => \$command, 'ssh_user=s' => \$ssh_user, 'orig_master_host=s' => \$orig_master_host, 'orig_master_ip=s' => \$orig_master_ip, 'orig_master_port=i' => \$orig_master_port, 'new_master_host=s' => \$new_master_host, 'new_master_ip=s' => \$new_master_ip, 'new_master_port=i' => \$new_master_port,); exit&main(); sub main { print "\n\nIN SCRIPT TEST====$ssh_stop_vip==$ssh_start_vip===\n\n"; if ( $command eq "stop" || $command eq "stopssh" ) { my $exit_code = 1;eval {print "Disabling the VIP on old master: $orig_master_host \n";&stop_vip(); $exit_code = 0; };if ($@) {warn "Got Error: $@\n";exit $exit_code; }exit $exit_code; }elsif ( $command eq "start" ) { my $exit_code = 10;eval {print "Enabling the VIP - $vip on the new master - $new_master_host \n";&start_vip(); $exit_code = 0; };if ($@) {warn $@;exit $exit_code; }exit $exit_code; }elsif ( $command eq "status" ) {print "Checking the Status of the script.. OK \n"; #`ssh $ssh_user\@cluster1 \" $ssh_start_vip \"`;exit 0; }else {&usage();exit 1; }} # A simple system call that enable the VIP on the new mastersubstart_vip() { `ssh $ssh_user\@$new_master_host \" $ssh_start_vip \"`;}# A simple system call that disable the VIP on the old_mastersubstop_vip() {return 0 unless ($ssh_user); `ssh $ssh_user\@$orig_master_host \" $ssh_stop_vip \"`;} sub usage {print "Usage: master_ip_failover --command=start|stop|stopssh|status --orig_master_host=host --orig_master_ip=ip --orig_master_port=port --new_master_host=host --new_master_ip=ip --new_master_port=port\n";}现在已经修改这个脚本了,接下来我们在/etc/masterha/app1.cnf 中调用故障切换脚本停止MHA: #masterha_stop --conf=/etc/masterha/app1.cnf在配置文件/etc/masterha/app1.cnf 中启用下面的参数(在[server default下面添加])master_ip_failover_script=/scripts/master_ip_failover启动MHA:#nohupmasterha_manager --conf=/etc/masterha/app1.cnf&>/tmp/mha_manager.log &检查状态:[root@centos1 ~]# masterha_check_status --conf=/etc/masterha/app1.cnfapp1 (pid:12047) is running(0:PING_OK), master:192.168.1.103再检查集群状态,看是否会报错。[root@centos1 ~]# masterha_check_repl --conf=/etc/masterha/app1.cnf……Thu Sep 29 23:29:30 2016 - [info] Slaves settings check done.Thu Sep 29 23:29:30 2016 - [info]192.168.1.103(192.168.1.103:3306) (current master) +--192.168.1.102(192.168.1.102:3306) +--192.168.1.104(192.168.1.104:3306) Thu Sep 29 23:29:30 2016 - [info] Checking replication health on 192.168.1.102..Thu Sep 29 23:29:30 2016 - [info] ok.Thu Sep 29 23:29:30 2016 - [info] Checking replication health on 192.168.1.104..Thu Sep 29 23:29:30 2016 - [info] ok.Thu Sep 29 23:29:30 2016 - [info] Checking master_ip_failover_script status:Thu Sep 29 23:29:30 2016 - [info] /scripts/master_ip_failover --command=status --ssh_user=root --orig_master_host=192.168.1.103 --orig_master_ip=192.168.1.103 --orig_master_port=3306IN SCRIPT TEST====/etc/init.d/keepalived stop==/etc/init.d/keepalived start===Checking the Status of the script.. OKThu Sep 29 23:29:30 2016 - [info] OK.Thu Sep 29 23:29:30 2016 - [warning] shutdown_script is not defined.Thu Sep 29 23:29:30 2016 - [info] Got exit code 0 (Not master dead).MySQL Replication Health is OK. 可以看见已经没有报错了。
/scripts/master_ip_failover添加或者修改的内容意思是当主库数据库发生故障时,会触发MHA切换,MHA Manager会停掉主库上的keepalived服务,触发虚拟ip漂移到备选从库,从而完成切换。当然可以在keepalived里面引入脚本,这个脚本监控mysql是否正常运行,如果不正常,则调用该脚本杀掉keepalived进程(参考MySQL 高可用性keepalived+mysql双主)。测试:在master上停止mysqld服务到slave(192.168.1.104)查看slave的状态:
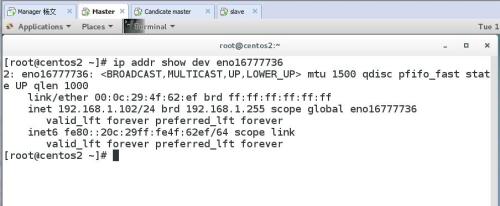
从上图可以看出slave指向了新的master服务器192.168.1.102(在故障切换前指向的是192.168.1.103)查看VIP绑定:在192.168.1.103上查看vip绑定

在192.168.1.102上查看vip绑定

从上面的显示结果可以看出vip地址漂移到了192.168.1.102主从切换后续工作重构:重构就是你的主挂了,切换到Candicate master上,Candicate master变成了主,因此重构的一种方案原主库修复成一个新的slave主库切换后,把原主库修复成新从库,原主库数据文件完整的情况下,可通过以下方式找出最后执行的CHANGE MASTER命令:[root@centos1 ~]# grep "CHANGE MASTER TO MASTER" /masterha/app1/manager.log | tail -1Thu Sep 29 23:38:16 2016 - [info] All other slaves should start replication from here. Statement should be: CHANGE MASTER TO MASTER_HOST='192.168.1.102', MASTER_PORT=3306, MASTER_LOG_FILE='mysql-bin.000013', MASTER_LOG_POS=107, MASTER_USER='mharep', MASTER_PASSWORD='xxx';将192.168.1.103(原主库)修复成从库[root@centos3 ~]# servicemysqld startStarting MySQL..[ OK ][root@centos3 ~]# mysql -uroot -ppwd123Welcome to the MySQL monitor. Commands end with ; or \g.Your MySQL connection id is 1Server version: 5.5.38-log Source distribution Copyright (c) 2000, 2013, Oracle and/or its affiliates. All rights reserved. Oracle is a registered trademark of Oracle Corporation and/or itsaffiliates. Other names may be trademarks of their respectiveowners. Type 'help;' or '\h' for help.Type '\c' to clear the current input statement. mysql>CHANGE MASTER TO MASTER_HOST='192.168.1.102', MASTER_PORT=3306, MASTER_LOG_FILE='mysql-bin.000013', MASTER_LOG_POS=107, MASTER_USER='mharep', MASTER_PASSWORD='123.abc';Query OK, 0 rows affected (0.06 sec) mysql> start slave;Query OK, 0 rows affected (0.00 sec) mysql> show slave status\G;*************************** 1. row ***************************Slave_IO_State: Waiting for master to send eventMaster_Host: 192.168.1.102Master_User: mharepMaster_Port: 3306Connect_Retry: 60Master_Log_File: mysql-bin.000013Read_Master_Log_Pos: 107Relay_Log_File: relay-bin.000002Relay_Log_Pos: 253Relay_Master_Log_File: mysql-bin.000013Slave_IO_Running: YesSlave_SQL_Running: Yes [root@centos3 ~]# /etc/init.d/keepalived startStarting keepalived: [ OK ][root@centos3 ~]# /etc/init.d/keepalived statuskeepalived (pid 6436) is running... 启动mha manager:[root@centos1 ~]# rm -fr /masterha/app1/app1.failover.complete[root@centos1 ~]# nohupmasterha_manager --conf=/etc/masterha/app1.cnf --ignore_fail_on_start&>/tmp/mha_manager.log &[1] 13010[root@centos1 ~]# masterha_check_status --conf=/etc/masterha/app1.cnfapp1 (pid:13010) is running(0:PING_OK), master:192.168.1.102 [root@centos1 ~]# masterha_check_repl --conf=/etc/masterha/app1.cnfFri Sep 30 00:02:39 2016 - [info] Slaves settings check done.Fri Sep 30 00:02:39 2016 - [info]192.168.1.102(192.168.1.102:3306) (current master) +--192.168.1.103(192.168.1.103:3306) +--192.168.1.104(192.168.1.104:3306) Fri Sep 30 00:02:39 2016 - [info] Checking replication health on 192.168.1.103..Fri Sep 30 00:02:39 2016 - [info] ok.Fri Sep 30 00:02:39 2016 - [info] Checking replication health on 192.168.1.104..Fri Sep 30 00:02:39 2016 - [info] ok.Fri Sep 30 00:02:39 2016 - [info] Checking master_ip_failover_script status:Fri Sep 30 00:02:39 2016 - [info] /scripts/master_ip_failover --command=status --ssh_user=root --orig_master_host=192.168.1.102 --orig_master_ip=192.168.1.102 --orig_master_port=3306 2、通过脚本实现VIP切换通过脚本的方式管理VIP。这里是修改/scripts/master_ip_failover,也可以使用其他的语言完成,比如php语言。使用php脚本编写的failover这里就不介绍了。修改完成后内容如下,而且如果使用脚本管理vip的话,需要手动在master服务器上绑定一个vip[root@centos2 ~]# /sbin/ifconfig eth0:0 192.168.1.100/24在mha-manager上修改/scripts/master_ip_failover,内容如下[root@centos1 ~]# cat /scripts/master_ip_failover#!/usr/bin/envperl use strict;use warnings FATAL => 'all'; useGetopt::Long; my ( $command, $ssh_user, $orig_master_host, $orig_master_ip, $orig_master_port, $new_master_host, $new_master_ip, $new_master_port); my $vip = '192.168.1.100/24';my $key = '0';my $ssh_start_vip = "/sbin/ifconfig eth0:$key $vip";my $ssh_stop_vip = "/sbin/ifconfig eth0:$key down"; GetOptions( 'command=s' => \$command, 'ssh_user=s' => \$ssh_user, 'orig_master_host=s' => \$orig_master_host, 'orig_master_ip=s' => \$orig_master_ip, 'orig_master_port=i' => \$orig_master_port, 'new_master_host=s' => \$new_master_host, 'new_master_ip=s' => \$new_master_ip, 'new_master_port=i' => \$new_master_port,); exit&main(); sub main { print "\n\nIN SCRIPT TEST====$ssh_stop_vip==$ssh_start_vip===\n\n"; if ( $command eq "stop" || $command eq "stopssh" ) { my $exit_code = 1;eval {print "Disabling the VIP on old master: $orig_master_host \n";&stop_vip(); $exit_code = 0; };if ($@) {warn "Got Error: $@\n";exit $exit_code; }exit $exit_code; }elsif ( $command eq "start" ) { my $exit_code = 10;eval {print "Enabling the VIP - $vip on the new master - $new_master_host \n";&start_vip(); $exit_code = 0; };if ($@) {warn $@;exit $exit_code; }exit $exit_code; }elsif ( $command eq "status" ) {print "Checking the Status of the script.. OK \n";exit 0; }else {&usage();exit 1; }} substart_vip() { `ssh $ssh_user\@$new_master_host \" $ssh_start_vip \"`;}substop_vip() {return 0 unless ($ssh_user); `ssh $ssh_user\@$orig_master_host \" $ssh_stop_vip \"`;} sub usage {print "Usage: master_ip_failover --command=start|stop|stopssh|status --orig_master_host=host --orig_master_ip=ip --orig_master_port=port --new_master_host=host --new_master_ip=ip --new_master_port=port\n";} 4)停止MHA: masterha_stop --conf=/etc/masterha/app1.cnf [root@centos1 ~]# grep "master_ip_failover_script" /etc/masterha/app1.cnfmaster_ip_failover_script=/scripts/master_ip_failover启动MHA: #nohupmasterha_manager --conf=/etc/masterha/app1.cnf&>/tmp/mha_manager.log & 5)检查状态:f[root@centos1 ~]# masterha_check_status --conf=/etc/masterha/app1.cnfapp1 (pid:2818) is running(0:PING_OK), master:192.168.1.102 再检查集群状态,看是否会报错。[root@centos1 ~]# masterha_check_repl--conf=/etc/masterha/app1.cnfFri Sep 30 23:05:10 2016 - [info] Slaves settings check done.Fri Sep 30 23:05:10 2016 - [info]192.168.1.102(192.168.1.102:3306) (current master) +--192.168.1.103(192.168.1.103:3306) +--192.168.1.104(192.168.1.104:3306) Fri Sep 30 23:05:10 2016 - [info] Checking replication health on 192.168.1.103..Fri Sep 30 23:05:10 2016 - [info] ok.Fri Sep 30 23:05:10 2016 - [info] Checking replication health on 192.168.1.104..Fri Sep 30 23:05:10 2016 - [info] ok.Fri Sep 30 23:05:10 2016 - [info] Checking master_ip_failover_script status:Fri Sep 30 23:05:10 2016 - [info] /scripts/master_ip_failover --command=status --ssh_user=root --orig_master_host=192.168.1.102 --orig_master_ip=192.168.1.102 --orig_master_port=3306 IN SCRIPT TEST====/sbin/ifconfig eth0:0 down==/sbin/ifconfig eth0:0 192.168.1.100/24=== Checking the Status of the script.. OKFri Sep 30 23:05:10 2016 - [info] OK.Fri Sep 30 23:05:10 2016 - [warning] shutdown_script is not defined.Fri Sep 30 23:05:10 2016 - [info] Got exit code 0 (Not master dead). MySQL Replication Health is OK.测试:在master上停掉mysql服务[root@centos2 ~]# /etc/init.d/mysqld stopShutting down MySQL... [ OK ]到slave(192.168.1.104)查看slave的状态:
从上图可以看出slave指向了新的master服务器(192.168.1.103)查看VIP
从上图可以看到centos2(原来的master)释放了VIP,centos03(新的master)接管了VIP地址主从切换后续工作主库切换后,把原主库修复成新从库,相关操作请参考前面相关操作。为了防止脑裂发生,推荐生产环境采用脚本的方式来管理虚拟ip,而不是使用keepalived来完成。到此为止,基本MHA集群已经配置完毕。 总结:MHA软件由两部分组成,Manager工具包和Node工具包,具体的说明如下。Manager工具包主要包括以下几个工具:masterha_check_ssh检查MHA的SSH配置状况masterha_check_repl检查MySQL复制状况masterha_manger启动MHAmasterha_check_status检测当前MHA运行状态masterha_master_monitor检测master是否宕机masterha_master_switch控制故障转移(自动或者手动)masterha_conf_host添加或删除配置的server信息Node工具包(这些工具通常由MHA Manager的脚本触发,无需人为操作)主要包括以下几个工具:save_binary_logs保存和复制master的二进制日志apply_diff_relay_logs识别差异的中继日志事件并将其差异的事件应用于其他的slavefilter_mysqlbinlog去除不必要的ROLLBACK事件(MHA已不再使用这个工具)purge_relay_logs清除中继日志(不会阻塞SQL线程) mysql必备技能掌握:1、MySQL架构:对mysql的架构,整体有个印象,才能不断的加深对mysql的理解和后继的学习。2、用各种姿势备份MySQL数据库数据备份是DBA或运维工程师日常工作之一,如果让你来备份,你会用什么方式备份,在时间时间备份,使用什么策略备份3、mysql主从复制及读写分离mysql的主从复制及读写分离是DBA必备技能之一4、MySQL/MariaDB数据库基于SSL实现主从复制加强主从复制的安全性5、MySQL高可用数据的高可用如何保证6、数据库Sharding的基本思想和切分策略随着数据量的不断攀升,从性能和可维护的角度,需要进行一些Sharding,也就是数据库的切分,有垂直切分和水平切分7、MySQL/MariaDB性能调整和优化技巧掌握优化思路和技巧,对数据库的不断优化是一项长期工程 谢谢观看,真心的希望能帮到您!
MHA(Master High Availability)目前在MySQL高可用方面是一个相对成熟的解决方案,它由日本DeNA公司youshimaton(现就职于Facebook公司)开发,是一套优秀的作为MySQL高可用性环境下故障切换和主从提升的高可用软件。在MySQL故障切换过程中,MHA能做到在0~30秒之内自动完成数据库的故障切换操作,并且在进行故障切换的过程中,MHA能在最大程度上保证数据的一致性,以达到真正意义上的高可用。MHA里有两个角色一个是MHA Node(数据节点)另一个是MHA Manager(管理节点)。MHA Manager可以单独部署在一台独立的机器上管理多个master-slave集群,也可以部署在一台slave节点上。MHA Node运行在每台MySQL服务器上,MHA Manager会定时探测集群中的master节点,当master出现故障时,它可以自动将最新数据的slave提升为新的master,然后将所有其他的slave重新指向新的master。整个故障转移过程对应用程序完全透明。
在MHA自动故障切换过程中,MHA试图从宕机的主服务器上保存二进制日志,最大程度的保证数据的不丢失,但这并不总是可行的。例如,如果主服务器硬件故障或无法通过ssh访问,MHA没法保存二进制日志,只进行故障转移而丢失了最新的数据。使用MySQL
5.5的半同步复制,可以大大降低数据丢失的风险。MHA可以与半同步复制结合起来。如果只有一个slave已经收到了最新的二进制日志,MHA可以将最新的二进制日志应用于其他所有的slave服务器上,因此可以保证所有节点的数据一致性。注:从MySQL5.5开始,MySQL以插件的形式支持半同步复制。如何理解半同步呢?首先我们来看看异步,全同步的概念:异步复制(Asynchronous replication)MySQL默认的复制即是异步的,主库在执行完客户端提交的事务后会立即将结果返给给客户端,并不关心从库是否已经接收并处理,这样就会有一个问题,主如果crash掉了,此时主上已经提交的事务可能并没有传到从上,如果此时,强行将从提升为主,可能导致新主上的数据不完整。全同步复制(Fully synchronous replication)指当主库执行完一个事务,所有的从库都执行了该事务才返回给客户端。因为需要等待所有从库执行完该事务才能返回,所以全同步复制的性能必然会收到严重的影响。半同步复制(Semisynchronous replication)介于异步复制和全同步复制之间,主库在执行完客户端提交的事务后不是立刻返回给客户端,而是等待至少一个从库接收到并写到relay log中才返回给客户端。相对于异步复制,半同步复制提高了数据的安全性,同时它也造成了一定程度的延迟,这个延迟最少是一个TCP/IP往返的时间。所以,半同步复制最好在低延时的网络中使用。下面来看看半同步复制的原理图:
总结:异步与半同步异同默认情况下MySQL的复制是异步的,Master上所有的更新操作写入Binlog之后并不确保所有的更新都被复制到Slave之上。异步操作虽然效率高,但是在Master/Slave出现问题的时候,存在很高数据不同步的风险,甚至可能丢失数据。
MySQL5.5引入半同步复制功能的目的是为了保证在master出问题的时候,至少有一台Slave的数据是完整的。在超时的情况下也可以临时转入异步复制,保障业务的正常使用,直到一台salve追赶上之后,继续切换到半同步模式。 工作原理相较于其它HA软件,MHA的目的在于维持MySQL Replication中Master库的高可用性,其最大特点是可以修复多个Slave之间的差异日志,最终使所有Slave保持数据一致,然后从中选择一个充当新的Master,并将其它Slave指向它。-从宕机崩溃的master保存二进制日志事件(binlogevents)。-识别含有最新更新的slave。-应用差异的中继日志(relay log)到其它slave。-应用从master保存的二进制日志事件(binlogevents)。-提升一个slave为新master。-使其它的slave连接新的master进行复制。 目前MHA主要支持一主多从的架构,要搭建MHA,要求一个复制集群中必须最少有三台数据库服务器,一主二从,即一台充当master,一台充当备用master,另外一台充当从库,因为至少需要三台服务器。 接下来部署MHA,具体的搭建环境如下
| 角色 | IP地址 | 主机名 | Server id | 类型 | os |
| Manager | 192.168.1.101 | Centos1 | 管理节点 | Centos6.5x86_64 | |
| Master | 192.168.1.102 | Centos2 | 1 | 主mysql(写入) | Centos6.5x86_64 |
| Candicatemaster | 192.168.1.103 | Centos3 | 2 | 从mysql(读) | Centos6.5x86_64 |
| slave | 192.168.1.104 | Centos4 | 3 | 从mysql(读) | Centos6.5x86_64 |
3、建立ssh无交互登录环境Manager主机:
Master主机:同上。Candicatemaster主机:
Slave主机:
测试ssh无交互登录
在其他主机上执行同样的测试操作。4、配置hosts环境
查看每台主机的hosts文件
二、配置mysql半同步复制为了尽可能的减少主库硬件损坏宕机造成的数据丢失,因此在配置MHA的同时建议配置成MySQL的半同步复制。注:mysql半同步插件是由谷歌提供,具体位置/usr/local/mysql/lib/plugin/下,一个是master用的semisync_master.so,一个是slave用的semisync_slave.so,下面我们就来具体配置一下。如果不清楚Plugin的目录,用如下查找:
1、分别在主从节点上安装相关的插件(master,Candicatemaster,slave)在MySQL上安装插件需要数据库支持动态载入。检查是否支持,用如下检测:
所有mysql数据库服务器,安装半同步插件(semisync_master.so,semisync_slave.so)
其他mysql主机采用同样的方法安装检查Plugin是否已正确安装:
mysql> show plugins;
或
mysql> select * from information_schema.plugins;
查看半同步相关信息
上图可以看到半同复制插件已经安装,只是还没有启用,所以是off2、修改my.cnf文件,配置主从同步:注:若主MYSQL服务器已经存在,只是后期才搭建从MYSQL服务器,在置配数据同步前应先将主MYSQL服务器的要同步的数据库拷贝到从MYSQL服务器上(如先在主MYSQL上备份数据库,再用备份在从MYSQL服务器上恢复)master mysql主机:server-id = 1
log-bin=mysql-bin
binlog_format=mixedlog-bin-index=mysql-bin.indexrpl_semi_sync_master_enabled=1rpl_semi_sync_master_timeout=1000rpl_semi_sync_slave_enabled=1relay_log_purge=0relay-log = relay-binrelay-log-index = slave-relay-bin.index注:rpl_semi_sync_master_enabled=1 1表是启用,0表示关闭rpl_semi_sync_master_timeout=10000:毫秒单位,该参数主服务器等待确认消息10秒后,不再等待,变为异步方式。 Candicate master主机:server-id = 2
log-bin=mysql-bin
binlog_format=mixedlog-bin-index=mysql-bin.indexrelay_log_purge=0relay-log = relay-binrelay-log-index = slave-relay-bin.indexrpl_semi_sync_master_enabled=1rpl_semi_sync_master_timeout=10000rpl_semi_sync_slave_enabled=1注:relay_log_purge=0,禁止 SQL 线程在执行完一个 relay log 后自动将其删除,对于MHA场景下,对于某些滞后从库的恢复依赖于其他从库的relay
log,因此采取禁用自动删除功能 Slave主机:Server-id = 3log-bin = mysql-binrelay-log = relay-binrelay-log-index = slave-relay-bin.index
read_only = 1rpl_semi_sync_slave_enabled=1 查看半同步相关信息mysql>show variables like ‘%查看半同步状态:mysql>show status like ‘%rpl_semi_sync%’;有几个状态参数值得关注的:rpl_semi_sync_master_status :显示主服务是异步复制模式还是半同步复制模式 rpl_semi_sync_master_clients :显示有多少个从服务器配置为半同步复制模式 rpl_semi_sync_master_yes_tx :显示从服务器确认成功提交的数量 rpl_semi_sync_master_no_tx :显示从服务器确认不成功提交的数量 rpl_semi_sync_master_tx_avg_wait_time :事务因开启 semi_sync ,平均需要额外等待的时间 rpl_semi_sync_master_net_avg_wait_time :事务进入等待队列后,到网络平均等待时间 master主机:
第一条grant命令是创建一个用于主从复制的帐号,在master和candicate master的主机上创建即可。第二条grant命令是创建MHA管理账号,所有mysql服务器上都需要执行。MHA会在配置文件里要求能远程登录到数据库,所以要进行必要的赋权。Candicate master主机:
查看从的状态,以下两个值必须为yes,代表从服务器能正常连接主服务器Slave_IO_Running:YesSlave_SQL_Running:Yes
查看从的状态,以下两个值必须为yes,代表从服务器能正常连接主服务器
Slave_IO_Running:YesSlave_SQL_Running:Yes查看master服务器的半同步状态:mysql>show status like ‘%rpl_semi_sync%’;
三、配置mysql-mhamha包括manager节点和data节点,data节点包括原有的MySQL复制结构中的主机,至少3台,即1主2从,当masterfailover后,还能保证主从结构;只需安装node包。manager server:运行监控脚本,负责monitoring
和 auto-failover;需要安装node包和manager包。1、 在所有主机上安装mha所依赖的软件包
2、 以下操作管理节点需要两个都安装, 在3台数据库节点只要安装MHA的node节点:在所有数据库节点上安装mha4mysql-node-0.56.tar.gz
其他两个数据节点也安装mha4mysql-node-0.56.tar.gz(过程略)在管理节点需要两个都安装:mha4mysql-node-0.56.tar.gz和mha4mysql-manager-0.56.tar.gz安装mha4mysql-node-0.56.tar.gz
make && make install根据提示输入。
3、 配置mha与绝大多数Linux应用程序类似,MHA的正确使用依赖于合理的配置文件。MHA的配置文件与mysql的my.cnf文件配置相似,采取的是param=value的方式来配置,配置文件位于管理节点,通常包括每一个mysql
server的主机名,mysql用户名,密码,工作目录等等。编辑/etc/masterha/app1.conf,内容如下:
此处补加一下:[server3]hostname=192.168.1.104port=3306master_binlog_dir=/usr/local/mysql/data/candidate_master=1保存退出
配关配置项的解释:manager_workdir=/masterha/app1 //设置manager的工作目录manager_log=/masterha/app1/manager.log //设置manager的日志user=manager//设置监控用户managerpassword=123456 //监控用户manager的密码ssh_user=root //ssh连接用户repl_user=mharep //主从复制用户repl_password=123.abc //主从复制用户密码ping_interval=1 //设置监控主库,发送ping包的时间间隔,默认是3秒,尝试三次没有回应的时候自动进行railovermaster_binlog_dir=/usr/local/mysql/data //设置master 保存binlog的位置,以便MHA可以找到master的日志,我这里的也就是mysql的数据目录candidate_master=1//设置为候选master,如果设置该参数以后,发生主从切换以后将会将此从库提升为主库。 SSH 有效性验证:[root@centos1 ~]# masterha_check_ssh --global_conf=/etc/masterha/masterha_default.cnf --conf=/etc/masterha/app1.cnfWed Sep 28 21:34:50 2016 - [info] Reading default configuration from /etc/masterha/masterha_default.cnf..Wed Sep 28 21:34:50 2016 - [info] Reading application default configuration from /etc/masterha/app1.cnf..Wed Sep 28 21:34:50 2016 - [info] Reading server configuration from /etc/masterha/app1.cnf..Wed Sep 28 21:34:50 2016 - [info] Starting SSH connection tests..Wed Sep 28 21:34:50 2016 - [debug]Wed Sep 28 21:34:50 2016 - [debug] Connecting via SSH from root@192.168.1.102(192.168.1.102:22) to root@192.168.1.103(192.168.1.103:22)..Wed Sep 28 21:34:50 2016 - [debug] ok.Wed Sep 28 21:34:50 2016 - [debug] Connecting via SSH from root@192.168.1.102(192.168.1.102:22) to root@192.168.1.104(192.168.1.104:22)..Wed Sep 28 21:34:50 2016 - [debug] ok.Wed Sep 28 21:34:51 2016 - [debug]Wed Sep 28 21:34:50 2016 - [debug] Connecting via SSH from root@192.168.1.103(192.168.1.103:22) to root@192.168.1.102(192.168.1.102:22)..Wed Sep 28 21:34:50 2016 - [debug] ok.Wed Sep 28 21:34:50 2016 - [debug] Connecting via SSH from root@192.168.1.103(192.168.1.103:22) to root@192.168.1.104(192.168.1.104:22)..Wed Sep 28 21:34:51 2016 - [debug] ok.Wed Sep 28 21:34:51 2016 - [debug]Wed Sep 28 21:34:51 2016 - [debug] Connecting via SSH from root@192.168.1.104(192.168.1.104:22) to root@192.168.1.102(192.168.1.102:22)..Wed Sep 28 21:34:51 2016 - [debug] ok.Wed Sep 28 21:34:51 2016 - [debug] Connecting via SSH from root@192.168.1.104(192.168.1.104:22) to root@192.168.1.103(192.168.1.103:22)..Wed Sep 28 21:34:51 2016 - [debug] ok.Wed Sep 28 21:34:51 2016 - [info] All SSH connection tests passed successfully.集群复制的有效性验证:mysql必须都启动[root@centos1 ~]# masterha_check_repl --global_conf=/etc/masterha/masterha_default.cnf --conf=/etc/masterha/app1.cnfWed Sep 28 21:38:21 2016 - [info] Reading default configuration from /etc/masterha/masterha_default.cnf..Wed Sep 28 21:38:21 2016 - [info] Reading application default configuration from /etc/masterha/app1.cnf..Wed Sep 28 21:38:21 2016 - [info] Reading server configuration from /etc/masterha/app1.cnf..Wed Sep 28 21:38:21 2016 - [info] MHA::MasterMonitor version 0.56.Wed Sep 28 21:38:21 2016 - [info] GTID failover mode = 0Wed Sep 28 21:38:21 2016 - [info] Dead Servers:Wed Sep 28 21:38:21 2016 - [info] Alive Servers:Wed Sep 28 21:38:21 2016 - [info] 192.168.1.102(192.168.1.102:3306)Wed Sep 28 21:38:21 2016 - [info] 192.168.1.103(192.168.1.103:3306)Wed Sep 28 21:38:21 2016 - [info] 192.168.1.104(192.168.1.104:3306)Wed Sep 28 21:38:21 2016 - [info] Alive Slaves:Wed Sep 28 21:38:21 2016 - [info] 192.168.1.103(192.168.1.103:3306) Version=5.5.38-log (oldest major version between slaves) log-bin:enabledWed Sep 28 21:38:21 2016 - [info] Replicating from 192.168.1.102(192.168.1.102:3306)Wed Sep 28 21:38:21 2016 - [info] Primary candidate for the new Master (candidate_master is set)Wed Sep 28 21:38:21 2016 - [info] 192.168.1.104(192.168.1.104:3306) Version=5.5.38-log (oldest major version between slaves) log-bin:enabledWed Sep 28 21:38:21 2016 - [info] Replicating from 192.168.1.102(192.168.1.102:3306)Wed Sep 28 21:38:21 2016 - [info] Not candidate for the new Master (no_master is set)Wed Sep 28 21:38:21 2016 - [info] Current Alive Master: 192.168.1.102(192.168.1.102:3306)Wed Sep 28 21:38:21 2016 - [info] Checking slave configurations..Wed Sep 28 21:38:21 2016 - [info] read_only=1 is not set on slave 192.168.1.103(192.168.1.103:3306).Wed Sep 28 21:38:21 2016 - [warning] relay_log_purge=0 is not set on slave 192.168.1.104(192.168.1.104:3306).Wed Sep 28 21:38:21 2016 - [info] Checking replication filtering settings..Wed Sep 28 21:38:21 2016 - [info] binlog_do_db= , binlog_ignore_db=Wed Sep 28 21:38:21 2016 - [info] Replication filtering check ok.Wed Sep 28 21:38:21 2016 - [info] GTID (with auto-pos) is not supportedWed Sep 28 21:38:21 2016 - [info] Starting SSH connection tests..Wed Sep 28 21:38:23 2016 - [info] All SSH connection tests passed successfully.Wed Sep 28 21:38:23 2016 - [info] Checking MHA Node version..Wed Sep 28 21:38:23 2016 - [info] Version check ok.Wed Sep 28 21:38:23 2016 - [info] Checking SSH publickey authentication settings on the current master..Wed Sep 28 21:38:23 2016 - [info] HealthCheck: SSH to 192.168.1.102 is reachable.Wed Sep 28 21:38:23 2016 - [info] Master MHA Node version is 0.56.Wed Sep 28 21:38:23 2016 - [info] Checking recovery script configurations on 192.168.1.102(192.168.1.102:3306)..Wed Sep 28 21:38:23 2016 - [info] Executing command: save_binary_logs --command=test --start_pos=4 --binlog_dir=/usr/local/mysql/data --output_file=/var/tmp/save_binary_logs_test --manager_version=0.56
--start_file=mysql-bin.000010Wed Sep 28 21:38:23 2016 - [info] Connecting to root@192.168.1.102(192.168.1.102:22).. Creating /var/tmp if not exists..ok. Checking output directory is accessible or not..ok.Binlog found at /usr/local/mysql/data, up to mysql-bin.000010Wed Sep 28 21:38:23 2016 - [info] Binlog setting check done.Wed Sep 28 21:38:23 2016 - [info] Checking SSH publickey authentication and checking recovery script configurations on all alive slave servers..Wed Sep 28 21:38:23 2016 - [info] Executing command :apply_diff_relay_logs --command=test --slave_user='manager' --slave_host=192.168.1.103 --slave_ip=192.168.1.103 --slave_port=3306 --workdir=/var/tmp
--target_version=5.5.38-log --manager_version=0.56 --relay_log_info=/usr/local/mysql/data/relay-log.info --relay_dir=/usr/local/mysql/data/ --slave_pass=xxxWed Sep 28 21:38:23 2016 - [info] Connecting to root@192.168.1.103(192.168.1.103:22).. Checking slave recovery environment settings..Opening /usr/local/mysql/data/relay-log.info ... ok. Relay log found at /usr/local/mysql/data, up to relay-bin.000007 Temporary relay log file is /usr/local/mysql/data/relay-bin.000007 Testing mysql connection and privileges..done. Testing mysqlbinlog output..done. Cleaning up test file(s)..done.Wed Sep 28 21:38:24 2016 - [info] Executing command :apply_diff_relay_logs --command=test --slave_user='manager' --slave_host=192.168.1.104 --slave_ip=192.168.1.104 --slave_port=3306 --workdir=/var/tmp
--target_version=5.5.38-log --manager_version=0.56 --relay_log_info=/usr/local/mysql/data/relay-log.info --relay_dir=/usr/local/mysql/data/ --slave_pass=xxxWed Sep 28 21:38:24 2016 - [info] Connecting to root@192.168.1.104(192.168.1.104:22).. Checking slave recovery environment settings..Opening /usr/local/mysql/data/relay-log.info ... ok. Relay log found at /usr/local/mysql/data, up to relay-bin.000007 Temporary relay log file is /usr/local/mysql/data/relay-bin.000007 Testing mysql connection and privileges..done. Testing mysqlbinlog output..done. Cleaning up test file(s)..done.Wed Sep 28 21:38:24 2016 - [info] Slaves settings check done.Wed Sep 28 21:38:24 2016 - [info]192.168.1.102(192.168.1.102:3306) (current master) +--192.168.1.103(192.168.1.103:3306) +--192.168.1.104(192.168.1.104:3306) Wed Sep 28 21:38:24 2016 - [info] Checking replication health on 192.168.1.103..Wed Sep 28 21:38:24 2016 - [info] ok.Wed Sep 28 21:38:24 2016 - [info] Checking replication health on 192.168.1.104..Wed Sep 28 21:38:24 2016 - [info] ok.Wed Sep 28 21:38:24 2016 - [warning] master_ip_failover_script is not defined.Wed Sep 28 21:38:24 2016 - [warning] shutdown_script is not defined.Wed Sep 28 21:38:24 2016 - [info] Got exit code 0 (Not master dead).MySQL Replication Health is OK.验证成功的话会自动识别出所有服务器和主从状况注:验证成功的话会自动识别出所有服务器和主从状况在验证时,若遇到这个错误:Can't exec "mysqlbinlog" ......解决方法是在所有服务器上执行:ln -s /usr/local/mysql/bin/* /usr/local/bin/启动 manager:
注:在应用Unix/Linux时,我们一般想让某个程序在后台运行,于是我们将常会用&在程序结尾来让程序自动运行。比如我们要运行mysql在后台:
/usr/local/mysql/bin/mysqld_safe –user=mysql&。可是有很多程序并不想mysqld一样,这样我们就需要nohup命令,状态检查:nohup masterha_check_status --conf=/etc/masterha/app1.cnf
故障转移验证:(自动failover)master dead后,MHA当时已经开启,候选Master库(Slave)会自动failover为Master.验证的方式是先停掉 master(centos2),因为之前的配置文件中,把Candicatemaster(centos3)作为了候选人,那么就到 slave(centos4) 上查看 master 的 IP 是否变为了
centos3 的 IP1)停掉 master在 master(192.168.1.102)上把mysql停掉2)查看 MHA 日志上面的配置文件中指定了日志位置为 /masterha/app1/manager.log[root@centos1 ~]# cat /masterha/app1/manager.log----- Failover Report ----- app1: MySQL Master failover 192.168.1.102(192.168.1.102:3306) to 192.168.1.103(192.168.1.103:3306) succeeded Master 192.168.1.102(192.168.1.102:3306) is down! Check MHA Manager logs at centos1.benet.com:/masterha/app1/manager.log for details. Started automated(non-interactive) failover.The latest slave 192.168.1.103(192.168.1.103:3306) has all relay logs for recovery.Selected 192.168.1.103(192.168.1.103:3306) as a new master.192.168.1.103(192.168.1.103:3306): OK: Applying all logs succeeded.192.168.1.104(192.168.1.104:3306): This host has the latest relay log events.Generating relay diff files from the latest slave succeeded.192.168.1.104(192.168.1.104:3306): OK: Applying all logs succeeded. Slave started, replicating from 192.168.1.103(192.168.1.103:3306)192.168.1.103(192.168.1.103:3306): Resetting slave info succeeded.Master failover to 192.168.1.103(192.168.1.103:3306) completed successfully.从日志信息中可以看到 master failover 已经成功了,并可以看出故障转移的大体流程3)检查 slave2 的复制登录 slave(192.168.1.104)的Mysql,查看 slave 状态mysql> show slave status\G;*************************** 1. row ***************************Slave_IO_State: Waiting for master to send eventMaster_Host: 192.168.1.103Master_User: mharepMaster_Port: 3306Connect_Retry: 60Master_Log_File: mysql-bin.000009Read_Master_Log_Pos: 107Relay_Log_File: relay-bin.000002Relay_Log_Pos: 253Relay_Master_Log_File: mysql-bin.000009Slave_IO_Running: YesSlave_SQL_Running: Yes可以看到 master 的 IP 现在为 192.168.1.103,已经切换到和192.168.1.103同步了,本来是和192.168.1.102同步的,说明 MHA 已经把Candicatemaster(centos3)提升为了新的 master,IO线程和SQL线程也正确运行,MHA 搭建成功MHA Manager 端日常主要操作步骤1)检查是否有下列文件,有则删除。发生主从切换后,MHAmanager服务会自动停掉,且在manager_workdir(/masterha/app1)目录下面生成文件app1.failover.complete,若要启动MHA,必须先确保无此文件)如果有这个提示,那么删除此文件/masterha/app1/app1.failover.complete[error][/usr/share/perl5/vendor_perl/MHA/MasterFailover.pm, ln298] Last failover was done at 2015/01/09 10:00:47. Current time is too early to do failover again.
If you want to do failover, manually remove /masterha/app1/app1.failover.complete and run this script again. # ll /masterha/app1/app1.failover.complete # ll /masterha/app1/app1.failover.error 2)检查MHA当前置: # masterha_check_repl --conf=/etc/masterha/app1.cnf 3)启动MHA: #nohup masterha_manager --conf=/etc/masterha/app1.cnf&>/tmp/mha_manager.log &当有slave 节点宕掉时,默认是启动不了的,加上 --ignore_fail_on_start即使有节点宕掉也能启动MHA,如下: #nohupmasterha_manager --conf=/etc/masterha/app1.cnf--ignore_fail_on_start&>/tmp/mha_manager.log & 4)停止MHA: masterha_stop --conf=/etc/masterha/app1.cnf 5)检查状态:# masterha_check_status --conf=/etc/masterha/app1.cnf 6)检查日志:#tail -f /masterha/app1/manager.log 7)主从切换后续工作重构:重构就是你的主挂了,切换到Candicate master上,Candicate master变成了主,因此重构的一种方案原主库修复成一个新的slave 主库切换后,把原主库修复成新从库,然后重新执行以上5步。原主库数据文件完整的情况下,可通过以下方式找出最后执行的CHANGE MASTER命令:[root@centos1 ~]# grep "CHANGE MASTER TO MASTER" /masterha/app1/manager.log | tail -1Wed Sep 28 22:36:41 2016 - [info] All other slaves should start replication from here. Statement should be: CHANGE MASTER TO MASTER_HOST='192.168.1.103', MASTER_PORT=3306, MASTER_LOG_FILE='mysql-bin.000009', MASTER_LOG_POS=107, MASTER_USER='mharep', MASTER_PASSWORD='xxx'; [root@centos2 ~]# mysql -uroot -ppwd123mysql> CHANGE MASTER TO MASTER_HOST='192.168.1.103', MASTER_PORT=3306, MASTER_LOG_FILE='mysql-bin.000009', MASTER_LOG_POS=107, MASTER_USER='mharep', MASTER_PASSWORD='123.abc';Query OK, 0 rows affected (0.06 sec) mysql> start slave;Query OK, 0 rows affected (0.00 sec) mysql> show slave status\G;*************************** 1. row ***************************Slave_IO_State: Waiting for master to send eventMaster_Host: 192.168.1.103Master_User: mharepMaster_Port: 3306Connect_Retry: 60Master_Log_File: mysql-bin.000011Read_Master_Log_Pos: 107Relay_Log_File: relay-bin.000005Relay_Log_Pos: 253Relay_Master_Log_File: mysql-bin.000011Slave_IO_Running: YesSlave_SQL_Running: Yes启动manager
注意:如果正常,会显示"PING_OK",否则会显示"NOT_RUNNING",这代表MHA监控没有开启。 定期删除中继日志在配置主从复制中,slave上设置了参数relay_log_purge=0,所以slave节点需要定期删除中继日志,建议每个slave节点删除中继日志的时间错开。corntab -e0 5 * * * /usr/local/bin/purge_relay_logs - -user=root --password=pwd123 --port=3306 --disable_relay_log_purge>> /var/log/purge_relay.log 2>&1 四、配置VIP:vip配置可以采用两种方式,一种通过keepalived的方式管理虚拟ip的浮动;另外一种通过脚本方式启动虚拟ip的方式(即不需要keepalived或者heartbeat类似的软件)。1、keepalived方式管理虚拟ip,keepalived配置方法如下:下载软件进行并进行安装(两台master,准确的说一台是master,另外一台是备选master,在没有切换以前是slave)在centos2和centos3上安装软件包keepalived安装keepalived软件包与服务控制在编译安装Keepalived之前,必须先安装内核开发包kernel-devel以及openssl-devel、popt-devel等支持库。
若没有安装则通过rpm或yum工具进行安装编译安装Keepalived使用指定的linux内核位置对keepalived进行配置,并将安装路径指定为根目录,这样就无需额外创建链接文件了,配置完成后,依次执行make、make install进行安装。
使用keepalived服务执行make install操作之后,会自动生成/etc/init.d/keepalived脚本文件,但还需要手动添加为系统服务,这样就可以使用service、chkconfig工具来对keepalived服务程序进行管理了。
Centos3主机也完成keepalived安装,与master1一样,安装过程略注:若开启了防火墙,需要关闭防火墙或创建规则。修改Keepalived的配置文件(在master上配置)
在候选master上配置
启动keepalived服务,在master上启动并查看日志#/etc/init.d/keepalivedstart ; tail -f /var/log/messages
发现已经将虚拟ip 192.168.1.100绑定了网卡eth0上
# tail -f /var/log/messages查看eth0网卡是否绑定了VIP
在另外一台服务器,候选master上启动keepalived服务,并观察#/etc/init.d/keepalivedstart ; tail -f /var/log/messages
查看eth0网卡绑定情况
从上面的信息可以看到keepalived已经配置成功注意:上面两台服务器的keepalived都设置为了BACKUP模式,在keepalived中2种模式,分别是master->backup模式和backup->backup模式。这两种模式有很大区别。在master->backup模式下,一旦主库宕机,虚拟ip会自动漂移到从库,当主库修复后,keepalived启动后,还会把虚拟ip抢占过来,即使设置了非抢占模式(nopreempt)抢占ip的动作也会发生。在backup->backup模式下,当主库宕机后虚拟ip会自动漂移到从库上,当原主库恢复和keepalived服务启动后,并不会抢占新主的虚拟ip,即使是优先级高于从库的优先级别,也不会发生抢占。为了减少ip漂移次数,通常是把修复好的主库当做新的备库。 2、MHA引入keepalived(MySQL服务进程挂掉时通过MHA 停止keepalived):要想把keepalived服务引入MHA,我们只需要修改切换时触发的脚本文件master_ip_failover即可,在该脚本中添加在master发生宕机时对keepalived的处理。编辑脚本/scripts/master_ip_failover,修改后如下。[root@centos1 ~]# cat /scripts/master_ip_failover#!/usr/bin/envperl use strict;use warnings FATAL => 'all'; useGetopt::Long; my ( $command, $ssh_user, $orig_master_host, $orig_master_ip, $orig_master_port, $new_master_host, $new_master_ip, $new_master_port); my $vip = '192.168.1.100';my $ssh_start_vip = "/etc/init.d/keepalived start";my $ssh_stop_vip = "/etc/init.d/keepalived stop"; GetOptions( 'command=s' => \$command, 'ssh_user=s' => \$ssh_user, 'orig_master_host=s' => \$orig_master_host, 'orig_master_ip=s' => \$orig_master_ip, 'orig_master_port=i' => \$orig_master_port, 'new_master_host=s' => \$new_master_host, 'new_master_ip=s' => \$new_master_ip, 'new_master_port=i' => \$new_master_port,); exit&main(); sub main { print "\n\nIN SCRIPT TEST====$ssh_stop_vip==$ssh_start_vip===\n\n"; if ( $command eq "stop" || $command eq "stopssh" ) { my $exit_code = 1;eval {print "Disabling the VIP on old master: $orig_master_host \n";&stop_vip(); $exit_code = 0; };if ($@) {warn "Got Error: $@\n";exit $exit_code; }exit $exit_code; }elsif ( $command eq "start" ) { my $exit_code = 10;eval {print "Enabling the VIP - $vip on the new master - $new_master_host \n";&start_vip(); $exit_code = 0; };if ($@) {warn $@;exit $exit_code; }exit $exit_code; }elsif ( $command eq "status" ) {print "Checking the Status of the script.. OK \n"; #`ssh $ssh_user\@cluster1 \" $ssh_start_vip \"`;exit 0; }else {&usage();exit 1; }} # A simple system call that enable the VIP on the new mastersubstart_vip() { `ssh $ssh_user\@$new_master_host \" $ssh_start_vip \"`;}# A simple system call that disable the VIP on the old_mastersubstop_vip() {return 0 unless ($ssh_user); `ssh $ssh_user\@$orig_master_host \" $ssh_stop_vip \"`;} sub usage {print "Usage: master_ip_failover --command=start|stop|stopssh|status --orig_master_host=host --orig_master_ip=ip --orig_master_port=port --new_master_host=host --new_master_ip=ip --new_master_port=port\n";}现在已经修改这个脚本了,接下来我们在/etc/masterha/app1.cnf 中调用故障切换脚本停止MHA: #masterha_stop --conf=/etc/masterha/app1.cnf在配置文件/etc/masterha/app1.cnf 中启用下面的参数(在[server default下面添加])master_ip_failover_script=/scripts/master_ip_failover启动MHA:#nohupmasterha_manager --conf=/etc/masterha/app1.cnf&>/tmp/mha_manager.log &检查状态:[root@centos1 ~]# masterha_check_status --conf=/etc/masterha/app1.cnfapp1 (pid:12047) is running(0:PING_OK), master:192.168.1.103再检查集群状态,看是否会报错。[root@centos1 ~]# masterha_check_repl --conf=/etc/masterha/app1.cnf……Thu Sep 29 23:29:30 2016 - [info] Slaves settings check done.Thu Sep 29 23:29:30 2016 - [info]192.168.1.103(192.168.1.103:3306) (current master) +--192.168.1.102(192.168.1.102:3306) +--192.168.1.104(192.168.1.104:3306) Thu Sep 29 23:29:30 2016 - [info] Checking replication health on 192.168.1.102..Thu Sep 29 23:29:30 2016 - [info] ok.Thu Sep 29 23:29:30 2016 - [info] Checking replication health on 192.168.1.104..Thu Sep 29 23:29:30 2016 - [info] ok.Thu Sep 29 23:29:30 2016 - [info] Checking master_ip_failover_script status:Thu Sep 29 23:29:30 2016 - [info] /scripts/master_ip_failover --command=status --ssh_user=root --orig_master_host=192.168.1.103 --orig_master_ip=192.168.1.103 --orig_master_port=3306IN SCRIPT TEST====/etc/init.d/keepalived stop==/etc/init.d/keepalived start===Checking the Status of the script.. OKThu Sep 29 23:29:30 2016 - [info] OK.Thu Sep 29 23:29:30 2016 - [warning] shutdown_script is not defined.Thu Sep 29 23:29:30 2016 - [info] Got exit code 0 (Not master dead).MySQL Replication Health is OK. 可以看见已经没有报错了。
/scripts/master_ip_failover添加或者修改的内容意思是当主库数据库发生故障时,会触发MHA切换,MHA Manager会停掉主库上的keepalived服务,触发虚拟ip漂移到备选从库,从而完成切换。当然可以在keepalived里面引入脚本,这个脚本监控mysql是否正常运行,如果不正常,则调用该脚本杀掉keepalived进程(参考MySQL 高可用性keepalived+mysql双主)。测试:在master上停止mysqld服务到slave(192.168.1.104)查看slave的状态:
从上图可以看出slave指向了新的master服务器192.168.1.102(在故障切换前指向的是192.168.1.103)查看VIP绑定:在192.168.1.103上查看vip绑定
在192.168.1.102上查看vip绑定
从上面的显示结果可以看出vip地址漂移到了192.168.1.102主从切换后续工作重构:重构就是你的主挂了,切换到Candicate master上,Candicate master变成了主,因此重构的一种方案原主库修复成一个新的slave主库切换后,把原主库修复成新从库,原主库数据文件完整的情况下,可通过以下方式找出最后执行的CHANGE MASTER命令:[root@centos1 ~]# grep "CHANGE MASTER TO MASTER" /masterha/app1/manager.log | tail -1Thu Sep 29 23:38:16 2016 - [info] All other slaves should start replication from here. Statement should be: CHANGE MASTER TO MASTER_HOST='192.168.1.102', MASTER_PORT=3306, MASTER_LOG_FILE='mysql-bin.000013', MASTER_LOG_POS=107, MASTER_USER='mharep', MASTER_PASSWORD='xxx';将192.168.1.103(原主库)修复成从库[root@centos3 ~]# servicemysqld startStarting MySQL..[ OK ][root@centos3 ~]# mysql -uroot -ppwd123Welcome to the MySQL monitor. Commands end with ; or \g.Your MySQL connection id is 1Server version: 5.5.38-log Source distribution Copyright (c) 2000, 2013, Oracle and/or its affiliates. All rights reserved. Oracle is a registered trademark of Oracle Corporation and/or itsaffiliates. Other names may be trademarks of their respectiveowners. Type 'help;' or '\h' for help.Type '\c' to clear the current input statement. mysql>CHANGE MASTER TO MASTER_HOST='192.168.1.102', MASTER_PORT=3306, MASTER_LOG_FILE='mysql-bin.000013', MASTER_LOG_POS=107, MASTER_USER='mharep', MASTER_PASSWORD='123.abc';Query OK, 0 rows affected (0.06 sec) mysql> start slave;Query OK, 0 rows affected (0.00 sec) mysql> show slave status\G;*************************** 1. row ***************************Slave_IO_State: Waiting for master to send eventMaster_Host: 192.168.1.102Master_User: mharepMaster_Port: 3306Connect_Retry: 60Master_Log_File: mysql-bin.000013Read_Master_Log_Pos: 107Relay_Log_File: relay-bin.000002Relay_Log_Pos: 253Relay_Master_Log_File: mysql-bin.000013Slave_IO_Running: YesSlave_SQL_Running: Yes [root@centos3 ~]# /etc/init.d/keepalived startStarting keepalived: [ OK ][root@centos3 ~]# /etc/init.d/keepalived statuskeepalived (pid 6436) is running... 启动mha manager:[root@centos1 ~]# rm -fr /masterha/app1/app1.failover.complete[root@centos1 ~]# nohupmasterha_manager --conf=/etc/masterha/app1.cnf --ignore_fail_on_start&>/tmp/mha_manager.log &[1] 13010[root@centos1 ~]# masterha_check_status --conf=/etc/masterha/app1.cnfapp1 (pid:13010) is running(0:PING_OK), master:192.168.1.102 [root@centos1 ~]# masterha_check_repl --conf=/etc/masterha/app1.cnfFri Sep 30 00:02:39 2016 - [info] Slaves settings check done.Fri Sep 30 00:02:39 2016 - [info]192.168.1.102(192.168.1.102:3306) (current master) +--192.168.1.103(192.168.1.103:3306) +--192.168.1.104(192.168.1.104:3306) Fri Sep 30 00:02:39 2016 - [info] Checking replication health on 192.168.1.103..Fri Sep 30 00:02:39 2016 - [info] ok.Fri Sep 30 00:02:39 2016 - [info] Checking replication health on 192.168.1.104..Fri Sep 30 00:02:39 2016 - [info] ok.Fri Sep 30 00:02:39 2016 - [info] Checking master_ip_failover_script status:Fri Sep 30 00:02:39 2016 - [info] /scripts/master_ip_failover --command=status --ssh_user=root --orig_master_host=192.168.1.102 --orig_master_ip=192.168.1.102 --orig_master_port=3306 2、通过脚本实现VIP切换通过脚本的方式管理VIP。这里是修改/scripts/master_ip_failover,也可以使用其他的语言完成,比如php语言。使用php脚本编写的failover这里就不介绍了。修改完成后内容如下,而且如果使用脚本管理vip的话,需要手动在master服务器上绑定一个vip[root@centos2 ~]# /sbin/ifconfig eth0:0 192.168.1.100/24在mha-manager上修改/scripts/master_ip_failover,内容如下[root@centos1 ~]# cat /scripts/master_ip_failover#!/usr/bin/envperl use strict;use warnings FATAL => 'all'; useGetopt::Long; my ( $command, $ssh_user, $orig_master_host, $orig_master_ip, $orig_master_port, $new_master_host, $new_master_ip, $new_master_port); my $vip = '192.168.1.100/24';my $key = '0';my $ssh_start_vip = "/sbin/ifconfig eth0:$key $vip";my $ssh_stop_vip = "/sbin/ifconfig eth0:$key down"; GetOptions( 'command=s' => \$command, 'ssh_user=s' => \$ssh_user, 'orig_master_host=s' => \$orig_master_host, 'orig_master_ip=s' => \$orig_master_ip, 'orig_master_port=i' => \$orig_master_port, 'new_master_host=s' => \$new_master_host, 'new_master_ip=s' => \$new_master_ip, 'new_master_port=i' => \$new_master_port,); exit&main(); sub main { print "\n\nIN SCRIPT TEST====$ssh_stop_vip==$ssh_start_vip===\n\n"; if ( $command eq "stop" || $command eq "stopssh" ) { my $exit_code = 1;eval {print "Disabling the VIP on old master: $orig_master_host \n";&stop_vip(); $exit_code = 0; };if ($@) {warn "Got Error: $@\n";exit $exit_code; }exit $exit_code; }elsif ( $command eq "start" ) { my $exit_code = 10;eval {print "Enabling the VIP - $vip on the new master - $new_master_host \n";&start_vip(); $exit_code = 0; };if ($@) {warn $@;exit $exit_code; }exit $exit_code; }elsif ( $command eq "status" ) {print "Checking the Status of the script.. OK \n";exit 0; }else {&usage();exit 1; }} substart_vip() { `ssh $ssh_user\@$new_master_host \" $ssh_start_vip \"`;}substop_vip() {return 0 unless ($ssh_user); `ssh $ssh_user\@$orig_master_host \" $ssh_stop_vip \"`;} sub usage {print "Usage: master_ip_failover --command=start|stop|stopssh|status --orig_master_host=host --orig_master_ip=ip --orig_master_port=port --new_master_host=host --new_master_ip=ip --new_master_port=port\n";} 4)停止MHA: masterha_stop --conf=/etc/masterha/app1.cnf [root@centos1 ~]# grep "master_ip_failover_script" /etc/masterha/app1.cnfmaster_ip_failover_script=/scripts/master_ip_failover启动MHA: #nohupmasterha_manager --conf=/etc/masterha/app1.cnf&>/tmp/mha_manager.log & 5)检查状态:f[root@centos1 ~]# masterha_check_status --conf=/etc/masterha/app1.cnfapp1 (pid:2818) is running(0:PING_OK), master:192.168.1.102 再检查集群状态,看是否会报错。[root@centos1 ~]# masterha_check_repl--conf=/etc/masterha/app1.cnfFri Sep 30 23:05:10 2016 - [info] Slaves settings check done.Fri Sep 30 23:05:10 2016 - [info]192.168.1.102(192.168.1.102:3306) (current master) +--192.168.1.103(192.168.1.103:3306) +--192.168.1.104(192.168.1.104:3306) Fri Sep 30 23:05:10 2016 - [info] Checking replication health on 192.168.1.103..Fri Sep 30 23:05:10 2016 - [info] ok.Fri Sep 30 23:05:10 2016 - [info] Checking replication health on 192.168.1.104..Fri Sep 30 23:05:10 2016 - [info] ok.Fri Sep 30 23:05:10 2016 - [info] Checking master_ip_failover_script status:Fri Sep 30 23:05:10 2016 - [info] /scripts/master_ip_failover --command=status --ssh_user=root --orig_master_host=192.168.1.102 --orig_master_ip=192.168.1.102 --orig_master_port=3306 IN SCRIPT TEST====/sbin/ifconfig eth0:0 down==/sbin/ifconfig eth0:0 192.168.1.100/24=== Checking the Status of the script.. OKFri Sep 30 23:05:10 2016 - [info] OK.Fri Sep 30 23:05:10 2016 - [warning] shutdown_script is not defined.Fri Sep 30 23:05:10 2016 - [info] Got exit code 0 (Not master dead). MySQL Replication Health is OK.测试:在master上停掉mysql服务[root@centos2 ~]# /etc/init.d/mysqld stopShutting down MySQL... [ OK ]到slave(192.168.1.104)查看slave的状态:
从上图可以看出slave指向了新的master服务器(192.168.1.103)查看VIP
从上图可以看到centos2(原来的master)释放了VIP,centos03(新的master)接管了VIP地址主从切换后续工作主库切换后,把原主库修复成新从库,相关操作请参考前面相关操作。为了防止脑裂发生,推荐生产环境采用脚本的方式来管理虚拟ip,而不是使用keepalived来完成。到此为止,基本MHA集群已经配置完毕。 总结:MHA软件由两部分组成,Manager工具包和Node工具包,具体的说明如下。Manager工具包主要包括以下几个工具:masterha_check_ssh检查MHA的SSH配置状况masterha_check_repl检查MySQL复制状况masterha_manger启动MHAmasterha_check_status检测当前MHA运行状态masterha_master_monitor检测master是否宕机masterha_master_switch控制故障转移(自动或者手动)masterha_conf_host添加或删除配置的server信息Node工具包(这些工具通常由MHA Manager的脚本触发,无需人为操作)主要包括以下几个工具:save_binary_logs保存和复制master的二进制日志apply_diff_relay_logs识别差异的中继日志事件并将其差异的事件应用于其他的slavefilter_mysqlbinlog去除不必要的ROLLBACK事件(MHA已不再使用这个工具)purge_relay_logs清除中继日志(不会阻塞SQL线程) mysql必备技能掌握:1、MySQL架构:对mysql的架构,整体有个印象,才能不断的加深对mysql的理解和后继的学习。2、用各种姿势备份MySQL数据库数据备份是DBA或运维工程师日常工作之一,如果让你来备份,你会用什么方式备份,在时间时间备份,使用什么策略备份3、mysql主从复制及读写分离mysql的主从复制及读写分离是DBA必备技能之一4、MySQL/MariaDB数据库基于SSL实现主从复制加强主从复制的安全性5、MySQL高可用数据的高可用如何保证6、数据库Sharding的基本思想和切分策略随着数据量的不断攀升,从性能和可维护的角度,需要进行一些Sharding,也就是数据库的切分,有垂直切分和水平切分7、MySQL/MariaDB性能调整和优化技巧掌握优化思路和技巧,对数据库的不断优化是一项长期工程 谢谢观看,真心的希望能帮到您!

相关文章推荐
- MySQL高可用性大杀器之MHA
- MySQL高可用性大杀器之MHA
- mysql 高可用性工具MHA
- mysql 高可用性工具MHA
- MySQL高可用性大杀器之MHA
- MySQL高可用性大杀器之MHA
- MySQL高可用性大杀器之MHA | 火丁笔记
- [MHA]mysql-master-ha:mysql master高可用性管理工具 (转)
- MySQL高可用性之MHA
- MySQL高可用性大杀器之MHA
- MySQL高可用性大杀器之MHA
- MySQL高可用性大杀器之MHA
- 高可用性、负载均衡的mysql集群解决方案 -- 2
- 高可用性、负载均衡的mysql集群解决方案(data+sql+mgm节点)
- 使用DRBD+Heartbeat+Replication实现MYSQL高可用性 推荐
- MySQL+DRBD+HeartBeat实现高可用性
- drbd+corosync+pacemaker实现mysql服务器的高可用性群集
- 使用MMM搭建Mysql同步高可用性
- 使用MHA做mysql的高可用
- mysql-master-ha:mysql master高可用性管理工具