laravel5.1的用户权限管理的实现
2016-12-02 00:00
519 查看
本文是在基于laravel5.3的基础上实现
修改database/migrations/2016_12_02_070731_create_blogs_table.php文件
执行命令
生成model
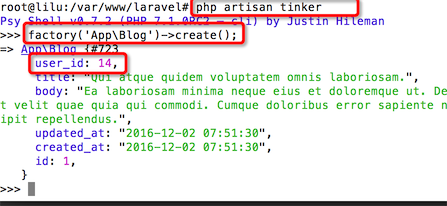
添加生成代码到database/factories/ModelFactory.php
执行tinker命令生成测试数据 同时各生成了一条blog和user数据
生成controller
在app/Http/Controllers/BlogController.php 里添加方法
在routes/web.php 中添加路由
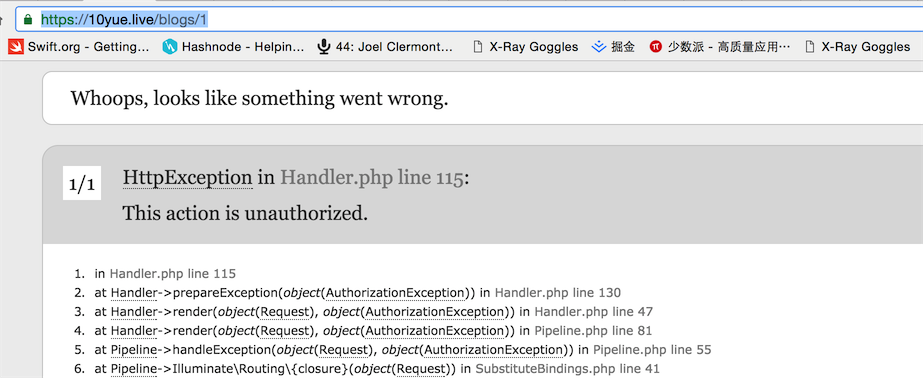
在浏览器中打开https://10yue.live/blogs/1 就可以看到到博客title
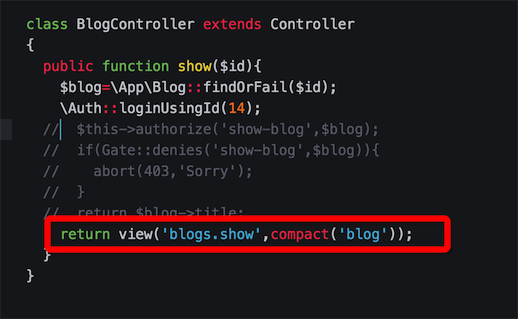
编辑app/Http/Controllers/BlogController.php
用浏览器打开https://10yue.live/blogs/1 看看
然后换一个用户登录 \Auth::loginUsingId(12);看看 https://10yue.live/blogs/1是否能打开
你会发现当blog的作者不是登录用户时会报错
其实app/Http/Controllers/BlogController.php 的authorize方法也能达到同样的效果
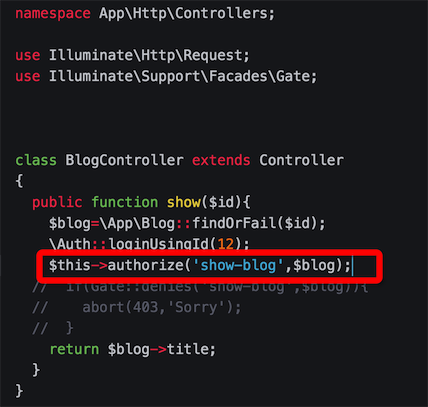
app/Http/Controllers/BlogController.php 改为
view页面 如果登录用户是blog的作者,就可以显示编辑文章的内容
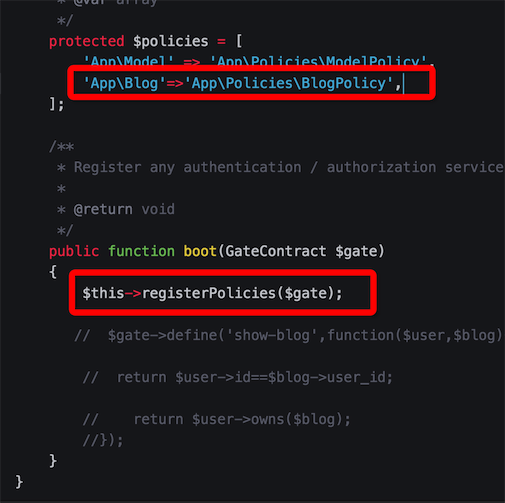
修改这个生成的文件 app/Policies/BlogPolicy.php 添加update方法
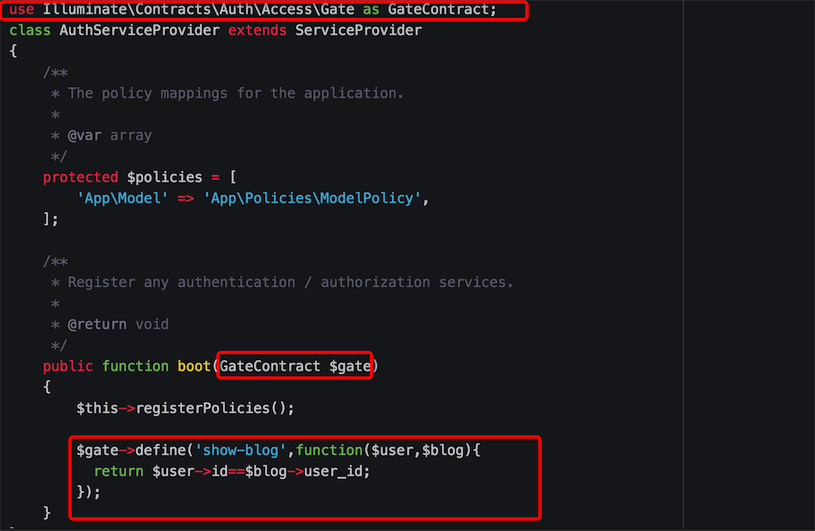
回到app/Providers/AuthServiceProvider.php 修改对应的boot方法 增加policy的注册
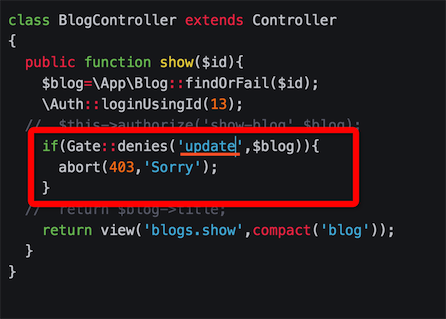
修改app/Http/Controllers/BlogController.php的show方法
修改 resources/views/blogs/show.blade.php
创建 roles表
修改database/migrations/2016_12_07_100212_create_roles_table.php 的up方法
执行migrate命令
Laravel ACL 权限
先创建blogs表php artisan make:migration create_blogs_table --create=blogs
修改database/migrations/2016_12_02_070731_create_blogs_table.php文件
public function up()
{
Schema::create('blogs', function (Blueprint $table) {
$table->increments('id');
$table->integer('user_id')->unsigned();
$table->string('title');
$table->text('body');
$table->timestamps();
$table->foreign('user_id')
->references('id')
->on('users')
->onDelete('cascade');
});
}
执行命令
php artisan migrate
生成model
php artisan make:model Blog
添加生成代码到database/factories/ModelFactory.php
$factory->define(App\Blog::class, function (Faker\Generator $faker) {

return [
'user_id'=>factory(\App\User::class)->create()->id,
'title' => $faker->sentence,
'body' => $faker->paragraph,
];
});
执行tinker命令生成测试数据 同时各生成了一条blog和user数据
生成controller
php artisan make:controller BlogController
在app/Http/Controllers/BlogController.php 里添加方法
public function show($id){
$blog=\App\Blog::findOrFail($id);
return $blog->title;
}
在routes/web.php 中添加路由
Route::resource('blogs','BlogController');在浏览器中打开https://10yue.live/blogs/1 就可以看到到博客title
下面我们将为这个blog的显示添加访问权限
编辑app/Providers/AuthServiceProvider.php编辑app/Http/Controllers/BlogController.php
namespace App\Http\Controllers;
use Illuminate\Http\Request;
use Illuminate\Support\Facades\Gate;
class BlogController extends Controller
{
public function show($id){
$blog=\App\Blog::findOrFail($id);
\Auth::loginUsingId(14);
if(Gate::denies('show-blog',$blog)){
abort(403,'Sorry');
}
return $blog->title;
}
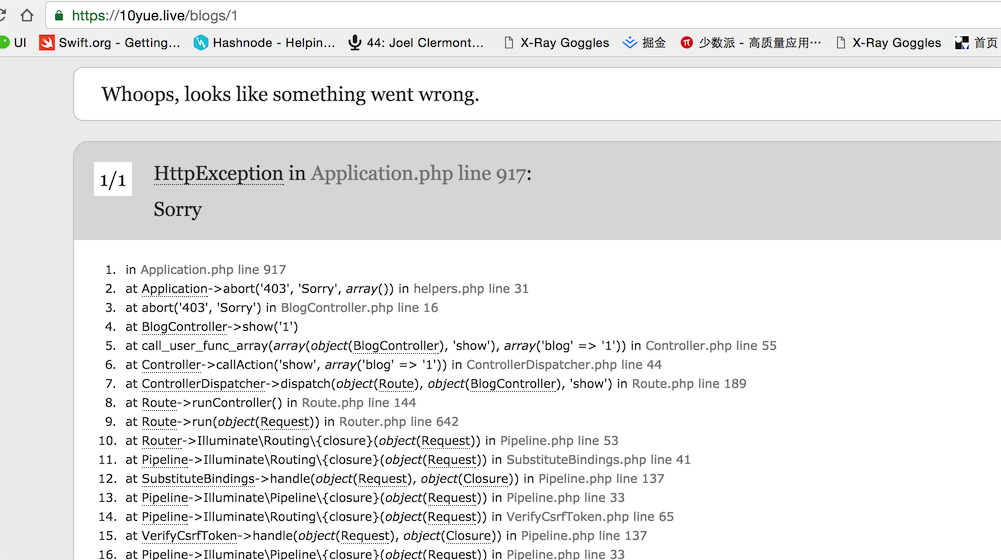
}用浏览器打开https://10yue.live/blogs/1 看看
然后换一个用户登录 \Auth::loginUsingId(12);看看 https://10yue.live/blogs/1是否能打开
你会发现当blog的作者不是登录用户时会报错
其实app/Http/Controllers/BlogController.php 的authorize方法也能达到同样的效果
优化代码
在app/User.php添加代码public function owns(\App\Blog $blog){
return $this->id==$blog->user_id;
}app/Http/Controllers/BlogController.php 改为
public function boot(GateContract $gate)
{
$this->registerPolicies();

$gate->define('show-blog',function($user,$blog){

//  return $user->id==$blog->user_id;

return $user->owns($blog);
});
}
下面我们演示一下在view页面上实现权限控制
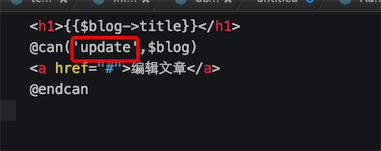
controller页面改为view页面 如果登录用户是blog的作者,就可以显示编辑文章的内容
<h1>{{$blog->title}}</h1>
@can('show-blog',$blog)
<a href="#">编辑文章</a>
@endcan
Laravel Policy
创建policy文件php artisan make:policy BlogPolicy
修改这个生成的文件 app/Policies/BlogPolicy.php 添加update方法
public function update(User $user, Blog $blog){
return $user->owns($blog);

}
回到app/Providers/AuthServiceProvider.php 修改对应的boot方法 增加policy的注册
修改app/Http/Controllers/BlogController.php的show方法
修改 resources/views/blogs/show.blade.php
Setup Roles And Permissions
创建2个model文件叫 一个叫Permission 一个叫Rolephp artisan make:model Permission
php artisan make:model Role
创建 roles表
php artisan make:migration create_roles_table --create=roles
修改database/migrations/2016_12_07_100212_create_roles_table.php 的up方法
public function up()
{
Schema::create('roles', function (Blueprint $table) {
$table->increments('id');
$table->string('name'); //admin member;
$table->string('label')->nullable(); //管理员 普通用户
$table->timestamps();
});

Schema::create('permissions', function (Blueprint $table) {
$table->increments('id');
$table->string('name'); //admin member;
$table->string('label')->nullable(); //管理员 普通用户
$table->timestamps();
});

Schema::create('permission_role', function (Blueprint $table) {
$table->integer('permission_id')->unsigned();
$table->integer('role_id')->unsigned();

$table->foreign('permission_id')
->references('id')
->on('permissions')
->onDelete('cascade');

$table->foreign('role_id')
->references('id')
->on('roles')
->onDelete('cascade');
$table->primary(['permission_id','role_id']);

});

Schema::create('role_user', function (Blueprint $table) {
$table->integer('user_id')->unsigned();
$table->integer('role_id')->unsigned();

$table->foreign('user_id')
->references('id')
->on('users')
->onDelete('cascade');

$table->foreign('role_id')
->references('id')
->on('roles')
->onDelete('cascade');
$table->primary(['user_id','role_id']);

});
}
执行migrate命令
php artisan migrate
实现用户权限管理

相关文章推荐
- laravel5.1框架下的用户权限管理
- Laravel 5.1 中的ACL用户授权及权限检查功能实现教程
- 实现业务系统中的用户权限管理--实现篇
- Spring框架下实现基于组的用户权限管理
- Pb中多用户权限管理实现方案
- 实现业务系统中的用户权限管理--设计篇
- 实现业务系统中的用户权限管理--设计篇
- 实现业务系统中的用户权限管理--实现篇
- 基于整合了struts 和hibernate 的j2ee 架构的用户权限管理系统的设计与实现
- 实现业务系统中的用户权限管理
- Pb中多用户权限管理实现方案
- ASP.NET中启用Windows集成验证,怎样在调用System.DirectoryServices下的组件时传递安全上下文,也就是说当前用户凭据,来实现权限管理
- Pb中多用户权限管理实现方案
- 实现业务系统中的用户权限管理
- 实现业务系统中的用户权限管理--设计篇(强烈推荐)
- Pb中多用户权限管理实现方案
- 实现业务系统中的用户权限管理--设计篇
- 用户权限管理及动态菜单的实现
- 实现业务系统中的用户权限管理--实现篇
- 实现业务系统中的用户权限管理