Keepalived + MySQLfailover + GTIDs 高可用
2016-01-21 10:01
816 查看
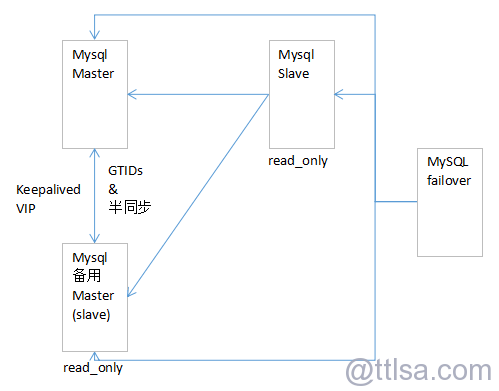
架构图
10.1.1.207 mysql master + keepalived10.1.1.206 mysql slave ( backup master ) + keepalived
10.1.1.208 mysql slave
10.1.1.210 mysqlfailover ( monitor )
10.1.1.211 VIP
配置基于GTIDs的主从
本实验在GTIDs主从的基础上进行,GTIDs配置步骤省略。但不懂的可以参考如下步骤配置 比较简单1. 修改Master配置文件
| 1 2 3 4 5 6 | vim /etc/my.cnf 添加以下内容 gtid-mode=on -- 启动gtid模式 enforce_gtid_consistency -- 强制gtid一致性 5.6.9之前的版本为disable-gtid-unsafe-statement log-bin -- master和slave都必须启用binlog log-slave-updates -- 必须使用 |
-- 先启动Master 再启动slave
service mysql start
3.配置slave
-- slave下执行
| 1 2 3 4 5 6 7 8 | change master to master_host='master_ip', master_port=3306, master_user='repl', master_password='redhat', master_auto_position=1; -- 表示基于GTIDs的主从 MySQL自动判断从哪开始同步 基于GTIDs的主从已经不需要手动指定编号了 start slave; -- 启动slave; |
开启master与[b]备用master之间的主从半同步[/b]
-- 情景大家都知道,mysql5.7以前的主从经常会发生延迟(据说5.7彻底解决了主从延迟),试想一下,如果master故障了,要升slave(备用master)为master,但此slave的数据严重延迟于master,甚至是连binlog都还没读过来的那种。那么此时如果数据往这个新master上写,数据肯定会出现混乱。这可是悲剧大事。解决方法如下
-- MySQL半同步复制
开启半同步后,在master提交一个写事务之后,master会block这个事务,直到备用master确认已经接受到了该复制事件,这时master才向应用程序确认提交成功。否则超时中断半同步,直到重新满足条件开启。
在master提交事务之后,而slave未来得及接收复制事件,这时候master crash的话,应用程序会切换到slave上,并重新发起事务,这正好是我们所需要的,满足高可用的初衷。但是这里存在一个缺陷,那就是在master恢复之后,原来的事务已经提交,这时候复制会出现问题。
解决办法:在原来的master恢复之后数据重做(推荐),或者跳过重复数据错误。
-- 模块默认在MYSQL_INSTALL_PATH/lib/plugin/semisync*.so
1. 在master与备用master上开启半同步
-- 安装半同步模块和临时开启半同步 -- 在master与备用master上操作
| 1 2 | mysql> install plugin rpl_semi_sync_master SONAME 'semisync_master.so'; mysql> install plugin rpl_semi_sync_slave SONAME 'semisync_slave.so'; |
| 1 2 | mysql> set global rpl_semi_sync_master_enabled = 1; -- 开启为master角色 mysql> set global rpl_semi_sync_master_timeout = 1000; -- 配置 |
-- 在备用master上启用半同步
| 1 2 3 | mysql> stop slave; -- 先停止主从 不然即使执行开启半同步命令也没效果 mysql> SET GLOBAL rpl_semi_sync_slave_enabled = 1; -- 开启为slave角色 mysql> start slave; |
| 1 2 3 4 5 | vim /etc/my.cnf 添加一下内容 rpl_semi_sync_master_enabled=1 rpl_semi_sync_master_timeout=1000 rpl_semi_sync_slave_enabled=1 |
| 1 2 3 4 5 6 7 8 | show status like '%semi_sync%'; master上 Rpl_semi_sync_master_clients | 1 -- 有一个slave(备用master)开启半同步 Rpl_semi_sync_master_status | ON -- 已开启成功 备用master上 Rpl_semi_sync_slave_status | ON -- 已开启成功 |
安装配置MySQLfailover
在monitor监控机上-- 安装 使用mysql官方yum源安装
yum install -y mysql-utilities.noarch -- 安装mysqlfailover
yum install -y mysql -- 安装mysql客户端
-- 在所有mysql上给mysqlfailover监控机授权 -- 在master上操作即可 因为会自动同步
| 1 | mysal> grant create,insert,drop,select,super,replication slave,reload on *.* to 'replm'@'10.1.1.210' identified by 'replm' with grant option; |
| 1 2 3 4 5 | vim /etc/my.cnf 添加以下配置 report_host=10.1.1.210 -- 只读参数 指定报告主机为10.1.1.210(mysqlfailover monitor) master_info_repository=TABLE -- 把master.info的信息 保存到数据库里面 mysqlfailover必须 原本默认保存到文件 relay_log_info_repository=TABLE -- 把relay_log信息保存到数据库里面 mysqlfailover必须 原本默认保存到文件 |
vim /etc/my.cnf
添加以下配置
read_only=1 -- mysql只读
-- 重启所有mysql 由于有些参数为只读(report_host) 所以只能修改配置文件并重启mysql
mysqladmin -predhat shutdown
service mysqld start
-- 确认slave_master_info的表引擎为innodb
mysql> show create table slave_master_info;
ENGINE=InnoDB -- 若此表引擎不为innodb请修改表引擎
配置MySQLfailover
-- 授权 把主从帐号权限精确到登录IP (用IP范围的话在failover时会自动创建用户,下一次failover时就会卡住 切换失败)| 1 2 | grant replication slave,reload,super on *.* to 'repl'@'10.1.1.207' identified by 'redhat'; grant replication slave,reload,super on *.* to 'repl'@'10.1.1.206' identified by 'redhat'; |
Q-quit R-refresh H-health G-GTID Lists U-UUIDs
Failed to reconnect to the master after 3 attemps.
Failover starting in 'auto' mode...
Replication user not found but --force used. -- 如果主从帐号权限是用IP范围 就会出现这样的错误 找不到主从帐号
# Candidate slave 10.1.1.206:3306 will become the new master.
# Checking slaves status (before failover).
# Preparing candidate for failover.
# Creating replication user if it does not exist.
# ERROR: ERROR: Cannot grant replication slave to replication user. -- 提示用户问题 本次切换会成功 但下一次切换就会卡住 失败
# Stopping slaves.
# Performing STOP on all slaves.
# Switching slaves to new master.
# Disconnecting new master as slave.
# Starting slaves.
# Performing START on all slaves.
# Checking slaves for errors.
# Failover complete.
Failover console will restart in 5 seconds.
-- 编写脚本
-- 编写failover后执行的辅助脚本 在monitor监控机上操作
| 1 2 3 4 5 | vim /usr/local/sbin/mysqlfailover_after.sh -- 编写failover后执行的脚本 #!/bin/bash candidateIP=$3 -- 接收备用master的IP mysql -ureplm -preplm -h $candidateIP -e 'set global read_only=0' -- 把候选者mysql的只读取消 mysql -ureplm -preplm -h $candidateIP -e 'set global rpl_semi_sync_master_enabled=1' -- 开启备用master的半同步状态为master |
| 1 2 3 4 5 6 7 8 9 10 | mysqlfailover --master=replm:replm@10.1.1.207 --slaves=replm:replm@10.1.1.206,replm:replm@10.1.1.208 --candidates=replm:replm@10.1.1.206 --force --log=/var/log/mysqlfailover.log --exec-after=/usr/local/sbin/mysqlfailover_after.sh 解释 --master=replm:replm@10.1.1.207 -- 指定连接master的用户名(刚刚给mysqlfailover授权的用户)和密码和master的IP --slaves= -- 指定所有slave(包括备用master)的用户名和密码和IP地址 多个slave之间用逗号隔开 --candidates= -- 指定备用master是哪台 --force -- 最好添加 如果mysqlfailover上次意外退出 不添加此参数 则不能启动mysqlfailover --log= -- 指定配置文件路径 --exec-before= -- 指定failover切换前执行的脚本路径 (刚刚编写的脚本路径) --exec-after= -- 指定failover切换后执行的脚本路径 (刚刚编写的脚本路径) --daemon=start -- 以服务的形式运行 start表示启动 stop表示停止 restart表示重启 detach表示占用前台但只输出到日志 |
| 1 2 3 4 5 6 7 8 9 10 11 12 13 14 15 16 17 18 19 | MySQL Replication Failover Utility Failover Mode = auto Next Interval = Wed Dec 16 19:00:17 2015 -- Failover Mode 必须 = auto状态 不然不会自动切换 Master Information ------------------ Binary Log File Position Binlog_Do_DB Binlog_Ignore_DB mysqld-bin.000024 271 GTID Executed Set 9507aa71-9280-11e5-88d8-525400ef6331:1-33 [...] Replication Health Status +-------------+-------+---------+--------+------------+--------------------------------------------+ | host | port | role | state | gtid_mode | health | +-------------+-------+---------+--------+------------+--------------------------------------------+ | 10.1.1.207 | 3306 | MASTER | UP | ON | OK | | 10.1.1.206 | 3306 | SLAVE | UP | ON | OK | | 10.1.1.208 | 3306 | SLAVE | UP | ON | OK | +-------------+-------+---------+--------+------------+--------------------------------------------+ |
模拟故障
-- 把10.1.1.207 master 关掉mysqladmin -predhat shutdown
monitor 监控机切换过程显示--------------------------------------------------------------------------------------
Q-quit R-refresh H-health G-GTID Lists U-UUIDs L-log entries
Failed to reconnect to the master after 3 attemps. -- 检测到master挂掉
Failover starting in 'auto' mode...
# Candidate slave 10.1.1.206:3306 will become the new master. -- 升候选者10.1.1.206为新master
# Checking slaves status (before failover).
# Preparing candidate for failover.
# Creating replication user if it does not exist.
# Spawning external script.
# Script completed Ok. -- failover前脚本执行成功
# Stopping slaves.
# Performing STOP on all slaves.
# Switching slaves to new master.
# Disconnecting new master as slave.
# Starting slaves.
# Performing START on all slaves.
# Spawning external script.
# Script completed Ok. -- failover后脚本执行成功
# Checking slaves for errors.
# Failover complete.
Failover console will restart in 5 seconds.
切换完成后显示 --------------------------------------------------------------------------------------------------------
| 1 2 3 4 5 6 7 | Replication Health Status +-------------+-------+---------+--------+------------+---------+ | host | port | role | state | gtid_mode | health | +-------------+-------+---------+--------+------------+---------+ | 10.1.1.206 | 3306 | MASTER | UP | ON | OK | -- 新master为206 | 10.1.1.208 | 3306 | SLAVE | UP | ON | OK | -- 208已成为206的从 +-------------+-------+---------+--------+------------+---------+ |
| 1 2 3 4 5 6 7 | mysql> show variables like 'read_only'; +---------------+-------+ | read_only | OFF | -- 由于执行了脚本 把只读取消 新master就能写了 +---------------+-------+ show status like '%semi_sync%'; | Rpl_semi_sync_master_status | ON | -- 半同步状态的master为on 为原来的master恢复后挂为从做准备 |
mysql> show slave status\G;
Master_Host: 10.1.1.206 -- 已成功切换为206的slave
-- 恢复原master 并成为新master的从
| 1 2 3 4 5 6 7 8 9 | mysql> service mysqld start mysql> set global read_only=1; -- 启动只读 原理跟之前一样. mysql> set global rpl_semi_sync_slave_enabled=1; -- 启动半同步的slave状态 其实配置文件里已开启 这里以防万一 mysql> change master to master_host='10.1.1.206',master_user='repl',master_password='redhat',master_auto_position=1; -- 指定为新master的从 mysql> start slave; mysql> show slave status\G; Master_Host: 10.1.1.206 -- 已成功切换为206的slave mysql> show status like '%semi_sync%'; | Rpl_semi_sync_slave_status | ON | -- 成功与新master建立半同步关系 |
-- 先按shift + q 退出监控
mysqlfailover --master=replm:replm@10.1.1.206 --slaves=replm:replm@10.1.1.207,replm:replm@10.1.1.208 --candidates=replm:replm@10.1.1.207 --force --log=/var/log/mysqlfailover.log --exec-after=/usr/local/sbin/mysqlfailover_after.sh
-- 这次master为206 slave为207和208 备用master(候选者)为207
-- 这次把新master 207关掉
mysqladmin -predhat shutdown
-- 查看slave 208状态
show slave status\G;
Master_Host: 10.1.1.207 -- 成功切换到原master207上
-- 查看原master状态
show variables like 'read_only';
| read_only | OFF | -- 成功取消只读
mysql> show status like '%semi_sync%';
| Rpl_semi_sync_master_status | ON | -- 半同步master状态为on
互为failover切换成功 现206的恢复过程参考207 以此类推 切记注意更换master和备用master的IP(不然会很悲剧的)
引入[b]Keepalived管理VIP 达到failover对前端应用透明[/b]
-- 安装keepalived 在mysql master和备用master 上
yum install -y openssl-devel
./configure --prefix=/usr/local/keepalived && make && make install
-- 编写mysqld健康检查脚本 [b]在mysql master和备用master 上[/b]
| 1 2 3 4 5 | mkdir /usr/local/keepalived/mysqld_script -p vim /usr/local/keepalived/mysqld_script/mysqld_check.sh #!/bin/bash mysqladmin -predhat ping 2> /dev/null | grep alive >> /dev/null -- 判断mysqld是否存活 exit $? -- 把返回值返回给keepalived 0为健康 1为不健康(keepalived对脚本的设定) |
-- 在mysql master 207上配置
| 1 2 3 4 5 6 7 8 9 10 11 12 13 14 15 16 17 18 19 20 21 22 23 24 25 26 | vim /usr/local/keepalived/etc/keepalived/keepalived.conf vrrp_script chk_mysqld { -- 定义检查脚本 script "/usr/local/keepalived/mysqld_script/mysqld_check.sh" interval 2 timeout 2 fall 3 } vrrp_instance mysqld { state BACKUP -- 重点 master也设置为backup 不会抢VIP interface eth0 virtual_router_id 52 priority 150 -- 权重 比备用master高 nopreempt -- 重点 设置为mysql恢复后不抢回VIP 如果mysql master启动后VIP又飘过去 即不安全又麻烦 advert_int 1 authentication { auth_type PASS auth_pass 1111 } virtual_ipaddress { 10.1.1.211 -- 指定VIP mysql需要监听在此VIP上 注意/etc/my.cnf上的bind-address } track_script { -- 指定定义监控脚本 chk_mysqld } } |
| 1 2 3 4 5 6 7 8 9 10 11 12 13 14 15 16 17 18 19 20 21 22 23 24 25 | vim /usr/local/keepalived/etc/keepalived/keepalived.conf vrrp_script chk_mysqld { script "/usr/local/keepalived/mysqld_script/mysqld_check.sh" interval 2 timeout 2 fall 3 } vrrp_instance mysqld { state BACKUP -- 角色也为BACKUP interface eth0 virtual_router_id 52 priority 100 -- 权重 比master低 advert_int 1 authentication { auth_type PASS auth_pass 1111 } virtual_ipaddress { 10.1.1.211 } track_script { chk_mysqld } } |
-- 在启动keepalived前先确保mysqld都已正常启动
-- 先启动mysql master上的keepalived
/usr/local/keepalived/sbin/keepalived -f /usr/local/keepalived/etc/keepalived/keepalived.conf -- 指定配置文件启动keepalived
-- 再启动mysql 备用master上的keepalived
/usr/local/keepalived/sbin/keepalived -f /usr/local/keepalived/etc/keepalived/keepalived.conf -- 指定配置文件启动keepalived
-- 观看VIP情况 分别在mysql master与备用master上
ip a s -- 使用ip命令查看
inet 10.1.1.211/32 scope global eth0 -- 现在的VIP只会出现在mysql master上 , 备用master不会有此VIP
-- 模拟故障
-- 先把mysql master关闭
mysqladmin -predhat shutdown
此时vip会漂移到备用master上 (在master上取消此IP 并在备用master配上此IP 此过程自动完成)
-- 再把mysql master启动
service mysqld start
此时keepalived已检查到mysqld恢复正常,但由于设置了应用恢复时不抢回VIP 所以此时VIP还是在备用master上 防止mysqld手动重启后误把VIP抢了过来 。keepalived的切换过程和状态可以查看日志 tail -f /var/log/messages
-- 把mysql 备用master关闭
此时vip会漂移到master上
-- 再把mysql 备用master启动
此时vip还是在master上
关闭keepalived 注意:
如果是需要关闭keepalived要根据keepalived的状态进行判断 先关闭没有配上vip的服务器的keepalived 再关另外一个 以防发生vip漂移
Keepalived + Mysqlfailover 联合测试
-- 把mysqld 恢复正常主从关系 207为主 206 208为从-- 按顺序启动keepalived
-- 启动mysqlfailover
-- 编写测试脚本 在monitor监控机上
-- 脚本达到无限插入数据并插入失败重新提交
| 1 2 3 4 5 6 7 8 9 10 11 12 13 14 15 16 | vim /usr/local/sbin/mysql_insert.sh #!/bin/bash flag=1 while ((1==1)) -- 定义死循环 无限插入sql do RECV=1 flag=$((flag=$flag+1)) while (($RECV!=0)) -- 这里为了模拟真实环境对操作语句是否成功的判断 并保证语句失败重新提交 根据返回值定义了循环 do mysql -h10.1.1.211 -u'user_db01' -predhat -e "insert into db01.t1 values($flag,'a')" &>> /tmp/mysql_insert.log -- 执行语句并把输出重定向给日志文件 RECV=$? echo "insert into db01.t1 values($flag,'a')" >> /tmp/mysql_insert.log echo $RECV >> /tmp/mysql_insert.log sleep 0.01 done done |
create database db01;
create table t1(id int,name char(3));
-- 给监控机赋予mysqld权限
grant all on db01.* to user_db01@'10.1.1.210' identified by 'redhat';
-- 执行测试脚本 并查看结果
chmod +x /usr/local/sbin/mysql_insert.sh -- 赋予权限
/usr/local/sbin/mysql_insert.sh -- 执行脚本
新建一个终端 查看日志
tail -f /tmp/mysql_insert.log -- 查看日志
------------------------- 没出现故障时的日志是这样的 ------------------------------
Warning: Using a password on the command line interface can be insecure.
insert into db01.t1 values(94,'a')
0
---------------------------------------------------------------------------------------
-- 把mysqld master 207关掉
mysqladmin -predhat shutdown
----------------------- mysql 发生故障 keepalived还没漂移时 -----------------------
Warning: Using a password on the command line interface can be insecure.
insert into db01.t1 values(108,'a') -- shutdown前的插入 108
0
Warning: Using a password on the command line interface can be insecure.
ERROR 2003 (HY000): Can't connect to MySQL server on '10.1.1.211' (111) -- 已shutdown的插入 显示插入失败 连不上mysql (因为mysql已经关闭了)
insert into db01.t1 values(109,'a') -- 开始发生故障的插入 109
1
------------------------ vip 已漂移到206 但mysqlfailover还没切换时 -----------------
Warning: Using a password on the command line interface can be insecure.
ERROR 1290 (HY000) at line 1: The MySQL server is running with the --read-only option so it cannot execute this statement -- 已经通过vip连接上备用master 此时备用master的角色还没切换成master的 但由于设置了read_only 所以此时数据插入失败 才保证了数据一致性
insert into db01.t1 values(109,'a') -- 看 还是插入109
1
------------------------ mysqlfailover进行故障切换后 把206正式升为master 并把208挂到206上 -------------------------------------
Warning: Using a password on the command line interface can be insecure. -- 由于failover后执行脚本把mysql的read_only取消 插入成功
insert into db01.t1 values(109,'a') -- 看 还是插入109哦 保证了故障切换不会发生数据不一致
0
-----------------------------------------------------------------------------------------------------------------------------------------

相关文章推荐
- PHP网站编程:密码嗅探
- 八,JavaWeb之开发一个纳米级的JSP网站
- 为 Drupal 7 网站添加自定义CSS
- 是否应该立即将网站升级到Drupal 8?
- 1小时建网站
- mysql四种高可用方案整理
- Flume架构与源码分析-核心组件分析
- Thrift和Zookeeper实现的动态服务调用的功能
- 服务器端架构,前端服务器与客户端随机负载平衡
- 在线进行复杂数学计算的网站——云算子
- 网站攻防
- 大型站点技术架构(三)--架构核心要素
- 第三章:高性能Web宏观架构之代理服务器Keepalived安装部署
- 02 自定义网站的根目录
- 支付宝的高可用与容灾架构演进
- 服务器端架构,前端服务器与客户端随机负载平衡
- flume架构介绍!
- 修改DNS域名转发器解决IP解析错误导致的网站不能访问
- android ios winform图标下载网站,手机图标下载
- 基于ar9331 mips架构AP121 uboot分析(3) 启动流程