TPS相机及相机遮挡的一些处理方法
2015-11-07 21:34
651 查看
提要
第三人称相机有非常多种,今天要实现的一个第三人称射击游戏的相机。
如果对相机控制不是很了解,建议看一下上一篇博文 FPS相机。
控制思路
鼠标控制yaw和pitch,添加一个distance变量来记录角色和相机之间的距离。通过yaw和pitch来得到相机的position。最后添加一个向右的位移和向上的位移量,将角色放在屏幕偏左边的位置。
transform.localEulerAngles = new Vector3(-rotationY, rotationX, 0);
characterModel.transform.forward = new Vector3(transform.forward.x, characterModel.transform.forward.y, transform.forward.z);
target.forward = new Vector3(transform.forward.x, 0, transform.forward.z);
float yaw = rotationX;
float pitch = rotationY;
float yawRed = Mathf.Deg2Rad * (yaw - 90f);
float pitchRed = Mathf.Deg2Rad * pitch;
Vector3 direction = new Vector3(-Mathf.Cos(yawRed) * Mathf.Cos(pitchRed), -Mathf.Sin(pitchRed), Mathf.Sin(yawRed) * Mathf.Cos(pitchRed));
transform.position = target.transform.position + distance * direction;
transform.position += transform.right + transform.up;
在这里,相机只控制了model的rotation。
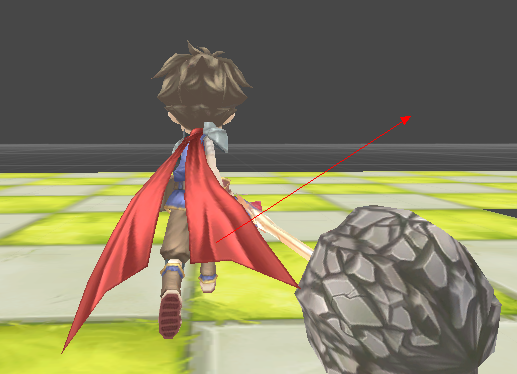
direction是通过yaw和pitch计算出的角色到相机的Ray的方向。
一些问题的处理
角色往斜方向跑的动画处理通常在TPS游戏中,角色的背面是始终对着摄像机的。当玩家希望角色往斜方向走的时候,不能直接播放角色往前走的动画,这时候就需要给角色Model一个额外的角度偏移量,这个偏移量由玩家的输入决定。
代码如下
characterModel.transform.forward = new Vector3(transform.forward.x, characterModel.transform.forward.y, transform.forward.z);
if (characterModel.transform.parent.GetComponent<Character>().characterFPAnimation.extraRotation == 0)
{
extraRot = Mathf.Lerp(extraRot, 0f, 10 * Time.deltaTime);
}else
{
extraRot = Mathf.Lerp(extraRot, characterModel.transform.parent.GetComponent<Character>().characterFPAnimation.extraRotation, 10 * Time.deltaTime);
}
Quaternion targetRotation = characterModel.transform.rotation * Quaternion.AngleAxis(extraRot, Vector3.up);
characterModel.transform.rotation = targetRotation;
添加了Lerp,让转身更加顺滑。
墙体遮挡
环境遮挡是第三人称摄像机一个经常遇到问题,下面是几个常见的方法。
解法一 射线检测,将相机移动到不被遮挡的位置。
在Unity官网的一个Tutorial里面,处理的方法是将相机慢慢上移,直到看到角色(游戏的场景是没有天花板的)
bool ViewingPosCheck (Vector3 checkPos)
{
RaycastHit hit;
// If a raycast from the check position to the player hits something...
if(Physics.Raycast(checkPos, player.position - checkPos, out hit, relCameraPosMag))
// ... if it is not the player...
if(hit.transform != player)
// This position isn't appropriate.
return false;
// If we haven't hit anything or we've hit the player, this is an appropriate position.
newPos = checkPos;
return true;
}
void SmoothLookAt ()
{
// Create a vector from the camera towards the player.
Vector3 relPlayerPosition = player.position - transform.position;
// Create a rotation based on the relative position of the player being the forward vector.
Quaternion lookAtRotation = Quaternion.LookRotation(relPlayerPosition, Vector3.up);
// Lerp the camera's rotation between it's current rotation and the rotation that looks at the player.
transform.rotation = Quaternion.Lerp(transform.rotation, lookAtRotation, smooth * Time.deltaTime);
}
在Update里面的处理是这样的
void FixedUpdate ()
{
// The standard position of the camera is the relative position of the camera from the player.
Vector3 standardPos = player.position + relCameraPos;
// The abovePos is directly above the player at the same distance as the standard position.
Vector3 abovePos = player.position + Vector3.up * relCameraPosMag;
// An array of 5 points to check if the camera can see the player.
Vector3[] checkPoints = new Vector3[5];
// The first is the standard position of the camera.
checkPoints[0] = standardPos;
// The next three are 25%, 50% and 75% of the distance between the standard position and abovePos.
checkPoints[1] = Vector3.Lerp(standardPos, abovePos, 0.25f);
checkPoints[2] = Vector3.Lerp(standardPos, abovePos, 0.5f);
checkPoints[3] = Vector3.Lerp(standardPos, abovePos, 0.75f);
// The last is the abovePos.
checkPoints[4] = abovePos;
// Run through the check points...
for(int i = 0; i < checkPoints.Length; i++)
{
// ... if the camera can see the player...
if(ViewingPosCheck(checkPoints[i]))
// ... break from the loop.
break;
}
// Lerp the camera's position between it's current position and it's new position.
transform.position = Vector3.Lerp(transform.position, newPos, smooth * Time.deltaTime);
// Make sure the camera is looking at the player.
SmoothLookAt();
}
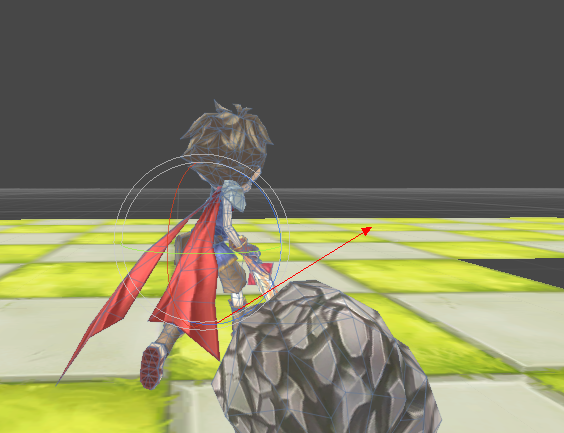
从角色的脚到头,分四个地方都进行了射线检测,最后的结果是这样的

类似的还可以将相机拉到被遮挡的墙前面。
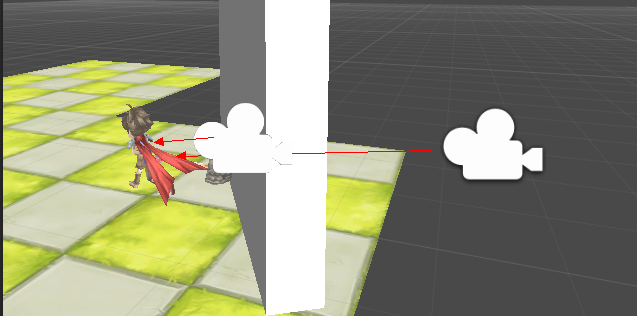
检测的代码如下
void ShelterTest()
{
RaycastResult result = new RaycastResult();
float characterHeight = GameManager.GetInstance().character.height * 0.4f;
Vector3 targetHeadPos = new Vector3(target.position.x, target.position.y + characterHeight, target.position.z);
Ray[] testRays = new Ray[5];
testRays[0] = new Ray(targetHeadPos, transform.position + 0.8f * transform.right + 0.5f * transform.up - targetHeadPos);
testRays[1] = new Ray(targetHeadPos, transform.position + 0.8f * transform.right - 0.5f * transform.up - targetHeadPos);
testRays[2] = new Ray(targetHeadPos, transform.position - 0.8f * transform.right + 0.5f * transform.up - targetHeadPos);
testRays[3] = new Ray(targetHeadPos, transform.position - 0.8f * transform.right - 0.5f * transform.up - targetHeadPos);
testRays[4] = new Ray(transform.position, transform.position - targetHeadPos);
float castDist = (transform.position - targetHeadPos).magnitude;
float[] dists = new float[5];
for (int i = 0; i < 5; i++)
{
if (RaycastHelper.RaycastAll(testRays[i], castDist, true, GameManager.GetInstance().character.floorMask, out result))
{
Debug.DrawLine(targetHeadPos, result.point, Color.red);
dists[i] = Vector3.Distance(result.point, targetHeadPos);
}else
{
Debug.DrawLine(targetHeadPos, targetHeadPos + castDist * testRays[i].direction, Color.blue);
dists[i] = castDist;
}
}
float minDist0 = Mathf.Min(dists[0], dists[1]);
float minDist1 = Mathf.Min(dists[2], dists[3]);
float minDist2 = Mathf.Min(minDist0, minDist1);
float minDist = Mathf.Min(minDist2, dists[4]);
transform.position = targetHeadPos + minDist * testRays[4].direction.normalized;
}
用了5根射线来检测,为了避免fov穿墙的问题。注意是从角色射向摄像机。
解法二 半透明掉中间遮挡的物体

用raycast进行检测,然后动态替换掉材质就可以了。
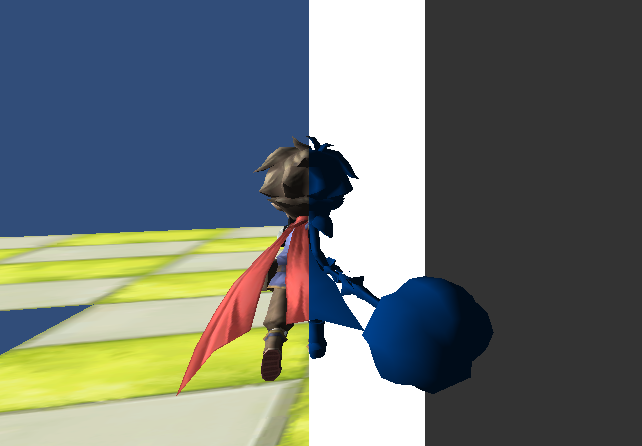
解法三 利用Stencil对角色进行重绘
对Stencil Buffer 不了解的请参考这一篇 : Stencil buffer
通过Ztest将角色被遮挡部分的Stencial标记出来,然后就可以对这部分的像素进行处理。要么用一种单色绘制出来,要么绘制成透明,要么绘制一个发光的描边,都可以。
简单的效果如下:
这里分三个pass处理,第一遍绘制利用ZTest写Stencil
Shader "Custom/Player" {
Properties {
_MaskValue("Mask Value", int) = 2
_MainTex ("Base (RGB)", 2D) = "white" {}
}
SubShader {
Tags { "RenderType"="Opaque" }
LOD 200
Stencil {
Ref [_MaskValue]
Comp always
Pass replace
ZFail keep
}
CGPROGRAM
#pragma surface surf Lambert
sampler2D _MainTex;
struct Input {
float2 uv_MainTex;
};
void surf (Input IN, inout SurfaceOutput o) {
half4 c = tex2D (_MainTex, IN.uv_MainTex);
o.Albedo = c.rgb;
o.Alpha = c.a;
}
ENDCG
}
FallBack "Diffuse"
}
再加一个Shader来清掉ZTest
Shader "Custom/ClearZbuffer" {
Properties {
_MainTex ("Base (RGB) Gloss (A)", 2D) = "white" {}
}
SubShader {
Tags { "RenderType"="Transparent" "Queue"="Transparent+100"}
LOD 80
ColorMask 0
ZTest Greater
ZWrite On
CGPROGRAM
#pragma surface surf Lambert
sampler2D _MainTex;
struct Input {
float2 uv_MainTex;
};
void surf (Input IN, inout SurfaceOutput o) {
half4 c = tex2D (_MainTex, IN.uv_MainTex);
o.Albedo = half4(1,0,0,1);
o.Alpha = 0.3;
}
ENDCG
}
FallBack "Diffuse"
}
最后用一个Shader对被Stencil标记出来的像素进行处理
Shader "Custom/StencilTransparent" {
Properties {
_MaskValue("Mask Value", int) = 2
_MainTex ("Base (RGB)", 2D) = "white" {}
_TransVal ("Transparency Value", Range(0,1)) = 1.0
_ColorAdd ("Color (Add, RGB)", Color) = (0.5,0,0)
}
SubShader {
Tags { "RenderType"="Opaque" "Queue"="Transparent+100"}
LOD 80
Stencil {
Ref [_MaskValue]
Comp notequal
Pass keep
}
ZTest LEqual
ZWrite On
Blend SrcAlpha OneMinusSrcAlpha
BlendOp Add
CGPROGRAM
#pragma surface surf Lambert
sampler2D _MainTex;
fixed _TransVal;
half4 _ColorAdd;
struct Input {
float2 uv_MainTex;
};
void surf (Input IN, inout SurfaceOutput o) {
half4 c = tex2D (_MainTex, IN.uv_MainTex);
//o.Albedo = c.rgb * half4(1,0,0,1);
//o.Alpha = 1;
o.Albedo = c.rgb * _ColorAdd;
o.Alpha = _TransVal;
}
ENDCG
}
FallBack "Diffuse"
}
参考
Real-Time Cameras:A Guide for Game Designers and DevelopersUnity tutorial stealth - http://unity3d.com/learn/tutorials/projects/stealth-tutorial-4x-only

相关文章推荐
- Kinect结合Unity3D引擎开发体感游戏(一)
- Unity3D中脚本的执行顺序和编译顺序
- Unity3D动态对象优化代码分享
- javascript制作游戏开发碰撞检测的封装代码
- unity3d发布apk在android虚拟机中运行的详细步骤(unity3d导出android apk)
- Unity3D游戏引擎实现在Android中打开WebView的实例
- Android游戏开发实践之人物移动地图的平滑滚动处理
- unity3d调用手机或电脑摄像头
- Unity3d发布IOS9应用时出现中文乱码的解决方法
- 分享一个开源的网络游戏服务器架构—HouHai
- 游戏服务器端开发要点
- Unity3D插件详细评测及教学下载
- 开源游戏 “打飞机”
- 开源游戏 “Elvish Bird”
- 开源游戏“2048”IOS移植版
- 游戏开发如何成功
- 【v2.x OGE教程 15】布局相关
- 【v2.x OGE-example 第二节】 实体参数