Spring -- ApplicationContext使用及Bean的配置
2015-07-20 17:31
405 查看
Spring 提供了两种类型的 IOC 容器实现.
BeanFactory: IOC 容器的基本实现.
ApplicationContext: 提供了更多的高级特性. 是 BeanFactory 的子接口.
BeanFactory是Spring框架的基础设施,面向Spring本身;ApplicationContext 面向使用 Spring 框架的开发者,几乎所有的应用场合都直接使用 ApplicationContext 而非底层的 BeanFactory
无论使用何种方式, 配置文件时相同的
对上一篇博客的main方法修改如下:
使用ApplicationContext实现IOC容器。
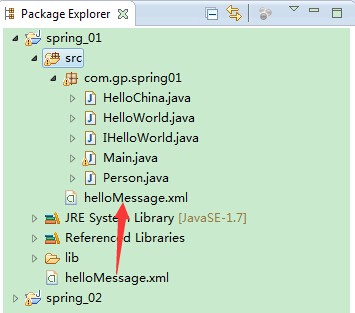
注意文件结构,此时我们需要将配置文件放到src目录下,如图
构造器注入
工程方法注入(比较少用)
下面是前两种注入的IOC容器配置方式
测试方法
输出结果
com.gp.spring.HelloWorld@5ce611
Hello Spring
Car [brand=dazong, color=blue, prince=0.0]
Car [brand=dazong, color=null, prince=100000.0]
输出结果
Person [name=gaopeng, car=Car [brand=dazong, color=null, prince=100000.0]]
并且这里我们还使用car.color方式对属性进行赋值,代码如下
代码中list标签引用,将对象注入到List中。
实体Bean属性如下
输出结果
Person [name=wangjianlin, car=null, cars=[Car [brand=dazong, color=null, prince=100000.0], Car [brand=Aodi, color=null, prince=400000.0]]]
测试结果
Person [name=wangjianlin, carMap={1car=Car [brand=dazong, color=null, prince=100000.0], 2car=Car [brand=Aodi, color=null, prince=400000.0]}]
下面我们来看看是如何进行Properties的注入的吧。
首先我们需要一个Bean,如下
其中包含一个Properties的属性
再来看配置文件
测试输出结果
{driverClss=com.mysql.jdbc.Driver, password=pwd, jbbcUrl=jdbc:mysql:3306/db, username=mysql}
在配置IOC容器XML之前,需要注意,我们需要引入Bean所需要的一些信息,如下
BeanFactory: IOC 容器的基本实现.
ApplicationContext: 提供了更多的高级特性. 是 BeanFactory 的子接口.
BeanFactory是Spring框架的基础设施,面向Spring本身;ApplicationContext 面向使用 Spring 框架的开发者,几乎所有的应用场合都直接使用 ApplicationContext 而非底层的 BeanFactory
无论使用何种方式, 配置文件时相同的
对上一篇博客的main方法修改如下:
ApplicationContext简单用法
package com.gp.spring01;

import org.springframework.beans.factory.BeanFactory;
import org.springframework.beans.factory.xml.XmlBeanFactory;
import org.springframework.context.ApplicationContext;
import org.springframework.context.support.ClassPathXmlApplicationContext;
import org.springframework.core.io.FileSystemResource;
import org.springframework.core.io.Resource;

public class Main {

public static void main(String[] args) {
// Resource r = new FileSystemResource("helloMessage.xml");
ApplicationContext ctx = new ClassPathXmlApplicationContext(
"helloMessage.xml");
Person person = (Person) ctx.getBean("person");
person.say();
}
}
使用ApplicationContext实现IOC容器。
注意文件结构,此时我们需要将配置文件放到src目录下,如图
Spring支持3种依赖注入的方式
属性注入构造器注入
工程方法注入(比较少用)
下面是前两种注入的IOC容器配置方式
<?xml version="1.0" encoding="UTF-8"?>
<!DOCTYPE beans PUBLIC "-//SPRING/DTD BEAN/EN"
"http://www.springframework.org/dtd/spring-beans.dtd">

<beans>
<!-- 属性注入 -->
<bean id="helloWord" class="com.gp.spring.HelloWorld">
<property name="userName" value="Spring"></property>
</bean>

<!-- 构造器注入 -->
<bean id="car" class="com.gp.spring.Car">
<constructor-arg value="dazong"></constructor-arg>
<constructor-arg value="blue"></constructor-arg>
</bean>
<bean id="car1" class="com.gp.spring.Car">
<constructor-arg value="dazong"></constructor-arg>
<constructor-arg value="100000" type="double"></constructor-arg>
</bean>

</beans>
测试方法
package com.gp.spring;

import org.springframework.context.ApplicationContext;
import org.springframework.context.support.ClassPathXmlApplicationContext;

public class Main {

/**
* @param args
*/
public static void main(String[] args) {
ApplicationContext ctx = new ClassPathXmlApplicationContext(
"helloMessage.xml");
HelloWorld helloWorld = (HelloWorld) ctx.getBean("helloWord");
System.out.println(helloWorld);
helloWorld.hello();

Car car = (Car) ctx.getBean("car");
System.out.println(car);
Car car1 = (Car) ctx.getBean("car1");
System.out.println(car1);
}

}
输出结果
com.gp.spring.HelloWorld@5ce611
Hello Spring
Car [brand=dazong, color=blue, prince=0.0]
Car [brand=dazong, color=null, prince=100000.0]
属性注入NULL
属性注入的时候,如果我们想给一个值赋为NULL,用法如下<constructor-arg><null/></constructor-arg>
属性注入之对象
person类中注入car的信息,如下,package com.gp.spring;
public class Person {
private String name;
private Car car;
public Person() {
super();
}
public Person(String name, Car car) {
super();
this.name = name;
this.car = car;
}
@Override
public String toString() {
return "Person [name=" + name + ", car=" + car + "]";
}
}<bean id="person" class="com.gp.spring.Person"> <constructor-arg value="gaopeng"></constructor-arg> <constructor-arg ref="car1"></constructor-arg> </bean>
public static void main(String[] args) {
ApplicationContext ctx = new ClassPathXmlApplicationContext(
"helloMessage.xml");
Person person = (Person) ctx.getBean("person");
System.out.println(person);

}
输出结果
Person [name=gaopeng, car=Car [brand=dazong, color=null, prince=100000.0]]
使用内部bean
内部Bean好处就是私有,不被外界所调用。并且这里我们还使用car.color方式对属性进行赋值,代码如下
<bean id="person" class="com.gp.spring.Person">
<property name="name" value="gaopeng"></property>
<property name="car">
<bean id="car3" class="com.gp.spring.Car">
<constructor-arg value="dazong"></constructor-arg>
<constructor-arg value="100000" type="double"></constructor-arg>
</bean>
</property>
<property name="car.color" value="red"></property>
</bean>
数组的注入
我们如何注入到Bean对象中一个List数组呢,比如一个人拥有一辆奥迪和一辆大众汽车,下面我们来演示如何注入List<bean id="list_person_car1" class="com.gp.spring.Car"> <constructor-arg value="dazong"></constructor-arg> <constructor-arg value="100000" type="double"></constructor-arg> </bean> <bean id="list_person_car2" class="com.gp.spring.Car"> <constructor-arg value="Aodi"></constructor-arg> <constructor-arg value="400000" type="double"></constructor-arg> </bean> <bean id="person2" class="com.gp.spring.Person"> <property name="name" value="wangjianlin"></property> <property name="cars"> <list> <ref bean="list_person_car1"></ref> <ref bean="list_person_car2"></ref> </list> </property> </bean>
代码中list标签引用,将对象注入到List中。
实体Bean属性如下
public class Person {
private String name;

private Car car;

private List<Car> cars;
输出结果
Person [name=wangjianlin, car=null, cars=[Car [brand=dazong, color=null, prince=100000.0], Car [brand=Aodi, color=null, prince=400000.0]]]
Map的注入
注入方式如下<bean id="person3" class="com.gp.spring.Person"> <property name="name" value="wangjianlin"></property> <property name="carMap"> <map> <entry key="1car"> <ref bean="list_person_car1" /> </entry> <entry key="2car"> <ref bean="list_person_car2"></ref> </entry> </map> </property> </bean>
测试结果
Person [name=wangjianlin, carMap={1car=Car [brand=dazong, color=null, prince=100000.0], 2car=Car [brand=Aodi, color=null, prince=400000.0]}]
使用Properties
Properties类似Map,在Spring与Hibernate进行集成的时候会用到此类。下面我们来看看是如何进行Properties的注入的吧。
首先我们需要一个Bean,如下
package com.gp.spring;

import java.util.Properties;

public class DataSource {
private Properties properties;

public Properties getProperties() {
return properties;
}

public void setProperties(Properties properties) {
this.properties = properties;
}

@Override
public String toString() {
return "DataSource [properties=" + properties + "]";
}

}
其中包含一个Properties的属性
再来看配置文件
<bean id="dataSource" class="com.gp.spring.DataSource">
<property name="properties">
<props>
<prop key="username">mysql</prop>
<prop key="password">pwd</prop>
<prop key="jbbcUrl">jdbc:mysql:3306/db</prop>
<prop key="driverClss">com.mysql.jdbc.Driver</prop>
</props>
</property>
</bean>
测试输出结果
{driverClss=com.mysql.jdbc.Driver, password=pwd, jbbcUrl=jdbc:mysql:3306/db, username=mysql}
util:list用法
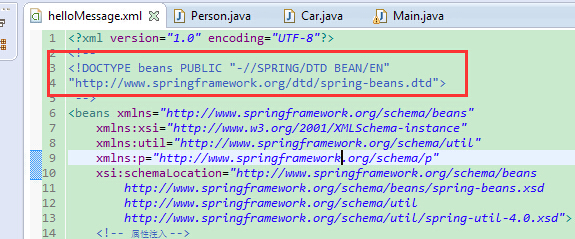
通过上面引用集合注入的例子,我们发现集合都是配置在bean中,那么如果我们想要配置一个公用的集合,供多个Bean使用,那么就用到util:*这个标签,下面我们来看一个util:list的用法在配置IOC容器XML之前,需要注意,我们需要引入Bean所需要的一些信息,如下
<beans xmlns="http://www.springframework.org/schema/beans" xmlns:xsi="http://www.w3.org/2001/XMLSchema-instance" xmlns:util="http://www.springframework.org/schema/util" xmlns:p="http://www.springframework.org/schema/p" xsi:schemaLocation="http://www.springframework.org/schema/beans http://www.springframework.org/schema/beans/spring-beans.xsd http://www.springframework.org/schema/util http://www.springframework.org/schema/util/spring-util-4.0.xsd">[/code]
这里定义了一个utilList的共享List,Bean中直接可以通过ref指向它的id<util:list id="utilList"> <ref bean="list_person_car1"></ref> <ref bean="list_person_car2"></ref> <bean class="com.gp.spring.Car"> <property name="brand" value="BinLi"></property> <property name="color" value="red"></property> <property name="prince" value="1000000"></property> </bean> </util:list> <bean id="person4" class="com.gp.spring.Person"> <property name="name" value="xiaoli"></property> <property name="cars" ref="utilList"></property> </bean>
输出结果
Person [name=xiaoli, cars=[Car [brand=dazong, color=null, prince=100000.0], Car [brand=Aodi, color=null, prince=400000.0], Car [brand=BinLi, color=red, prince=1000000.0]]]
这里需要注意的是IOC容器配置文件与之前的几个例子引入XML规范有不一样的地方,这里我们用到的是XML schema,之前用到的都是XML dtd,开发时我们可能会遇到这样的异常Caused by: org.xml.sax.SAXParseException; lineNumber: 13; columnNumber: 68; 必须为元素类型 "beans" 声明属性 "xmlns"。 at com.sun.org.apache.xerces.internal.util.ErrorHandlerWrapper.createSAXParseException(ErrorHandlerWrapper.java:198) at com.sun.org.apache.xerces.internal.util.ErrorHandlerWrapper.error(ErrorHandlerWrapper.java:134)
原因就是由于文件中的DOCTYPE没有去掉。使用P命名空间对属性赋值
首先来看下我们是如何配置的。<bean id="person_P" class="com.gp.spring.Person" p:name="zhangzhang" p:cars-ref="utilList"></bean>
Person类中有2个属性一个是name(字符串类型),cars(List类型),其中p:cars-ref,直接执行一个已有的bean id为utilList,代码详见util:list用法
测试结果
Person [name=zhangzhang, cars=[Car [brand=dazong, color=null, prince=100000.0], Car [brand=Aodi, color=null, prince=400000.0], Car [brand=BinLi, color=red, prince=1000000.0]]]

相关文章推荐
- 免费的IOS企业证书打包
- android 多线程笔记
- android TextView 支持自定义字体和属性
- Android中ViewPgae中的Fragment如何确认当前页面可见的问题
- iOS开发 偷懒小技巧---自定义XCode代码片段
- 用CocoaPods做iOS程序的依赖管理
- android 编码规范
- iOS中id与NSObject* 和id<NSObject>的区别
- Android是如何在不同屏幕上适配图片的 -- 或控件大小
- iOS文本高度计算
- **android Intent 的Componet ,Action ,Category,Data,Type,Extra,Flag 7种属性详解
- android中各种Intent跳转(邮件、音频、联系人....)
- Android开发之ListView-BaseAdapter的使用
- IOS中系统唯一标识ID
- Object-C 预定义标识符
- 内存管理(Core Foundation object和Objective - C转换)__bridge,__bridge_retained和__bridge_transfer
- iOS 给照片加水印,文字
- [Android]使用ProGuard遇到“conversion to Dalvik format failed with error 1”错误的解决办法
- 应用集成UMeng,分享二维码到微信朋友和朋友圈
- Android sqlite数据库操作卡顿解决办法