Android异步处理一:使用Thread+Handler实现非UI线程更新UI界面
2014-08-17 19:23
531 查看
原文链接:http://blog.csdn.net/mylzc/article/details/6736988
概述:每个Android应用程序都运行在一个dalvik虚拟机进程中,进程开始的时候会启动一个主线程(MainThread),主线程负责处理和ui相关的事件,因此主线程通常又叫UI线程。而由于Android采用UI单线程模型,所以只能在主线程中对UI元素进行操作。如果在非UI线程直接对UI进行了操作,则会报错:
CalledFromWrongThreadException:only the original thread that created a view hierarchy can touch its views
。
Android为我们提供了消息循环的机制,我们可以利用这个机制来实现线程间的通信。那么,我们就可以在非UI线程发送消息到UI线程,最终让Ui线程来进行ui的操作。
对于运算量较大的操作和IO操作,我们需要新开线程来处理这些繁重的工作,以免阻塞ui线程。
例子:下面我们以获取CSDN logo的例子,演示如何使用Thread+Handler的方式实现在非UI线程发送消息通知UI线程更新界面。
ThradHandlerActivity.java:
[java] view
plaincopy
public class ThreadHandlerActivity extends Activity {
/** Called when the activity is first created. */
private static final int MSG_SUCCESS = 0;//获取图片成功的标识
private static final int MSG_FAILURE = 1;//获取图片失败的标识
private ImageView mImageView;
private Button mButton;
private Thread mThread;
private Handler mHandler = new Handler() {
public void handleMessage (Message msg) {//此方法在ui线程运行
switch(msg.what) {
case MSG_SUCCESS:
mImageView.setImageBitmap((Bitmap) msg.obj);//imageview显示从网络获取到的logo
Toast.makeText(getApplication(), getApplication().getString(R.string.get_pic_success), Toast.LENGTH_LONG).show();
break;
case MSG_FAILURE:
Toast.makeText(getApplication(), getApplication().getString(R.string.get_pic_failure), Toast.LENGTH_LONG).show();
break;
}
}
};
@Override
public void onCreate(Bundle savedInstanceState) {
super.onCreate(savedInstanceState);
setContentView(R.layout.main);
mImageView= (ImageView) findViewById(R.id.imageView);//显示图片的ImageView
mButton = (Button) findViewById(R.id.button);
mButton.setOnClickListener(new OnClickListener() {
@Override
public void onClick(View v) {
if(mThread == null) {
mThread = new Thread(runnable);
mThread.start();//线程启动
}
else {
Toast.makeText(getApplication(), getApplication().getString(R.string.thread_started), Toast.LENGTH_LONG).show();
}
}
});
}
Runnable runnable = new Runnable() {
@Override
public void run() {//run()在新的线程中运行
HttpClient hc = new DefaultHttpClient();
HttpGet hg = new HttpGet("http://csdnimg.cn/www/images/csdnindex_logo.gif");//获取csdn的logo
final Bitmap bm;
try {
HttpResponse hr = hc.execute(hg);
bm = BitmapFactory.decodeStream(hr.getEntity().getContent());
} catch (Exception e) {
mHandler.obtainMessage(MSG_FAILURE).sendToTarget();//获取图片失败
return;
}
mHandler.obtainMessage(MSG_SUCCESS,bm).sendToTarget();//获取图片成功,向ui线程发送MSG_SUCCESS标识和bitmap对象
// mImageView.setImageBitmap(bm); //出错!不能在非ui线程操作ui元素
// mImageView.post(new Runnable() {//另外一种更简洁的发送消息给ui线程的方法。
//
// @Override
// public void run() {//run()方法会在ui线程执行
// mImageView.setImageBitmap(bm);
// }
// });
}
};
}
main.xml布局文件:
[html] view
plaincopy
<?xml version="1.0" encoding="utf-8"?>
<LinearLayout xmlns:android="http://schemas.android.com/apk/res/android"
android:orientation="vertical" android:layout_width="fill_parent"
android:layout_height="fill_parent">
<Button android:id="@+id/button" android:text="@string/button_name" android:layout_width="wrap_content" android:layout_height="wrap_content"></Button>
<ImageView android:id="@+id/imageView" android:layout_height="wrap_content"
android:layout_width="wrap_content" />
</LinearLayout>
strings.xml
[html] view
plaincopy
<?xml version="1.0" encoding="utf-8"?>
<LinearLayout xmlns:android="http://schemas.android.com/apk/res/android"
android:orientation="vertical" android:layout_width="fill_parent"
android:layout_height="fill_parent">
<Button android:id="@+id/button" android:text="@string/button_name" android:layout_width="wrap_content" android:layout_height="wrap_content"></Button>
<ImageView android:id="@+id/imageView" android:layout_height="wrap_content"
android:layout_width="wrap_content" />
</LinearLayout>
Manifest.xml:
[html] view
plaincopy
<?xml version="1.0" encoding="utf-8"?>
<manifest xmlns:android="http://schemas.android.com/apk/res/android"
package="com.zhuozhuo"
android:versionCode="1"
android:versionName="1.0">
<uses-sdk android:minSdkVersion="9" />
<uses-permission android:name="android.permission.INTERNET"></uses-permission><!--不要忘记设置网络访问权限-->
<application android:icon="@drawable/icon" android:label="@string/app_name">
<activity android:name=".ThreadHandlerActivity"
android:label="@string/app_name">
<intent-filter>
<action android:name="android.intent.action.MAIN" />
<category android:name="android.intent.category.LAUNCHER" />
</intent-filter>
</activity>
</application>
</manifest>
运行结果:
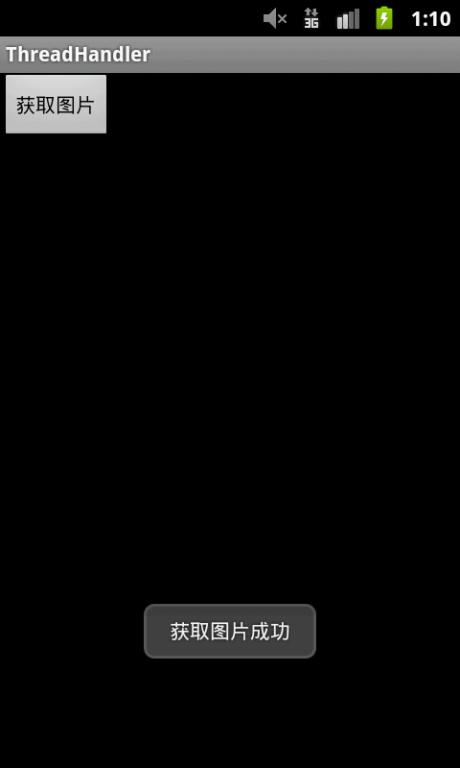
为了不阻塞ui线程,我们使用mThread从网络获取了CSDN的LOGO
,并用bitmap对象存储了这个Logo的像素信息。
此时,如果在这个线程的run()方法中调用
[java] view
plaincopy
mImageView.setImageBitmap(bm)
会出现:CalledFromWrongThreadException:only the original thread that created a view hierarchy can touch its views。原因是run()方法是在新开的线程中执行的,我们上面提到不能直接在非ui线程中操作ui元素。
非UI线程发送消息到UI线程分为两个步骤
一、发送消息到UI线程的消息队列
通过使用Handler的
[java] view
plaincopy
Message obtainMessage(int what,Object object)
构造一个Message对象,这个对象存储了是否成功获取图片的标识what和bitmap对象,然后通过message.sendToTarget()方法把这条message放到消息队列中去。
二、处理发送到UI线程的消息
在ui线程中,我们覆盖了handler的
[java] view
plaincopy
public void handleMessage (Message msg)
这个方法是处理分发给ui线程的消息,判断msg.what的值可以知道mThread是否成功获取图片,如果图片成功获取,那么可以通过msg.obj获取到这个对象。
最后,我们通过
[java] view
plaincopy
mImageView.setImageBitmap((Bitmap) msg.obj);
设置ImageView的bitmap对象,完成UI的更新。
补充:
事实上,我们还可以调用
View的post方法来更新ui
[java] view
plaincopy
mImageView.post(new Runnable() {//另外一种更简洁的发送消息给ui线程的方法。
@Override
public void run() {//run()方法会在ui线程执行
mImageView.setImageBitmap(bm);
}
});
这种方法会把Runnable对象发送到消息队列,ui线程接收到消息后会执行这个runnable对象。
从例子中我们可以看到handler既有发送消息和处理消息的作用,会误以为handler实现了消息循环和消息分发,其实Android为了让我们的代码看起来更加简洁,与UI线程的交互只需要使用在UI线程创建的handler对象就可以了。如需深入学习,了解消息循环机制的具体实现,请关注《Android异步处理三:Handler+Looper+MessageQueue深入详解》
第一次写博客,欢迎批评指正。
工程打包下载:http://www.androidtwitters.com/blog/threadhandler.rar
概述:每个Android应用程序都运行在一个dalvik虚拟机进程中,进程开始的时候会启动一个主线程(MainThread),主线程负责处理和ui相关的事件,因此主线程通常又叫UI线程。而由于Android采用UI单线程模型,所以只能在主线程中对UI元素进行操作。如果在非UI线程直接对UI进行了操作,则会报错:
CalledFromWrongThreadException:only the original thread that created a view hierarchy can touch its views
。
Android为我们提供了消息循环的机制,我们可以利用这个机制来实现线程间的通信。那么,我们就可以在非UI线程发送消息到UI线程,最终让Ui线程来进行ui的操作。
对于运算量较大的操作和IO操作,我们需要新开线程来处理这些繁重的工作,以免阻塞ui线程。
例子:下面我们以获取CSDN logo的例子,演示如何使用Thread+Handler的方式实现在非UI线程发送消息通知UI线程更新界面。
ThradHandlerActivity.java:
[java] view
plaincopy
public class ThreadHandlerActivity extends Activity {
/** Called when the activity is first created. */
private static final int MSG_SUCCESS = 0;//获取图片成功的标识
private static final int MSG_FAILURE = 1;//获取图片失败的标识
private ImageView mImageView;
private Button mButton;
private Thread mThread;
private Handler mHandler = new Handler() {
public void handleMessage (Message msg) {//此方法在ui线程运行
switch(msg.what) {
case MSG_SUCCESS:
mImageView.setImageBitmap((Bitmap) msg.obj);//imageview显示从网络获取到的logo
Toast.makeText(getApplication(), getApplication().getString(R.string.get_pic_success), Toast.LENGTH_LONG).show();
break;
case MSG_FAILURE:
Toast.makeText(getApplication(), getApplication().getString(R.string.get_pic_failure), Toast.LENGTH_LONG).show();
break;
}
}
};
@Override
public void onCreate(Bundle savedInstanceState) {
super.onCreate(savedInstanceState);
setContentView(R.layout.main);
mImageView= (ImageView) findViewById(R.id.imageView);//显示图片的ImageView
mButton = (Button) findViewById(R.id.button);
mButton.setOnClickListener(new OnClickListener() {
@Override
public void onClick(View v) {
if(mThread == null) {
mThread = new Thread(runnable);
mThread.start();//线程启动
}
else {
Toast.makeText(getApplication(), getApplication().getString(R.string.thread_started), Toast.LENGTH_LONG).show();
}
}
});
}
Runnable runnable = new Runnable() {
@Override
public void run() {//run()在新的线程中运行
HttpClient hc = new DefaultHttpClient();
HttpGet hg = new HttpGet("http://csdnimg.cn/www/images/csdnindex_logo.gif");//获取csdn的logo
final Bitmap bm;
try {
HttpResponse hr = hc.execute(hg);
bm = BitmapFactory.decodeStream(hr.getEntity().getContent());
} catch (Exception e) {
mHandler.obtainMessage(MSG_FAILURE).sendToTarget();//获取图片失败
return;
}
mHandler.obtainMessage(MSG_SUCCESS,bm).sendToTarget();//获取图片成功,向ui线程发送MSG_SUCCESS标识和bitmap对象
// mImageView.setImageBitmap(bm); //出错!不能在非ui线程操作ui元素
// mImageView.post(new Runnable() {//另外一种更简洁的发送消息给ui线程的方法。
//
// @Override
// public void run() {//run()方法会在ui线程执行
// mImageView.setImageBitmap(bm);
// }
// });
}
};
}
main.xml布局文件:
[html] view
plaincopy
<?xml version="1.0" encoding="utf-8"?>
<LinearLayout xmlns:android="http://schemas.android.com/apk/res/android"
android:orientation="vertical" android:layout_width="fill_parent"
android:layout_height="fill_parent">
<Button android:id="@+id/button" android:text="@string/button_name" android:layout_width="wrap_content" android:layout_height="wrap_content"></Button>
<ImageView android:id="@+id/imageView" android:layout_height="wrap_content"
android:layout_width="wrap_content" />
</LinearLayout>
strings.xml
[html] view
plaincopy
<?xml version="1.0" encoding="utf-8"?>
<LinearLayout xmlns:android="http://schemas.android.com/apk/res/android"
android:orientation="vertical" android:layout_width="fill_parent"
android:layout_height="fill_parent">
<Button android:id="@+id/button" android:text="@string/button_name" android:layout_width="wrap_content" android:layout_height="wrap_content"></Button>
<ImageView android:id="@+id/imageView" android:layout_height="wrap_content"
android:layout_width="wrap_content" />
</LinearLayout>
Manifest.xml:
[html] view
plaincopy
<?xml version="1.0" encoding="utf-8"?>
<manifest xmlns:android="http://schemas.android.com/apk/res/android"
package="com.zhuozhuo"
android:versionCode="1"
android:versionName="1.0">
<uses-sdk android:minSdkVersion="9" />
<uses-permission android:name="android.permission.INTERNET"></uses-permission><!--不要忘记设置网络访问权限-->
<application android:icon="@drawable/icon" android:label="@string/app_name">
<activity android:name=".ThreadHandlerActivity"
android:label="@string/app_name">
<intent-filter>
<action android:name="android.intent.action.MAIN" />
<category android:name="android.intent.category.LAUNCHER" />
</intent-filter>
</activity>
</application>
</manifest>
运行结果:
为了不阻塞ui线程,我们使用mThread从网络获取了CSDN的LOGO
,并用bitmap对象存储了这个Logo的像素信息。
此时,如果在这个线程的run()方法中调用
[java] view
plaincopy
mImageView.setImageBitmap(bm)
会出现:CalledFromWrongThreadException:only the original thread that created a view hierarchy can touch its views。原因是run()方法是在新开的线程中执行的,我们上面提到不能直接在非ui线程中操作ui元素。
非UI线程发送消息到UI线程分为两个步骤
一、发送消息到UI线程的消息队列
通过使用Handler的
[java] view
plaincopy
Message obtainMessage(int what,Object object)
构造一个Message对象,这个对象存储了是否成功获取图片的标识what和bitmap对象,然后通过message.sendToTarget()方法把这条message放到消息队列中去。
二、处理发送到UI线程的消息
在ui线程中,我们覆盖了handler的
[java] view
plaincopy
public void handleMessage (Message msg)
这个方法是处理分发给ui线程的消息,判断msg.what的值可以知道mThread是否成功获取图片,如果图片成功获取,那么可以通过msg.obj获取到这个对象。
最后,我们通过
[java] view
plaincopy
mImageView.setImageBitmap((Bitmap) msg.obj);
设置ImageView的bitmap对象,完成UI的更新。
补充:
事实上,我们还可以调用
View的post方法来更新ui
[java] view
plaincopy
mImageView.post(new Runnable() {//另外一种更简洁的发送消息给ui线程的方法。
@Override
public void run() {//run()方法会在ui线程执行
mImageView.setImageBitmap(bm);
}
});
这种方法会把Runnable对象发送到消息队列,ui线程接收到消息后会执行这个runnable对象。
从例子中我们可以看到handler既有发送消息和处理消息的作用,会误以为handler实现了消息循环和消息分发,其实Android为了让我们的代码看起来更加简洁,与UI线程的交互只需要使用在UI线程创建的handler对象就可以了。如需深入学习,了解消息循环机制的具体实现,请关注《Android异步处理三:Handler+Looper+MessageQueue深入详解》
第一次写博客,欢迎批评指正。
工程打包下载:http://www.androidtwitters.com/blog/threadhandler.rar

相关文章推荐
- Android异步处理一:使用Thread+Handler实现非UI线程更新UI界面
- Android异步处理:使用Thread+Handler实现非UI线程更新UI界面
- Android异步处理一:使用Thread+Handler实现非UI线程更新UI界面
- Android异步处理一:使用Thread+Handler实现非UI线程更新UI界面
- Android异步处理一:使用Thread+Handler实现非UI线程更新UI界面
- Android异步处理一:使用Thread+Handler实现非UI线程更新UI界面 .
- Android异步处理一:使用Thread+Handler实现非UI线程更新UI界面
- Android异步处理一:使用Thread+Handler实现非UI线程更新UI界面
- Android异步处理一:使用Thread+Handler实现非UI线程更新UI界面
- Android异步处理一:使用Thread+Handler实现非UI线程更新UI界面
- Android异步处理一:使用Thread+Handler实现非UI线程更新UI界面
- Android异步处理一:使用Thread+Handler实现非UI线程更新UI界面 .
- Android异步处理一:使用Thread+Handler实现非UI线程更新UI界面
- Android异步处理一:使用Thread+Handler实现非UI线程更新UI界面
- Android异步处理一:使用Thread+Handler实现非UI线程更新UI界面
- Android异步处理一:使用Thread+Handler实现非UI线程更新UI界面
- Android异步处理一:使用Thread+Handler实现非UI线程更新UI界面
- Android异步处理一:使用Thread+Handler实现非UI线程更新UI界面
- Android异步处理一:使用Thread+Handler实现非UI线程更新UI界面 .
- Android异步处理一:使用Thread+Handler实现非UI线程更新UI界面