OpenCV 安装 以及在visual studio上的配置
2014-04-05 20:30
330 查看
本文利用opencv 2.4.5与vs2010, 其他opencv版本和vs版本均通用,只需更改少部分,照此步骤,能够一次成功。
原文链接:http://opencv-srf.blogspot.com/2013/05/installing-configuring-opencv-with-vs.html
In this tutorial, I am using OpenCV 2.4.5 and Visual Studio 2012. But it is almost same for other versions of OpenCV
and Visual Studio.
If you want, you can refer to the older post Installing
& Configuring OpenCV2.1 with Visual Studio 2010.
There are 2 ways to install OpenCV into your computer. But for a beginner, the most suitable way is the installation
by using the pre-built libraries. So, I am going to discuss how to install OpenCV by using pre-built libraries.
First of all you should have a suitable IDE. I installed Visual
Studio Express 2012 which is a free edition. (You will need to register by giving your email address to obtain the
free product key).
Then you have to download OpenCV from here.
You can choose whatever version, you want. I choose OpenCV 2.4.5.
Then double click the downloaded 'OpenCV-2.4.5.exe' file and it will be extracted to whatever location, you give. I gave
C:\ as the extracting location.
Then you will need to set up environment variables correctly to be able to use OpenCV.
Steps to Set up Environmental Variable
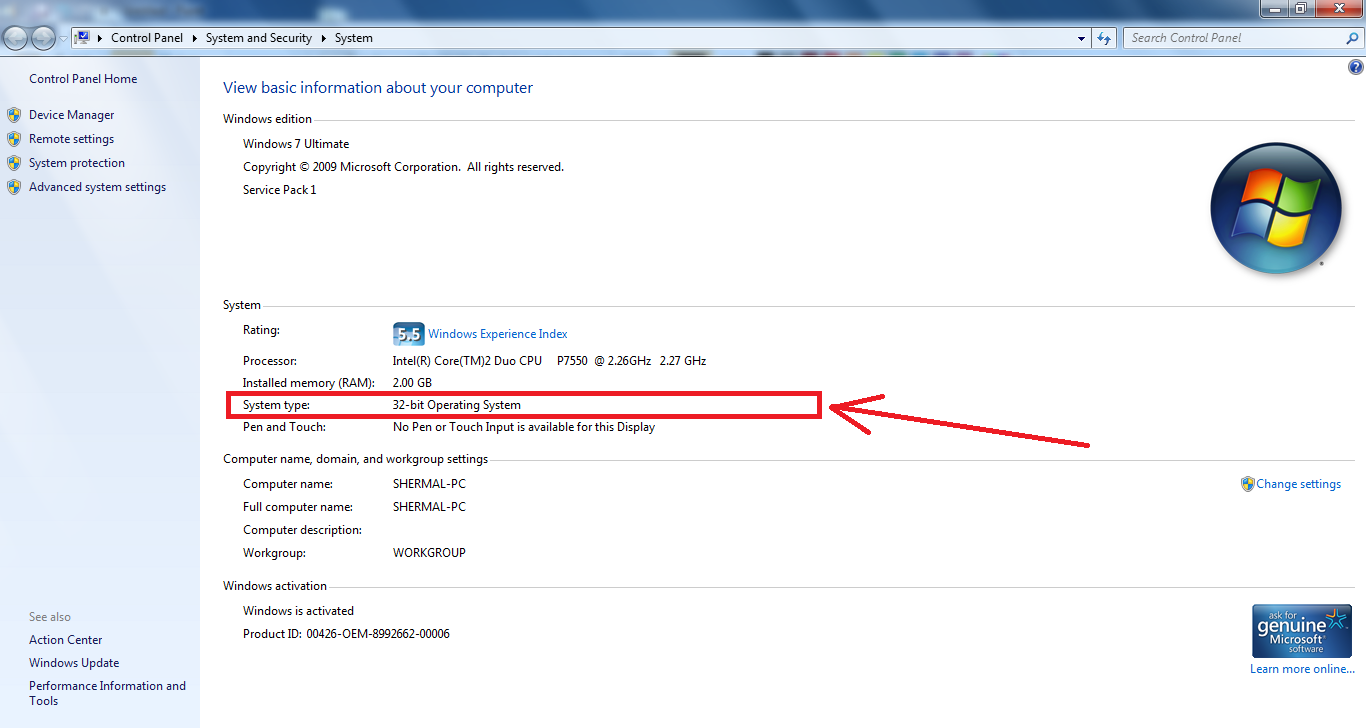
Right click on 'My Computer' and click 'Properties' in the drop down menu. You will see a window like this.
Here the System type is 32
bit operating system. So the system architecture is x86.
If the system type is 64
bit operating system, the system architecture is x64.
Both Visual Studio 2012 and OpenCV2.4.5 supports vc11. So, in this tutorial, I am going to use vc11 as
the compiler type. You can find supporting compiler types of OpenCV, if you go to C:\opencv\build\x86 or C:\opencv\build\x64 according
to your system architecture.
Remember your system
architecture and expected compiler
type because you will need this in the middle part of this post.
Now you are ready to set the environment variables. This can be done in the command line or by using GUI. I am going to explain the GUI method.
Right click on 'My Computer' and click 'Properties' in the drop down menu. You will see a window like this.

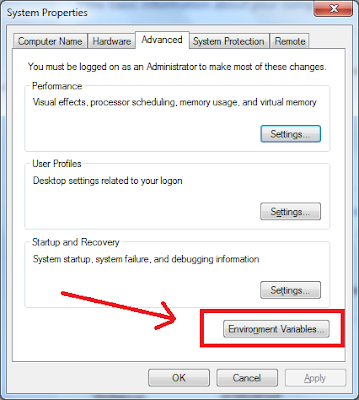
Click 'Advance System Settings' in the above window
Then click 'Environment Variables'
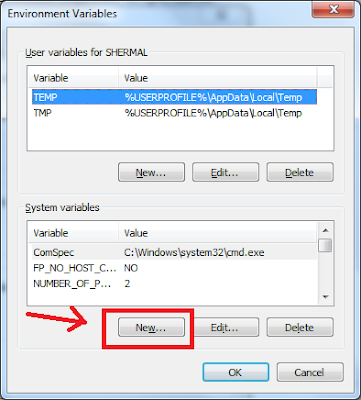
Then click 'New' button at the bottom of the window
Type OPENCV_DIR against Variable name:. And type
the location C:\opencv\build\ against the Variable value:.
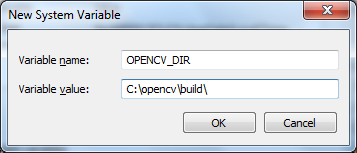
Then press OK
Now you have added a new environment variable to the system.
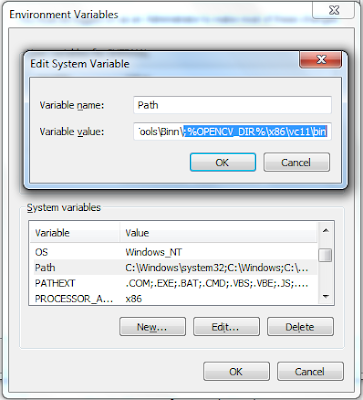
Now you are going to edit a system variable.
click 'Path' or 'PATH' inside the list of System variables and thenclick 'Edit' button at the bottom of the window
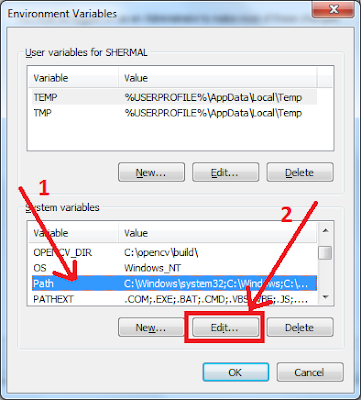
Then add a ; to the end of the line and add the following %OPENCV_DIR%\x86\vc11\bin after
the semicolon. x86 is your system architecture and vc11 is the compiler type. How to find your system architecture and compiler type is explained at the beginning of
the post. (Don't delete anything. Just append it at the end of the line.)
Hooray!! You have completed the installation of OpenCV. Next thing you have to do is configuring Visual Studio.
Configure Visual Studio Express
Start Microsoft Visual Studio
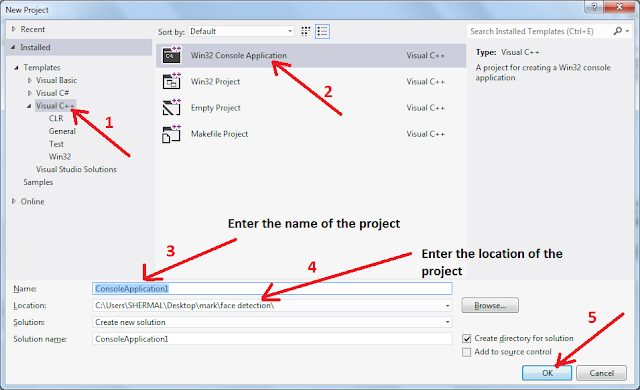
Go to File>New Project...
Do everything as shown in the below image and click OK and then click Finish.
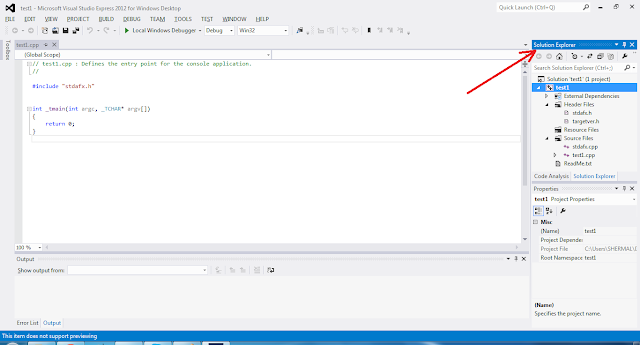
Press 'Ctrl' key and then 'W' while holding the 'Ctrl' key in your keyboard. Release both keys. Then press 'S' in
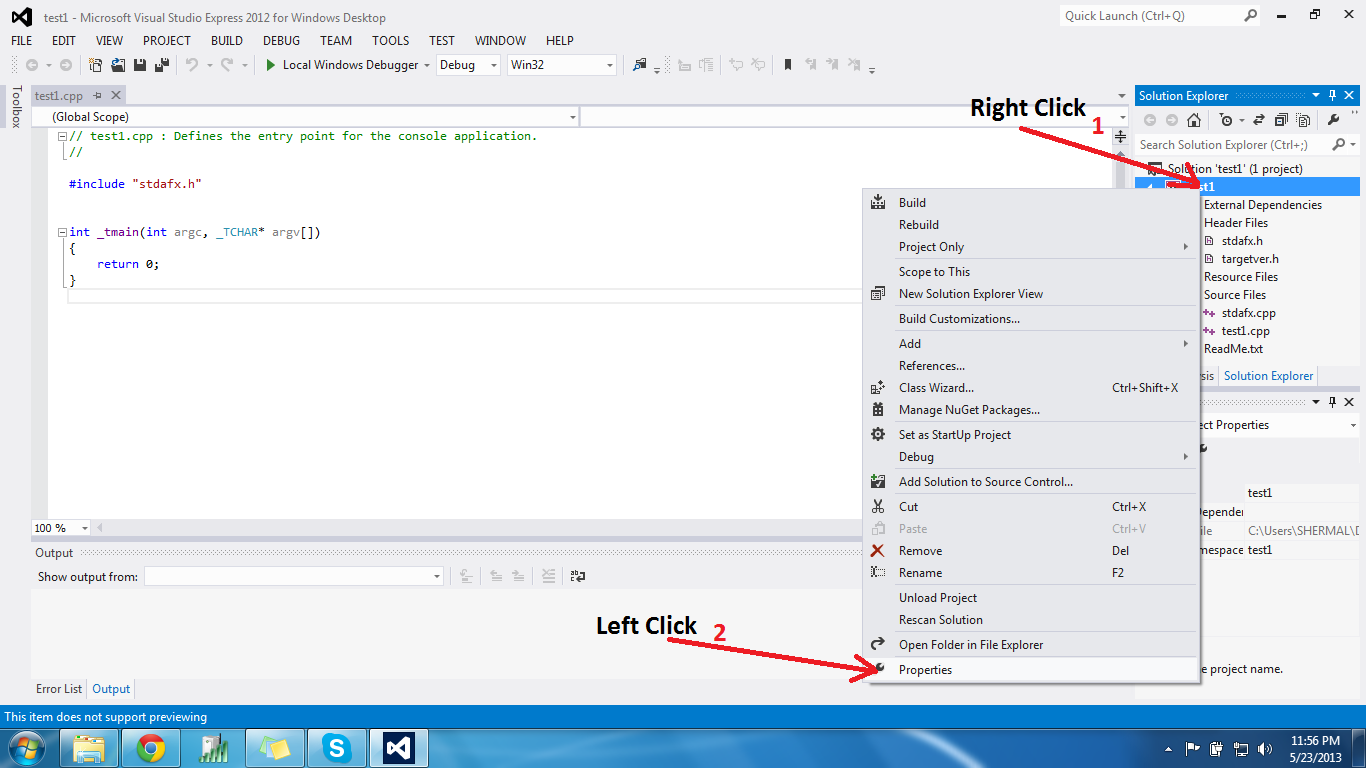
your keyboard. Then you will see the 'Solution Explorer' pane in your right or left side of the Visual Studio window. In my case, it is in the right side.
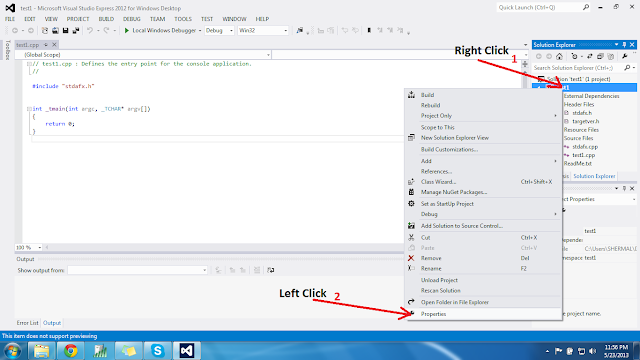
Then right click on the project name (you have entered this name in a previous step) and then click 'Properties'
Choose 'All Configurations' as indicated in the 1st box. Click the 3 places as pointed by next 3 boxes in the given order. Then copy and paste $(OPENCV_DIR)\include against
the 'Additional Include Directories'

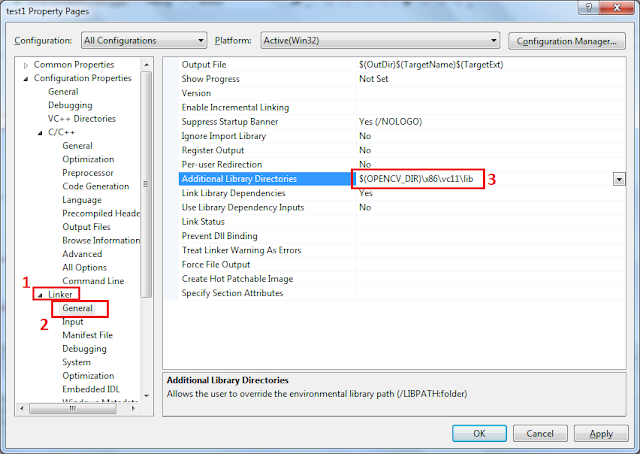
Click the first 2 places as pointed by first 2 boxes in the given order.Then copy and paste $(OPENCV_DIR)\x86\vc11\lib against the
'Additional Library Directories'
Click as illustrated below
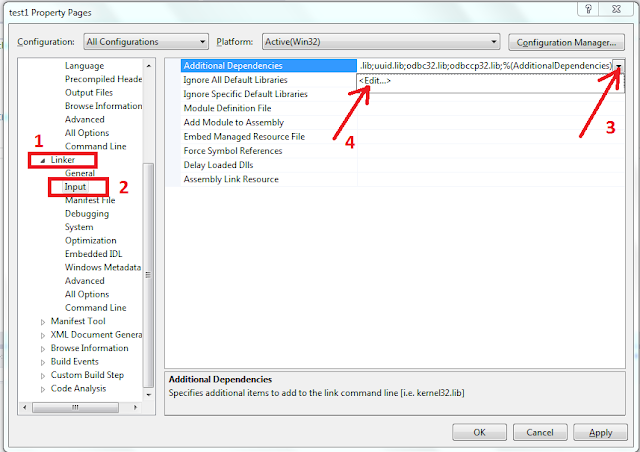
After you click the <Edit...> (4th arrow in the above image), dialog box will appear and you have to copy and paste following library file names. If you are using a different version
of OpenCV other than 2.4.5, please check the 'C:\opencv\build\x86\vc11\lib' location for respective file names.
opencv_calib3d245d.lib
opencv_contrib245d.lib
opencv_core245d.lib
opencv_features2d245d.lib
opencv_flann245d.lib
opencv_gpu245d.lib
opencv_haartraining_engined.lib
opencv_highgui245d.lib
opencv_imgproc245d.lib
opencv_legacy245d.lib
opencv_ml245d.lib
opencv_nonfree245d.lib
opencv_objdetect245d.lib
opencv_photo245d.lib
opencv_stitching245d.lib
opencv_superres245d.lib
opencv_ts245d.lib
opencv_video245d.lib
opencv_videostab245d.lib
These are some of the file names, you can find in the 'C:\opencv\build\x86\vc11' location.
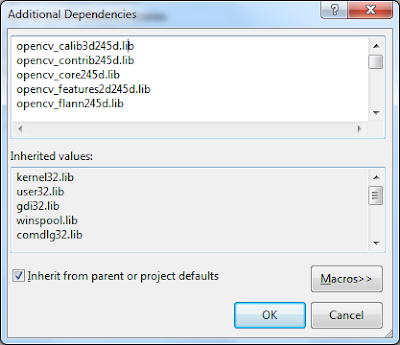
Now click OK
Congratulations!! You have done with all of the configurations of your IDE. Now you are ready to write your first OpenCV application.
原文链接:http://opencv-srf.blogspot.com/2013/05/installing-configuring-opencv-with-vs.html
In this tutorial, I am using OpenCV 2.4.5 and Visual Studio 2012. But it is almost same for other versions of OpenCV
and Visual Studio.
If you want, you can refer to the older post Installing
& Configuring OpenCV2.1 with Visual Studio 2010.
There are 2 ways to install OpenCV into your computer. But for a beginner, the most suitable way is the installation
by using the pre-built libraries. So, I am going to discuss how to install OpenCV by using pre-built libraries.
First of all you should have a suitable IDE. I installed Visual
Studio Express 2012 which is a free edition. (You will need to register by giving your email address to obtain the
free product key).
Then you have to download OpenCV from here.
You can choose whatever version, you want. I choose OpenCV 2.4.5.
Then double click the downloaded 'OpenCV-2.4.5.exe' file and it will be extracted to whatever location, you give. I gave
C:\ as the extracting location.
Then you will need to set up environment variables correctly to be able to use OpenCV.
Steps to Set up Environmental Variable
Right click on 'My Computer' and click 'Properties' in the drop down menu. You will see a window like this.
 |
| Find Bitness of a Computer |
bit operating system. So the system architecture is x86.
If the system type is 64
bit operating system, the system architecture is x64.
Both Visual Studio 2012 and OpenCV2.4.5 supports vc11. So, in this tutorial, I am going to use vc11 as
the compiler type. You can find supporting compiler types of OpenCV, if you go to C:\opencv\build\x86 or C:\opencv\build\x64 according
to your system architecture.
Remember your system
architecture and expected compiler
type because you will need this in the middle part of this post.
Now you are ready to set the environment variables. This can be done in the command line or by using GUI. I am going to explain the GUI method.
Right click on 'My Computer' and click 'Properties' in the drop down menu. You will see a window like this.

Click 'Advance System Settings' in the above window
Then click 'Environment Variables'

Then click 'New' button at the bottom of the window

Type OPENCV_DIR against Variable name:. And type
the location C:\opencv\build\ against the Variable value:.

Then press OK
Now you have added a new environment variable to the system.
Now you are going to edit a system variable.
click 'Path' or 'PATH' inside the list of System variables and thenclick 'Edit' button at the bottom of the window

Then add a ; to the end of the line and add the following %OPENCV_DIR%\x86\vc11\bin after
the semicolon. x86 is your system architecture and vc11 is the compiler type. How to find your system architecture and compiler type is explained at the beginning of
the post. (Don't delete anything. Just append it at the end of the line.)

Hooray!! You have completed the installation of OpenCV. Next thing you have to do is configuring Visual Studio.
Configure Visual Studio Express
Start Microsoft Visual Studio
Go to File>New Project...
Do everything as shown in the below image and click OK and then click Finish.

Press 'Ctrl' key and then 'W' while holding the 'Ctrl' key in your keyboard. Release both keys. Then press 'S' in
your keyboard. Then you will see the 'Solution Explorer' pane in your right or left side of the Visual Studio window. In my case, it is in the right side.

Then right click on the project name (you have entered this name in a previous step) and then click 'Properties'
Choose 'All Configurations' as indicated in the 1st box. Click the 3 places as pointed by next 3 boxes in the given order. Then copy and paste $(OPENCV_DIR)\include against
the 'Additional Include Directories'

Click the first 2 places as pointed by first 2 boxes in the given order.Then copy and paste $(OPENCV_DIR)\x86\vc11\lib against the
'Additional Library Directories'

Click as illustrated below

After you click the <Edit...> (4th arrow in the above image), dialog box will appear and you have to copy and paste following library file names. If you are using a different version
of OpenCV other than 2.4.5, please check the 'C:\opencv\build\x86\vc11\lib' location for respective file names.
opencv_calib3d245d.lib
opencv_contrib245d.lib
opencv_core245d.lib
opencv_features2d245d.lib
opencv_flann245d.lib
opencv_gpu245d.lib
opencv_haartraining_engined.lib
opencv_highgui245d.lib
opencv_imgproc245d.lib
opencv_legacy245d.lib
opencv_ml245d.lib
opencv_nonfree245d.lib
opencv_objdetect245d.lib
opencv_photo245d.lib
opencv_stitching245d.lib
opencv_superres245d.lib
opencv_ts245d.lib
opencv_video245d.lib
opencv_videostab245d.lib
These are some of the file names, you can find in the 'C:\opencv\build\x86\vc11' location.

Now click OK
Congratulations!! You have done with all of the configurations of your IDE. Now you are ready to write your first OpenCV application.

相关文章推荐
- visual studio 2013中配置opencv图文教程 Opencv2.4.9安装配置教程
- OpenCV(一) 安装配置篇 opencv2.49以及vs2010及其以上版本
- win8系统安装vs2010配置opencv2.4.9以及模块计算机类型“x64”与目标计算机类型“X86”冲突问题解决
- 安装以及配置OpenCv
- opencv2的安装、在VS上的配置以及第一个示例
- Visual Studio 2010下OpenCv 安装与配置
- visual studio 2010下安装OpenCV及相关配置
- Ubuntu 16.04 LTS 安装RealSense R200 驱动以及SDK配置+QT+OpenCV
- Win7下安装配置OpenCV2.3+Visual Studio 2008
- linux下使用OpenCV,visual studio 2010下安装OpenCV及相关配置
- Visual Studio 2010下OpenCv 安装与配置
- Win7下安装配置OpenCV2.3+Visual Studio 2008
- 安装opencv3.0.0与配置Visual studio 2008
- 倔强青铜编程日记<2>:windows visual studio 下opencv以及opencv-contrib、samples的安装
- visual studio 2010下安装OpenCV及相关配置
- visual studio 2012安装配置方法图文教程 附opencv配置教程
- 安装visual studio 2012,并配置opencv
- (kate)win8-64位系统下opencv-2.4.3的安装以及在visual_studio2010中配置
- OpenCV 在mac下的安装以及在Xcode中的配置
- opencv配置安装以及配置vs和第一次运行