WPF and Silverlight 学习笔记(六):WPF窗体
2012-06-07 11:00
525 查看
一、窗体类
在Visual Studio和Expression Blend中,自定义的窗体均继承System.Windows.Window类(类型化窗体)。定义的窗体由两部分组成:1、XAML文件
1: <Window
2: xmlns="http://schemas.microsoft.com/winfx/2006/xaml/presentation"
3: xmlns:x="http://schemas.microsoft.com/winfx/2006/xaml"
4: x:Class="WpfWindow.BasicWindow"
5: x:Name="Window"
6: Title="BasicWindow"
7: Width="300" Height="200">
8: <Canvas>
9: <Button x:Name="btnMessage" Width="79" Height="24" Content="OK"
10: Canvas.Left="172" Canvas.Top="93" Click="btnMessage_Click"/>
11: <TextBox x:Name="txtValue" Width="215" Height="25"
12: Canvas.Left="36" Canvas.Top="48" Text="" TextWrapping="Wrap"/>
13: </Canvas>
14: </Window>
2、后台代码文件
1: using System;
2: using System.Windows;
3:
4: namespace WpfWindow
5: {6: public partial class BasicWindow : Window
7: {8: public BasicWindow()
9: {10: this.InitializeComponent();
11: }
12:
13: private void btnMessage_Click(object sender, System.Windows.RoutedEventArgs e)
14: {15: txtValue.Text = "Hello World";
16: }
17: }
18: }
也可以将后台代码放在XAML文件中,上面的例子可以改写为:
1: <Window
2: xmlns="http://schemas.microsoft.com/winfx/2006/xaml/presentation"
3: xmlns:x="http://schemas.microsoft.com/winfx/2006/xaml"
4: x:Class="WpfWindow.BasicWindow"
5: x:Name="Window"
6: Title="BasicWindow"
7: Width="300" Height="200">
8: <Canvas>
9: <Button x:Name="btnMessage" Width="79" Height="24" Content="OK"
10: Canvas.Left="172" Canvas.Top="93" Click="btnMessage_Click"/>
11: <x:Code><![CDATA[
12: void btnMessage_Click(object sender, System.Windows.RoutedEventArgs e)
13: {14: txtValue.Text = "Hello World";
15: }
16: ]]>
17: </x:Code>
18: <TextBox x:Name="txtValue" Width="215" Height="25"
19: Canvas.Left="36" Canvas.Top="48" Text="" TextWrapping="Wrap"/>
20: </Canvas>
21: </Window>
二、窗体的生存周期
1、显示窗体构造方法
Show()、ShowDialog()方法:Show()方法显示非模态窗口,ShowDialog()方法显示模态窗口
Loaded事件:窗体第一次Show()或ShowDialog()时引发的事件,通常在此事件中加载窗体的初始化数据
2、关闭窗体
Close()方法:关闭窗体,并释放窗体的资源
Closing事件、Closed事件:关闭时、关闭后引发的事件,通常在Closing事件中提示用户是否退出。
3、窗体的激活
Activate()方法:激活某窗体
Activated、Deactivated事件:当窗体激动、失去焦点时引发的事件
4、窗体的生存周期

示例程序:
在窗体载入时显示当前日期,并开始播放媒体
当窗体失去焦点时暂停播放媒体
当窗体重新获得焦点时继承播放窗体
当点击窗体的关闭按钮时,询问用户是否退出应用程序
XAML文件:
1: <Window x:Class="WpfWindow.WindowLifeCycle"
2: xmlns="http://schemas.microsoft.com/winfx/2006/xaml/presentation"
3: xmlns:x="http://schemas.microsoft.com/winfx/2006/xaml"
4: Title="WindowLifeCycle" Height="200" Width="300"
5: Loaded="Window_Loaded"
6: Activated="Window_Activated"
7: Deactivated="Window_Deactivated"
8: Closing="Window_Closing">
9: <Canvas>
10: <TextBlock Canvas.Right="15" Canvas.Bottom="15" Height="21" Name="txtDate"/>
11: <MediaElement Canvas.Left="89" Canvas.Top="12" Height="100" Width="100"
12: Name="myMedia" Source="numbers.wmv"
13: Stretch="Fill" LoadedBehavior="Manual" />
14: </Canvas>
15: </Window>
代码文件:
1: using System;
2: using System.Windows;
3:
4: namespace WpfWindow
5: {6: public partial class WindowLifeCycle : Window
7: {8: public WindowLifeCycle()
9: {10: InitializeComponent();
11: }
12:
13: // 开关变量,判断是否正在播放媒体
14: private bool isPlaying;
15:
16: private void Window_Loaded(object sender, RoutedEventArgs e)
17: {18: // 窗体加载时,显示当前日期及开始播放媒体
19: txtDate.Text = DateTime.Now.ToString("yyyy-MM-dd");20:
21: myMedia.Play();
22: isPlaying = true;
23: }
24:
25: private void Window_Activated(object sender, EventArgs e)
26: {27: // 如果窗体被激活,则继承播放媒体
28: if (!isPlaying)
29: {30: myMedia.Play();
31: isPlaying = true;
32: }
33: }
34:
35: private void Window_Deactivated(object sender, EventArgs e)
36: {37: // 如果窗体失去焦点,则暂停播放媒体
38: if (isPlaying)
39: {40: myMedia.Pause();
41: isPlaying = false;
42: }
43: }
44:
45: private void Window_Closing(object sender, System.ComponentModel.CancelEventArgs e)
46: {47: // 点击窗体的“关闭”按钮,询问用户是否退出程序
48:
49: string message = "Quit the application?";
50: string title = "System Information";
51: MessageBoxButton button = MessageBoxButton.OKCancel;
52: MessageBoxImage img = MessageBoxImage.Question;
53:
54: MessageBoxResult result = MessageBox.Show(
55: message, title, button, img);
56:
57: if (result == MessageBoxResult.Cancel)
58: {59: e.Cancel = true; // 取消退出
60: }
61: }
62: }
63: }
三、其他窗体相关的属性、方法、事件
WPF窗体的详细的属性、方法、事件请参考MSDN,有很多的属性、方法、事件与Windows应用程序中System.Windows.Forms.Form类相同或近似,其中常用的一些属性、方法、事件有:窗体边框模式(WindowStyle属性)和是否允许更改窗体大小(ResizeMode属性)
窗体启动位置(WindowStartupLocation属性)和启动状态(WindowState属性)
窗体标题(Title属性)
始终在最前(TopMost属性)
是否显示在任务栏(ShowInTaskbar)
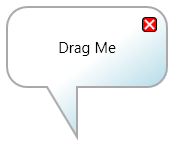
四、定义异形窗体
使用异形窗体,可以将窗体的背景设置为透明,边框设置为空,然后利用控件做出异形的窗体,例如:XAML:
1: <Window x:Class="WpfWindow.CustomerWindow"
2: xmlns="http://schemas.microsoft.com/winfx/2006/xaml/presentation"
3: xmlns:x="http://schemas.microsoft.com/winfx/2006/xaml"
4: Title="NonRectangularWindowSample" SizeToContent="WidthAndHeight"
5: MouseLeftButtonDown="NonRectangularWindow_MouseLeftButtonDown"
6: WindowStyle="None"
7: AllowsTransparency="True"
8: Background="Transparent">
9: <Canvas Width="200" Height="200" >
10: <Path Stroke="DarkGray" StrokeThickness="2">
11: <Path.Fill>
12: <LinearGradientBrush StartPoint="0.2,0" EndPoint="0.8,1" >
13: <GradientStop Color="White" Offset="0"></GradientStop>
14: <GradientStop Color="White" Offset="0.45"></GradientStop>
15: <GradientStop Color="LightBlue" Offset="0.9"></GradientStop>
16: <GradientStop Color="Gray" Offset="1"></GradientStop>
17: </LinearGradientBrush>
18: </Path.Fill>
19: <Path.Data>
20: <PathGeometry>
21: <PathFigure StartPoint="40,20" IsClosed="True">
22: <LineSegment Point="160,20"></LineSegment>
23: <ArcSegment Point="180,40" Size="20,20" SweepDirection="Clockwise"></ArcSegment>
24: <LineSegment Point="180,80"></LineSegment>
25: <ArcSegment Point="160,100" Size="20,20" SweepDirection="Clockwise"></ArcSegment>
26: <LineSegment Point="90,100"></LineSegment>
27: <LineSegment Point="90,150"></LineSegment>
28: <LineSegment Point="60,100"></LineSegment>
29: <LineSegment Point="40,100"></LineSegment>
30: <ArcSegment Point="20,80" Size="20,20" SweepDirection="Clockwise"></ArcSegment>
31: <LineSegment Point="20,40"></LineSegment>
32: <ArcSegment Point="40,20" Size="20,20" SweepDirection="Clockwise"></ArcSegment>
33: </PathFigure>
34: </PathGeometry>
35: </Path.Data>
36: </Path>
37: <Label Width="200" Height="120" FontSize="15" HorizontalContentAlignment="Center" VerticalContentAlignment="Center">Drag Me</Label>
38: <Button Canvas.Left="155" Canvas.Top="30" Click="closeButtonRectangle_Click">
39: <Button.Template>
40: <ControlTemplate>
41: <Canvas>
42: <Rectangle Width="15" Height="15" Stroke="Black" RadiusX="3" RadiusY="3">
43: <Rectangle.Fill>
44: <SolidColorBrush x:Name="myAnimatedBrush" Color="Red" />
45: </Rectangle.Fill>
46: </Rectangle>
47: <Line X1="3" Y1="3" X2="12" Y2="12" Stroke="White" StrokeThickness="2"></Line>
48: <Line X1="12" Y1="3" X2="3" Y2="12" Stroke="White" StrokeThickness="2"></Line>
49: </Canvas>
50: </ControlTemplate>
51: </Button.Template>
52: </Button>
53: </Canvas>
54: </Window>
代码文件:
1: using System.Windows;
2: using System.Windows.Input;
3:
4: namespace WpfWindow
5: {6: public partial class CustomerWindow : Window
7: {8: public CustomerWindow()
9: {10: InitializeComponent();
11: }
12:
13: void NonRectangularWindow_MouseLeftButtonDown(object sender, MouseButtonEventArgs e)
14: {15: this.DragMove();
16: }
17:
18: void closeButtonRectangle_Click(object sender, RoutedEventArgs e)
19: {20: this.Close();
21: }
22: }
23: }

相关文章推荐
- WPF and Silverlight 学习笔记(六):WPF窗体
- WPF and Silverlight 学习笔记(二十七):基本图形的使用(2)Path和位图操作
- WPF and Silverlight 学习笔记(十七):WPF资源(Resource)(2)
- WPF and Silverlight 学习笔记(二十):WPF数据绑定概述
- WPF and Silverlight 学习笔记
- WPF and Silverlight 学习笔记(一):开发环境及参考资料
- WPF and Silverlight 学习笔记(二十八):基本图形的使用(3)图形的操作
- WPF and Silverlight 学习笔记:索引页
- WPF and Silverlight 学习笔记(五):WPF应用程序管理
- WPF and Silverlight 学习笔记(二十一):数据绑定值的自定义转换
- WPF and Silverlight 学习笔记(二十二):使用代码实现绑定、绑定数据的验证
- WPF and Silverlight 学习笔记(二十二):使用代码实现绑定、绑定数据的验证
- WPF and Silverlight 学习笔记(三十):Brush(2)
- WPF and Silverlight 学习笔记(十五):WPF命令(Commands)
- WPF and Silverlight 学习笔记(二十一):数据绑定值的自定义转换
- WPF and Silverlight 学习笔记(十三):依赖项属性和路由事件
- WPF and Silverlight 学习笔记(七):WPF布局管理之StackPanel、WrapPanel、DockPanel
- WPF and Silverlight 学习笔记(二十三):绑定集合数据源
- WPF and Silverlight 学习笔记(八):WPF布局管理之Grid、UniformGrid
- WPF and Silverlight 学习笔记(二十四):数据源提供器(DataProvider)