WPF and Silverlight 学习笔记(二十二):使用代码实现绑定、绑定数据的验证
2012-06-07 11:12
1051 查看
一、通过代码实现数据绑定
通过代码实现数据绑定,使用的是System.Windows.Data命名空间的Binding类,主要使用Binding类的如下的属性:Source属性:绑定到的数据源
Mode属性:绑定的模式(OneTime、OneWay、TwoWay、OneWayToSource或Default)
Path属性:绑定到的数据源的属性
Converter属性:绑定时所使用的类型转换器
在绑定目标控件上使用SetBinding方法添加数据绑定。例如将MyData的Name属性绑定到txtName控件的Text属性上,使用MyColorConverter转换器将MyBindingColor的ColorObject属性绑定到rec控件的Fill属性上:
1: MyData data = new MyData();
2:
3: Binding binding1 = new Binding();
4: binding1.Source = data;
5: binding1.Mode = BindingMode.OneWay;
6: binding1.Path = new PropertyPath("Name");7:
8: txtName.SetBinding(TextBox.TextProperty, binding1);
9:
10:
11: MyBindingColor color = new MyBindingColor();
12:
13: Binding binding2 = new Binding();
14: binding2.Source = color;
15: binding2.Mode = BindingMode.OneWay;
16: binding2.Path = new PropertyPath("ColorObject");17: binding2.Converter = new MyColorConverter();
18:
19: rec.SetBinding(Rectangle.FillProperty, binding2);
二、实现绑定数据的验证:
对于绑定数据的验证,系统采用如下的机制: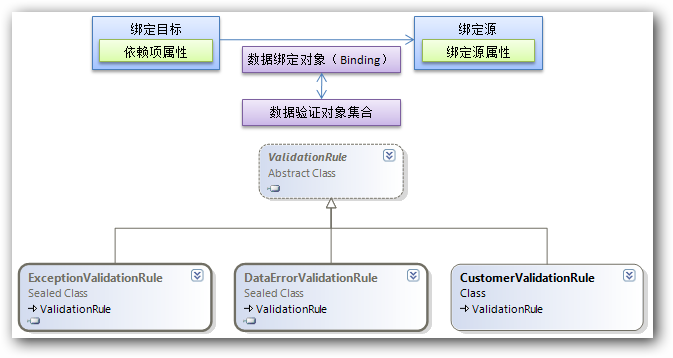
使用 WPF 数据绑定模型可以将 ValidationRules 与 Binding 对象相关联。当绑定目标的属性向绑定源属性传递属性值时(仅限TwoWay模式或OneWayToSource模式),执行ValidationRule中的Validate方法,实现对界面输入数据的验证。
定义验证可以采用以下三种:
DataErrorValidationRule:检查由源对象的 IDataErrorInfo 实现所引发的错误,要求数据源对象实现System.ComponentModel命名空间的IDataErrorInfo接口。
例如,定义一个学生信息类,要求其学生成绩在0到100间,学生姓名的长度在2到10个字符间:
1: public class StudentInfoWithValidation : IDataErrorInfo
2: {3: #region 构造方法
4: public StudentInfoWithValidation()
5: {6: StudentName = "Tom";
7: Score = 90;
8: }
9: public StudentInfoWithValidation(string m_StudentName,double m_Score)
10: {11: StudentName = m_StudentName;
12: Score = m_Score;
13: }
14: #endregion
15:
16: #region 属性
17: public string StudentName
18: {19: get; set;
20: }
21: public double Score
22: {23: get; set;
24: }
25: #endregion
26:
27: #region 实现IDataErrorInfo接口的成员
28: public string Error
29: {30: get
31: {32: return null;
33: }
34: }
35:
36: public string this[string columnName]
37: {38: get
39: {40: string result = null;
41:
42: switch (columnName)
43: {44: case "StudentName":
45: // 设置StudentName属性的验证规则
46: int len = StudentName.Length;
47: if (len < 2 || len > 10)
48: {49: result = "StudentName length must between 2 and 10";
50: }
51: break;
52: case "Score":
53: // 设置Score属性的验证规则
54: if (Score < 0 || Score > 100)
55: {56: result = "Score must between 0 and 100";
57: }
58: break;
59: }
60:
61: return result;
62: }
63: }
64: #endregion
65: }
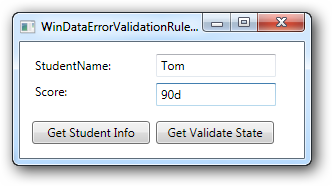
在界面上,定义两个TextBox绑定到StudentName和Score两个属性上,并设置其采用DataErrorValidationRule:
1: <Window x:Class="WPFDataBindingDemo.WinDataErrorValidationRuleDemo"
2: xmlns="http://schemas.microsoft.com/winfx/2006/xaml/presentation"
3: xmlns:x="http://schemas.microsoft.com/winfx/2006/xaml"
4: xmlns:local="clr-namespace:WPFDataBindingDemo"
5: Title="WinDataErrorValidationRuleDemo" Height="154" Width="300">
6: <Canvas Height="116" x:Name="mainCanvas">
7: <Canvas.Resources>
8: <local:StudentInfoWithValidation x:Key="myData" />
9: </Canvas.Resources>
10: <Canvas.DataContext>
11: <Binding Source="{StaticResource myData}" />12: </Canvas.DataContext>
13: <Label Canvas.Left="10" Canvas.Top="10" Height="28" Name="label1" Width="120">StudentName:</Label>
14: <Label Canvas.Left="10" Canvas.Top="36" Height="28" Name="label2" Width="120">Score:</Label>
15: <TextBox Canvas.Left="136" Canvas.Top="12" Height="23" Name="textBox1" Width="120">
16: <TextBox.Text>
17: <Binding Path="StudentName"
18: Mode="TwoWay"
19: UpdateSourceTrigger="PropertyChanged"
20: ValidatesOnDataErrors="True" />
21: </TextBox.Text>
22: </TextBox>
23: <TextBox Canvas.Left="136" Canvas.Top="41" Height="23" Name="textBox2" Width="120">
24: <TextBox.Text>
25: <Binding Path="Score" Mode="TwoWay" UpdateSourceTrigger="PropertyChanged">
26: <!--与上一个TextBox控件的写法作用相同-->
27: <Binding.ValidationRules>
28: <DataErrorValidationRule />
29: </Binding.ValidationRules>
30: </Binding>
31: </TextBox.Text>
32: </TextBox>
33: <Button Canvas.Left="12" Canvas.Top="79" Height="23" Name="button1" Width="118" Click="button1_Click">Get Student Info</Button>
34: <Button Canvas.Left="136" Canvas.Top="79" Height="23" Name="button2" Width="118" Click="button2_Click">Get Validate State</Button>
35: </Canvas>
36: </Window>


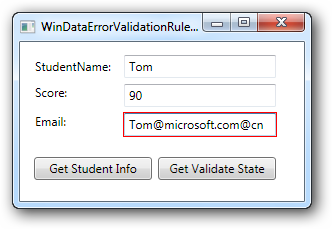
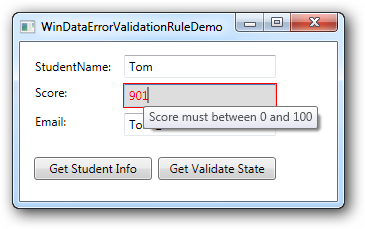
从执行的结果上来看,当验证出现错误(即索引器属性返回的字符串不为空时),系统默认给出一种验证错误的显示方式(控件以红色边框包围),但是需注意两点:
产生验证错误,验证后的数据仍然会更改数据源的值
如果系统出现异常,如成绩值输入 “90d”,则系统不会显示错误,控件上的输入值也不赋值到数据源。这种情况下,需要使用ExceptionValidationRule。
ExceptionValidationRule:即当绑定目标的属性值向绑定源的属性值赋值时引发异常所产生的验证。此种方式若实现自定义的逻辑验证,通常设置数据源的属性的Set访问器,在Set访问器中,根据输入的值结合逻辑,使用throw抛出相应的异常。
例如上例中,对于Score对应的TextBox,再加入ExceptionValidationRule:
1: <TextBox Canvas.Left="136" Canvas.Top="41" Height="23" Name="textBox2" Width="120">
2: <TextBox.Text>
3: <Binding Path="Score" Mode="TwoWay" UpdateSourceTrigger="PropertyChanged">
4: <!--与上一个TextBox控件的写法作用相同-->
5: <Binding.ValidationRules>
6: <DataErrorValidationRule />
7: <ExceptionValidationRule />
8: </Binding.ValidationRules>
9: </Binding>
10: </TextBox.Text>
11: </TextBox>

自定义验证规则:定义一个类,继承ValidationRule抽象类,实现其Validate方法,验证某一输入。
例如,定义一个类,用来验证输入的Email地址是否合法(验证的Email允许为字符串的空值String.Empty,但有输入必须符合Email的格式要求)
在学生类中添加Email可读可写属性(并不做相应的验证,忽略其他重复代码):
1: public string Email
2: {3: set; get;
4: }
定义一个类,实现Email格式验证:
1: using System.Globalization;
2: using System.Text.RegularExpressions;
3: using System.Windows.Controls;
4:
5: namespace WPFDataBindingDemo
6: {7: public class EmailValidationRule : ValidationRule
8: {9: public override ValidationResult Validate(object value, CultureInfo cultureInfo)
10: {11: bool isValid = false;
12: string message = null;
13:
14: // 检查输入值不为空,且是字符串
15: if (value != null && value is string)
16: {17: string email = value.ToString();
18:
19: // 检查输入的字符串是否为String.Empty
20: if (email != string.Empty)
21: {22: string emailFormartRegex =
23: @"^([\w-\.]+)@((\[[0-9]{1,3}\.[0-9]{1,3}\.[0-9]{1,3}\.)|" +24: @"(([\w-]+\.)+))([a-zA-Z]{2,4}|[0-9]{1,3})(\]?)$";25:
26: // 检查输入的字符串是否符合Email格式
27: isValid = Regex.IsMatch(email, emailFormartRegex);
28:
29: if (! isValid)
30: {31: message = "Input string not match Email Format";
32: }
33: }
34: else
35: {36: // 输入的字符串为字符串空值时,认为验证通过
37: isValid = true;
38: }
39: }
40: else
41: {42: message = "Input value is NULL or is not string.";
43: }
44:
45: // 返回验证结果(ValidationResult对象)
46: return new ValidationResult(isValid,message);
47: }
48: }
49: }
在界面上:
1: <TextBox Canvas.Left="104" Canvas.Top="70" Height="23" Name="textBox3" Width="152">
2: <Binding Mode="TwoWay" Path="Email" UpdateSourceTrigger="PropertyChanged">
3: <Binding.ValidationRules>
4: <local:EmailValidationRule />
5: </Binding.ValidationRules>
6: </Binding>
7: </TextBox>
三、为数据验证提供视觉效果
在数据验证错误后,可以通过以下两种方式提供相应的视觉效果:定义Style及相应的触发器
如果要使输入的控件的外观发生变化,可以使用Style。例如上例中出错,使输入的文本框的背景颜色和字体颜色发生变化,并提供ToolTip显示错误信息,可以定义如下的Style:
1: <Style TargetType="TextBox">
2: <Setter Property="Background" Value="White" />
3: <Setter Property="Foreground" Value="Black" />
4: <Style.Triggers>
5: <Trigger Property="Validation.HasError" Value="True">
6: <Setter Property="Background" Value="#DDD" />
7: <Setter Property="Foreground" Value="Red" />
8: <Setter Property="ToolTip"
9: Value="{Binding RelativeSource={RelativeSource Self},Path=(Validation.Errors)[0].ErrorContent}"/>10: </Trigger>
11: </Style.Triggers>
12: </Style>
效果如下:
定义控件模板
如果要为相应的控件添加一些辅助的控件,可以使用控件模板,如出现验证错误时,不使用系统默认的红色边框,而是在文本框后添加一个红色的星号:
1: <ControlTemplate x:Key="validErrorTextBoxTemplate">
2: <DockPanel>
3: <AdornedElementPlaceholder/>
4: <TextBlock Foreground="Red" FontSize="20">*</TextBlock>
5: </DockPanel>
6: </ControlTemplate>
并在每一个输入的TextBox中添加:
1: Validation.ErrorTemplate="{StaticResource validErrorTextBoxTemplate}"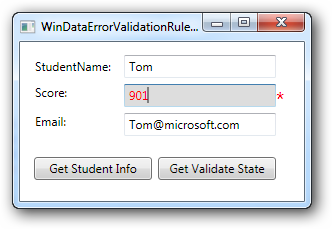

相关文章推荐
- WPF and Silverlight 学习笔记(二十二):使用代码实现绑定、绑定数据的验证
- WPF and Silverlight 学习笔记(二十二):使用代码实现绑定、绑定数据的验证
- WPF and Silverlight 学习笔记(二十五):使用CollectionView实现对绑定数据的排序、筛选、分组
- WPF and Silverlight 学习笔记(二十五):使用CollectionView实现对绑定数据的排序、筛选、分组
- [转]WPF and Silverlight 学习笔记(二十五):使用CollectionView实现对绑定数据的排序、筛选、分组
- WPF and Silverlight 学习笔记(二十):WPF数据绑定概述
- WPF and Silverlight 学习笔记(二十一):数据绑定值的自定义转换
- WPF and Silverlight 学习笔记(二十):WPF数据绑定概述
- WPF and Silverlight 学习笔记(二十一):数据绑定值的自定义转换
- WPF学习笔记 - 数据绑定(在代码中)
- WPF and Silverlight 学习笔记(二十三):绑定集合数据源
- WPF and Silverlight 学习笔记(二十六):基本图形使用(1)
- SilverLight学习笔记--关于使用IValueConvert对绑定数据的格式化操作
- SilverLight学习笔记--关于使用IValueConvert对绑定数据的格式化操作
- WPF and Silverlight 学习笔记(二十六):基本图形使用(1)
- WPF and Silverlight 学习笔记(二十):WPF数据绑定概述
- WPF and Silverlight 学习笔记(二十七):基本图形的使用(2)Path和位图操作
- SilverLight学习笔记--使用WebClient实现通讯(一)(上传和下载字符串数据)
- WPF and Silverlight 学习笔记(二十八):基本图形的使用(3)图形的操作
- WPF and Silverlight 学习笔记(二十七):基本图形的使用(2)Path和位图操作