Kubernetes使用 S3FS 将 AWS S3 作为持久性存储
2021-03-20 22:33
302 查看
kubernetes-s3
k8s后端使用 AWS S3 作为持久性存储,本文详细介绍使用方法和步骤。
源码获取
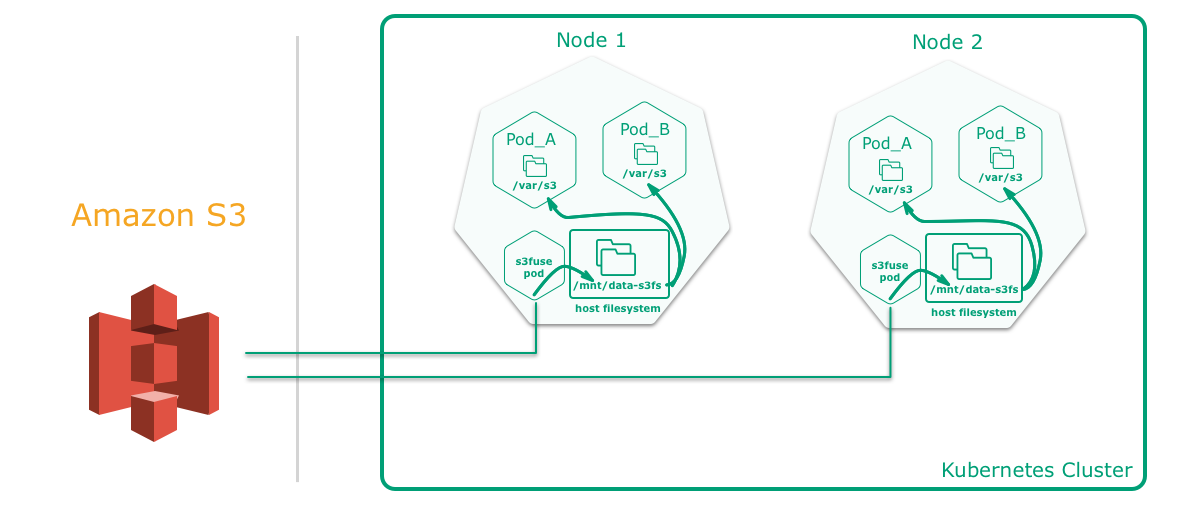
Kubernetes pod 中使用S3FS架构图
创建 AWS IAM账号与权限
登陆AWS控制台进入IAM,新创建个IAM账号给予S3读写权限,记下改账号的访问密钥ID和私有访问密钥。后面configmap文件中要使用~
创建命名空间
这里创建个
open-falcon-monitoring命名空间用于后面的监控,内容如下:
# cat ns-open-falcon.yaml
apiVersion: v1
kind: Namespace
metadata:
name: open-falcon-monitoring
# 创建namespace
kubectl apply -f ns-open-falcon.yaml
创建镜像仓库
这里你可以使用 AWS ECR 也可以其他公有云或自己私有仓库,我这里使用的阿里云镜像服务,如有需要自己可免费注册一个。
阿里云镜像仓库信息
# 阿里云Docker Registry
registry.cn-shanghai.aliyuncs.com
# 镜像仓库
open-falcon-s3
创建pull/push镜像secret
这里在
open-falcon-monitoring命名空间下,创建名称是
open-falcon-registry-secret的secret,内容如下:
kubectl create secret docker-registry open-falcon-registry-secret -n open-falcon-monitoring \
--docker-server=registry.cn-shanghai.aliyuncs.com \
--docker-username=<阿里云控制台账号> \
--docker-password=<阿里云控制台密码> \
--docker-email=2422123451@qq.com
创建 S3 持久性存储流程
创建存储桶
登陆 AWS 控制台,进入S3,创建bucket(存储桶)
open-falcon-monitoring。
配置configmap
cd yaml/ && cp configmap_secrets_template.yaml configmap_secrets.yaml
# cat configmap_secrets.yaml
apiVersion: v1
kind: ConfigMap
metadata:
name: s3-config
namespace: open-falcon-monitoring
data:
S3_BUCKET: open-falcon-monitoring
AWS_KEY: <AWS IAM 访问密钥ID>
AWS_SECRET_KEY: <AWS IAM 私有访问密钥>
构建和部署
修改build.sh文件
下面是完整文件,内容如下:
#!/usr/bin/env bash

########################################################################################################################
# PREREQUISTITS
########################################################################################################################
#
# - ensure that you have a valid Artifactory or other Docker registry account
# - Create your image pull secret in your namespace
#   kubectl create secret docker-registry artifactory --docker-server=<YOUR-REGISTRY>.docker.repositories.sap.ondemand.com --docker-username=<USERNAME> --docker-password=<PASSWORD> --docker-email=<EMAIL> -n <NAMESPACE>
# - change the settings below arcording your settings
#
# usage:
# Call this script with the version to build and push to the registry. After build/push the
# yaml/* files are deployed into your cluster
#
#  ./build.sh 1.0
#
VERSION=$1
PROJECT=open-falcon-s3 # 修改成自己的仓库名
REPOSITORY=registry.cn-shanghai.aliyuncs.com/ai-voice-test # 仓库地址,这里使用的是阿里云

# causes the shell to exit if any subcommand or pipeline returns a non-zero status.
set -e
# set debug mode
#set -x

########################################################################################################################
# build the new docker image
########################################################################################################################
#
echo '>>> Building new image'
# Due to a bug in Docker we need to analyse the log to find out if build passed (see https://github.com/dotcloud/docker/issues/1875)
docker build --no-cache=true -t $REPOSITORY/$PROJECT:$VERSION . | tee /tmp/docker_build_result.log
RESULT=$(cat /tmp/docker_build_result.log | tail -n 1)
if [[ "$RESULT" != *Successfully* ]];
then
exit -1
fi

########################################################################################################################
# push the docker image to your registry
########################################################################################################################
#
echo '>>> Push new image'
docker push $REPOSITORY/$PROJECT:$VERSION

########################################################################################################################
# deploy your YAML files into your kubernetes cluster
########################################################################################################################
#
# (and replace some placeholder in the yaml files...
# It is recommended to use HELM for bigger projects and more dynamic deployments
#
kubectl apply -f ./yaml/configmap_secrets.yaml
# Apply the YAML passed into stdin and replace the version string first
#cat ./yaml/daemonset.yaml | sed "s/$REPOSITORY\/$PROJECT/$REPOSITORY\/$PROJECT:$VERSION/g" | kubectl apply -f -
修改Dockerfile
添加国内源,否则你会哭的,完整内容如下:
###############################################################################
# The FUSE driver needs elevated privileges, run Docker with --privileged=true
###############################################################################

FROM alpine:latest

ENV MNT_POINT /var/s3
ENV IAM_ROLE=none  # 我这里并没创建 IAM 角色,所以写none
ENV S3_REGION 'ap-southeast-1'

VOLUME /var/s3

ARG S3FS_VERSION=v1.89

RUN sed -i 's/dl-cdn.alpinelinux.org/mirrors.aliyun.com/g' /etc/apk/repositories

RUN apk --update add bash fuse libcurl libxml2 libstdc++ libgcc alpine-sdk automake autoconf libxml2-dev fuse-dev curl-dev git; \
git clone https://github.com/s3fs-fuse/s3fs-fuse.git; \
cd s3fs-fuse; \
git checkout tags/${S3FS_VERSION}; \
./autogen.sh; \
./configure --prefix=/usr ; \
make; \
make install; \
make clean; \
rm -rf /var/cache/apk/*; \
apk del git automake autoconf;

RUN sed -i s/"#user_allow_other"/"user_allow_other"/g /etc/fuse.conf

COPY docker-entrypoint.sh /
RUN chmod 777 /docker-entrypoint.sh
CMD /docker-entrypoint.sh
构建镜像
# 运行如下命令
./build.sh 2.0
发布daemon
cat yaml/daemonset.yaml
apiVersion: apps/v1
kind: DaemonSet
metadata:
labels:
app: s3-provider
name: s3-provider
namespace: open-falcon-monitoring
spec:
selector:
matchLabels:
app: s3-provider
template:
metadata:
labels:
app: s3-provider
spec:
containers:
- name: s3fuse
# 修改成自己镜像名称
image: registry.cn-shanghai.aliyuncs.com/ai-voice-test/open-falcon-s3:2.0
lifecycle:
preStop:
exec:
command: ["/bin/sh","-c","umount -f /var/s3"]
securityContext:
privileged: true
capabilities:
add:
- SYS_ADMIN
# use ALL  entries in the config map as environment variables
envFrom:
- configMapRef:
name: s3-config
volumeMounts:
- name: devfuse
mountPath: /dev/fuse
- name: mntdatas3fs
mountPath: /var/s3:shared
volumes:
- name: devfuse
hostPath:
path: /dev/fuse
- name: mntdatas3fs
hostPath:
path: /mnt/data-s3-fs
# 部署
kubectl apply -f yaml/daemonset.yaml
# 查看
kubectl get pod -n open-falcon-monitoring
NAME                READY   STATUS    RESTARTS   AGE
s3-provider-2j6pw   1/1     Running   2          18s
测试
cd yaml && cat example_pod.yaml
apiVersion: v1
kind: Pod
metadata:
name: test-pd
namespace: open-falcon-monitoring
spec:
containers:
- image: nginx
name: s3-test-container
securityContext:
privileged: true
volumeMounts:
- name: mntdatas3fs
mountPath: /var/s3:shared
livenessProbe:
exec:
command: ["ls", "/var/s3"]
failureThreshold: 3
initialDelaySeconds: 10
periodSeconds: 5
successThreshold: 1
timeoutSeconds: 1
volumes:
- name: mntdatas3fs
hostPath:
path: /mnt/data-s3-fs
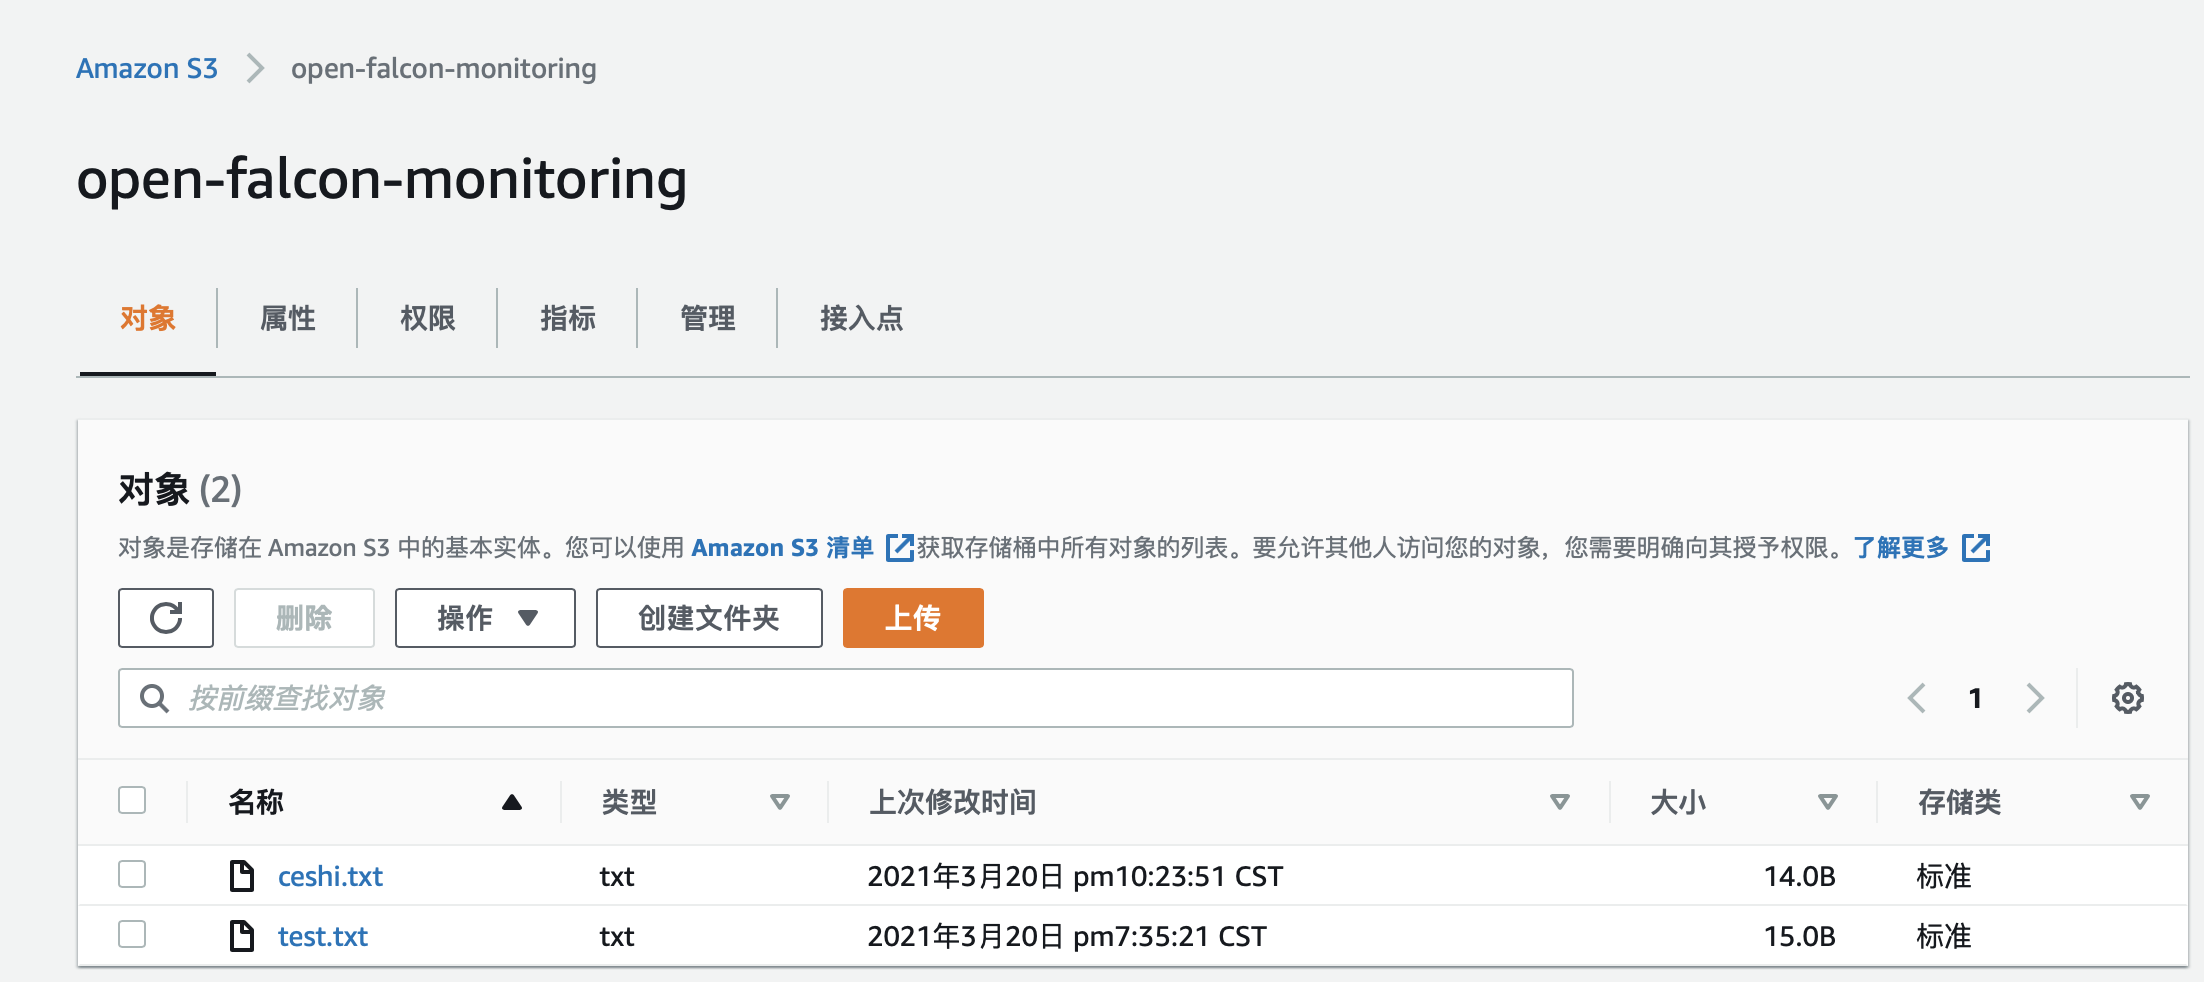
# 查看
# kubectl get pod -n open-falcon-monitoring
NAME                READY   STATUS    RESTARTS   AGE
s3-provider-2j6pw   1/1     Running   2          3m44s
test-pd             1/1     Running   0          73s
# 查看系统
df -h
s3fs                     256T     0  256T    0% /mnt/data-s3-fs
# 创建文件
kubectl exec -ti test-pd -n open-falcon-monitoring sh
echo "this is a ok!" > /var/s3/ceshi.txt
# 在/mnt/data-s3-fs上
cd /mnt/data-s3-fs/ && cat ceshi.txt
this is a ok!
# 在 AWS S3 上,如下图:
参考文档

相关文章推荐
- 为什么PPIO作为去中心化存储,也能像阿里云、AWS S3一样,保证数据不丢失?
- 为什么PPIO作为去中心化存储,也能像阿里云、AWS S3一样,保证数据不丢失?
- 使用s3fs将S3存储桶挂载在Linux的文件系统下
- Kubernetes 1.11.2使用NFS作为共享存储
- 使用Ceph集群作为Kubernetes的动态分配持久化存储
- 历年世界杯冠军队伍如下,使用map存储这些队伍,使用年份作为key,冠军队伍名称作为value。 完成下面的功能: 1) 输入一个年份,如果当年有世界杯比赛,则输出获奖队伍,如果没有则输出“当年没有举
- 关于使用openfiler作为共享存储来安装rac时的问题
- 存储过程中使用函数作为默认参数
- sae中使用mysql作为session存储
- aws s3 静态网站_为什么不应该使用AWS S3或CloudFront交付静态资产
- 初试 Kubernetes 集群使用 Ceph RBD 块存储
- 使用 Amazon S3 云服务轻松实现存储(1)
- Fabric1.4 九、使用couchdb作为节点存储
- 使用 minio 搭建私有对象存储云。aws-php-sdk 操作object
- Kubernetes使用NFS作为幸运28源码出售
- 使用Docker跑MySQL 作为Django的存储后端
- Python持久性管理——使用序列化存储Python对象
- 使用map来进行票数统计工作,循环输入多个人名,作为key存储到map中,对应的value就是该人获得的票数(即重复输入的次数),当重复输入时,需要对相应的数据进行修改。最红输quit结束循环,打印
- KVM使用glusterfs作为后端存储
- 使用Heartbeat V1和V2 实现nfs作为共享存储的高可用