一文掌握 YUV 图像 1000 的基本处理

 YUV 图片
YUV 的由来
YUV 是一种色彩编码模型,也叫做 YCbCr,其中 “Y” 表示明亮度(Luminance),“U” 和 “V” 分别表示色度(Chrominance)和浓度(Chroma)。
YUV 色彩编码模型,其设计初衷为了解决彩色电视机与黑白电视的兼容问题,利用了人类眼睛的生理特性(对亮度敏感,对色度不敏感),允许降低色度的带宽,降低了传输带宽。
在计算机系统中应用尤为广泛,利用 YUV 色彩编码模型可以降低图片数据的内存占用,提高数据处理效率。
另外,YUV 编码模型的图像数据一般不能直接用于显示,还需要将其转换为 RGB(RGBA) 编码模型,才能够正常显示图像。
YUV 几种常见采样方式
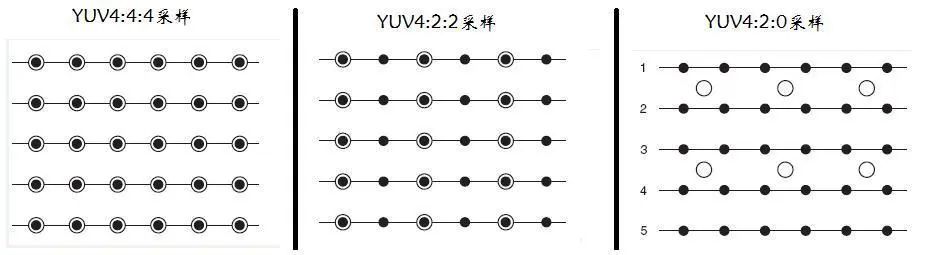 YUV 几种常见采样方式
YUV 图像主流的采样方式有三种:
YUV 4:4:4,每一个 Y 分量对于一对 UV 分量,每像素占用 (Y + U + V = 8 + 8 + 1000 8 = 24bits)3 字节;
YUV 4:2:2,每两个 Y 分量共用一对 UV 分量,每像素占用 (Y + 0.5U + 0.5V = 8 + 4 + 4 = 16bits)2 字节;
YUV 4:2:0,每四个 Y 分量共用一对 UV 分量,每像素占用 (Y + 0.25U + 0.25V = 8 + 2 + 2 = 12bits)1.5 字节。
其中最常用的采样方式是 YUV422 和 YUV420 。
YUV 格式也可按照 YUV 三个分量的组织方式分为打包(Packed)格式和平面格式(Planar)。
打包(Packed)格式:每个像素点的 YUV 分量是连续交叉存储的,如 YUYV 、NV21 格式;
平面格式(Planar):YUV 图像数据的三个分量分别存放在不同的矩阵中,这种格式适用于采样,如 YV12、YU12 格式。
YUV 几种常用的格式
对 YUV 图像处理中,YUYV 、YU12(I420)、NV21 和 NV12 最为常用,下面介绍下这几种格式的存储方式。
以一幅分辨率为 4x4 的 YUV 图为例,说明在不同 YUV 格式下的存储方式(括号内范围表示内存地址索引范围,默认以下不同格式图片存储使用的都是连续内存)。
YUYV (YU 518 V422 采样方式)
YUYV 是 2 个Y 分量共用一对 UV 分量,YUYV 格式的存储格式:
(0  ~  7)  Y00  U00  Y01  V00  Y02  U01   Y03  V01
(8  ~ 15)  Y10  U10  Y11  V10  Y12  U11   Y13  V11
(16 ~ 23)  Y20  U20  Y21  V20  Y22  U21   Y23  V21
(24 ~ 31
ffa
)  Y30  U30  Y31  V30  Y32  U31   Y33  V31
一幅 720P (1280x720分辨率) 的图片,使用 YUV422 采样时占用存储大小为:
Y 分量:1280 * 720  = 921600 字节
U 分量:1280 * 720 * 0.5 = 460800 字节
V 分量:1280 * 720 * 0.5 = 460800 字节
总大小:Y 分量 + U 分量 + V 分量 = (1280 * 720 + 1280 * 720 * 0.5 * 2) / 1024 / 1024 = 1.76 MB
由上面计算可以看出 YUV422 采样的图像比 RGB 模型图像节省了 1/3 的存储空间。,在传输时占用的带宽也会随之减小。
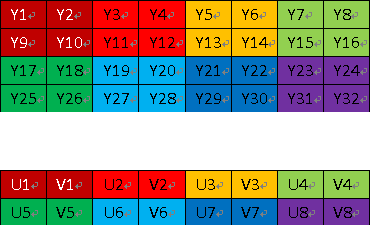
YV12/YU12 (YUV420 采样方式)
YV12/YU12 也属于 YUV420P ,即 YUV420 采样方式的平面模式,YUV 三个分量分别存储于 3 个不同的矩阵(平面)。
 YUV420P 存储方式图
YV12 格式的存储方式
(0  ~  3) Y00  Y01  Y02  Y03
(4  ~  7) Y10  Y11  Y12  Y13
(8  ~ 11) Y20  Y21  Y22  Y23
(12 ~ 15) Y30  Y31  Y32  Y33

(16 ~ 17) V00  V01
(18 ~ 19) V10  V11

(20 ~ 21) U00  U01
(22 ~ 23) U10  U11
YU12(也称 I420) 格式的存储方式
(0  ~  3) Y00  Y01  Y02  Y03
(4  ~  7) Y10  Y11  Y12  Y13
(8  ~ 11) Y20  Y21  Y22  Y23
(12 ~ 15) Y30  Y31  Y32  Y33

(16 ~ 17) U00  U01
(18 ~ 19) U10  U11

(20 ~ 21) V00  V01
(22 ~ 23) V10  V11
一幅 720P (1280x720分辨率) 的图片,使用 YUV420 采样时(格式 YV12/YU12 )占用存储大小为:
Y 分量:1280 * 720  = 921600 字节
U 分量:1280 * 720 * (1/4) = 230400 字节
V 分量:1280 * 720 * (1/4) = 230400 字节
总大小:Y 分量 + U 分量 + V 分量 = (1280 * 720 + 1280 * 720 * (1/4)* 2) / 1024 / 1024 = 1.32 MB
由上面计算可以看出 YUV420 采样(格式 YV12/YU12 )的图像比 RGB 模型图像节省了 1/2 的存储空间。
NV21/NV12 (YUV420 采样方式)
NV21/NV12 属于 YUV420SP ,YUV420SP 格式有 2 个平面,Y 分量存储于一个平面,UV 分量交错存储于另一个平面。
 YUV420SP 存储方式图
NV21 格式的存储方式
(0  ~  3) Y00  Y01  Y02  Y03 &n
1000
bsp;
(4  ~  7) Y10  Y11  Y12  Y13
(8  ~ 11) Y20  Y21  Y22  Y23
(12 ~ 15) Y30  Y31  Y32  Y33

(16 ~ 19) V00  U00  V01  U01
(20 ~ 23) V10  U10  V11  U11
NV12 格式的存储方式
(0  ~  3) Y00  Y01  Y02  Y03
(4  ~  7) Y10  Y11  Y12  Y13
(8  ~ 11) Y20  Y21  Y22  Y23
(12 ~ 15) Y30  Y31  Y32  Y33

(16 ~ 19) U00  V00  U01  V01
(20 ~ 23) U10  V10  U11  V11
NV21 与 NV12 格式的区别仅在于 UV 分量排列的先后顺序不同。
一幅 720P (1280x720分辨率) 的图片,使用 YUV420 采样时(格式 NV21/NV12 )占用存储大小为:
Y 分量:1280 * 720  = 921600 字节
UV 分量:1280 * 720 * (1/2) = 460800 字节
总大小:Y 分量 + UV 分量 = (1280 * 720 + 1280 * 720 * (1/2)) / 1024 / 1024 = 1.32 MB
由上面计算可以看出 YUV420 采样(格式 NV21/NV12 )的图像比 RGB 模型图像也节省了 1/2 的存储空间。
YUV 图像的基本操作
下面以最常用的 NV21 图为例介绍其旋转、缩放和剪切的基本方法。
YUV 图片的定义、加载、保存及内存释放。
//YUV420SP  NV21 or NV12

typedef struct
{
    int width;                 // 图片宽
    int height;                // 图片高
    unsigned char  *yPlane;    // Y 平面指针
    unsigned char  *uvPlane;   // UV 平面指针
} YUVImage;

void LoadYUVImage(const char *filePath, YUVImage *pImage)
{
    FILE *fpData = fopen(filePath, "rb+");
    if (fpData != NULL)
    {
        fseek(fpData, 0, SEEK_END);
        int len = ftell(fpData);
        pImage->yPlane = malloc(len);
        fseek(fpData, 0, SEEK_SET);
        fread(pImage->yPlane, 1, len, fpData);
        fclose(fpData);
        fpData = NULL;
    }
    pImage->uvPlane = pImage->yPlane + pImage->width * pImage->height;
}

void SaveYUVImage(const char *filePath, YUVImage *pImage)
{
    FILE *fp = fopen(filePath, "wb+");
    if (fp)
    {
        fwrite(pImage->yPlane, pImage->width * pImage->height, 1, fp);
        fwrite(pImage->uvPlane, pImage->width * (pImage->height >> 1), 1, fp);
    }
}

void ReleaseYUVImage(YUVImage *pImage)
{
    if (pImage->yPlane)
    {
        free(pImage->yPlane);
        pImage->yPlane = NULL;
        pImage->uvPlane = NULL;
    }
}
NV21 图片旋转
以顺时针旋转 90 度为例,Y 和 UV 两个平面分别从平面左下角进行纵向拷贝,需要注意的是一对 UV 分量作为一个整体进行拷贝。
以此类比,顺时针旋转 180 度时从平面右下角进行横向拷贝,顺时针旋转 270 度时从平面右上角进行纵向拷贝。
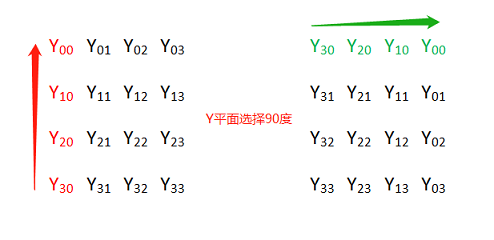 Y 平面旋转 90 度
 UV 平面旋转 90 度
存储空间表示:
Y00  Y01  Y02  Y03
1000
;          Y30  Y20  Y10  Y00
Y10  Y11  Y12  Y13    旋转90度  Y31  Y21  Y11  Y01
Y20  Y21  Y22  Y23    ----->    Y32  Y22  Y12  Y02
Y30  Y31  Y32  Y33              Y33  Y23  Y13  Y03
                      旋转90度
V00  U00  V01  U01    ----->    V10  U10  V00  U00
V10  U10  V11  U11              V11  U11  V01  U01
代码实现:
//angle 90,  270, 180
void RotateYUVImage(YUVImage *pSrcImg, YUVImage *pDstImg, int angle)
{
    int yIndex = 0;
    int uvIndex = 0;
    switch (angle)
 &
1000
nbsp;  {
    case 90:
    {
        // y plane
        for (int i = 0; i < pSrcImg->width; i++) {
            for (int j = 0; j < pSrcImg->height; j++) {
                *(pDstImg->yPlane + yIndex) = *(pSrcImg->yPlane + (pSrcImg->height - j - 1) * pSrcImg->width + i);
                yIndex++;
            }
        }

        //uv plane
        for (int i = 0; i < pSrcImg->width; i += 2) {
            for (int j = 0; j < pSrcImg->height / 2; j++) {
                *(pDstImg->uvPlane + uvIndex) = *(pSrcImg->uvPlane + (pSrcImg->height / 2 - j - 1) * pSrcImg->width + i);
                *(pDstImg->uvPlane + uvIndex + 1) = *(pSrcImg->uvPlane + (pSrcImg->height / 2 - j - 1) * pSrcImg->width + i + 1);
                uvIndex += 2;
            }
        }
    }
    break;
    case 180:
    {
        // y plane
        for (int i = 0; i < pSrcImg->height; i++) {
            for (int j = 0; j < pSrcImg->width; j++)&nbs
ff8
p;{
                *(pDstImg->yPlane + yIndex) = *(pSrcImg->yPlane + (pSrcImg->height - 1 - i) * pSrcImg->width + pSrcImg->width - 1 - j);
                yIndex++;
            }
        }

        //uv plane
        for (int i = 0; i < pSrcImg->height / 2; i++) {
            for (int j = 0; j < pSrcImg->width; j += 2) {
                *(pDstImg->uvPlane + uvIndex) = *(pSrcImg->uvPlane + (pSrcImg->height / 2 - 1 - i) * pSrcImg->width + pSrcImg->width - 2 - j);
                *(pDstImg->uvPlane + uvIndex + 1) = *(pSrcImg->uvPlane + (pSrcImg->height / 2 - 1 - i) * pSrcImg->width + pSrcImg->width - 1 - j);
                uvIndex += 2;
            }
        }
    }
    break;
    case 270:
    {
        // y plane
        for (int i = 0; i < pSrcImg->width; i++) {
            for (int j = 0; j < pSrcImg->height; j++) {
                *(pDstImg->yPlane + yIndex) = *(pSrcImg->yPlane + j * pSrcImg->width + (pSrcImg->width - i - 1));
                yIndex++;
            }
        }

        //uv plane
        for (int i = 0; i < pSrcImg->width; i += 2) {
            for (int j = 0; j < pSrcImg->height / 2; j++) {
                *(pDstImg->uvPlane + uvIndex + 1) = *(pSrcImg->uvPlane + j * pSrcImg->width + (pSrcImg->width - i - 1));
                *(pDstImg->uvPlane + uvIndex) = *(pSrcImg->uvPlane + j * pSrcImg->width + (pSrcImg->width - i - 2));
                uvIndex += 2;
            }
        }
    }
    break;
    default:
        break;
    }

}
NV21 图片缩放
将 2x2 的 NV21 图缩放成 4x4 的 NV21 图,原图横向每个像素的 Y 分量向右拷贝 1(放大倍数-1)次,纵向每列元素以列为单位向下拷贝 1(放大倍数-1)次.
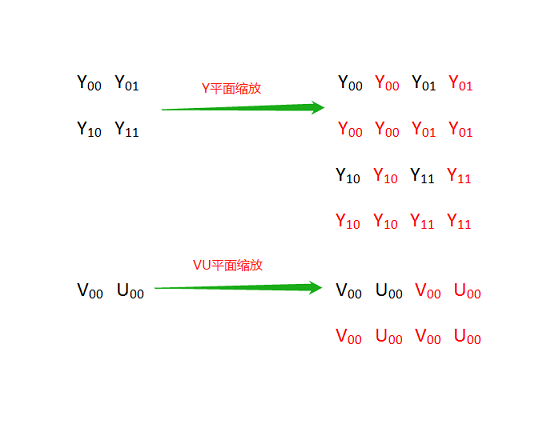 将 2x2 的 NV21 图缩放成 4x4 的 NV21 图
将 4x4 的 NV21 图缩放成 2x2 的 NV21 图,实际上就是进行采样。
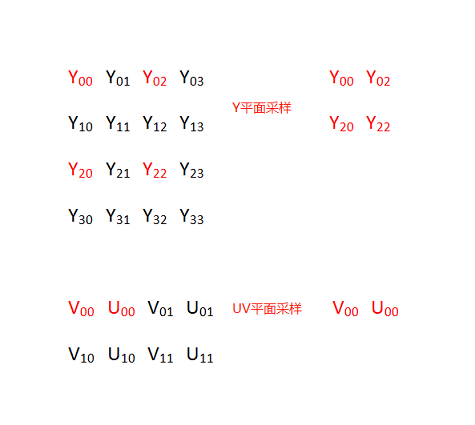 将 4x4 的 NV21 图缩放成 2x2 的 NV21 图
代码实现:
void ResizeYUVImage(YUVImage *pSrcImg, YUVImage *pDstImg)
{
    if (pSrcImg->width > pDstImg->width)
    {
        //缩小
        int x_scale = pSrcImg->width / pDstImg->width;
        int y_scale = pSrcImg->height / pDstImg->height;

        for
fea
 (size_t i = 0; i < pDstImg->height; i++)
        {
            for (size_t j = 0; j < pDstImg->width; j++)
            {
                *(pDstImg->yPlane + i*pDstImg->width + j) = *(pSrcImg->yPlane + i * y_scale *pSrcImg->width + j * x_scale);
            }
        }

        for (size_t i = 0; i < pDstImg->height / 2; i++)
        {
            for (size_t j = 0; j < pDstImg->width; j += 2)
            {
                *(pDstImg->uvPlane + i*pDstImg->width + j) = *(pSrcImg->uvPlane + i * y_scale *pSrcImg->width + j * x_scale);
                *(pDstImg->uvPlane + i*pDstImg->width + j + 1) = *(pSrcImg->uvPlane + i * y_scale *pSrcImg->width + j * x_scale + 1);
            }
        }
    }
    else
    {
        // 放大
        int x_scale = pDstImg->width / pSrcImg->width;
        int y_scale = pDstImg->height / pSrcImg->height;

        for (size_t i = 0; i < pSrcImg->height; i++)
        {
            for (size_t j = 0; j < pSrcImg->width; j++)
            {
                int yValue = *(pSrcImg->yPlane + i *pSrcImg->width + j);
                for (size_t k = 0; k < x_scale; k++)
                {
                    *(pDstImg->yPlane + i * y_scale * pDstImg->width + j  * x_scale + k) = yValue;
                }
            }
            unsigned char  *pSrcRow = pDstImg->yPlane + i * y_scale * pDstImg->width;
            unsigned char  *pDstRow = NULL;
            for (size_t l = 1; l < y_scale; l++)
            {
                pDstRow = (pDstImg->yPlane + (i * y_scale + l)* pDstImg->width);
                memcpy(pDstRow, pSrcRow, pDstImg->width * sizeof(unsigned char ));
            }
        }

        for (size_t i = 0; i < pSrcImg->height / 2; i++)
        {
            for (si
ff8
ze_t j = 0; j < pSrcImg->width; j += 2)
            {
                int vValue = *(pSrcImg->uvPlane + i *pSrcImg->width + j);
                int uValue = *(pSrcImg->uvPlane + i *pSrcImg->width + j + 1);
                for (size_t k = 0; k < x_scale * 2; k += 2)
                {
                    *(pDstImg->uvPlane + i * y_scale * pDstImg->width + j  * x_scale + k) = vValue;
                    *(pDstImg->uvPlane + i * y_scale * pDstImg->width + j  * x_scale + k + 1) = uValue;
                }
            }

            unsigned char  *pSrcRow = pDstImg->uvPlane + i * y_scale * pDstImg->width;
            unsigned char  *pDstRow = NULL;
            for (size_t l = 1; l < y_scale; l++)
            {
                pDstRow = (pDstImg->uvPlane + (i * y_scale + l)* pDstImg->width);
                memcpy(pDstRow, pSrcRow, pDstImg->width * sizeof(unsigned char ));
            }
        }
    }
}
NV21 图片裁剪
图例中将 6x6 的 NV21 图按照横纵坐标偏移量为(2,2)裁剪成 4x4 的 NV21 图。
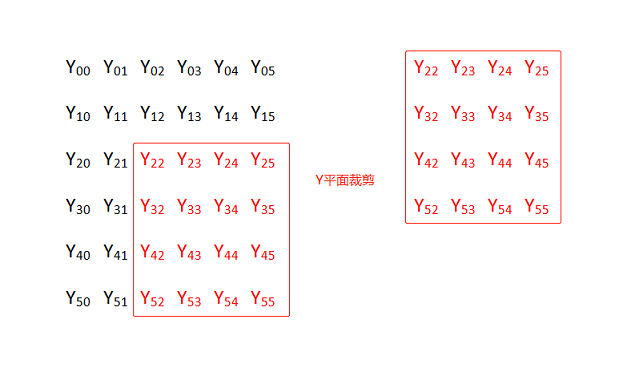 对 Y 平面裁剪
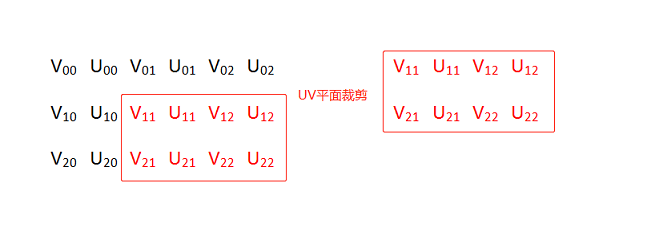 对 UV 平面裁剪
代码实现:
// x_offSet ,y_offSet % 2 == 0
void CropYUVImage(YUVImage *pSrcImg, int x_offSet, int y_offSet, YUVImage *pDstImg)
{
    // 确保裁剪区域不存在内存越界
    int cropWidth = pSrcImg->width - x_offSet;
    cropWidth = cropWidth > pDstImg->width ? pDstImg->width : cropWidth;
    int cropHeight = pSrcImg->height - y_offSet;
    cropHeight = cropHeight > pDstImg->height ? pDstImg->height : cropHeight;

    unsigned char  *pSrcCursor = NULL;
    unsigned char  *pDstCursor = NULL;

    //crop yPlane
    for (size_t i = 0; i < cropHeight; i++)
    {
        pSrcCursor = pSrcImg->yPlane + (y_offSet + i) * pSrcImg->width + x_offSet;
        pDstCursor = pDstImg->yPlane + i * pDstImg->width;
        memcpy(pDstCursor, pSrcCursor, sizeof(unsigned char ) * cropWidth);
    }

    //crop uvPlane
    for (size_t i = 0; i < cropHeight / 2; i++)
    {
        pSrcCursor = pSrcImg->uvPlane + (y_offSet / 2 + i) * pSrcImg->width + x_offSet;
        pDstCursor = pDstImg->uvPlane + i * pDstImg->width;
        memcpy(pDstCursor, pSrcCursor, sizeof(unsigned char ) * cropWidth);
    }

}
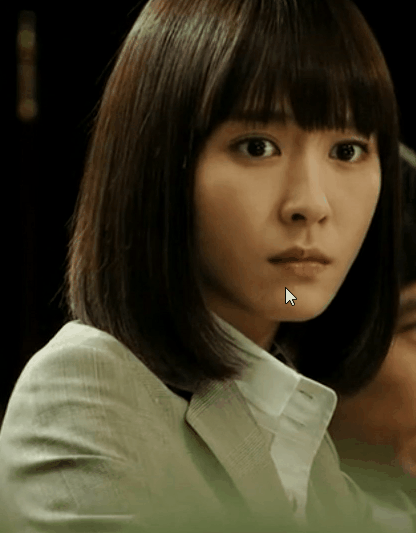
测试原图
 IMG_840x1074 原图(图片用于显示都已转成 PNG)
测试代码
void main()
{
    YUVImage srcImg = { 0 };
    srcImg.width = 840;
    srcImg.height = 1074;
    LoadYUVImage("IMG_840x1074.NV21", &srcImg);

    YUVImage rotateDstImg = { 0 };
    rotateDstImg.width = 1074;
    rotateDstImg.height = 840;
    rotateDstImg.yPlane = malloc(rotateDstImg.width * rotateDstImg.height*1.5);
    rotateDstImg.uvPlane = rotateDstImg.yPlane + rotateDstImg.width * rotateDstImg.height;

    RotateYUVImage(&srcImg, &rotateDstImg, 270);

    SaveYUVImage("D:\\material\\IMG_1074x840_270.NV21", &rotateDstImg);

    RotateYUVImage(&srcImg, &rotateDstImg, 90);

    SaveYUVImage("D:\\material\\IMG_1074x840_90.NV21", &rotateDstImg);

    rotateDstImg.width = 840;
    rotateDstImg.height = 1074;
    RotateYUVImage(&srcImg, &rotateDstImg, 180);

    SaveYUVImage("D:\\material\\IMG_840x1074_180.NV21", &rotateDstImg);


    YUVImage resizeDstImg = { 0 };
    resizeDstImg.width = 420;
    resizeDstImg.height = 536;
    resizeDstImg.yPlane = malloc(resizeDstImg.width * resizeDstImg.height*1.5);
    resizeDstImg.uvPlane = resizeDstImg.yPlane + resizeDstImg.width * resizeDstImg.height;

    ResizeYUVImage(&srcImg, &resizeDstImg);

    SaveYUVImage("D:\\material\\IMG_420x536_Resize.NV21", &resizeDstImg);

    YUVImage cropDstImg = { 0 };
    cropDstImg.width = 300;
    cropDstImg.height = 300;
    cropDstImg.yPlane = malloc(cropDstImg.width * cropDstImg.height*1.5);
    cropDstImg.uvPlane = cropDstImg.yPlane + cropDstImg.width * cropDstImg.height;

    CropYUVImage(&srcImg, 100, 500, &cropDstImg);

    SaveYUVImage("D:\\material\\IMG_300x300_crop.NV21", &cropDstImg);

    ReleaseYUVImage(&srcImg);
    ReleaseYUVImage(&rotateDstImg);
    ReleaseYUVImage(&resizeDstImg);
    ReleaseYUVImage(&cropDstImg);
}
测试结果
 IMG_1074x840_270(旋转270度)
 IMG_1074x840_90(旋转90度)
 IMG_840x1074_180(旋转180度)
 IMG_420x536_Resize(缩放)
 IMG_300x300_Crop(裁剪)
参考
https://blog.csdn.net/leixiaohua1020/article/details/50534150
https://cloud.tencent.com/developer/article/1442041
-- 技术交流可以添加我的微信:Byte-Flow --

字节流动
推荐:
Android OpenGL ES 从入门到精通系统性学习教程
觉得不错,点个在看呗~

本文分享自微信公众号 - 字节流动(google_developer)。
如有侵权,请联系 support@oschina.cn 删除。
本文参与“OSC源创计划”,欢迎正在阅读的你也加入,一起分享。

- Python图像处理库:PIL中Image,ImageDraw等基本模块介绍
- 图像处理基本算法 Hough变换
- 20200316.图像处理基本操作
- python图像处理库Pillow基本使用方法
- 从零开始学习数字图像处理——第一天(什么是数字图像处理,数字图像处理的基本步骤)
- 图形图像基本处理之——一个非常容易理解的图像求质心代码
- 三种图像处理的基本边缘检测法
- Matlab图像处理常用基本函数
- C#基本图像处理
- 基于标准C语言的数字图像处理基本框架
- 计算机视觉--基本的图像操作和处理
- Python-OpenCV 处理图像(一):基本操作
- Python3与OpenCV3.3 图像处理(二)--图像基本操作
- 图像处理基本概念——卷积,滤波,平滑(转载)
- 图像处理之图像基本变化(平移、缩放、旋转)(Octave实现)
- 图像处理基本算法-立体视觉
- OpenCV 教程(1) -- 基本图像处理
- 图像处理基本知识
- 图像处理基本概念——卷积,滤波,平滑
- Opencv学习笔记(三)--图像处理的基本操作