2020大厂面试JUC线程重要技术点【集合+线程+阻塞队列+线程池】
一、集合安全问题
1.1 ArrayList
- 空的集合初始值为10
- object类型的数组
- 扩容Arrays.copyOf 原始大小的一倍
- 线程不安全
1.1.1 不安全
java.util.concurrentModificationException

- Vector加了锁保证了数据一致性,但是并发性急剧下降,所以很少用!
- ArrayList牺牲了线程安全从而保证并发性
1.1.2 如何解决ArrayList线程不安全问题
1.new Vector<>()
2.Collection与Collections
- Collection为集合类的父接口
- Collections为辅助类来解决ArrayList线程不安全问题
List<String> list = Collections.synchronizedList(new ArrayList<>());
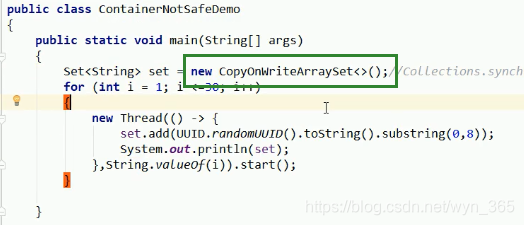
3.CopyOnWriteArrayList<>()类
写时复制 读写分离的思想
List<String> list = new CopyOnWriteArrayList<>();
private tranisent volatile []…
1.2 HashSet
底层:HashMap 初始值16 负载因子0.75
线程不安全解决的问题与上面雷同
解决办法一Collections.synchronizedSet():

解决办法二CopyOnWriteArraySet<>():
1.3 HashMap
演示错误 java.util.concurrentModificationException
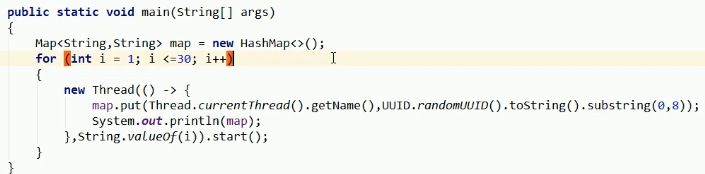
解决办法一:
Map<String,String> map = new ConcurrentHashMap<>();
解决办法二:
Collections.synchronizedMap();
二、JAVA锁机制
公平锁:多个新线程按照申请顺序来获取锁,先到先得 非
非公平锁:多个线程并不是按照申请的顺序,有可能造成优先级反转或者饥饿现象。
2.1 可重入锁【递归锁】
ReentrantLock
线程可以进入任何一个它已经拥有的锁同步着的代码块
通过构造函数制定该锁是否为公平锁,默认是非公平锁。
非公平锁的优势在于吞吐量比较大
对于Synchronized而言,也是一种非公平锁
作用:避免死锁
2.2 自旋锁
是指尝试获取锁的线程不会阻塞,而是采用循环的方式来尝试乎获取锁,这样的好处就是减少线程上下文的切换消耗,缺点是循环会消耗CPU.
do
while()
CAS
期望值与工作区间的值比较
2.2.1 自旋锁代码
public class SpinLock{
//原子引用线程
AtomicReference<Thread> ar = new AtomicReference<>();

public void myLock(){
Thread thread = Thread.currentThread();
System.out.println(Thread.currentThread().getName()+"come in");
while(!ar.compareAndSet(null,thread)){

}
}

public void myUnLock(){
Thread thread = Thread.currentThread();
ar.compareAndSet(thread,null);
System.out.println(Thread.currentThread().getName()+"unlock");
}

public static void main(String[] args){
SpinLock sl = new SpinLock();

new Thread(()-> {
// 加锁
sl.myLock();
// 暂停一会
try{TimeUnit.SECONDS.sleep(5);}catch(...){}
// 解锁
sl.myUnLock();
},"AA").start();

try{TimeUnit.SECONDS.sleep(1);}catch(...){}

new Thread(()-> {
// 加锁
sl.myLock();
try{TimeUnit.SECONDS.sleep(1);}catch(...){}
// 解锁
sl.myUnLock();
},"BB").start();
}
}
2.3 独占锁(写锁)/共享锁(读锁)
独占锁:指该锁一次只能被一个线程所持有的。
ReentrantLock Synchronized 都是独占锁
共享锁:该锁可以被多个线程所持有
ReentrantReadWriteLock为共享锁,写锁为独占锁
读锁的共享锁可保证并发读是非常高效的,读写,写读,写写的过程都是互斥的。
一个线程去写【原子+独占】绝对不可以被阻断,多个线程可以读
【问题描述如下:】
class MyCache{//缓存资源类
//volatile 可见性 不保证原子性 禁止指令重排
private volatile Map<String,Object> map = new HashMap<>();
//解决问题 原子性
//private ReentrantReadWriteLock rwLock = new ReentrantReadWriteLock ();

public void put(String key,Object value){

//加写锁
rwLock.writeLock().lock();
try{
System.out.println(Thread.currentThread().getName()+"正在写入"+key);
try{Time.MILLSECONDS.sleep(300);}catch(){};
map.put(key,value);
System.out.println(Thread.currentThread().getName()+"写入完成");
}catch(Exception e){
}finally{
rwLock.writeLock().unlock();
}
}

public void get(String key,Object value){
//加读锁
rwLock.readLock().lock();
try{
System.out.println(Thread.currentThread().getName()+"正在读取"+key);
try{Time.MILLSECONDS.sleep(300);}catch(){};
Object result = map.get(key);
System.out.println(Thread.currentThread().getName()+"读取完成"+result);
}catch(Exception e){
}finally{
rwLock.readLock().unlock();
}

}
}

public class ReadWriteLockDemo{
public static void main(String[] args){
MyCache myCache = new MyCache();
//写
for(int i = 1;i <= 5;i++){
new Thread(() -> {
final int tempInt = i;
myCache.put(tempInt+"",tempInt+"");
},String.valueOf(i)).start();
}

//读
for(int i = 1;i <= 5;i++){
new Thread(() -> {
final int tempInt = i;
myCache.get(tempInt+"");
},String.valueOf(i)).start();
}
}
}
这样既保证了数据一致性,有保证了并发性,读写分离。
Synchronized太重量。
三、CountDownLatch【线程做减法倒计时】
3.1 离开教室锁门问题产生!
public class CountDownLatchDemo{
public static void main(String[] args){
for(int i = 1;i<=6;i++){
new Thread(()->{
System.out.println(Thread.currentThread().getName()+"上完自习,离开教室");
},String.valueOf(i)).start();
}
System.out,println(Thread.currentThread().getName()+"班长最后关门走人");

}

}
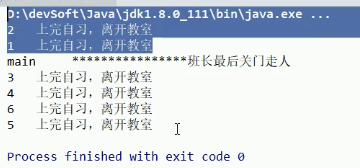
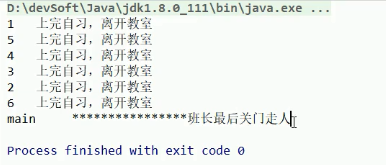
3.2 解决问题:CountDownLatch
public class CountDownLatchDemo{
public static void main(String[] args){
// 计数
CountDownLatch countDownLatch = new CountDownLatch(6);

for(int i = 1;i<=6;i++){
new Thread(()->{
System.out.println(Thread.currentThread().getName()+"上完自习,离开教室");
countDownLatch.countDown();//减1操作
},String.valueOf(i)).start();
}
// 主线程等待
countDownLatch.await();
System.out,println(Thread.currentThread().getName()+"班长锁门,最后关门走人");

}

}
四、CyclicBarrier【加法】
加法 与CountDownLatch【减法】相反
加到一定的数值然后做事
最后一个线程到达屏障时候才会进行
public class CountDownLatchDemo{

public static void main(String[] args){
CyclicBarrier cyclicBarrier = new CyclicBarrier(7,()->{System.out.println("***召唤神龙***");});
for(int i = 1;i<=7;i++){
final int tempInt  = i;
new Thread(()->{
System.out.println(Thread.currentThread().getName()+"收集到第"+tempInt +"颗龙珠");
cyclicBarrier.await();
},String.valueOf(i)).start();
}
}
}

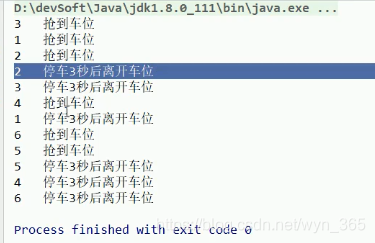
五、Semaphore【信号量】
多个共享资源的互斥使用
并发线程数量的控制
public class CountDownLatchDemo{

public static void main(String[] args){
// 模拟3个停车位
Semaphore semaphore = new Semaphore(3);
for(int i = 1; i <= 6;i++){
new Thread(()->{
try{
semaphore.acquire();
System.out.println(Thread.currentThread().getName()+"抢到车位");
TimeUnit.SECONDS.sleep(3);
System.out.println(Thread.currentThread().getName()+"停车3S后,离开车位");
}catch(...){
}finally{
semaphore.release();
}

},String.valueOf(i)).start();
}
}
}
六、阻塞队列【MQ核心】


6.1 阻塞队列ArrayBlockingQueue<>()

报异常
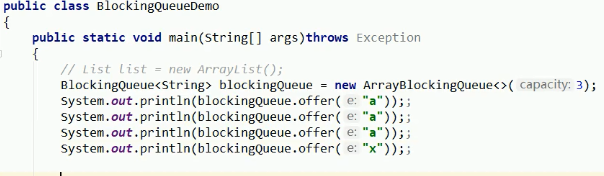
没有异常,直接返回布尔类型false

一直阻塞,取出用take方法
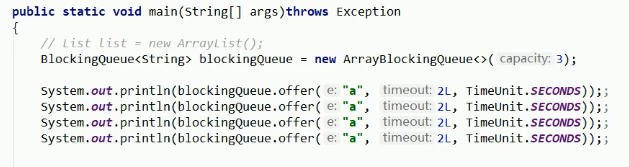
过时不候
6.2 阻塞队列 SynchronousQueue<>()

不消费,不会继续插下一个,会卡在 put(1)
6.3 生产者-消费者案例【新方式】
案例:一个初始值为0的变量,两个线程交替操作,一个加一,一个减一,来5轮
class SahreData{
private int number = 0;
private Lock lock = new ReentrantLock();
private Condition condition = lock.newCondition();
// 加法
public void increament(){
lock.lock{
try{
//1.判断
while(number != 0){
condition.await();
}
//2.干活
number++;
System.out.println(Thread.currentThread().getName()+ number);
//3.通知唤醒
condition.signalAll();
}catch(...){
}finally{
lock.unlock();
}
}
}

// 减法
public void decreament(){
lock.lock{
try{
//1.判断
while(number == 0){
condition.await();
}
//2.干活
number--;
System.out.println(Thread.currentThread().getName()+ number);
//3.通知唤醒
condition.signalAll();
}catch(...){
}finally{
lock.unlock();
}
}
}
}

public class ProdConsumer{
public static void main(String[] args){
ShareData shareData = new ShareData();

new Thread(()->{
for(int i = 1;i<=5;i++){
shareData.increament();
}
},"A").start();

new Thread(()->{
for(int i = 1;i<=5;i++){
shareData.decreament();
}
},"B").start();
}
}
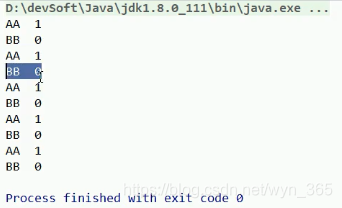
6.4 虚假唤醒
防止虚假唤醒 一定要用while 不要用if
6.3 中的代码换成If,多添加几个线程就会出现问题!
会出现结果 1 2 -1 0等等,并没有控制住结果。
七、Synchrinized与Lock的区别
1.前者JVM层面,是Java的关键字,后者是API层面,java5以后的出现的。
2. synchronized不可以中断
3. Reentranrlock可以中断,设置超时,或者中断方法
4.synchronized默认非公平锁
5.Reentranrlock可以分组唤醒,精确唤醒
6.synchronized要么随即唤醒一个,要么唤醒全部notify() notifyAll()
实现案例:
多线程之间要按照顺序调用,实现A-B-C三个线程启动:
AA打印5次,BB打印10次,CC打印15次
然后
AA打印5次,BB打印10次,CC打印15次
…
循环10次
7.1 打印案例【新的Lock版本】
class ShareResource{
private int number = 1;//A1 B2 C3
private Lock lock = new ReentrantLock();
private Condition c1 = new lock.newCondition();
private Condition c2 = new lock.newCondition();
private Condition c3 = new lock.newCondition();

public void prints5(){
lock.lock();
try{
//1.判断
while(number != 1){
c1.await();
}
//2.干活
for(int i = 1;i<=5;i++){
System.out.println(Thread.currentThread().getName()+"\t"+number);
}
//3.通知2
number = 2;
c2.signal();
}catch(){}finally{
lock.unlock();
}
}

public void prints10(){
lock.lock();
try{
//1.判断
while(number != 2){
c2.await();
}
//2.干活
for(int i = 1;i<=10;i++){
System.out.println(Thread.currentThread().getName()+"\t"+number);
}
//3.通知2
number = 3;
c3.signal();
}catch(){}finally{
lock.unlock();
}
}

public void prints15(){
lock.lock();
try{
//1.判断
while(number != 3){
c3.await();
}
//2.干活
for(int i = 1;i<=10;i++){
System.out.println(Thread.currentThread().getName()+"\t"+number);
}
//3.通知2
number = 1;
c1.signal();
}catch(){}finally{
lock.unlock();
}
}

}

public class SyncAndReentrantLockDemo{

ShareSource shareSource = new ShareSource();
new Thread(()->{
for(int i=0;i<=10;i++){
shareSource.prints5();
}
},"A").start();

new Thread(()->{
for(int i=0;i<=10;i++){
shareSource.prints10();
}
},"B").start();

new Thread(()->{
for(int i=0;i<=10;i++){
shareSource.prints15();
}
},"C").start();
}
7.2 生产消费案例【阻塞队列版本】高并发
class MyResource{
private volatile boolean FLAG = true;//默认开启,生产+消费
private AtomicInteger atomicInteger = new AtomicInteger();

BlockingQueue<String> blockingQueue = null;
public MyResource(BlockingQueue<String> blockingQueue){
this.blockingQueue = blockingQueue;
System.out.println(blockingQueue.getClass().getName());
}

public void myProd(){
String data = null;
boolean retValue;
while(FLAG){
data = atomInteger.incrementAndGet()+"";
retValue = blockingQueue.offer(data,2L,TimeUnit.SECONDS);
if(retValue){
System.out.println(Thread.currentThread().getName()+"\t 插入队列"+data+"成功");
}else{
System.out.println(Thread.currentThread().getName()+"\t 插入队列"+data+"失败");
}
TimeUint.SECONDS.sleep(1);
}
System.out.println(Thread.currentThread().getName()+"\t 生产叫停,false 生产结束");
}

public void MyConsumer(){
String result = null;
while(FLAG){
result = blockingQueue.poll(2L,TimeUnit.SECONDS);
if(null == result || result.equalsIngoreCase("")){
FLAG = false;
System.out.println(Thread.currentThread().getName()+"\t 超过2S没有消费,消费退出");
return;
}
System.out.println(Thread.currentThread().getName()+"\t 消费队列"+result+"成功");
}
}

public void stop(){
this.FLAG = fasle;
}
}

public class ProdConsumer_BlockQueueDemo{
public static void main(String[] args){
MyResource myResource = new MyResource(new ArrayBlockingQueue<>(10));

new Thread(()->{
System.out.println(Thread.currentThread().getName()+ "\t 生产线成启动");
myResource.myProd();
},"Prod").start();

new Thread(()->{
System.out.println(Thread.currentThread().getName()+ "\t 消费线成启动");
myResource.myConsumer();
},"Consumer").start();

//暂停一会
try{TimeUnit.SECONDS.sleep(5);catchh(...){}}
System.out.println("5S结束,大老板叫停,活动结束");
myResource.stop();
}

}

八、线程池
8.1 Runnable与 Callable
class MyThread implements Runnable{
@Override
public void run(){
}
}

class MyThread2 implements Callable<Integer>{
@Override
public Integer call() throws Exception{
System.out.println("进来了");
return 1024;
}
}

public class CallableDemo{
public static void main(String[] args){
FuterTask<Integer> futerTask = new FuterTask<>(new MyThread);
Thread t1 = new Thread(futerTask,"AAA");
t1.start();
int result01 = 100;
int result02 = futerTask.get();

System.out.println(result01+result02);
}
}
结果:1124
8.2 线程池的优势
Executor顶级接口和工具包Executors


底层:阻塞队列
1.降低资源消耗
2.提高响应速度
3.提高线程的可管理性
// 拓展工具类
// Array Arrays
// Collection Collections
// Executor Executors
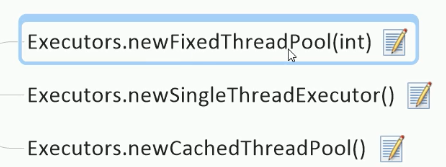
8.3 线程池实现的方式【3种核心】
工作中你用那个??? 哪个都不用的
阿里巴巴开发手册:不允许使用Executors区创建,而是使用ThreadPoolExecutor的方式,这样的处理方式更加明确线程池的运行规则,避免资源耗尽。

但是也要学习!!!!!!如下:
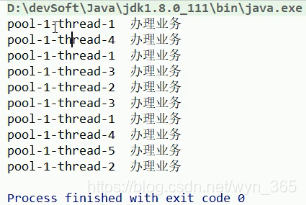
第一种【重要】:
public class MyThreadPoolDemo{
public static void main(String[] args){
// 1个线程池 5个线程
ExecutorService threadPool = Executors.newFixedThreadPool(5);

try{
for(int i = 1;i<=10;i++){//10个用户
threadPool.execute(()->{
System.out.println(Thread.currentThread().getName()+"办理业务");
});
}
}catch(...){
}finally{
thread.shutdown();
}
}
}
第二种:
public class MyThreadPoolDemo{
public static void main(String[] args){
// 1个线程池 1个线程
ExecutorService threadPool = Executors.newSingleThreadExecutor();

try{
for(int i = 1;i<=10;i++){//10个用户
threadPool.execute(()->{
System.out.println(Thread.currentThread().getName()+"办理业务");
});
}
}catch(...){
}finally{
thread.shutdown();
}
}
}

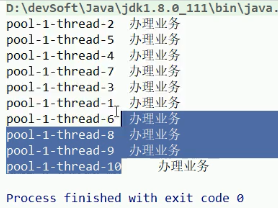
第三种:
public class MyThreadPoolDemo{
public static void main(String[] args){
// 1个线程池 不定线程
ExecutorService threadPool = Executors.newCacgedThreadPool();

try{
for(int i = 1;i<=10;i++){//10个用户
threadPool.execute(()->{
System.out.println(Thread.currentThread().getName()+"办理业务");
});
}
}catch(...){
}finally{
thread.shutdown();
}
}
}
8.4 线程池7大参数


8.5 线程池拒绝策略
等待队列已经满了,再也塞不下新任务了
线程池中的max线程也达到了最大,无法继续为新任务服务

8.6 手写线程池【大厂工作核心–7大参数】
public class MyThreadPoolDemo{
public static void main(String[] args){
ExecutorService threadPool = new ThreadPoolExecutor(
2,//核心数
5,//最大线程数
1L,//活跃时间
TimeUint.SECONDS,//单位
new LinkedBlockingQueue<Runnable>(3),//阻塞队列大小个数
Executors.defaultThreadFactory(),//线程工厂
new ThreadPoolExecutor.AbortPolicy());//拒绝策略,会抛异常

try{
for(int i = 1;i<=5;i++){
threadPool.execute(()->{
System.out.println(Thread.currentThread().getName()+"办理业务");
});
}
}catch(...){
}finally{
threadPool.shutdown();
}
}
}
8.7 如何合理配置线程的数量呢?
回答:
1.CPU密集型?
2.IO密集型?
1.获取CPU密集型
Runtime.getRuntime().getProcessors()
一般为:CPU核数+1个线程
2.IO密集型
io密集型的任务并不是一直在执行任务,应该配置尽可能多的线程
一般为:CPU核数*2

- 利用队列的自动阻塞和线程池来做线程的生产消费
- JUC-阻塞队列+线程池
- JUC中 阻塞队列和线程池
- 面试-阻塞队列及线程池
- 【多线程】 java线程实例(测试阻塞队列&&线程池)
- 教你一文读清线程通信之阻塞队列版(JUC编程)
- 三、多线程面试知识点-并发度_读写锁_确认线程池_阻塞线程唤醒
- Java线程(十三):BlockingQueue-线程的阻塞队列
- 线程池的启动方式,以及线程池中的阻塞队列
- 阻塞队列模型和线程池
- 最全的大厂技术面试指南,GitHub10000星
- 线程池ThreadPoolExecutor与阻塞队列BlockingQueue
- 教你一文了解阻塞队列(资源存放地-JUC)
- 主线程阻塞、消息队列机制和图片下载
- spring线程池ThreadPoolTaskExecutor与阻塞队列BlockingQueue
- 【高并发10】JUC组件扩展(FutureTask, Fork / Join 并行框架 ,阻塞队列BlockingQueue)
- 使用新的java线程池技术创建固定的线程去完成任务,都完成后计算总时间
- java线程深度解析(六)——线程池技术
- 线程池与阻塞队列
- Java - "JUC线程池" 线程状态与拒绝策略源码分析