前端Vue上传图片到七牛云&后端Django上传图片到七牛云
2020-06-04 05:34
369 查看
前言
在开发项目的时候,经常会用到上传图片的功能,如果把图片全都存放在项目路径下,会导致项目越来越臃肿,因此可以考虑把图片上传交给第三方处理,此处采用七牛云进行图片存储。
经过测试,通过七牛云获取图片确实比直接通过自己的服务器获取的速度要快得多,赶快去注册七牛云吧。
上传方式
上传图片的方式有两种:
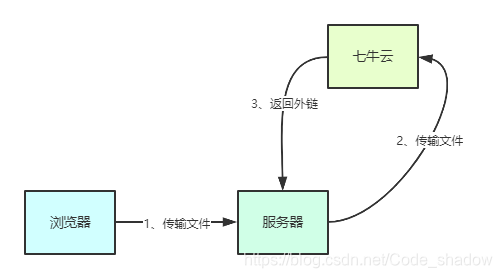
- 通过服务器:将文件传到服务端,由服务端上传到七牛云
- 通过前端JS:将文件直接从JS上传到七牛云。
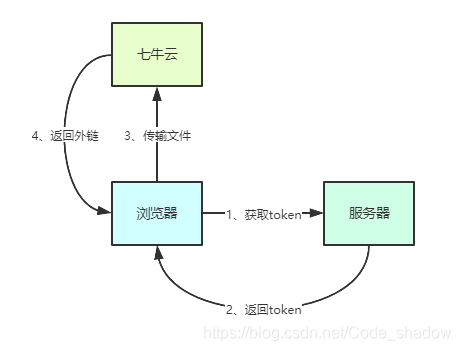
- 两种方式都可以完成上传,但是前者还需占用服务端的带宽来上传文件,然后再由服务端上传;而后者仅占用客户端的资源,这样可以减轻服务端的压力。
Vue上传图片到七牛云
<template>
<div class="upload-info">
<div>
<el-upload
class="upload-pic"
:action="domain"
:data="QiniuData"
:on-remove="handleRemove"
:on-error="uploadError"
:on-success="uploadSuccess"
:before-remove="beforeRemove"
:before-upload="beforeAvatarUpload"
:limit="3"
multiple
:on-exceed="handleExceed"
:file-list="fileList"
>
<el-button size="small" type="primary">选择图片</el-button>
</el-upload>
<div>
<img class="pic-box" :src="uploadPicUrl" v-if="uploadPicUrl">
</div>
</div>
<div>
<el-button type="primary" :loading="loading" @click="handleSubmit">提交</el-button>
<el-button type="info" plain >取消</el-button>
</div>
</div>
</template>

<script>
export default {
data() {
return {
loading: false,
QiniuData: {
key: "", //图片名字处理
token: "" //七牛云token
},
domain: "https://upload-z2.qiniup.com", // 七牛云的上传地址(华南区)
qiniuaddr: "http://xxxx.com", // 七牛云的图片外链地址
uploadPicUrl: "", //提交到后台图片地址
fileList: []
};
},
mounted() {
this.getQiniuToken();
},
methods: {
handleRemove(file, fileList) {
this.uploadPicUrl = "";
},
handleExceed(files, fileList) {
this.$message.warning(
`当前限制选择 3 张图片,如需更换,请删除上一张图片在重新选择!`
);
},
beforeAvatarUpload(file) {
const isPNG = file.type === "image/png";
const isJPEG = file.type === "image/jpeg";
const isJPG = file.type === "image/jpg";
const isLt2M = file.size / 1024 / 1024 < 2;

if (!isPNG && !isJPEG && !isJPG) {
this.$message.error("上传头像图片只能是 jpg、png、jpeg 格式!");
return false;
}
if (!isLt2M) {
this.$message.error("上传头像图片大小不能超过 2MB!");
return false;
}
this.QiniuData.key = `upload_pic_${file.name}`;
},
uploadSuccess(response, file, fileList) {
console.log(fileList);
this.uploadPicUrl = `${this.qiniuaddr}/${response.key}`;
},
uploadError(err, file, fileList) {
this.$message({
message: "上传出错,请重试!",
type: "error",
center: true
});
},
beforeRemove(file, fileList) {
// return this.$confirm(`确定移除 ${ file.name }?`);
},
//提交数据到后台
handleSubmit() {
let ajaxData = {
receipt_img: this.uploadPicUrl //图片地址
};
this.$http.put("/xxx", ajaxData)
.then(response => {
let { code, data } = response.data;
if (code == "0") {
this.$message({
message: "提交成功!",
type: "success",
center: true
});
}
})
.catch(error => {
this.$message({
message: error.msg,
type: "error",
center: true
});
});
},
//请求后台拿七牛云token
getQiniuToken() {
this.$http.get("/xxx")
.then(response => {
let { code, data } = response.data;
if (code == "0") {
this.QiniuData.token = data;
}
})
.catch(error => {});
}
}
};
</script>
Django上传图片到七牛云
- 安装七牛云的SDK
pip install qiniu
- Django项目中的配置
QINIU_ACCESS_KEY = '你的七牛云access_key'
QINIU_SECRET_KEY = '你的七牛云secert_key'
QINIU_BUCKET_NAME = '你的bucket_name'
- 上传文件
import io
import uuid

import qiniu
from PIL import Image
from django.conf import settings

q = qiniu.Auth(settings.QINIU_ACCESS_KEY, settings.QINIU_SECRET_KEY)

def upload(img):
_img = img.read()
size = len(_img) / (1024 * 1024)  # 上传图片的大小 M单位

image = Image.open(io.BytesIO(_img))

key = str(uuid.uuid1()).replace('-', '')

name = 'upfile.{0}'.format(image.format)  # 获取图片后缀(图片格式)

if size > 1:
# 压缩
x, y = image.size
im = image.resize((int(x / 1.73), int(y / 1.73)), Image.ANTIALIAS) #等比例压缩 1.73 倍
else:
# 不压缩
im = image

im.save('./media/' + name)  # 在根目录有个media文件
path = './media/' + name

token = q.upload_token(settings.QINIU_BUCKET_NAME, key, 3600,)

qiniu.put_file(token, key, path)
url = 'http://7u2iif.com1.z0.glb.clouddn.com/{}'.format(key)
return url
- 视图
from web.uploadpic import upload

def uploadpic(request):
img = request.FILES['file']
url = upload(img)
return HttpResponse(url)

相关文章推荐
- Django上传图片到七牛云
- 前端上传图片到后端
- Express实现前端后端通信上传图片之存储数据库(mysql)傻瓜式教程(一)
- 后端Django + 前端Vue.js快速搭建web项目
- ueditor在vue+springboot前后端分离项目图片上传配置踩坑总结
- 使用python3.7+Vue.js2.0+Django2.0.4异步前端通过api上传文件到七牛云云端存储
- 前端上传多张图片,编译发给后端
- Jersey后端服务接收ajax前端的图片上传
- 基于Ajax的formData图片和数据上传(前端发送及后端验证)
- 纯前端使用vue+element+阿里云oss上传图片+分片上传
- 图片上传(前端显示预览,后端php接收)
- canvas剪裁图片并上传,前端一步到位,无需用到后端
- 【功能点】前端vue传过来的是base64格式(解码变成二进制)的图片怎么做多图上传
- 图片上传的两种方式(前端和后端)
- vue+cropperjs实现图片剪裁,上传七牛云
- Express实现前端后端通信上传图片之存储数据库(mysql)傻瓜式教程(二)
- h5移动开发Ajax上传多张Base64格式图片(前端发送及后端验证)
- Express实现前端后端通信上传图片之存储数据库(mysql)傻瓜式教程(一)
- springboot下bootstrap-fileinput上传、修改、删除图片(前端+后端)
- vue中上传视频或图片或图片和文字一起到后端的解决方法