Springboot 整合RabbitMQ

消息队列
何谓消息队列,我们都知道,队列queue 我们在学习线程知识的时候碰到过,多线程生产者消费者模型 生产者生产产品到队列当中。消费者从队列当中拿取产品进行消费。这就是一个队列,当生产者消费的速度大于消费者消费的速度,所堆积起来的东西就需要一个东西来进行缓存它,然后让消费者慢慢消费。就好比一个冰箱,一次性买的太多吃不完,那就先放到冰箱里面,慢慢吃完。
RabbitMQ 作为一款优秀的消息队列,生产者和消费者通过中间件队列进行解耦。无需关心是谁生产的,达到解耦的目的。
相关概念
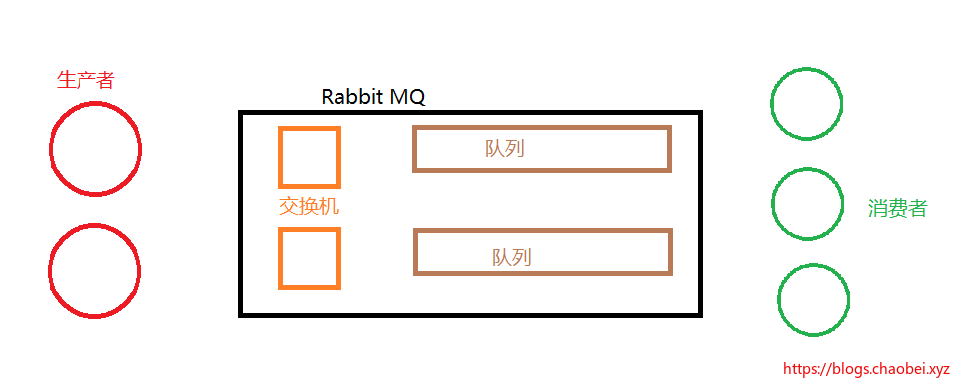
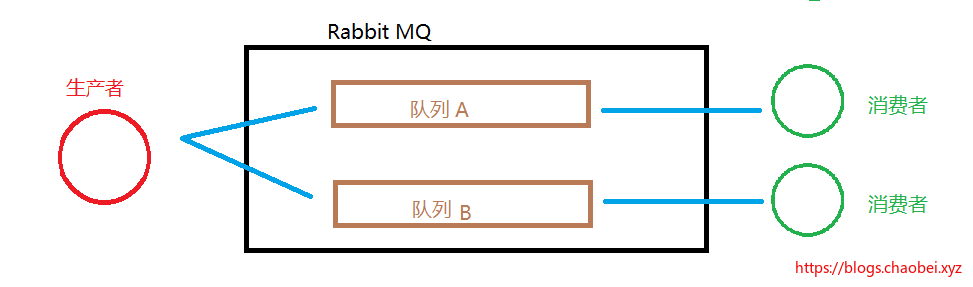
我们通过这样一张图,就会有这样几个概念需要理解
- 生产者
- 消费者
- RabbitMQ (包含交换机和队列)
生产者和消费者、队列我们已经举例过了。这里主要说一下交换机以及虚拟主机
交换机
从这个名称我就可以大致了解到。和网络交换机的概念差不多,网络交换机用来处理以太网数据帧(包) 达到交换转发的目的。很显然,我们这里的交换机也是这样的,用来交换消息,这里需要注意的地方就是路由键
先来创建一个demo ,里面涉及到的内容,我会这逐一分析
Demo 练习
通过Springboot 整合RabbitMQ的方式来学习MQ 当中的一些交换机类型、以及虚拟主机、绑定等概念
<dependency>
<groupId>org.springframework.boot</groupId>
<artifactId>spring-boot-starter-amqp</artifactId>
</dependency>
新建一个Springboot 开启Springboot 对于MQ 队列的支持。
在这之前呢,你需要使用Windows 安装好RabbitMQ 服务端,并且开启Web方式进行管理。可以通过
http://127.0.0.1:15672/登录
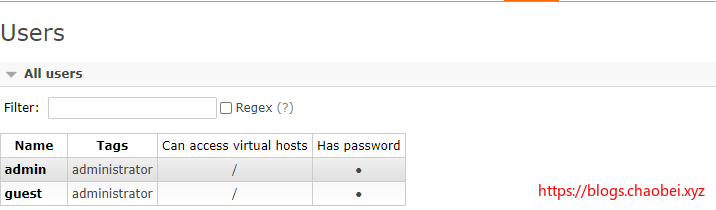
这里我已经创建了一个admin 管理账户,或不会创建,则使用guest即可
先配置一下
spring.application.name=rabbit-mq-demo

spring.rabbitmq.host=127.0.0.1
spring.rabbitmq.port=5672
spring.rabbitmq.username=admin
spring.rabbitmq.password=admin
这里其实没有啥解释的内容:无非就是rabbit的通信地址,这里安装在本机,以及 5672 端口
创建一个基本队列
@Configuration
public class RabbitConfig {

@Bean
public Queue CreateQueue() {
return new Queue("hello");
}

}
在JAVA 里面万物皆对象,我们的队列也是一个对象,这里因为使用的Springboot, 通过@Bean 将我们实例化后的这个队列对象交给Springboot IOC 容器进行管理。
创建一个发送者
@Component
public class HelloSender {

@Autowired
private AmqpTemplate rabbitTemplate;

public void send() {
String context = "hello " + new Date();
System.out.println("Sender : " + context);
this.rabbitTemplate.convertAndSend("hello", context);
}

}
这里我们就发送一个 hello+当前时间 通过AmqpTemplate 这个类来进行基本的发送功能。这里发送前,将打印出我们将要发送的内容。
创建一个消费者
@Component
@RabbitListener(queues = "hello")
public class HelloReceiver {

@RabbitHandler
public void process(String hello) {
System.out.println("Receiver  : " + hello);
}

}
运行试试
创建一个测试类。我们就写了这么多,先让他跑起来。
@RunWith(SpringRunner.class)
@SpringBootTest
public class DemoApplicationTests {

@Autowired
private HelloSender helloSender;

@Test
public void contextLoads() {
helloSender.send();
}
}
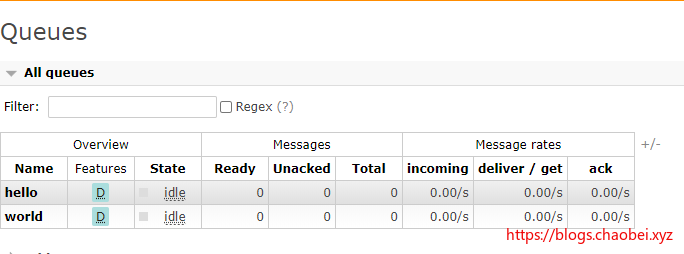
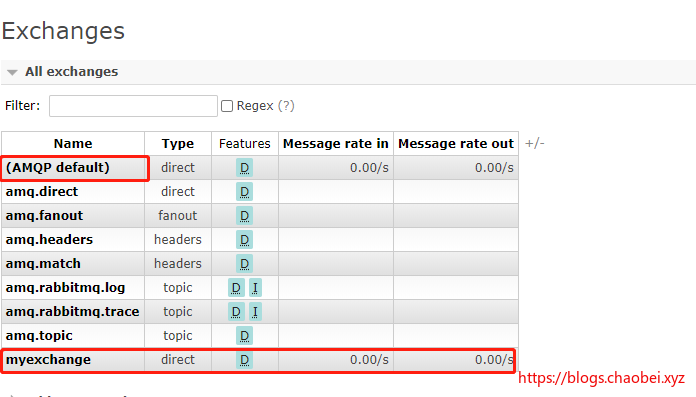
我们可以查看到,控制台打印的消息,说明我们发送成功,并且消费者通过监听也接收到我们发送的消息了。 再打开RabbitMQ 的管理页面,我们可以看到这样一个界面
Sender : hello Thu Mar 05 16:01:23 CST 2020
2020-03-05 16:01:23.959  INFO 12456 --- [       Thread-2] o.s.a.r.l.SimpleMessageListenerContainer : Waiting for workers to finish.
Receiver  : hello Thu Mar 05 16:01:23 CST 2020
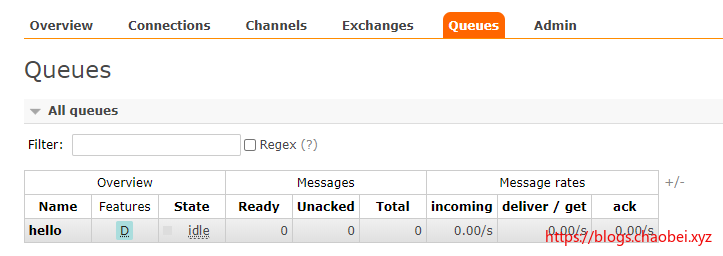
这就是我们刚才创建的队列啊,就叫Hello嘛
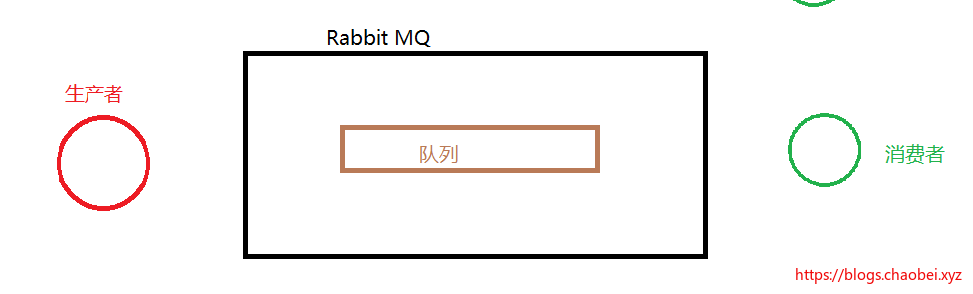
当前的路线我们可以简单的画个图,一个队列,一个发送者,一个接受者
路由(交换机)详解
这里我们来建立两个队列,分别是
- hello 队列
- world 队列
这样开起来是没有毛病的,再建立一个消费者,用来监听world的消息队列
新建一个队列B。我们取名为world
@Bean
public Queue CreateQueueB() {
return new Queue("world");
}
新建一个消费者,用于从队列B中拿取消息
@Component
@RabbitListener(queues = "world")
public class ReceiverB {
@RabbitHandler
public void process(String hello) {
System.out.println("ReceiverB  : " + hello);
}
}
将原有的发送方法进行稍加修改,同时也将消息往B队列中丢一份。
public void send() {
String context = "hello " + new Date();
System.out.println("Sender : " + context);
this.rabbitTemplate.convertAndSend("hello", context);
this.rabbitTemplate.convertAndSend("world", context);
}
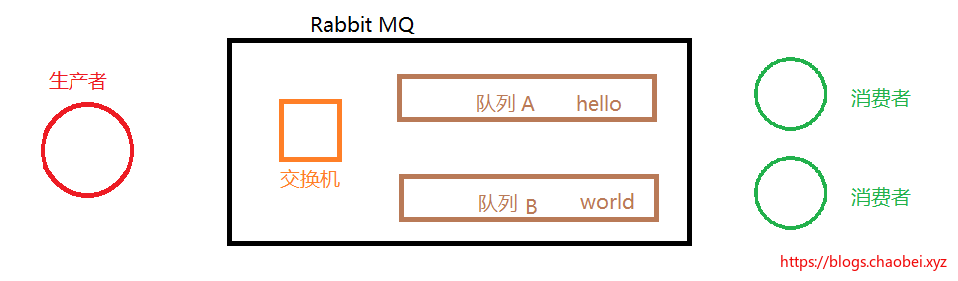
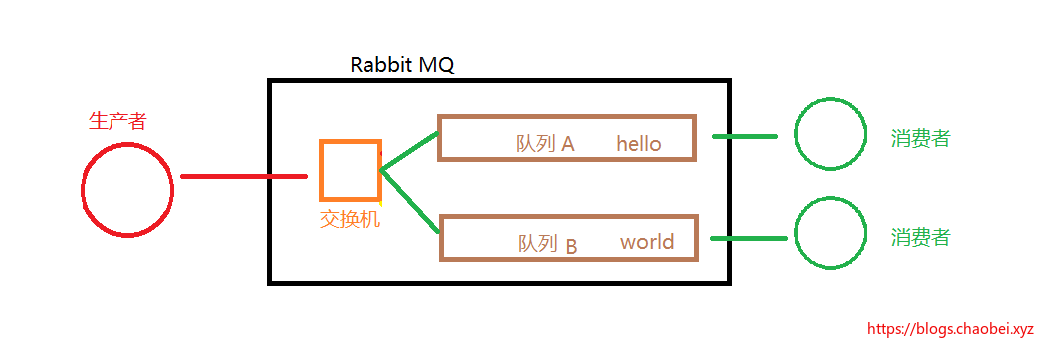
我们的队列现在看起来好像是这样的
测试一下
Receiver  : hello Thu Mar 05 17:48:18 CST 2020
ReceiverB  : hello Thu Mar 05 17:48:18 CST 2020
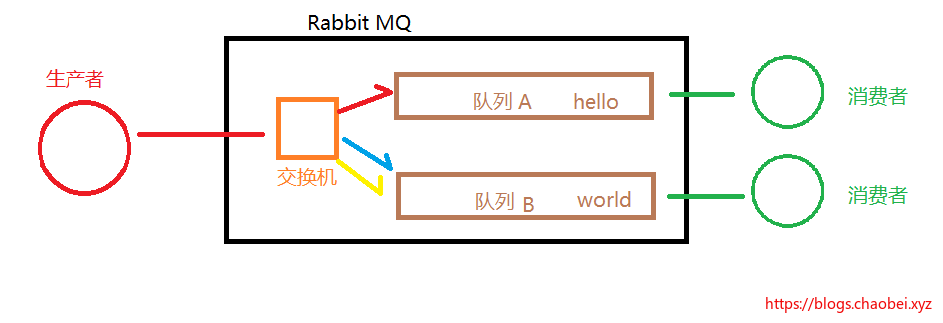
可以看到,这两个消息都通过不同的队列到达我们的消费者。这样就出现了一个问题,假设我们发送的这个消息要么会向A队列走,要么向B队列走,这样的话,我们该如何去实现呢?
- 加入IF 判断,执行不同代码(傻瓜式)
这样其实也可以,但是肯定有解决的方案,并不是让你把代码写死。
概念
交换机的主要功能我从上面已经说过了,就好比家里的路由器(交换机)把网络包进行转发,同样的,这里的类型我需要解释一下,下面两种是最常用的
- Direct 匹配投送
- Topic 规则投送
匹配投送在生产者发送消息的时候,需要设置对应的路由键,交换机识别路由键routing_key后,将消息投送到指定的队列里面。
规则投送类似于通配符的投送方法,更加灵活。
创建一个交换机(Exchange)
@Bean
public DirectExchange exchange() {
return new DirectExchange("myexchange");
}
未绑定前,我是这样的
进行交换机与队列的绑定
@Bean
public Queue helloQueue() {
return new Queue("hello");
}

@Bean
public Queue worldQueue() {
return new Queue("world");
}
这里为了理解方便,我将名字进行了修改
@Bean
public Binding bindingExchangeHello(Queue helloQueue, DirectExchange exchange) {
return BindingBuilder.bind(helloQueue).to(exchange).with("red");
}

@Bean
public Binding bindingExchangeWorld(Queue worldQueue, DirectExchange exchange) {
return BindingBuilder.bind(worldQueue).to(exchange).with("blue");
}

@Bean
public Binding bindingExchangeWorld2(Queue worldQueue, DirectExchange exchange) {
return BindingBuilder.bind(worldQueue).to(exchange).with("yellow");
}
这里进行了绑定的操作。分别是:
- red--->A队列(hello)
- blue--->B队列(world)
- yellow--->B队列(world)
修改发送部分内容
public void send() {

String [] keys = new String[]{"red","yellow","blue"};

for (int i = 0;i<9;i++) {

int random = (int)(Math.random()*3);

this.rabbitTemplate.convertAndSend("myexchange",keys[random],keys[random]);
}
}
rabbitTemplate.convertAndSend 第一个参数指定需要使用的交换机。第二个参数需要带上我们的路由键rouding_key 第三个则是发送的内容:
ReceiverB  : yellow
ReceiverA  : red
ReceiverB  : yellow
ReceiverB  : yellow
ReceiverB  : yellow
ReceiverB  : yellow
ReceiverB  : yellow
ReceiverB  : yellow
ReceiverB  : blue
通过测试发现,我们的消息能顺利到达指定的队列,并有队列交给我们的消费者。
通过这张图,其实我们可以发现,在我们上面还没有使用交换机的时候,其实它有一个默认交换机来帮助我们处理消息,我们通过this.rabbitTemplate.convertAndSend("hello", context); 其实就可以将这个消息发送到 hello 队列,当然,我们使用了默认交换机。
可以猜想:默认交换机的绑定方式就是将使用队列名称绑定到指定的队列~
Topic Exchange
- topic 类型常用的是通配符类型
这种类型的交换机用起来更加的灵活,相比于 direct ,能够适配更多的类型。
还是按照上面的例子,我们稍作修改,将原有的交换机注释掉,我们新建一个统配型交换机,mytopic
@Bean
public TopicExchange exchange(){
return new TopicExchange("mytopic");
}
给通配型交换机绑定规则,就是告诉他,如何将我给你送过来的消息准确的转发到队列里面。
给 hello 队列绑定规则
@Bean
public Binding bindingExchangeHello(Queue helloQueue, TopicExchange exchange) {
return BindingBuilder.bind(helloQueue).to(exchange).with("red.#");
}
*用来统配任意一个词#用来通配多个词
这里说的词是怎么解释的:在RabbitMQ 当中。每个词之间通过句号(.)来分割
red.* 可以统配 red.blue 不可以统配 red.blue.yellow red.# 上面两种情况都是可以通配的。
给 world 队列绑定规则
@Bean
public Binding bindingExchangeWorld(Queue worldQueue, TopicExchange exchange) {
return BindingBuilder.bind(worldQueue).to(exchange).with("blue.blue");
}
这个就和上面一样了。指定的键,必须是red.blue 才可以通过
修改生产者
简单的修改一下生产者生产的消息类型
String key = keys[random]+"."+keys[random];

this.rabbitTemplate.convertAndSend("mytopic",key,key);
开始测试
ReceiverB  : blue.blue
ReceiverA  : red.red
ReceiverA  : red.red
ReceiverB  : blue.blue
ReceiverB  : blue.blue
ReceiverA  : red.red
Headers Exchange 自定义规则
相较于上面两种类型。基本上来说,消息的rouding_key 都是一个固定的值,而 handers 则是一种自定义规则匹配
这种模式使用最少,很少用,这里只作为了解即可。
Fanout Exchange 订阅模式
订阅模式就是我们熟悉的广播模式,可能学过计算机基础的都知道,在局域网内通过ARP 获取目标地址的MAC 地址,就是用的是广播,把这个包广播出去,所有的队列都会收到。
只要绑定了订阅交换机的所有队列都会收到发过来的包。
创建订阅交换机
@Bean
public FanoutExchange exchange(){
return new FanoutExchange("myfanout");
}
这里还是按照传统的方式,new 创建出一个订阅类型交换机。
绑定交换机与队列
将Hello 队列绑定到订阅交换机
@Bean
public Binding bindingExchangeHello(Queue helloQueue, FanoutExchange exchange) {
return BindingBuilder.bind(helloQueue).to(exchange);
}
将World 队列绑定到订阅交换机
@Bean
public Binding bindingExchangeWorld(Queue worldQueue, FanoutExchange exchange) {
return BindingBuilder.bind(worldQueue).to(exchange);
}
这里就不需要设定什么规则了。经过这个交换机的包都会进行转发到所有的所有与之绑定的队列内。
开始测试
在消息生产者位置改变原来的交换机名称为myfanout
this.rabbitTemplate.convertAndSend("myfanout",key,key);
----------------
产生消息:
yellow.yellow
yellow.yellow
blue.blue

----------------
ReceiverB  : yellow.yellow
ReceiverA  : yellow.yellow
2020-03-06 09:59:59.286  INFO 15952 --- [       Thread-2]
ReceiverA  : yellow.yellow
ReceiverB  : yellow.yellow
ReceiverB  : blue.blue
ReceiverA  : blue.blue
........
我们可以发现,就算带了路由键rouding_key 只要经过订阅交换机,它就会把所有经过的消息转发的所有与自己绑定的队列里面。
我们现在的路由模式,可以用这张图来解释,只要是通过这个订阅交换机的,就算你带了路由键,我也不管,直接抛给所有队列。
切记:这里的所有队列是,必须与之绑定的才可以
小结
MQ 需要了解的东西还是很多的,这里就暂时说这么多,等遇到了再进行深度的学习,现在呢,就先学习这么多吧!
代码示例
原文出处:https://www.cnblogs.com/ChromeT/p/12425161.html

- SpringBoot整合RabbitMq后实现消息传输
- SpringBoot整合RabbitMQ(一)
- 实现简单秒杀抢购,使用SpringBoot整合Spring-data-redis 、 rabbitMQ消息队列、redis缓存
- SpringBoot 整合 RabbitMQ(包含三种消息确认机制以及消费端限流)
- Spring Boot整合RabbitMQ实例(Topic模式)
- Spring Boot教程(二)关于RabbitMQ服务器整合
- RabbitMQ学习:Spring Boot整合RabbitMQ(五)
- 第一次使用spring boot整合RabbitMQ
- spring-boot整合rabbitmq启动报错no queue 'dev_pms2invoi_queue' in vhost '/'
- Spring Boot整合RabbitMQ实例
- Spring Boot---(10)SpringBoot整合RabbitMQ
- RabbitMQ模式,RabbitMQ和springboot整合,RabbitMQ全链路消息不丢失解决
- spring boot实战(第十二篇)整合RabbitMQ
- springboot整合rabbitmq(Springboot2.X)
- SpringBoot整合消息服务(SpringBoot 整合 ActiveMQ、SpringBoot 整合 RabbitMQ、SpringBoot 整合 Kafka)
- RabbitMQ实战(一)Spring Boot 整合 RabbitMQ
- SpringBoot2.0应用(三):SpringBoot2.0整合RabbitMQ
- spring boot整合RabbitMQ(Direct模式)
- spring boot 2.x 系列 —— spring boot 整合 RabbitMQ
- spring boot整合rabbitmq