Spring Boot整合RabbitMQ实例(Topic模式)
1.Topic交换器介绍
Topic Exchange 转发消息主要是根据通配符。 在这种交换机下,队列和交换机的绑定会定义一种路由模式,那么,通配符就要在这种路由模式和路由键之间匹配后交换机才能转发消息。
在这种交换机模式下:
路由键必须是一串字符,用句号(.) 隔开,比如说 agreements.us,或者 agreements.eu.stockholm 等。
路由模式必须包含一个 星号(*),主要用于匹配路由键指定位置的一个单词,比如说,一个路由模式是这样子:agreements..b.*,那么就只能匹配路由键是这样子的:第一个单词是 agreements,第四个单词是 b。 井号(#)就表示相当于一个或者多个单词,例如一个匹配模式是agreements.eu.berlin.#,那么,以agreements.eu.berlin开头的路由键都是可以的。
具体代码发送的时候还是一样,第一个参数表示交换机,第二个参数表示routing key,第三个参数即消息。如下:
rabbitTemplate.convertAndSend("testTopicExchange","key1.a.c.key2", " this is RabbitMQ!");
topic 和 direct 类似, 只是匹配上支持了"模式", 在"点分"的 routing_key 形式中, 可以使用两个通配符:
*表示一个词.
#表示零个或多个词.
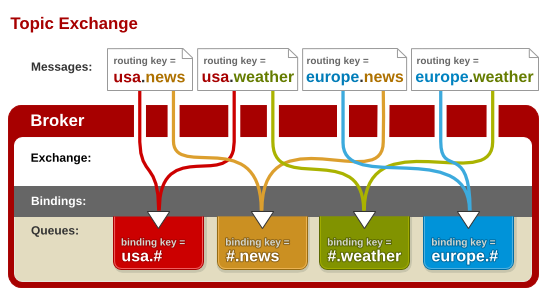
如上图所示:此类交换器使得来自不同的源头的消息可以到达一个对列,其实说的更明白一点就是模糊匹配的意思,例如:上图中红色对列的routekey为usa.#,#代表匹配任意字符,但是要想消息能到达此对列,usa.必须匹配后面的#好可以随意。图中usa.news,usa.weather都能找到红色队列,符号“#”匹配一个或多个词,符号“”匹配不多不少一个词。因此“usa.#”能够匹配到“usa.news.XXX”,但是“usa.” 只会匹配到“usa.XXX”。
注:交换器说到底是一个名称与队列绑定的列表。当消息发布到交换器时,实际上是由你所连接的信道,将消息路由键同交换器上绑定的列表进行比较,最后路由消息
2.示例代码
1).RabbitMQ的Topic的bean配置
RabbitTopic.java类:
package com.example.rabbitmqtopic;
import org.springframework.amqp.core.Binding;
import org.springframework.amqp.core.BindingBuilder;
import org.springframework.amqp.core.Queue;
import org.springframework.amqp.core.TopicExchange;
import org.springframework.context.annotation.Bean;
import org.springframework.context.annotation.Configuration;
@Configuration
public class RabbitTopic {
final static String message = "topic.message";
final static String messages = "topic.messages";
//创建队列
@Bean
public Queue queueMessage() {
return new Queue(RabbitTopic.message);
}
//创建队列
@Bean
public Queue queueMessages() {
return new Queue(RabbitTopic.messages);
}
//创建交换器
@Bean
TopicExchange exchange() {
return new TopicExchange("topicExchange");
}
  //对列绑定并关联到ROUTINGKEY
@Bean
Binding bindingExchangeMessage(Queue queueMessage, TopicExchange exchange) {
return BindingBuilder.bind(queueMessage).to(exchange).with("topic.message");
}
//对列绑定并关联到ROUTINGKEY
@Bean
Binding bindingExchangeMessages(Queue queueMessages, TopicExchange exchange) {
return BindingBuilder.bind(queueMessages).to(exchange).with("topic.#");//*表示一个词,#表示零个或多个词
  }
}
2).消息生产者生产消息
TopicSender.java类:
package com.example.rabbitmqtopic.rabbitmq;
import org.springframework.amqp.core.AmqpTemplate;
import org.springframework.beans.factory.annotation.Autowired;
import org.springframework.stereotype.Component;
@Component
public class TopicSender {
@Autowired
private AmqpTemplate rabbitTemplate;
public void send() {
String context = "hi, i am message all";
System.out.println("Sender : " + context);
this.rabbitTemplate.convertAndSend("topicExchange", "topic.1", context);
}
public void send1() {
String context = "hi, i am message 1";
System.out.println("Sender : " + context);
this.rabbitTemplate.convertAndSend("topicExchange", "topic.message", context);
}
public void send2() {
String context = "hi, i am messages 2";
System.out.println("Sender : " + context);
this.rabbitTemplate.convertAndSend("topicExchange", "topic.messages", context);
  }
}
3).消息消费者
TopicReceiver.java类:
package com.example.rabbitmqtopic.rabbitmq;
import org.springframework.amqp.rabbit.annotation.RabbitHandler;
import org.springframework.amqp.rabbit.annotation.RabbitListener;
import org.springframework.stereotype.Component;
@Component
@RabbitListener(queues = "topic.message")
public class TopicReceiver {
@RabbitHandler
public void process(String message) {
System.out.println("Topic Receiver1 : " + message);
}
}
TopicReceiver2.java类:
package com.example.rabbitmqtopic.rabbitmq;
import org.springframework.amqp.rabbit.annotation.RabbitHandler;
import org.springframework.amqp.rabbit.annotation.RabbitListener;
import org.springframework.stereotype.Component;
@Component
@RabbitListener(queues = "topic.messages")
public class TopicReceiver2 {
@RabbitHandler
public void process(String message) {
System.out.println("Topic Receiver2 : " + message);
}
}
4).测试
RabbitMQTopicTest.java类:
package com.example.rabbitmqtopic.rabbitmq;
import org.junit.Test;
import org.junit.runner.RunWith;
import org.springframework.beans.factory.annotation.Autowired;
import org.springframework.boot.test.context.SpringBootTest;
import org.springframework.test.context.junit4.SpringRunner;
@RunWith(SpringRunner.class)
@SpringBootTest
public class RabbitMQTopicTest {
@Autowired
private TopicSender sender;
@Test
public void topic() throws Exception {
sender.send();
}
@Test
public void topic1() throws Exception {
sender.send1();
}
@Test
public void topic2() throws Exception {
sender.send2();
}
}
以上所述是小编给大家介绍的Spring Boot整合RabbitMQ实例(Topic模式),希望对大家有所帮助,如果大家有任何疑问请给我留言,小编会及时回复大家的。在此也非常感谢大家对脚本之家网站的支持!
您可能感兴趣的文章:

- Spring Boot 整合 RabbitMQ 之 Topic转发模式 (二)
- spring boot整合RabbitMQ(Topic模式)
- spring boot整合RabbitMQ实例详解(Fanout模式)
- spring boot整合RabbitMQ(Topic模式)
- spring boot整合RabbitMQ(Direct模式)
- 利用Spring与ActiveMQ整合发送、接收消息实例(Queue与Topic模式)
- spring boot整合RabbitMQ(Fanout模式)
- spring整合activemq发送MQ消息[Topic模式]实例
- spring整合activemq发送MQ消息[Topic模式]实例,activemqmq
- Spring Boot整合RabbitMQ实例
- Spring Boot 整合 RabbitMQ 之 Fanout Exchange模式 (三)
- spring boot整合activeMQ,实现ptp和topic两者消息模式
- spring boot整合RabbitMQ(Direct模式)
- spring boot整合RabbitMQ(Fanout模式)
- spring boot整合RabbitMQ(Direct模式)
- SpringBoot的RabbitMQ消息队列: 三、第二模式"Work queues"
- SpringBoot非官方教程 | 第十五篇:Springboot整合RabbitMQ
- SpringBoot的RabbitMQ消息队列: 六、第五模式"Topics"
- 消息中间件-activemq实战整合Spring之Topic模式(五)
- 集群与负载均衡系列(5)——消息队列之spring-boot整合Rabbitmq