Android Studio实现简易计算器(表格布局TableLayout)
2020-03-31 12:05
816 查看
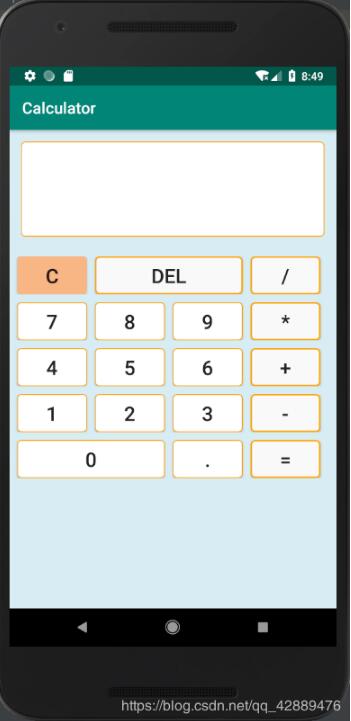
这是一个运用网格布局来做的简易计算器,可能没有那么美观,大家可以继续完善
首先先看看成果吧
首先先建一个新的Project Calculator
然后先编写颜色背景文件
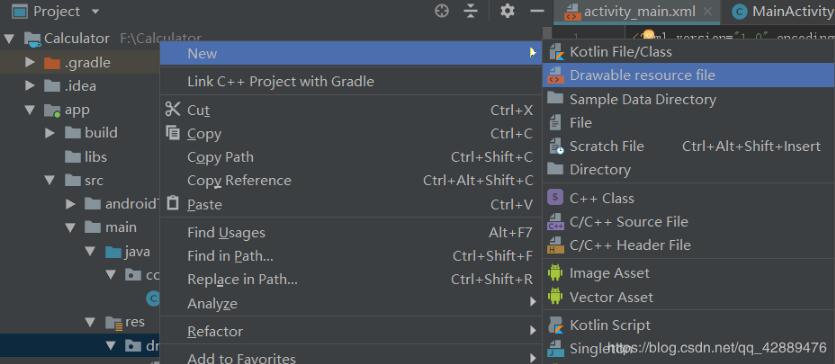
创建一个gray.xml,哪里创建呢?如图
在drawable下右击,选择new–Drawable resource file
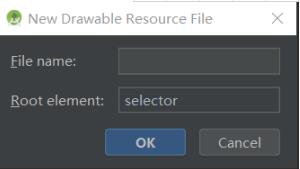
第一个是文件名字,第二个属性可以自己选择,我们这里前两个文件选择shape,第三个文件选selector,附上颜色背景代码
gray.xml
<?xml version="1.0" encoding="utf-8"?>
<shape xmlns:android="http://schemas.android.com/apk/res/android">

<corners android:radius="5dp"/>
<solid android:color="#f9f9f9"/>
<stroke
android:width="2dp"
android:color="#ffa600"/>
</shape>
orange.xml
<?xml version="1.0" encoding="utf-8"?>
<shape xmlns:android="http://schemas.android.com/apk/res/android">
<corners android:radius="5dp"/>  // 圆角
<solid android:color="#F7B684"/>  //颜色
</shape>
white.xml
<?xml version="1.0" encoding="utf-8"?>
<shape xmlns:android="http://schemas.android.com/apk/res/android">

<corners android:radius="5dp"/>
<solid android:color="#ffffff"/>
<stroke
android:width="1dp"
android:color="#ffa600"/>

</shape>
change.xml
<?xml version="1.0" encoding="utf-8"?>
<selector xmlns:android="http://schemas.android.com/apk/res/android">

<item android:drawable="@drawable/gray"/>  //默认颜色
<item android:drawable="@drawable/orange" android:state_pressed="true"/> //按下的改变的颜色
</selector>
这个是当你按下按键的时候按键会改变颜色
接下来就是布局文件了
activity_main.xml
我用的是表格布局,大家也可以用表格布局来写,效果会好一些
<?xml version="1.0" encoding="utf-8"?>
<TableLayout xmlns:android="http://schemas.android.com/apk/res/android"
android:layout_width="match_parent"
android:layout_height="match_parent"

android:background="#D8ECF3">

<TextView
android:gravity="bottom|right"
android:textSize="70dp"
android:singleLine="true"
android:layout_margin="15dp"
android:layout_width="match_parent"
android:layout_height="120dp"
android:background="@drawable/white"
android:id="@+id/textView"/>

<TableRow
android:layout_width="match_parent"
android:layout_height="match_parent"
android:layout_marginTop="10dp">

<Button
android:id="@+id/btn_clean"
android:layout_marginLeft="10dp"
android:background="@drawable/orange"
android:gravity="center"
android:text="C"
android:textSize="25sp" />

<Button
android:id="@+id/btn_del"
android:layout_marginLeft="10dp"
android:layout_span="2"
android:background="@drawable/gray"
android:gravity="center"
android:text="Del"
android:textSize="25sp" />

<Button
android:id="@+id/btn_divide"
android:layout_marginLeft="10dp"
android:layout_marginRight="10dp"
android:background="@drawable/gray"
android:gravity="center"
android:layout_span="1"
android:text="/"
android:textSize="25sp" />

</TableRow>

<TableRow
android:layout_width="match_parent"
android:layout_height="match_parent"
android:layout_marginTop="10dp">

<Button
android:id="@+id/btn_7"
android:layout_marginLeft="10dp"
android:background="@drawable/white"
android:gravity="center"
android:text="7"
android:textSize="25sp" />

<Button
android:id="@+id/btn_8"
android:layout_marginLeft="10dp"
android:background="@drawable/white"
android:gravity="center"
android:text="8"
android:textSize="25sp" />

<Button
android:id="@+id/btn_9"
android:layout_marginLeft="10dp"
android:background="@drawable/white"
android:gravity="center"
android:text="9"
android:textSize="25sp" />

<Button
android:id="@+id/btn_multiply"
android:layout_marginLeft="10dp"
android:layout_marginRight="10dp"
android:background="@drawable/gray"
android:gravity="center"
android:text="*"
android:textSize="25sp" />
</TableRow>

<TableRow
android:layout_width="match_parent"
android:layout_height="match_parent"
android:layout_marginTop="10dp">

<Button
android:id="@+id/btn_4"
android:layout_marginLeft="10dp"
android:background="@drawable/white"
android:gravity="center"
android:text="4"
android:textSize="25sp" />

<Button
android:id="@+id/btn_5"
android:layout_marginLeft="10dp"
android:background="@drawable/white"
android:gravity="center"
android:text="5"
android:textSize="25sp" />

<Button
android:id="@+id/btn_6"
android:layout_marginLeft="10dp"
android:background="@drawable/white"
android:gravity="center"
android:text="6"
android:textSize="25sp" />

<Button
android:id="@+id/btn_add"
android:layout_marginLeft="10dp"
android:layout_marginRight="10dp"
android:background="@drawable/gray"
android:gravity="center"
android:text="+"
android:textSize="25sp" />
</TableRow>

<TableRow
android:layout_width="match_parent"
android:layout_height="match_parent"
android:layout_marginTop="10dp">

<Button
android:id="@+id/btn_1"
android:layout_marginLeft="10dp"
android:background="@drawable/white"
android:gravity="center"
android:text="1"
android:textSize="25sp" />

<Button
android:id="@+id/btn_2"
android:layout_marginLeft="10dp"
android:background="@drawable/white"
android:gravity="center"
android:text="2"
android:textSize="25sp" />

<Button
android:id="@+id/btn_3"
android:layout_marginLeft="10dp"
android:background="@drawable/white"
android:gravity="center"
android:text="3"
android:textSize="25sp" />

<Button
android:id="@+id/btn_minus"
android:layout_marginLeft="10dp"
android:layout_marginRight="10dp"
android:background="@drawable/gray"
android:gravity="center"
android:text="-"
android:textSize="25sp" />

</TableRow>

<TableRow
android:layout_width="wrap_content"
android:layout_height="match_parent"
android:layout_marginTop="10dp">

<Button
android:id="@+id/btn_0"
android:layout_marginLeft="10dp"
android:layout_span="2"
android:background="@drawable/white"
android:gravity="center"
android:text="0"
android:textSize="25sp" />

<Button
android:id="@+id/btn_point"
android:layout_marginLeft="10dp"
android:layout_span="1"
android:background="@drawable/white"
android:gravity="center"
android:text="."
android:textSize="25sp" />

<Button
android:id="@+id/btn_equal"
android:layout_marginLeft="10dp"
android:layout_marginRight="10dp"
android:layout_span="1"
android:background="@drawable/gray"
android:gravity="center"
android:text="="
android:textSize="25sp" />

</TableRow>

</TableLayout>
接下来就是MainActivity.java
package com.example.calculator;

import android.support.v7.app.AppCompatActivity;
import android.os.Bundle;
import android.view.View;
import android.widget.Button;
import android.widget.TextView;

public class MainActivity extends AppCompatActivity implements View.OnClickListener {

Button btn_clean,btn_del,btn_divide,btn_0,btn_1,btn_2,btn_3,btn_4,btn_5,btn_6,btn_7,btn_8,btn_9,
btn_multiply,btn_add,btn_minus,btn_point,btn_equal;
TextView textView;
boolean clear_flag;   //清空标识
@Override
protected void onCreate(Bundle savedInstanceState) {
super.onCreate (savedInstanceState);
setContentView (R.layout.activity_main);
btn_0 = findViewById(R.id.btn_0); //初始化
btn_1 = findViewById(R.id.btn_1);
btn_2 = findViewById(R.id.btn_2);
btn_3 = findViewById(R.id.btn_3);
btn_4 = findViewById(R.id.btn_4);
btn_5 = findViewById(R.id.btn_5);
btn_6 = findViewById(R.id.btn_6);
btn_7 = findViewById(R.id.btn_7);
btn_8 = findViewById(R.id.btn_8);
btn_9 = findViewById(R.id.btn_9);
btn_multiply = findViewById(R.id.btn_multiply);
btn_divide = findViewById(R.id.btn_divide);
btn_add = findViewById(R.id.btn_add);
btn_minus = findViewById(R.id.btn_minus);
btn_point = findViewById(R.id.btn_point);
btn_del =findViewById(R.id.btn_del);
btn_equal = findViewById(R.id.btn_equal);
btn_clean = findViewById(R.id.btn_clean);

textView = findViewById(R.id.textView);

btn_0.setOnClickListener(this);  //设置按钮的点击事件
btn_1.setOnClickListener(this);
btn_2.setOnClickListener(this);
btn_3.setOnClickListener(this);
btn_4.setOnClickListener(this);
btn_5.setOnClickListener(this);
btn_6.setOnClickListener(this);
btn_7.setOnClickListener(this);
btn_8.setOnClickListener(this);
btn_9.setOnClickListener(this);
btn_minus.setOnClickListener(this);
btn_multiply.setOnClickListener(this);
btn_del.setOnClickListener(this);
btn_divide.setOnClickListener(this);
btn_point.setOnClickListener(this);
btn_add.setOnClickListener(this);
btn_equal.setOnClickListener(this);
btn_clean.setOnClickListener(this);
}

public void onClick(View v) {
String str = textView.getText().toString();
switch(v.getId ()){
case R.id.btn_0:
case R.id.btn_1:
case R.id.btn_2:
case R.id.btn_3:
case R.id.btn_4:
case R.id.btn_5:
case R.id.btn_6:
case R.id.btn_7:
case R.id.btn_8:
case R.id.btn_9:
case R.id.btn_point:
if(clear_flag){
clear_flag=false;
str="";
textView.setText ("");
}
textView.setText(str+((Button)v).getText ());
break;

case R.id.btn_add:
case R.id.btn_minus:
case R.id.btn_multiply:
case R.id.btn_divide:
if(clear_flag){
clear_flag=false;
textView.setText("");
}
textView.setText(str+" "+((Button)v).getText()+" ");
break;
case R.id.btn_del:
if(clear_flag){
clear_flag=false;
textView.setText ("");
}else if (str != null && !str.equals ("")){
textView.setText(str.substring(0,str.length()-1)); //删除一个字符
}
break;
case R.id.btn_clean:
clear_flag=false;
str = "";
textView.setText(""); //清空文本内容
break;
case R.id.btn_equal:
getResult();  //获取结果
break;
}
}

private void getResult() {    //算法
String s = textView.getText().toString();
if(s == null || s.equals ("")){
return;
}
if (!s.contains ("")){
return;
}
if (clear_flag){
clear_flag=false;
return;
}
clear_flag=true;

String str1 = s.substring(0,s.indexOf(" "));   // 获取到运算符前面的字符
String str_y = s.substring(s.indexOf(" ")+1,s.indexOf(" ")+2); //获取到运算符
String str2 = s.substring(s.indexOf(" ")+ 3);   //获取到运算符后面的字符

double result = 0;
if (!str1.equals ("") && !str2.equals ("")){
double num1 = Double.parseDouble(str1); //将str1、str2强制转化为double类型
double num2 = Double.parseDouble(str2);

if (str_y.equals ("+")){
result = num1 + num2;
}else if (str_y.equals ("-")){
result = num1 - num2;
}else if (str_y.equals ("÷")){
if (num2 == 0){
result = 0;
}else {
result = num1/num2;
}
}else if (str_y.equals ("*")){
result = num1*num2;
}
if (!str1.contains (".") && !str2.contains (".") && !s.equals ("÷")){
int k = (int) result;  //强制转换
textView.setText (k);
}else{
textView.setText (result+"");
}
}else if (!str1.equals ("") && str2.equals ("")){
textView.setText (s);
}else if (str1.equals ("") && !str2.equals ("")){
double num2 = Double.parseDouble(str2);
if (s.equals ("+")){
result = 0 + num2;
}else if (s.equals("-")){
result = 0 - num2;
}else if (s.equals("×")){
result = 0;
}else if (s.equals("÷")){
result = 0;
}
if (!str2.contains (".")) {
int r = (int) result;
textView.setText (r + "");
} else {
textView.setText (result + "");
}
} else {
textView.setText ("");
}
}
}
这里的算法可能写的没有那么好,大家可以网上找找其他案例参照一下,继续完善算法
更多计算器功能实现,请点击专题: 计算器功能汇总 进行学习
以上就是本文的全部内容,希望对大家的学习有所帮助
您可能感兴趣的文章:

相关文章推荐
- Android表格布局TableLayout简单实现(Java动态添加,设置边框,删除数据(单行,多行))
- IOS不用AutoLayout也能实现自动布局的类(4)----MyTableLayout表格布局
- 表格布局TableLayout ——实现商品浏览页面
- Android实现计算器布局(四种布局方式)之TableLayout表格布局
- Android布局之表格布局TableLayout详解
- TableLayout表格布局
- android:TableLayout表格布局详解
- Android TableLayout(表格布局) 使用介绍
- table-layout: fixed 实现表格列宽可控制
- 学习笔记:iOS布局库—MyLayout库之表格布局MyTableLayout
- Android 布局详解 -三表格布局(TableLayout)以及重要属性
- 详解Android TableLayout表格布局
- android:TableLayout表格布局详解
- TableLayout 表格布局管理器
- (三)Android布局之表格布局(TableLayout)
- android:TableLayout表格布局详解
- TableLayout表格布局详解
- (转)【Android】界面布局之TableLayout(表格布局)
- 五布局之表格布局TableLayout
- android中利用tablelayout实现表格效果