Appium+Pytest+Allure集成PO项目管理模式实现自动化测试
Appium+Pytest+Allure集成PO项目管理模式实现自动化测试
环境配置
前提条件: Java+Android SDK+ADB+Python
Appium环境配置
- Appium配置:
Appium客户端下载地址:http://appium.io/
运⾏appium-desktop-Setup-1.2.7.exe,默认安装即可
启动客户端,按图⽚步骤 1 -> 2 -> 3 -> 4 设置

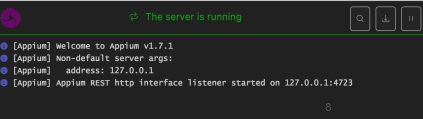
启动成功展示如下图
Pytest环境配置
- Pytest配置:
cmd输入pip3 install pytest==3.8.0下载pytest包
2.常用插件配置
下载pytest自带测试报告插件
cmd输入 pip3 install pytest-html下载pytest控制函数执行顺序插件
cmd输入 pip3 install pytest-ordering下载pytest失败重试插件
cmd输入 pip3 install pytest-rerunfailures==3.0
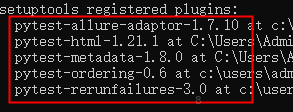
3.cmd输入python --version检测pytest版本是否安装成功
如下图
Allure环境配置
1.allure与pytest集成是在pytest中用一个插件
pip3 install pytest-allure-adaptor 用于生成XML测试报告
如果上面的包报错就删除上面的包使用下面这个
allure-pytest 2.6.1
2.allure环境变量的配置
1.解压allure2.6.0.zip到英⽂路径
2.进⼊步骤1的bin⽬录 :复制当前bin⽬录的路径 假设为X
3.进⼊电脑的环境变量,path系统环境变量,追加步骤2bin⽬录的路径
4.如果你的电脑已经打开了dos命令,那么关闭后,在启动dos命令,输⼊allure 回⻋
使用与集成
Appium使用
1.连接设备必要代码
# server 启动参数
desired_caps = {}
desired_caps['platformName'] = 'Android'
desired_caps['platformVersion'] = '5.1'
desired_caps['deviceName'] = '192.168.56.101:5555'
desired_caps['appPackage'] = 'com.android.settings'
desired_caps['appActivity'] = '.Settings'
# 声明driver对象
driver = webdriver.Remote('http://127.0.0.1:4723/wd/hub', desired_caps)
2.Appium元素API
| 元素API | 语法 | 使用方法 |
|---|---|---|
| id定位 | find_element_by_id(id_value) | driver.find_element_by_id(“com.android.settings:id/search”).click() |
| class定位 | find_element_by_class_name(class_value) | driver.find_element_by_class_name(‘android.widget.ImageButton’).click() |
| Xpath定位 | find_element_by_xpath(xpath_value) | driver.find_element_by_xpath("//*[contains(@text,‘WLA’)]").click() |
Xpath常用属性定位
1. id ://[contains(@resource-id,‘com.android.settings:id/search’)]
2. class : //[contains(@class,‘android.widget.ImageButton’)]
3. text : //*[contains(@text,‘WLA’)]
| API | 语法 | 使用方法 |
|---|---|---|
| swip滑动 | wipe(start_x, start_y, end_x, end_y, duration=None) | driver.swipe(188,659,148,248) |
| scroll滑动事件scroll | (origin_el, destination_el) | driver.scroll(el1,el2) |
| drag拖拽事件 | drag_and_drop(origin_el, destination_el) | driver.drag_and_drop(el1,el2) |
| 应⽤置于后台事件 | background_app(seconds) | driver.background_app(5) |
Pytest使用
1.代码示例
import pytest
class Test_ABC:
def setup_class(self):#类级优先执行
print("------->setup_class")
def teardown_class(self):#类级最后执行
print("------->teardown_class")
def setup(self):#函数级级优先执行
print("------->setup")
def teardown(self):#函数级最后执行
print("------->teardown")
@pytest.mark.run(order=1)#第一个执行的用例
def test_a(self):
print("------->test_a")
assert 1
@pytest.mark.run(order=2)#第二个执行的用例
def test_b(self):
print("------->test_b")
assert 0
#执行顺序
#setup_class()-->setup()-->test_a()-->test_b()-->teardown()-->teardown_class()
if __name__ == '__main__':
pytest.main("-s test_ABC.py")
2.打印日志
E:\Study\Python\Appium\Appium_Pytest_Allure>pytest f.py
============================= test session starts =============================
platform win32 -- Python 3.6.8, pytest-3.8.0, py-1.8.0, pluggy-0.12.0
rootdir: E:\Study\Python\Appium\Appium_Pytest_Allure, inifile:
plugins: allure-adaptor-1.7.10, html-1.21.1, metadata-1.8.0, ordering-0.6, rerunfailures-3.0
collected 2 items

f.py ..                                                                  [100%]

========================== 2 passed in 0.05 seconds ===========================
3.Pytest配置文件
[pytest]
# command line
addopts = -s --reruns 2 --alluredir report
# search path
testpaths = ./Script
# search file
python_files = Test*
# search classes
python_classes = Test*
# search function
python_functions = test*
Allure使用
1.在ini配置文件中加入报告
addopts = --alluredir report
2.执行完用例后执行生成html报告
控制台或cmd输入allure generate ./report -o ./html
3.在报告中添加测试步骤
@allure.step(title=“测试步骤名称”) # 标记于测试⽅法上⽅
4.allure添加步骤具体描述信息
allure.attach(“标题”, “具体描述内容”) # 标题是⽣成txt⽂件, txt⽂件内写⼊具体描述内容
5.allure添加测试⽤例严重级别
@pytest.allure.severity(severity)
#severity
1.pytest.allure.severity_level.BLOCKER # 最严重
2.pytest.allure.severity_level.CRITICAL # 相对严重
3.pytest.allure.severity_level.NORMAL # ⼀般的问题
4.pytest.allure.severity_level.MINOR # 较⼩的问题
5.pytest.allure.severity_level.TRIVIAL # 可以忽略的问题
6.allure添加测试截图
allure.attach(“图⽚名字”, “读取图⽚数据”, “指定图⽚类型”)
将⼀张png图⽚添加到测试报告:
with open(“图⽚路径”, “rb”) as f:
allure.attach(“截图”, f.read(), allure.attach_type.PNG)
7.allure覆盖已⽣成测试报告
allure generate 报告⽂件夹 -o ./html --clean
–clean: 覆盖已⽣成的html报告
PO项目管理模式
1.整理思路


2.项目结构
App_Project # 项⽬名称
Basic# 存储基础设施类
------->init.py # 空⽂件
------->Init_Driver.py # ⼿机驱动对象初始化
------->Base.py # ⽅法的⼆次封装
------->read_data.py #数据解析读取⽅法
Page # 存储封装⻚⾯⽂件
------->init.py # 存储⻚⾯元素
------->earch_page.py # 封装⻚⾯元素的操作⽅法
Data # 存储数据⽂件
------->search_data.yaml(也可以是其他⽂件⽐如txt,excel,json,数据库等)
Test # 存储测试脚本⽬录
------->test_search.py # 测试搜索⽂件
Inint_Dritver.py
def	init_driver():
#服务端启动参数
desired_caps={}
##	⼿机系统信息
desired_caps['platformName']='Android'
desired_caps['platformVersion']='9'
##设备号
desired_caps['deviceName']='19021'
##包名
desired_caps['appPackage']='com.android.settings'
##启动名
desired_caps['appActivity']='.SettingsActivity'

desired_caps['noReset']=True
##允许输⼊中⽂
# desired_caps['unicodeKeyboard']=True
# desired_caps['resetKeyboard']=True
##⼿机驱动对象
driver=webdriver.Remote("http://127.0.0.1:4723/wd/hub",desired_caps)
return driver
Base.py
from selenium.webdriver.support.wait import WebDriverWait

class Base(object):
def __init__(self,driver):
self.driver=driver

def find_element(self,loc,timeout=1):
print('第二步')
return WebDriverWait(self.driver,timeout).until(lambda x: x.find_element(*loc))

def click_element(self,loc):
self.find_element(loc).click()

def input_text(self,loc,text):
self.fm=self.find_element(loc)
self.fm.clear()
self.fm.send_keys(text)
search_page.py
import time

from Basic.Base import Base
import Page

class Search_Page(Base):
def __init__(self,driver):
Base.__init__(self,driver)

def input_search_text(self):
self.click_element(Page.search_button)  # 传⼊的__init__.py⽂件声明的search_button
test_search.py
from Page.search_page import Search_Page
from Basic.Init_Driver import init_driver
import time
class Test_Base:
def __init__(self):
self.driver=init_driver()
def test(self):
time.sleep(2)
sp=Search_Page(self.driver)
time.sleep(1)
sp.input_search_text()
print('第四步')

# self.driver.quit()
- 点赞 2
- 收藏
- 分享
- 文章举报
 你家可爱的小锋锋
发布了1 篇原创文章 · 获赞 2 · 访问量 169
私信
关注
你家可爱的小锋锋
发布了1 篇原创文章 · 获赞 2 · 访问量 169
私信
关注

- appium+pytest+allure+jenkins 如何实现多台手机连接
- 持续集成-Jenkins+robot framework+Appium实现在单台电脑上管理不同安卓终端运行不同测试用例
- 走火入魔权限管理系统、插件模式集成的实现参考
- 为企业实现集成项目管理平台
- [Android测试] AS+Appium+Java+Win 自动化测试之九:PO模式的实例与ReportNg测试报告
- Spring项目集成ShiroFilter简单实现权限管理
- pytest+allure+jenkins持续集成
- Appium+Pytest实现app并发测试
- Spring项目集成ShiroFilter简单实现权限管理
- 项目管理大法归档 - 思维导图、原型工具、接口测试、设计模式、版本管理、单元测试、持续集成、代码审查、Bug 跟踪
- 项目管理集成工具Apache Maven 2.0.3 发布
- 信息系统集成项目管理培训方案
- 项目管理手记(八) SaaS模式的DRP系统是否适用?
- 标准功能模块组件 -- “文档管理组件,网络文档管理,网络存储”,B\S版本组件可独立运行,也可集成到其他项目里,数据结构清晰思路严谨
- SCRUM模式项目管理在VS2010上的最佳实践LiveMeeting
- 凤凰公司CRM-ERP集成项目业务模式分析
- 集成项目管理工具终于要完成了
- 项目管理手记(八) SaaS模式的DRP系统是否适用?
- 系统集成项目整体管理
- Windows Mobile Test Framework实现手机软件自动化测试的介绍