赌十包辣条,你一定没见过这么通透的ThreadLocal讲解
不好意思,这次做个标题党,因为写这篇文章真的费了不少精力和心思,不希望随随便便被忽略,希望真的能帮到有需要的朋友!
如果转载请声明,转自【https://www.cnblogs.com/andy-songwei/p/12040372.html】,谢谢!
本文的主要内容为:
//=========源码5.3========
static class ThreadLocalMap {

static class Entry extends WeakReference<ThreadLocal<?>> {
/** The value associated with this ThreadLocal. */
Object value;

Entry(ThreadLocal<?> k, Object v) {
super(k);
value = v;
}
}

/**
* The initial capacity -- MUST be a power of two.
*/
private static final int INITIAL_CAPACITY = 16;

/**
* The table, resized as necessary.
* table.length MUST always be a power of two.
*/
private Entry[] table;

/**
* The number of entries in the table.
*/
private int size = 0;

/**
* The next size value at which to resize.
*/
private int threshold; // Default to 0

/**
* Set the resize threshold to maintain at worst a 2/3 load factor.
*/
private void setThreshold(int len) {
threshold = len * 2 / 3;
}

ThreadLocalMap(ThreadLocal<?> firstKey, Object firstValue) {
table = new Entry[INITIAL_CAPACITY];
int i = firstKey.threadLocalHashCode & (INITIAL_CAPACITY - 1);
table[i] = new Entry(firstKey, firstValue);
size = 1;
setThreshold(INITIAL_CAPACITY);
}

/**
* Get the entry associated with key.
* ......
*/
private Entry getEntry(ThreadLocal<?> key) {
int i = key.threadLocalHashCode & (table.length - 1);
Entry e = table[i];
if (e != null && e.get() == key)
return e;
else
return getEntryAfterMiss(key, i, e);
}

/**
* Set the value associated with key.
* ......
*/
private void set(ThreadLocal<?> key, Object value) {

// We don't use a fast path as with get() because it is at
// least as common to use set() to create new entries as
// it is to replace existing ones, in which case, a fast
// path would fail more often than not.

Entry[] tab = table;
int len = tab.length;
int i = key.threadLocalHashCode & (len-1);

for (Entry e = tab[i];
e != null;
e = tab[i = nextIndex(i, len)]) {
ThreadLocal<?> k = e.get();

if (k == key) {
e.value = value;
return;
}

if (k == null) {
replaceStaleEntry(key, value, i);
return;
}
}

tab[i] = new Entry(key, value);
int sz = ++size;
if (!cleanSomeSlots(i, sz) && sz >= threshold)
rehash();
}

/**
* Remove the entry for key.
*/
private void remove(ThreadLocal<?> key) {
Entry[] tab = table;
int len = tab.length;
int i = key.threadLocalHashCode & (len-1);
for (Entry e = tab[i];
e != null;
e = tab[i = nextIndex(i, len)]) {
if (e.get() == key) {
e.clear();
expungeStaleEntry(i);
return;
}
}
}

/**
* Double the capacity of the table.
*/
private void resize() {
......
}
}
View Code
这里面维护了一个Entry[] table数组,初始容量为16,当数据超过当前容量的2/3时,就开始扩容,容量增大一倍。每一个Entry的K为ThreadLocal对象,V为要存储的值。每一个Entry在数组中的位置,是根据其K(即ThreadLocal对象)的hashCode & (len - 1)来确定,如第44行所示,这里K的hashCode是系统给出的一个算法计算得到的。如果碰到K的hashCode值相同,即hash碰撞的场景,会采用尾插法形成链表。当对这个map进行set,get,remove操作的时候,也是通过K的hashCode来确定该Entry在table中的位置的,采用hashCode来查找数据,效率比较高。这也是HashMap底层实现的基本原理,如果研究过HashMap源码,这段代码就应该比较容易理解了。
继续看源码5.1,第一次调用的时候,显然map应该是null,就要执行第8行createMap了,
//==========ThreadLocal=========源码5.4
void createMap(Thread t, T firstValue) {
t.threadLocals = new ThreadLocalMap(this, firstValue);
}
结合ThreadLocalMap源码第41行的构造方法,就清楚了这个方法创建了一个ThreadLocalMap对象,并存储了一个Entry<当前的ThreadLocal对象,value>。此时,在当前的线程下拥有了一个ThreadLocalMap,这个ThreadLocalMap中维护了一个容量为16的table,table中存储了一个以当前的ThreadLocal对象为K,value值为V的Entry。Thread、ThreadLocalMap、ThreadLocal、Entry之间的关系可以表示为下图:
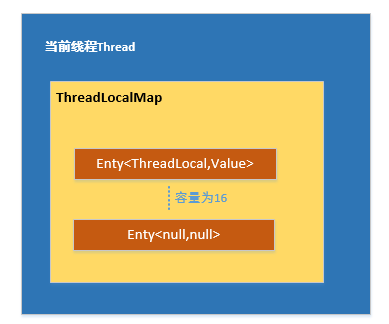
图5.1
而如果当前Thread的map已经存在了,源码5.1就会执行第6行了,进而执行ThreadLocalMap中的set方法。结合前面对ThreadLocalMap的介绍,想必这个set方法也容易理解了,大致过程是:
1)根据Thread找到map;
2)通过传入的this(即ThreadLocal对象),得到hashCode;
3)根据hashCode & (len - 1)确定对应Entry在table中的位置;
4)如果该Entry存在,则替换Value,否则新建(ThreadLocalMap源码第78~92行表示在具有相同hashCode的Entry链表上找到对应的Entry,这和hash碰撞有关)。
在调用ThreadLocal的get方法时又做了什么呢?看看其源码:
//=========ThreadLocal======源码5.5
public T get() {
Thread t = Thread.currentThread();
ThreadLocalMap map = getMap(t);
if (map != null) {
ThreadLocalMap.Entry e = map.getEntry(this);
if (e != null) {
@SuppressWarnings("unchecked")
T result = (T)e.value;
return result;
}
}
return setInitialValue();
}
现在,第12行及以前的代码应该很容易理解了,结合ThreadLocalMap中的get源码,我们再梳理一下:
1)根据Thread找到自己的map;
2)在map中通过this(即ThreadLocal对象)得到hashCode;
3)通过hashCode & (len-1)找到对应Entry在table中的位置;
4)返回Entry的value。
而如果map为null,或者在map中找到的Entry为null,那么就执行第20行了。
//==========ThreadLocal========源码5.6
private T setInitialValue() {
T value = initialValue();
Thread t = Thread.currentThread();
ThreadLocalMap map = getMap(t);
if (map != null)
map.set(this, value);
else
createMap(t, value);
return value;
}

protected T initialValue() {
return null;
}
第13行的initialValue()方法,前面介绍过,可以让子类重写,即给ThreadLocal指定初始值;如果没有重写,那返回值就是null。第4~9行前面也介绍过了,使用或者创建map来存入该值。
最后还一个remove()方法
//======ThreadLocal======
public void remove() {
ThreadLocalMap m = getMap(Thread.currentThread());
if (m != null)
m.remove(this);
}
结合ThrealLocalMap中的remove方法,完成对ThreadLocal值的删除。其大致流程为:
1)根据当前Thread找到其map;
2)根据ThreadLocal对象得到hashCode;
3)通过hashCode & (len -1)找到在table中的位置;
4)在table中查找对应的Entry,如果存在则删除。
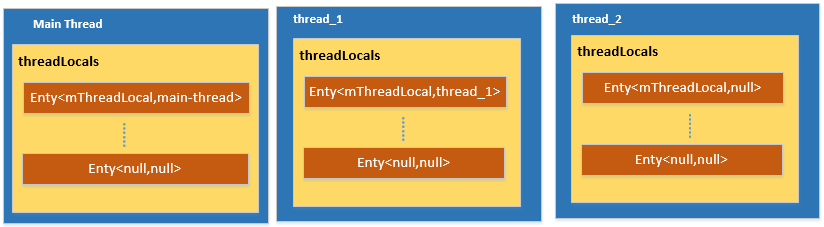
总结:通过对提供的4个接口方法的分析,我们应该就能清楚了,ThreadLocal之所以能够为每一个线程维护一个副本,是因为每个线程都拥有一个map,这个map就是每个线程的专属空间。也就是存在下面的关系图(不用怀疑,该图和图5.1相比,只是少了容量大小):
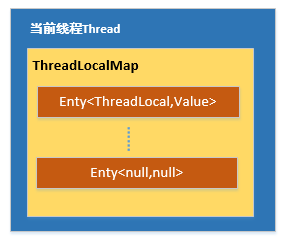
结合这一节对ThreadLocal机制的介绍,实例3.1执行后的就存在如下的数据结构了:
6、ThreadLocal在Looper中的使用
ThreadLocal在系统源码中有很多地方使用,最典型的地方就是Handler的Looper中了。这里结合Looper中的源码,来了解一下ThreadLocal在系统源码中的使用。
我们知道,在一个App进程启动的时候,会在ActiivtyThread类的main方法,也就是App的入口方法中,会为主线程准备一个Looper,如下代码所示:
//======ActivityTread======源码6.1
public static void main(String[] args) {
......
Looper.prepareMainLooper();
......
}
而在子线程中实例Handler的时候,总是需要显示调用Looper.prepare()方法来为当前线程生成一个Looper对象,以及通过Looper.myLooper()来得到自己线程的Looper来传递给Handler。
Looper中相关的关键源码如下:
//==========Looper========源码6.2

// sThreadLocal.get() will return null unless you've called prepare().
static final ThreadLocal<Looper> sThreadLocal = new ThreadLocal<Looper>();
private static Looper sMainLooper;

/**
* Initialize the current thread as a looper, marking it as an
* application's main looper. The main looper for your application
* is created by the Android environment, so you should never need
* to call this function yourself.  See also: {@link #prepare()}
*/
public static void prepareMainLooper() {
prepare(false);
synchronized (Looper.class) {
if (sMainLooper != null) {
throw new IllegalStateException("The main Looper has already been prepared.");
}
sMainLooper = myLooper();
}
}

/**
* Return the Looper object associated with the current thread.  Returns
* null if the calling thread is not associated with a Looper.
*/
public static @Nullable Looper myLooper() {
return sThreadLocal.get();
}

/** Initialize the current thread as a looper.
* ......
*/
public static void prepare() {
prepare(true);
}
private static void prepare(boolean quitAllowed) {
if (sThreadLocal.get() != null) {
throw new RuntimeException("Only one Looper may be created per thread");
}
sThreadLocal.set(new Looper(quitAllowed));
}

/**
* Returns the application's main looper, which lives in the main thread of the application.
*/
public static Looper getMainLooper() {
synchronized (Looper.class) {
return sMainLooper;
}
}
我们可以看到不少ThreadLocal的影子,Looper也正是通过ThreadLocal来为每个线程维护一份Looper实例的。通过我们前文的介绍,这里应该能够轻而易举理解其中的运作机制了吧,这里就再不啰嗦了。
7、实践是检验真理的唯一标准
前面介绍了ThreadLocal提供的四个接口,以及详细讲解了它的工作原理。现在我们将实例3.1做一些修改,将各个接口的功能都包含进来,并稍微增加一点复杂度,如果能够看懂这个实例,就算是真的理解ThreadLocal了。
//=========实例7.1=======
private ThreadLocal<String> mStrThreadLocal = new ThreadLocal<String>() {
@Override
protected String initialValue() {
Log.i("threadlocaldemo", "initialValue");
return "initName";
}
};
private ThreadLocal<Long> mLongThreadLocal = new ThreadLocal<>();
private void testThreadLocal() throws InterruptedException {
mStrThreadLocal.set("main-thread");
mLongThreadLocal.set(Thread.currentThread().getId());
Log.i("threadlocaldemo", "result-1:name=" + mStrThreadLocal.get() + ";id=" + mLongThreadLocal.get());
Thread thread_1 = new Thread() {
@Override
public void run() {
super.run();
mStrThreadLocal.set("thread_1");
mLongThreadLocal.set(Thread.currentThread().getId());
Log.i("threadlocaldemo", "result-2:name=" + mStrThreadLocal.get() + ";id=" + mLongThreadLocal.get());
}
};
thread_1.start();
//该句表示thread_1执行完后才会继续执行
thread_1.join();
Thread thread_2 = new Thread() {
@Override
public void run() {
super.run();
Log.i("threadlocaldemo", "result-3:name=" + mStrThreadLocal.get() + ";id=" + mLongThreadLocal.get());
}
};
thread_2.start();
//该句表示thread_2执行完后才会继续执行
thread_2.join();
mStrThreadLocal.remove();
Log.i("threadlocaldemo", "result-4:name=" + mStrThreadLocal.get() + ";id=" + mLongThreadLocal.get());
}
在主线程中运行该方法,执行结果为:
12-14 16:25:40.662 4844-4844/com.example.demos I/threadlocaldemo: result-1:name=main-thread;id=2
12-14 16:25:40.668 4844-5351/com.example.demos I/threadlocaldemo: result-2:name=thread_1;id=926
12-14 16:25:40.669 4844-5353/com.example.demos I/threadlocaldemo: initialValue
12-14 16:25:40.669 4844-5353/com.example.demos I/threadlocaldemo: result-3:name=initName;id=null
12-14 16:25:40.669 4844-4844/com.example.demos I/threadlocaldemo: initialValue
12-14 16:25:40.669 4844-4844/com.example.demos I/threadlocaldemo: result-4:name=initName;id=2
此时存在的数据结构为:
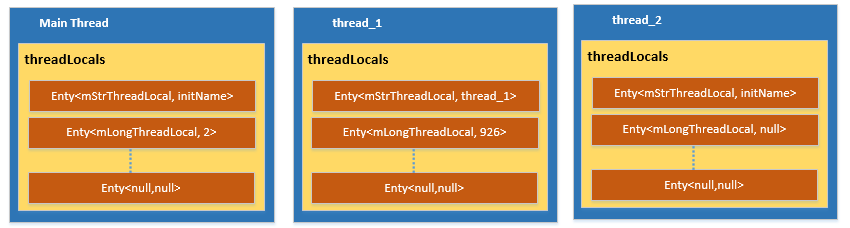
对于这份log和数据结构图,这里就不再一一讲解了,如果前面都看懂了,这些都是小菜一碟。
结语
对ThreadLocal的讲解这里就结束了,能读到这里,也足以说明你是人才,一定前途无量,祝你好运,早日走上人生巅峰!
由于经验和水平有限,有描述不当或不准确的地方,还请不吝赐教,谢谢!

- 你一定没见过这么有意思的电路板
- 通通透透理解ThreadLocal
- 通通透透理解ThreadLocal,实现安全的多线程
- 以前搞Delphi就没见过这么强大的用户权限系统,学C#才一个月,通用权限管理系统组件源码工具很强
- ThreadLocal类讲解及实例
- 通透讲解缓冲区溢出
- KMP算法-一个视频讲解很好的 很流畅 很详细 一定有益
- 面试|再次讲解Threadlocal使用及其内存溢出
- 面试官这么表现就有戏?不一定哦!
- 见过丑的,没见过这么丑的
- 以前搞Delphi就没见过这么强大的用户权限系统,学C#才一个月,通用权限管理系统组件源码工具很强
- Python最全内置函数合集!你应该没有见过这么全的函数以及解析
- ThreadLocal讲解
- 这么详细的分类 VB/VB.NET源代码网站你见过没有? VB/VB.NET中的每一个方法,每一个操作,每一个函数,每一个类.每一个属性,每一个事件都有相应的范例代码
- 见过不要脸的,没见过这么不要脸的。
- 转载[通透讲解缓冲区溢出]
- 见过的最清晰的讲解最大流思路的文章
- 通通透透理解ThreadLocal
- 见过贪婪的,没见过这么贪婪的
- 我见过最通俗易懂的快速排序过程讲解,转自《坐在马桶上看算法:快速排序》