Elasticsearch 6.8.3集群搭建
2019-09-26 10:52
1281 查看
1.下载安装包
wget https://artifacts.elastic.co/downloads/elasticsearch/elasticsearch-6.8.3.tar.gz
下载后,解压.
我解压的地址是:/usr/local/elasticsearch6.8.3
2.创建用户
- es不能以root用户运行,所以需要创建用户
adduser elastic #创建elastic用户
- 在es的安装目录下创建esdata
cd /usr/local/elasticsearch6.8.3
mkdir -p  esdata/data
mkdir -p  esdata/log
- 赋予elastic用户权限
chown -R elastic elasticsearch6.8.3
3.配置es节点
- 修改配置文件
vi /usr/local/elasticsearch6.8.3/config/elasticsearch.yml
- 具体配置如下
# ======================== Elasticsearch Configuration =========================
#
# NOTE: Elasticsearch comes with reasonable defaults for most settings.
#       Before you set out to tweak and tune the configuration, make sure you
#       understand what are you trying to accomplish and the consequences.
#
# The primary way of configuring a node is via this file. This template lists
# the most important settings you may want to configure for a production cluster.
#
# Please consult the documentation for further information on configuration options:
# https://www.elastic.co/guide/en/elasticsearch/reference/index.html
#
# ---------------------------------- Cluster -----------------------------------
#
# Use a descriptive name for your cluster:
#
cluster.name: htkj-es #集群的名称
#
# ------------------------------------ Node ------------------------------------
#
# Use a descriptive name for the node:
#
node.name: htkj101 #节点的名称
#
# Add custom attributes to the node:
#
#node.attr.rack: r1
#
# ----------------------------------- Paths ------------------------------------
#
# Path to directory where to store the data (separate multiple locations by comma):
#
path.data: /usr/local/elasticsearch6.8.3/esdata/data #data的路径
#
# Path to log files:
#
path.logs: /usr/local/elasticsearch6.8.3/esdata/log  #log的路径
#
# ----------------------------------- Memory -----------------------------------
#
# Lock the memory on startup:
#
bootstrap.memory_lock: true #ES在内存交换时性能很差,设置这个可以防止内存交换
#
# Make sure that the heap size is set to about half the memory available
# on the system and that the owner of the process is allowed to use this
# limit.
#
# Elasticsearch performs poorly when the system is swapping the memory.
#
# ---------------------------------- Network -----------------------------------
#
# Set the bind address to a specific IP (IPv4 or IPv6):
#
network.host: htkj101 #节点的ip地址
#
# Set a custom port for HTTP:
#
http.port: 9200   #端口号
http.cors.enabled: true #head插件发现节点
http.cors.allow-origin: "*" #head插件发现节点
#
# For more information, consult the network module documentation.
#
# --------------------------------- Discovery ----------------------------------
#
# Pass an initial list of hosts to perform discovery when new node is started:
# The default list of hosts is ["127.0.0.1", "[::1]"]
#
discovery.zen.ping.unicast.hosts: ["htkj102", "htkj103"]#集群的其他节点Ip,只有一个节点写本机ip
#
# Prevent the "split brain" by configuring the majority of nodes (total number of master-eligible nodes / 2 + 1):
#
discovery.zen.minimum_master_nodes: 2 #防止脑裂,配置的数量为集群的节点数量/2+1 我配的是3节点,所以为3/2+1=2
#
# For more information, consult the zen discovery module documentation.
#
# ---------------------------------- Gateway -----------------------------------
#
# Block initial recovery after a full cluster restart until N nodes are started:
#
gateway.recover_after_nodes: 3  #在集群完全重新启动后阻止初始恢复,直到启动3个节点
#
# For more information, consult the gateway module documentation.
#
# ---------------------------------- Various -----------------------------------
#
# Require explicit names when deleting indices:
#
action.destructive_requires_name: true #删除索引时需要明确名称
4.配置系统参数
- 修改 /etc/security/limits.conf
vi /etc/security/limits.conf

#修改下面几项,没有的就添加
* soft nofile 65536
* hard nofile 131072
* soft nproc 2048
* hard nproc 4096
-
修改 /etc/sysctl.conf,添加下面一行,然后重启机器
vm.max_map_count=262144
5.启动
- 重启机器后,启动es的节点
su elastic #es启动默认不使用root
cd /usr/local/elasticsearch6.8.3/bin
./elasticsearch -d
- 浏览器访问ip:port,出现如下信息表示安装成功
{
"name" : "htkj101",
"cluster_name" : "htkj-es",
"cluster_uuid" : "_na_",
"version" : {
"number" : "6.8.3",
"build_flavor" : "default",
"build_type" : "tar",
"build_hash" : "0c48c0e",
"build_date" : "2019-08-29T19:05:24.312154Z",
"build_snapshot" : false,
"lucene_version" : "7.7.0",
"minimum_wire_compatibility_version" : "5.6.0",
"minimum_index_compatibility_version" : "5.0.0"
},
"tagline" : "You Know, for Search"
}
6.部署head插件
- 下载head插件
#head插件只需要部署在一个节点上即可 这里选择htkj101这个节点
wget https://github.com/mobz/elasticsearch-head/archive/master.zip
unzip elasticsearch-head-master.zip
- 安装环境
cd /usr/local/elasticsearch-head-master
#以下操作均在elasticsearch-head-master目录下进行
su root #在root角色下
curl -sL https://rpm.nodesource.com/setup_8.x | bash -
sudo yum install gcc-c++ make
curl -sL https://dl.yarnpkg.com/rpm/yarn.repo | sudo tee /etc/yum.repos.d/yarn.repo
yum -y install yarn nodejs git
npm install -g grunt-cli
- 安装grunt
npm install grunt --save-dev
npm install
- 修改Gruntfile.js
vi /usr/local/elasticsearch-head-master/Gruntfile.js
#修改下面这一段:
connect: {
server: {
options: {
port: 9100,
hostname: '*', #添加hostname这一行
base: '.',
keepalive: true
}
}
}
- 启动head服务
#在elasticsearch-head-master目录下启动服务
cd /usr/local/elasticsearch-head-master
grunt server &
- 出现如下信息
Running "connect:server" (connect) task
Waiting forever...
Started connect web server on http://localhost:9100
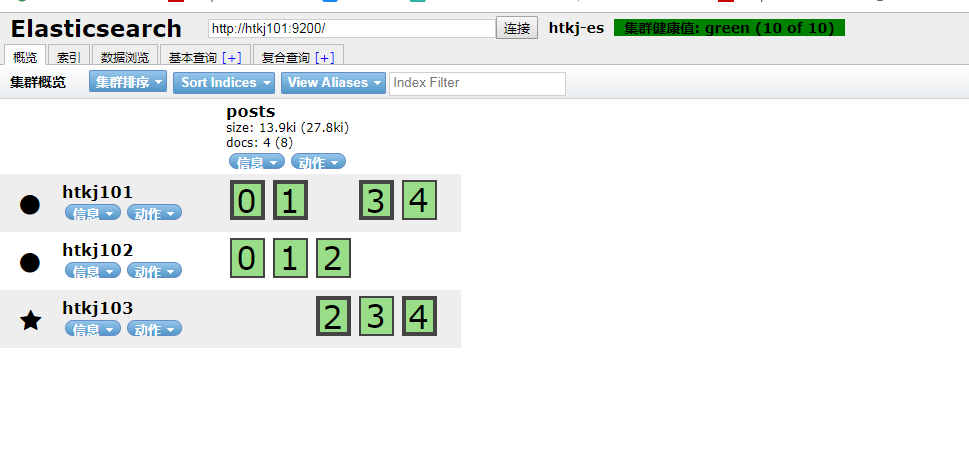
- 打开浏览器,访问http://ip:9100(ip为安装head插件的节点ip)

- 安装成功
相关文章推荐
- ElasticSearch集群搭建问题
- ElasticSearch入门 —— 集群搭建
- ElasticSearch笔记系列(2)——ES分布式集群环境搭建
- elasticsearch-2.0.0 搭建集群的最简易配置
- ElasticSearch入门 —— 集群搭建
- ElasticSearch集群搭建及插件安装
- elasticsearch 集群搭建
- 手把手教你搭建一个Elasticsearch集群
- Elasticsearch集群搭建
- CentOS7搭建elasticsearch集群
- Elasticsearch冷热集群搭建
- ElasticSearch5.4.3 环境搭建 2017 (2-集群搭建)
- ElasticSearch集群搭建及插件安装
- elasticsearch 分布式集群搭建
- Elasticsearch 03 搭建集群
- ELK集群的搭建和Elasticsearchd api的简单使用
- Elasticsearch5.2.1集群搭建,动态加入节点,并添加监控诊断插件
- Elasticsearch.5.4.1+kibana5.4.1+IK分词集群搭建
- 基于swarm的elasticsearch集群搭建
- ElasticSearch的基本用法与集群搭建
