自动化运维Ansible实践(二)
上篇提到了ansible基本安装、配置及命令行使用,这篇分享下ansible的高级用法即playbook,在生产环境如果需要完成负责任务,如大批量服务安装配置等,可以采用playbook方式来完成,高效且易于维护。
第 1 章 Playbook基本使用
使用Playbook的好处
特点
• 易读的编排语言
• 适合配置管理和应用部署
• 非常适合部署复杂的工作
先来认识一下Playbook
自动部署Nginx
main.yml
-
hosts: webservers
vars:
hello: Ansibletasks:
name: Add repo
yum_repository:
name: nginx
description: nginx repo
baseurl: http://nginx.org/packages/centos/3/$basearch/
gpgcheck: no
enabled: 1 - name: Install nginx
yum:
name: nginx
state: latest - name: Copy nginx configuration file
copy:
src: ./site.conf
dest: /etc/nginx/conf.d/site.conf - name: Start nginx
service:
name: nginx
state: started - name: Create wwwroot directory
file:
dest: /var/www/html
state: directory - name: Create test page index.html
shell: echo "hello {{hello}}" > /var/www/html/index.html
site.conf
server {
listen 80;
server_name www.ctnrs.com;
location / {
root /var/www/html;
index index.html;
}
}
.YAML语法
• 缩进表示层级关系
• 不支持制表符“tab”缩进,使用空格缩进
• 通常开头缩进 2 个空格
• 字符后缩进 1 个空格,如冒号、逗号等
• “---” 表示YAML格式,一个文件的开始
• “#”注释
playbook帮助 ansible-playbook --help
在执行前可以先检查语法ansible-playbook nginx.yml --syntax-check
.Playbook文件结构
-
name: play1
name: echo
hosts: webservers
remote_user: root
vars:
var_name: value
tasks:
shell: "echo {{var_name}}"
name: play2
hosts: webservers
remote_user: root
vars:
var_name: value
tasks:
-
name: echo
shell: "echo {{var_name}}"
remote_user: root
vars:
var_name: value
tasks:
-
name: echo
shell: "echo {{var_name}}"
.在变更时执行操作(handlers)
notify:在任务结束时触发
handlers:由特定条件触发Tasks
hosts: webservers
gather_facts: no
tasks:
-
name: Copy nginx configuration file
reload nginx ------》当配置文件改变时通知重启nginx服务
copy:
src: ./site.conf
dest: /etc/nginx/conf.d/site.conf
notify:
handlers:
- name: reload nginx
service: name=nginx state=reloaded
.任务控制(tags)
在每一个任务中添加tags标签,可以根据指定的tags运行相应的任务。
-
hosts: webservers
gather_facts: no
vars:
hello: Ansibletasks:
name: Add repo
yum_repository:
name: nginx
description: nginx repo
baseurl: http://nginx.org/packages/centos/2/$basearch/
gpgcheck: no
enabled: 1 - name: Install nginx
yum:
name: nginx
state: latest
tags: install - name: Copy nginx configuration file
copy:
src: ./site.conf
dest: /etc/nginx/conf.d/site.conf
tags: congiuration - name: Start nginx
service:
name: nginx
state: started - name: Create wwwroot directory
file:
dest: /var/www/html
state: directory - name: Create test page index.html
shell: echo "hello {{hello}}" > /var/www/html/index.html
指定tags运行:
[root@salt-master ansible-playbook]# ansible-playbook nginx.yml --tags "congiuration"
PLAY [webservers] ***
TASK [Copy nginx configuration file] ****
ok: [192.128.132.12]
ok: [192.128.132.14]
PLAY RECAP **
192.128.132.14 : ok=1 changed=0 unreachable=0 failed=0
192.128.132.12 : ok=1 changed=0 unreachable=0 failed=0
.Playbook文件调试
语法检查:ansible-playbook main.yml --syntax-check
打印语句:
- hosts: webservers
tasks: debug:
msg: {{group_names}} - debug:
msg: {{inventory_hostname}} - debug:
msg: {{ansible_hostname}}
.案例:自动部署Tomcat
-
hosts: 192.128.132.12
gather_facts: no
vars:
tomcat_version: 8.1.33
tomcat_install_dir: /usr/localtasks:
name: Install jdk1.8
yum: name=java-1.8.0-openjdk state=present -
name: Download tomcat
get_url: url=http://mirrors.hust.edu.cn/apache/tomcat/tomcat-8/v{{ tomcat_version }}/bin/apache-tomcat-{{ tomcat_version }}.tar.gz dest=/tmp -
name: Unarchive tomcat-{{ tomcat_version }}.tar.gz
unarchive:
src: /tmp/apache-tomcat-{{ tomcat_version }}.tar.gz
dest: "{{ tomcat_install_dir }}"
copy: no - name: Start tomcat
shell: cd {{ tomcat_install_dir }} &&
mv apache-tomcat-{{ tomcat_version }} tomcat8 &&
cd tomcat8/bin && nohup ./startup.sh &
第 2 章 Playbook定义变量与使用
.命令行
.在Inventory中定义
.在Playbook中定义
在Playbook中定义变量
hosts: webservers
gather_facts: no
vars:
var_name: value
var_name: value
tasks:
- name: hello
shell: "echo {{var_name}}"
.在Role中定义
.注册变量(register)
注册变量
- hosts: webservers
gather_facts: no
tasks: name: Get date
command: date +"%F_%T"
register: date_output - name: Echo date_output
command: touch /tmp/{{date_output.stdout}}
.系统信息变量(facts)
系统变量
hosts: webservers
tasks:
- name: Get hostname
debug: msg={{ansible_hostname}}第 3 章 Playbook文件复用
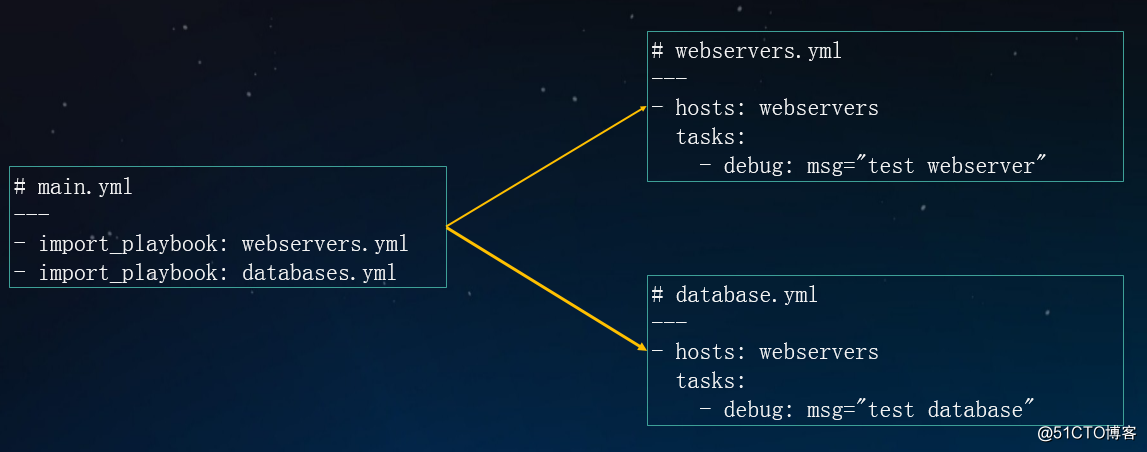
.include & import 区别
include(动态):在运行时导入
• --list-tags,--list-tasks不会显示到输出
• 不能使用notify触发来自include内处理程序名称(handlers)
import*(静态):在Playbook解析时预先导入
• 不能与循环一起使用
• 将变量用于目标文件或角色名称时,不能使用inventory(主机/主机组等)中的变量
import_playbook
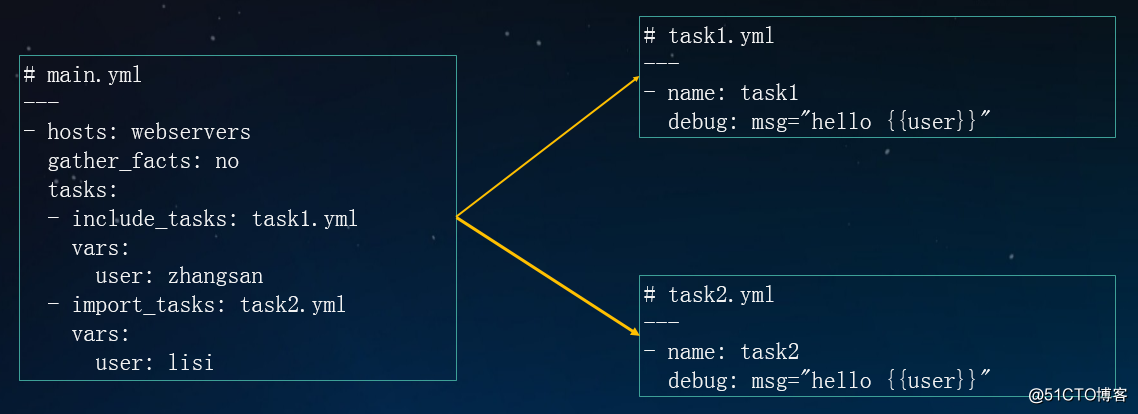
includetasks & importtasks
4. 第 4 章 Playbook流程控制
条件
-
hosts: webservers
tasks:
name: Host 192.168.132.16 run this task
debug: msg="{{ansible_default_ipv4.address}}"
when: ansible_default_ipv4.address == '192.168.132.16'
只执行该任务,跳过其他主机。
根据不同发行版安装apache服务
-
hosts: webservers
tasks:
name: Update apache version - yum
yum: name=httpd state=present
when: ansible_pkg_mgr == 'yum'
notify: restart httpd - name: Update apache version - apt
apt: name=apache2 state=present update_cache=yes
when: ansible_pkg_mgr == 'apt'
notify: restart apache2
handlers:
- name: restart httpd
service: name=httpd state=restared
handlers: - name: restart apache2
service: name=apache2 state=restared
tasks:
command: /sbin/shutdown -t now
when: (ansible_distribution == "CentOS" and ansible_distribution_major_version == "6") or
(ansible_distribution == "Debian" and ansible_distribution_major_version == "7")
tasks:
-
name: "shut down CentOS 6 systems"
command: /sbin/shutdown -t now
when: ansible_distribution == "CentOS"
循环
-
name: with_list
one
debug:
msg: "{{ item }}"
with_list: - two
debug:
msg: "{{ item }}"
loop:
-
one
name: with_items
debug:
msg: "{{ item }}"
with_items: "{{ items }}"
debug:
msg: "{{ item }}"
loop: "{{ items|flatten(levels=1) }}"
创建用户:
gather_facts: no
tasks:
-
name: with_list
user: name={{item}} state=present
with_list: test1
5. 第 5 章 Playbook模板(jinja2)
5.1 .条件和循环
test.yml
hosts: webservers
vars:
hello: Ansible
tasks:
-
template: src=f.j2 dest=/tmp/f.j2
f.j2
{% set list=['one', 'two', 'three'] %}
{% for i in list %}
{% if i == 'two' %}
-> two
{% elif loop.index == 3 %}
-> 3
{% else %}
{{i}}
{% endif %}
{% endfor %}
{{ hello }}
{% set dict={'zhangsan': '26', 'lisi': '25'} %}
{% for key, value in dict.iteritems() %}
{{key}} -> {{value}}
{% endfor %}
5.2 .案例:管理Nginx配置文件
main.yml
-
hosts: webservers
gather_facts: no
vars:
http_port: 80
server_name: www.ctnrs.comtasks:
name: Copy nginx configuration file
template: src=site.conf.j2 dest=/etc/nginx/conf.d/www.ctnrs.com.conf
notify: reload nginx
handlers:
- name: reload nginx
service: name=nginx state=reloaded
site.conf.j2
{% set list=[10, 12, 13, 25, 31] %}
upstream {{server_name}} {
{% for i in list %}
server 192.168.1.{{i}}:80;
{% endfor %}
}
server {
listen {{ http_port }};
server_name {{ server_name }};
location / {
proxy_pass http://{{server_name}};
}
}

- 浅谈接口自动化如何应用与工作中与开发模式实践
- 团队基础生成自动化流程之最佳实践总论(I) – 自动化生成流程基础
- 团队基础生成自动化流程之最佳实践(V) - 使用Desktop Build
- 【java 菜鸟自动化实践之二】采用PIO将图片存入指定的excel单元格中(支持excel2003和2007)
- Android UI自动化测试最佳实践 - 51Testing软件测试网-中国软件测试人的精神家园
- android自动化工具--robotium实践1
- 企业级SaaS产品自动化测试实践
- 基于 ANSIBLE 自动化运维实践
- Python 编程快速上手 让繁琐工作自动化-第九章实践项目 9.8.1选择性拷贝
- 自动化运维实践:Cobbler自动安装上百台服务器不是梦
- Android UI自动化测试最佳实践
- Coded UI 自动化测试实践 培训大纲
- 运维自动化的最佳实践探索 | 高效运维
- 自动化单元测试实践之路
- appium+python自动化实践之添加移动端logcat日志
- iOS及Android自动化实践
- 自动化部署实践
- Linux下的自动化运维ansible工具
- [转]基于AWS的自动化部署实践
- DBA很忙—MySQL的性能优化及自动化运维实践