微信小程序调用用百度地图天气功能
2018-07-31 09:38
162 查看
版权声明:个人原创,转载请说明出处。 https://blog.csdn.net/qq_38194393/article/details/81296381
小程序之调用百度地图天气功能
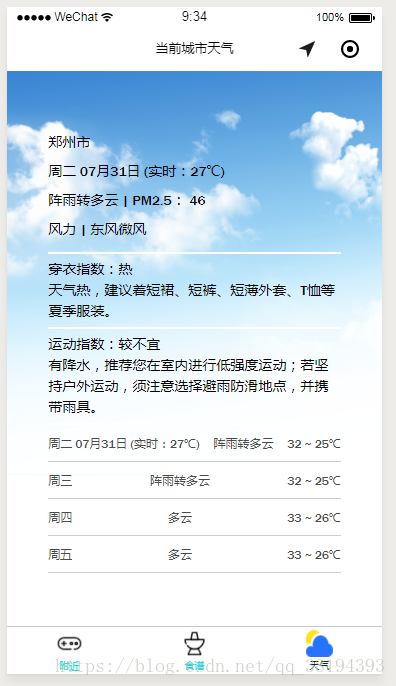
本篇博客主要介绍小程序在百度地图中获取天气信息,如有不全请指出。下面先上效果图

主要内容
- 百度地图API的个人密钥,也就是AK
- 请求百度地图API接口数据
- 获取到的信息结果
- 页面输出获取到的信息
- 完整代码
第一步:获取个人AK
这一步较为简单,也有很多博主写过了,可以直接去百度开放平台注册获取,链接(http://lbsyun.baidu.com/),具体界面获取后如下图:

红色部分就是我们要用到的AK,注意不是AK47哦,也不是安卓或者移动应用哦,一定要是微信小程序的应用AK。
第二步:JS代码中引入接口请求
*在util.js中写入函数方法
function getLocation(callback) { //位置信息
wx.getLocation({
type: 'gcj02',
success: function (res) {
callback(true, res.latitude, res.longitude);
},
fail: function () {
callback(false);
}
})
}

function getWeather(latitude, longitude, callback) {  //天气信息
var ak = "第一步获取到的AK";//换成自己的ak
var url = "https://api.map.baidu.com/telematics/v3/weather?location=" + longitude + "," + latitude + "&output=json&ak=" + ak; //接口请求和参数传递

wx.request({
url: url,
success: function (res) {
console.log("天气请求结果",res.data); //在打开应用即可看到
callback(res.data);
}

});
}

function loadWeatherData(callback) {
getLocation(function (success, latitude, longitude) {
getWeather(latitude, longitude, function (weatherData) {
callback(weatherData);
});
});
}
注意以上请求数据以及函数需要在util.js的module中声明出来
module.exports = {
http: http,
loadWeatherData: loadWeatherData //诸如此类新写入的函数
}
第三步: 获取到的天气信息结果
以下图片可能看不太清,可以放大了看。主要输出结果都在results数组中,results[0].index中是各种指数提示信息,想在天气中加入暖心贴片提示,可引用results[0].index(后面会有方法说明的)。天气信息列表在weather_data数组中,当天信息就是第一条数据了。关于百度地图为什么显示4条天气信息我未作深入研究。一般查看当天和未来三天信息已经足够了。如有爱好者有深入研究可评论回我,我也跟你们学点。

下面这是我们在util.js中写入的方法,
function getWeather(latitude, longitude, callback) {
var ak = "个人AK";//换成自己的ak
var url = "https://api.map.baidu.com/telematics/v3/weather?location=" + longitude + "," + latitude + "&output=json&ak=" + ak;

wx.request({
url: url,
success: function (res) {
console.log("天气请求结果",res.data); //天气请求结果输出
callback(res.data); //一定要回调
}

});
}
第四步:页面输出信息
页面输出当前城市天气信息:
<view class="now-tmp">
<view class="city">{{weather.currentCity}}</view>
<view class="tmp">{{weatherData[0].date}}</view>
<view class="type">{{weatherData[0].weather}} | PM2.5: {{weather.pm25}}</view>
<view class='wind'>风力  |  {{weatherData[0].wind}}</view>
</view>
以上页面代码对应就是效果图中的第一部分信息包括城市、日期、实时温度、天气信息、PM2.5以及风力。
<view class="exp-item">
<view class="">{{indexData[0].tipt}}:{{indexData[0].zs}}</view>
<view class="">{{indexData[0].des}}</view>
</view>
以上页面代码对应的是效果图中的暖心提示信息。
<block wx:for="{{weatherData}}" wx:for-item="item" wx:key="">
<view class="cast-item">
<view class="cast-day">{{item.date}}</view>
<view class="cast-type">
{{item.weather}}
</view>
<view class="cast-tmp">
{{item.temperature}}
</view>
</view>
</block>
以上代码对应的是最近天数天气信息列表
最后放上完整页面代码
先来.wxml页面的:
<!-- 当前城市天气 -->
<view class="wrapper">
<view class="now">
<view class="now-tmp">
<view class="city">{{weather.currentCity}}</view>
<view class="tmp">{{weatherData[0].date}}</view>
<view class="type">{{weatherData[0].weather}} | PM2.5: {{weather.pm25}}</view>
<view class='wind'>风力  |  {{weatherData[0].wind}}</view>
</view>
<!-- 暖心提示 -->
<view class="now-exp">
<view class="item-sp"></view>
<view class="exp-item">
<view class="">{{indexData[0].tipt}}:{{indexData[0].zs}}</view>
<view class="">{{indexData[0].des}}</view>
</view>
<view class="item-sp"></view>
<view class="exp-item">
<view class="">{{indexData[3].tipt}}:{{indexData[3].zs}} </view>
<view class="">{{indexData[3].des}}</view>
</view>
<view class="item-sp"></view>
</view>
</view>
<!-- 最近几天天气列表 -->
<view class="forecast">
<block wx:for="{{weatherData}}" wx:for-item="item" wx:key="">
<view class="cast-item">
<view class="cast-day">{{item.date}}</view>
<view class="cast-type">
{{item.weather}}
</view>
<view class="cast-tmp">
{{item.temperature}}
</view>
</view>
</block>
</view>
</view>
<!--页面背景图  -->
<view class='bgImg'><image src='../../image/card1.png' ></image></view>
再来.wxss的代码:
.wrapper{
width:100%;
height:100%;
box-sizing: border-box;
position: absolute;
top:0;
left:0;
padding:50rpx;
font-family: 'Franklin Gothic Medium', 'Arial Narrow', Arial, sans-serif;
}
.now{
height:60%;
color:#000;
font-size: 28rpx;
display: flex;
flex-direction: column;
width:90%;
margin:0 auto;
margin-top:8%;
}
.city{
margin-top:10px;
}
.type{
margin-top:10px;
}
.wind{
margin-top:10px;
}
.tmp{
margin-top:10px;
}

.now-exp{
display: block;
flex-direction: row;
justify-content: space-around;
line-height:150%;
}
.now-tmp{
flex-grow:  1;/*表示剩余的空间都分配给该元素*/
}

.exp-item{
font-size: 28rpx;
text-align: left;
margin-top:5px;
margin-bottom:5px;
}
.item-sp{
height:5rpx;
width:100%;
background-color: #fff;
}

.forecast{
margin-top: 30rpx;
width:90%;
margin:0 auto;
}

.cast-item{
display: flex;
flex-direction: row;
justify-content: space-between;
border-bottom: 1rpx solid #ccc;
padding: 20rpx 0;
}

.bgImg{
height:100%;
width:100%;
margin:0 auto;
top:0;
}
.bgImg image{
width:100%;
height:100%;
margin:0 auto;
}
最后附上js代码,代码各行用处我就不一一做注释了。有不了解的可以评论区回复我
// 引用百度地图微信小程序JSAPI模块
var App = getApp();
var common = require('../../utils/util.js');

Page({
data: {
weather: {},
weatherData: {},
indexData:{}
},
onLoad: function () {
var that = this;
console.log("当加载天气页面的时候", that.data);
common.loadWeatherData(function (data) {
that.setData({
weather: data.results[0],
weatherData: data.results[0].weather_data,
indexData: data.results[0].index

});

});

},
getUserFortune: function() {
wx.navigateTo({
url: '../fortune-result/fortune-result',
})
},
onShareAppMessage: function(res) {
if (res.from === 'button') {
// 来自页面内转发按钮
console.log(res.target)
}
return {
title: '快来看看你周围有什么',
path: 'pages/maps/map',
success: function(res) {
// 转发成功
wx.showShareMenu({
// 要求小程序返回分享目标信息
withShareTicket: true
});
},
fail: function(res) {
// 转发失败
}
}
}

})
运行后的效果展示:
最后祝各位学有所成!
阅读更多
相关文章推荐
- 微信小程序开发——实现天气预报小功能
- 微信小程序实现天气预报功能
- 微信小程序实现倒计时调用相机自动拍照功能
- 微信小程序调用摄像头隐藏式拍照功能
- 更方便!微信小程序任务栏功能升级:增加「我的小程序」
- 微信小程序Java登录流程(ssm实现具体功能和加解密隐私信息问题解决方案)
- 微信JSSDK调用微信扫一扫功能的方法
- 微信小程序-路线规划,地图导航功能基于高德地图API
- 微信小程序video组件调用腾讯视频的解决方案
- 微信小程序实现即时通信聊天功能的实例代码
- 调用百度地图实现定位功能
- [置顶] 安卓调用系统自带分享功能分享文字,分享大图片,仿好奇心日报分享长图片(不用申请微信微博官方sdk就能直接分享)
- 微信小程序使用toast消息对话框提示用户忘记输入用户名或密码功能【附源码下载】
- 微信小程序之退款功能
- 微信小程序(3)函数调用,参数传递
- 微信小程序如何调用后台接口
- 微信小程序 支付功能
- 微信小程序一个你可能需要的功能
- 微信小程序如何实现自动退款功能?
- 微信小程序功能介绍