微信小程序开发——实现天气预报小功能
2017-11-06 17:22
1191 查看
步骤:
1.安装“微信web开发者工具”,登录后创建本地项目,.wxml相当于html文件,.wxss相当于css文件,语法上略有不同(div改成view)。
页面代码如下:
main.wxml代码:
main.wxss代码:
main.js代码:
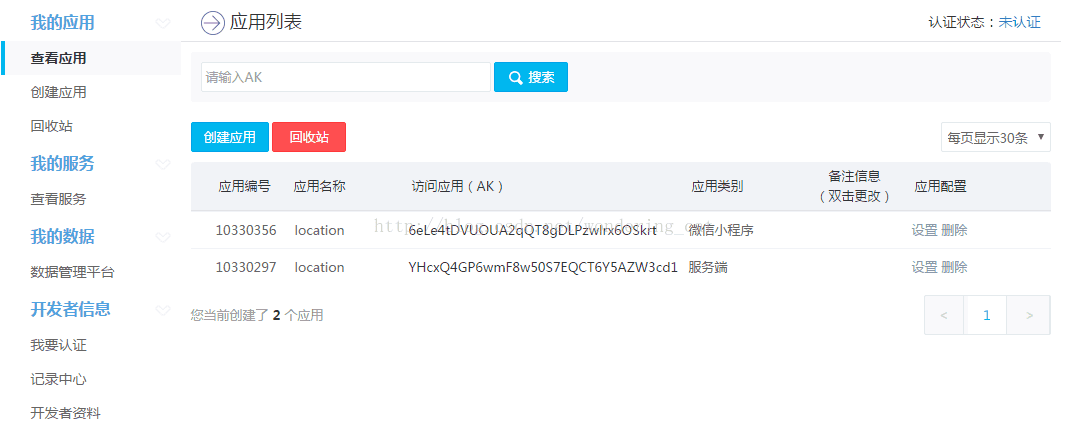
需要登录百度地图账号,百度地图开放平台-->开发文档-->web服务API-->正/逆地理编码服务-->逆地理编码
ak-->申请ak-->获取ak编号
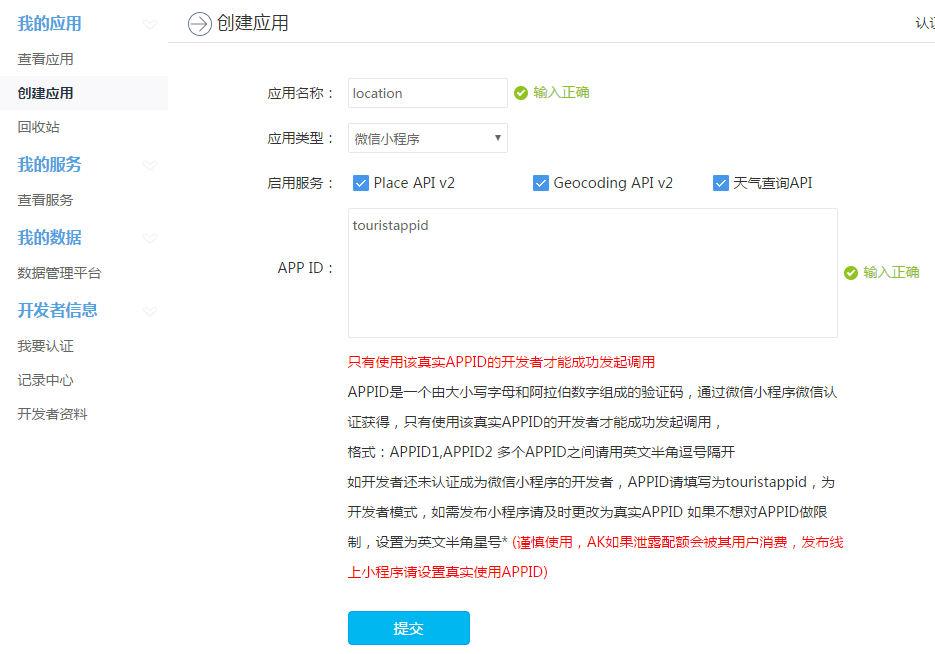
提交后成功申请ak编号
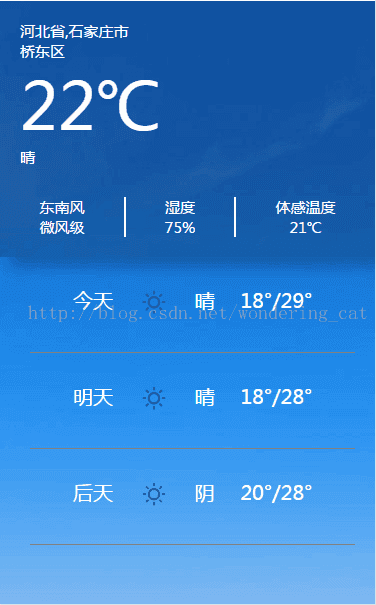
页面效果:
1.安装“微信web开发者工具”,登录后创建本地项目,.wxml相当于html文件,.wxss相当于css文件,语法上略有不同(div改成view)。
页面代码如下:
main.wxml代码:
<!-- 最外部整体-->
<view class="content">
  <!-- 上部-->
  <view class="location">
    <view class="province">{{province}},{{city}}</view>

    <view class="quxian">{{district}}</view>
    <view class="tmp">22℃</view>
    <view class="weather">晴</view>
    <view class="other">
      <!--风  -->
      <view class="x">
        <view>东南风</view>
        <view>微风级</view>
      </view>
      <view class="fgx"></view>
       <!--湿度  -->
      <view class="x">
        <view>湿度</view>
        <view>75%</view>
      </view>
      <view class="fgx"></view>
       <!--体感温度  -->
      <view class="x">
        <view>体感温度</view>
        <view>21℃</view>
      </view>
    </view>
  </view>
  <!-- 下部 -->
  <view class="future">
    <view class="day">
      <view class="x">{{days[0]}}</view>
      <view class="x">
        <image class="img" src="../Assets/img/100.png"></image>
      </view>
      <view class="x">晴</view>
      <view class="x">18°/29°</view>
    </view>
    <view class="day">
      <view class="x">{{days[1]}}</view>
      <view class="x">
        <image class="img" src="../Assets/img/100.png"></image>
      </view>
      <view class="x">晴</view>
      <view class="x">18°/28°</view>
    </view>
    <view class="day">
      <view>{{days[2]}}</view>
      <view class="x">
        <image class="img" src="../Assets/img/100.png"></image>
      </view>
      <view class="x">阴</view>
      <view class="x">20°/28°</view>
    </view>
  </view>
</view>
main.wxss代码:
.content{
  background-image: url('../Assets/img/bg.jpg');
  width: 100%;
  height: 100%;
  position: absolute;
  color: white;
  font-size: 15px;
  font-family: 微软雅黑,宋体;
}
.location{
  padding: 20px;
  background: rgba(0, 0, 0, 0.2);
  box-shadow: 10px 10px 20px rgba(0, 0, 0, 0.2);
}
.tmp{
  font-size: 65px;
}
.other{
  padding-top:30px;
  text-align: center;
  width: 100%;
  flex-direction: row;
  justify-content: space-around;
  display: flex;
}
.fgx{
  border: 1px solid white;
}
.future{
  padding-left: 20px;
  flex-direction: row;
  justify-content: space-around;
}
.img{
  width: 60rpx;
  height: 60rpx;
}
 .day{
   padding: 30px;
   font-size: 20px;
   flex-direction: row;
   justify-content: space-around;
   display: flex;
   border-bottom: 1px solid gray;
   margin-left: 10px;
   margin-right: 20px;
}
main.js代码:
Page({

data: {
days:['今天','明天','后天']
},

onLoad: function () {
this.getLocationXY()
},
//获得当前的坐标,通过百度地图API
//
getLocationXY: function () {
var that=this;
wx.getLocation({
success: function(res) {
var locationX=res.latitude;
var locationY=res.longitude;
//通过坐标获得具体的位置
that.getCityByLocation(locationX, locationY);
},
})
},
//通过坐标获得具体的位置名称,关联百度地图API
getCityByLocation: function (locationX,locationY) {
var that=this;
wx.request({
url: 'http://api.map.baidu.com/geocoder/v2/',
data:{
location:locationX+","+locationY,
ak: '6eLe4tDVUOUA2qQT8gDLPzwlrx6OSkrt',
output: 'json'
},
success:function(res){
var province=res.data.result.addressComponent.province;
var city = res.data.result.addressComponent.city;
var district = res.data.result.addressComponent.district;
that.setData({province:province,city:city,district:district});
},
fail:function(res){},
complete:function(res){}
})
},

onShow: function () {

},

onHide: function () {

},

onUnload: function () {

},

onPullDownRefresh: function () {

},

onReachBottom: function () {

},

onShareAppMessage: function () {

}
})
需要登录百度地图账号,百度地图开放平台-->开发文档-->web服务API-->正/逆地理编码服务-->逆地理编码
ak-->申请ak-->获取ak编号
提交后成功申请ak编号
页面效果:

相关文章推荐
- 微信开发(从申请微信到注册上线的一整套流程)第四章 实现天气预报功能
- 微信小程序实现天气预报功能
- 微信订阅号天气预报功能的实现(java版)
- 微信小程序开发之radio实现显示和隐藏功能 原创 2017年07月04日 20:33:07 标签: 前端开发 / 微信 我们在开发微信小程序的时候,经常会用到显示和隐藏,
- 微信小程序 开发之快递查询功能的实现
- 微信小程序开发详解---小知识,大功能【实现按钮的随着手指移动】
- 微信开发二三事:功能应用一、天气预报
- 微信小程序开发日志2018-03-04: 实现图书管理小程序基本功能
- 微信程序开发---实现天气状态查询
- 微信小程序开发之radio实现显示和隐藏功能
- 微信小程序开发之天气预报
- 微信小程序分组开发与左滑功能实现
- python 实现天气预报功能
- 简单快速开发C\S架构程序用最简单的不分层最快的效率达到功能要求的例子程序FrmCommnetList 所有评论列表的功能实现
- android开发利用传感器实现微信的摇一摇功能
- 简单快速开发C\S架构程序用最简单的不分层最快的效率达到功能要求的例子程序FrmCommentAdd 添加评论的功能实现
- android版天气预报程序开发总结
- eclipse开发Android小程序:实现贪吃蛇部分功能
- android使用soap协议访问webservice实现天气预报功能
- 简单快速开发C\S架构程序用最简单的不分层最快的效率达到功能要求的例子程序FrmCommentEdit 编辑评论的功能实现