Linux 第28课 ——Linux集群架构(上)
2018-07-19 16:30
477 查看
Linux集群架构(上)
一、集群介绍
集群,简单地说是指一组(若干个)相互独立的计算机,利用高速通信网络组成一个较大的计算机服务系统,每个集群节点(即集群中的每台计算机)都是运行各自服务的独立服务器。集群的特点:高性能(Performance)、价格有效(Cost-effectiveness)、可伸缩性(Scalability)、高可用性(Availability)、透明性(Traansparency)、可管理性(Manageability)、可编程性(Programmability)
集群的分类:
负载均衡集群:Load balancing clusters,简称LBC、LB
高可用集群:High-availability clusters,简称HAC
高性能计算集群:High-performance clusters,简称HPC
网格计算集群:Grid computing clusters
常见的集群开源软件:
高可用: Keepalived、Heartbeat
负载均衡:Keepalived、Nginx、LVS、Haproxy
二、 keepalived介绍
使用keepalived来实现高可用集群,因为heartbeat在centos6上有一些问题,影响实验效果,而且heartbeat软件在2010年停止更新;因此着重讲解keepalivedkeepalived通过VRRP(Virtual Router Redundancy Protocl)来实现高可用。
在这个协议里会将多台功能相同的路由器组成一个小组,这个小组里会有1个master角色和N(N>=1)个backup角色。
master会通过组播的形式向各个backup发送VRRP协议的数据包,当backup收不到master发来的VRRP数据包时,就会认为master宕机了。此时就需要根据各个backup的优先级来决定谁成为新的mater。
Keepalived要有三个模块,分别是core、check和vrrp。其中core模块为keepalived的核心,负责主进程的启动、维护以及全局配置文件的加载和解析,check模块负责健康检查,vrrp模块是来实现VRRP协议的。
三、用keepalived配置高可用集群
实验准备准备两台机器ying01和ying02,ying01作为master,ying02作为backup;
两台机器都执行yum install -y keepalived;
两台机器都安装nginx,其中ying01上已经编译安装过nginx,ying02上需安装nginx。
3.1 准备阶段
ying02上 配置在ying02客户端上,安装配置ngnix
[root@ying02 src]# scp 192.168.112.136:/usr/local/src/nginx-1.4.7.tar.gz ./   //拷贝源码包

[root@ying02 src]# tar zxf nginx-1.4.7.tar.gz     //解压

[root@ying02 nginx-1.4.7]# ./configure --prefix=/usr/local/nginx       //定制服务

[root@ying02 nginx-1.4.7]# echo $?
0
[root@ying02 nginx-1.4.7]# make                                       //编译

[root@ying02 nginx-1.4.7]# echo $?
0
[root@ying02 nginx-1.4.7]# make install                               //安装

[root@ying02 nginx-1.4.7]# echo $?
0
编辑nginx启动脚本文件;
[root@ying02 ~]# vim /etc/init.d/nginx          //新建启动脚本,见ying01启动脚本

[root@ying02 ~]# chmod 755 /etc/init.d/nginx    //给予755权限
[root@ying02 ~]# chkconfig --add nginx          //增加启动权限
[root@ying02 ~]# chkconfig nginx on
编辑配置文件
[root@ying02 ~]# cd /usr/local/nginx/conf/
[root@ying02 conf]# ls
fastcgi.conf          fastcgi_params          koi-utf  mime.types          nginx.conf
fastcgi.conf.default  fastcgi_params.default  koi-win  mime.types.default  nginx.conf.default
[root@ying02 conf]# mv nginx.conf nginx.conf.1
[root@ying02 conf]# vim nginx.conf                   //与ying01一样
检查语法错误,开始启动nginx服务;
[root@ying02 conf]# /usr/local/nginx/sbin/nginx -t
nginx: the configuration file /usr/local/nginx/conf/nginx.conf syntax is ok
nginx: configuration file /usr/local/nginx/conf/nginx.conf test is successful
[root@ying02 conf]# /etc/init.d/nginx start
Starting nginx (via systemctl):                            [  确定  ]
[root@ying02 conf]# ps aux |grep nginx
root      9393  0.0  0.0  24844   788 ?        Ss   12:21   0:00 nginx: master process /usr/loc
nobody    9394  0.0  0.1  27148  3360 ?        S    12:21   0:00 nginx: worker process
nobody    9395  0.0  0.1  27148  3360 ?        S    12:21   0:00 nginx: worker process
root      9397  0.0  0.0 112720   984 pts/1    R+   12:21   0:00 grep --color=auto nginx
在ying01上配置
先安装keepalived包;并找到其配置文件;
[root@ying01 ~]# yum install -y keepalived

[root@ying01 ~]# ls /etc/keepalived/keepalived.conf
/etc/keepalived/keepalived.conf
原配置文件清空,并写入以下配置
[root@ying01 ~]# > /etc/keepalived/keepalived.conf
[root@ying01 ~]# cat /etc/keepalived/keepalived.conf
[root@ying01 ~]# vim /etc/keepalived/keepalived.conf

global_defs {
notification_email {
txwd188@126.com         //定义接收邮件人
}
notification_email_from 27623694@qq.com   //定义发邮件地址(实际没有)
smtp_server 127.0.0.1
smtp_connect_timeout 30
router_id LVS_DEVEL
}

vrrp_script chk_nginx {
script "/usr/local/sbin/check_ng.sh"    //此脚本为监控nginx服务的
interval 3
}

vrrp_instance VI_1 {
state MASTER
interface ens33              //网卡
virtual_router_id 51
priority 100                 //权重100,此数值要大于backup
advert_int 1
authentication {
auth_type PASS
auth_pass ying           //定义密码
}
virtual_ipaddress {
192.168.112.100          //定义VIP
}

track_script {
chk_nginx                //定义监控脚本,这里和上面vrr_script后面的字符串保持一致
}
在配置文件中,定义了check_ng.sh脚本,现在新建如下脚本;
[root@ying01 ~]# vim /usr/local/sbin/check_ng.sh

#!/bin/bash
#时间变量,用于记录日志
d=`date --date today +%Y%m%d_%H:%M:%S`
#计算nginx进程数量
n=`ps -C nginx --no-heading|wc -l`
#如果进程为0,则启动nginx,并且再次检测nginx进程数量,
#如果还为0,说明nginx无法启动,此时需要关闭keepalived
if [ $n -eq "0" ]; then
/etc/init.d/nginx start               //启动命令
n2=`ps -C nginx --no-heading|wc -l`
if [ $n2 -eq "0"  ]; then
echo "$d nginx down,keepalived will stop" >> /var/log/check_ng.log
systemctl stop keepalived
fi
fi
给该脚本赋予755权限,否则无法被keepalived调用
[root@ying01 ~]# ls -l /usr/local/sbin/check_ng.sh
-rw-r--r-- 1 root root 567 7月  21 10:48 /usr/local/sbin/check_ng.sh
[root@ying01 ~]# chmod 755 /usr/local/sbin/check_ng.sh
[root@ying01 ~]# ls -l /usr/local/sbin/check_ng.sh
-rwxr-xr-x 1 root root 567 7月  21 10:48 /usr/local/sbin/check_ng.sh
开启keepalived服务,停止防火墙,关闭SElinux
[root@ying01 ~]# systemctl start keepalived
[root@ying01 ~]# ps aux |grep keep
root      2162  0.1  0.0 118652  1392 ?        Ss   10:51   0:00 /usr/sbin/keepalived -D
root      2163  0.0  0.1 127516  3340 ?        S    10:51   0:00 /usr/sbin/keepalived -D
root      2164  0.2  0.1 127456  2844 ?        S    10:51   0:00 /usr/sbin/keepalived -D
root      2206  0.0  0.0 112720   980 pts/0    S+   10:51   0:00 grep --color=auto keep

[root@ying01 ~]# systemctl stop firewalld
[root@ying01 ~]# getenforce
Disabled
[root@ying01 ~]# iptables -nvL
Chain INPUT (policy ACCEPT 0 packets, 0 bytes)
pkts bytes target     prot opt in     out     source               destination

Chain FORWARD (policy ACCEPT 0 packets, 0 bytes)
pkts bytes target     prot opt in     out     source               destination

Chain OUTPUT (policy ACCEPT 0 packets, 0 bytes)
pkts bytes target     prot opt in     out     source               destination
同样在ying02上也配置
先安装keepalived包;清空原配置文件,并按以下内容写入配置文件中
[root@ying02 ~]# yum install -y keepalived

[root@ying02 ~]# > /etc/keepalived/keepalived.conf
[root@ying02 ~]# cat /etc/keepalived/keepalived.conf
[root@ying02 ~]# vim /etc/keepalived/keepalived.conf

global_defs {
notification_email {
txwd1214@126.com
}
notification_email_from 1276700694@qq.com
smtp_server 127.0.0.1
smtp_connect_timeout 30
router_id LVS_DEVEL
}

vrrp_script chk_nginx {
script "/usr/local/sbin/check_ng.sh"
interval 3
}

vrrp_instance VI_1 {
state BACKUP
interface ens33
virtual_router_id 51
priority 90            //权重90
advert_int 1
authentication {
auth_type PASS
auth_pass ying    //密码
}
virtual_ipaddress {
192.168.112.100
}

track_script {
chk_nginx
}
在配置文件中,定义了check_ng.sh脚本,现在新建如下脚本;
[root@ying02 ~]#  vim /usr/local/sbin/check_ng.sh

#时间变量,用于记录日志
d=`date --date today +%Y%m%d_%H:%M:%S`
#计算nginx进程数量
n=`ps -C nginx --no-heading|wc -l`
#如果进程为0,则启动nginx,并且再次检测nginx进程数量,
#如果还为0,说明nginx无法启动,此时需要关闭keepalived
if [ $n -eq "0" ]; then
systemctl start nginx
/etc/init.d/nginx start
if [ $n2 -eq "0"  ]; then
echo "$d nginx down,keepalived will stop" >> /var/log/check_ng.log
systemctl stop keepalived
fi
fi
给该脚本赋予755权限,否则无法被keepalived调用
[root@ying02 conf]# ls -l  /usr/local/sbin/check_ng.sh
-rw-r--r--. 1 root root 542 7月  21 12:25 /usr/local/sbin/check_ng.sh
[root@ying02 conf]# chmod 755  /usr/local/sbin/check_ng.sh
[root@ying02 conf]# ls -l  /usr/local/sbin/check_ng.sh
-rwxr-xr-x. 1 root root 542 7月  21 12:25 /usr/local/sbin/check_ng.sh
[root@ying02 conf]#
开启keepalived服务,停止防火墙,关闭SElinux
[root@ying02 conf]# systemctl start keepalived
[root@ying02 conf]# ps aux |grep keep
root      9429  0.1  0.0 118652  1396 ?        Ss   12:26   0:00 /usr/sbin/keepalived -D
root      9430  0.0  0.1 127516  3296 ?        S    12:26   0:00 /usr/sbin/keepalived -D
root      9431  0.0  0.1 127456  2844 ?        S    12:26   0:00 /usr/sbin/keepalived -D
root      9470  0.0  0.0 112720   980 pts/1    S+   12:26   0:00 grep --color=auto keep

[root@ying02 ~]# getenforce
Disabled
[root@ying02 ~]# systemctl stop firewalld
3.2 测试阶段
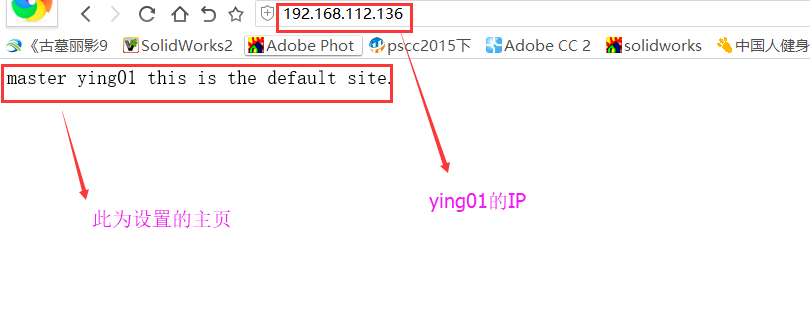
现在把个机器梳理以下:192.168.112.136 此为master机,ying01
192.168.112.138 此为backup机,ying02
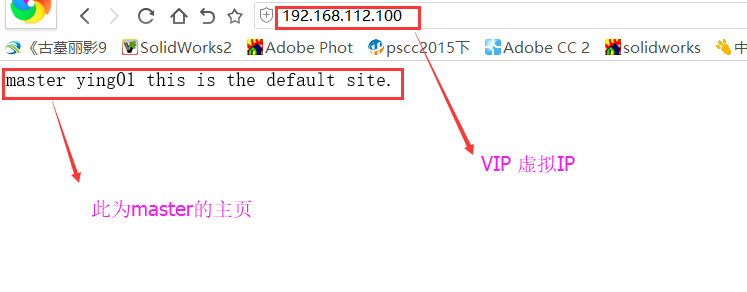
192.168.112.100 此为VIP机
用ip add命令查看,此时VIP 192.168.112.100在ying01上;
[root@ying01 ~]# ip add
1: lo: <LOOPBACK,UP,LOWER_UP> mtu 65536 qdisc noqueue state UNKNOWN qlen 1
link/loopback 00:00:00:00:00:00 brd 00:00:00:00:00:00
inet 127.0.0.1/8 scope host lo
valid_lft forever preferred_lft forever
inet6 ::1/128 scope host
valid_lft forever preferred_lft forever
2: ens33: <BROADCAST,MULTICAST,UP,LOWER_UP> mtu 1500 qdisc pfifo_fast state UP qlen 1000
link/ether 00:0c:29:87:3f:91 brd ff:ff:ff:ff:ff:ff
inet 192.168.112.136/24 brd 192.168.112.255 scope global ens33
valid_lft forever preferred_lft forever
inet 192.168.112.100/32 scope global ens33          //在master ying01上
valid_lft forever preferred_lft forever
inet 192.168.112.158/24 brd 192.168.112.255 scope global secondary ens33:0
valid_lft forever preferred_lft forever
inet6 fe80::16dc:89c:b761:e115/64 scope link
valid_lft forever preferred_lft forever
3: ens37: <BROADCAST,MULTICAST,UP,LOWER_UP> mtu 1500 qdisc pfifo_fast state UP qlen 1000
link/ether 00:0c:29:87:3f:9b brd ff:ff:ff:ff:ff:ff
inet6 fe80::ad38:a02e:964e:1b93/64 scope link
valid_lft forever preferred_lft forever
而backup机上没有.mater给客户端提供服务;
[root@ying02 ~]# ip add
1: lo: <LOOPBACK,UP,LOWER_UP> mtu 65536 qdisc noqueue state UNKNOWN qlen 1
link/loopback 00:00:00:00:00:00 brd 00:00:00:00:00:00
inet 127.0.0.1/8 scope host lo
valid_lft forever preferred_lft forever
inet6 ::1/128 scope host
valid_lft forever preferred_lft forever
2: ens33: <BROADCAST,MULTICAST,UP,LOWER_UP> mtu 1500 qdisc pfifo_fast state UP qlen 1000
link/ether 00:0c:29:c6:2c:24 brd ff:ff:ff:ff:ff:ff
inet 192.168.112.138/24 brd 192.168.112.255 scope global ens33
valid_lft forever preferred_lft forever
inet6 fe80::964f:be22:ddf2:54b7/64 scope link
valid_lft forever preferred_lft forever
3: ens37: <BROADCAST,MULTICAST,UP,LOWER_UP> mtu 1500 qdisc pfifo_fast state UP qlen 1000
link/ether 00:0c:29:c6:2c:2e brd ff:ff:ff:ff:ff:ff
在winows浏览器上测试,能够清楚看到提供服务的是master;
master 192.168.112.136的主页
虚拟IP 192.168.112.100显示的页面为master的页面
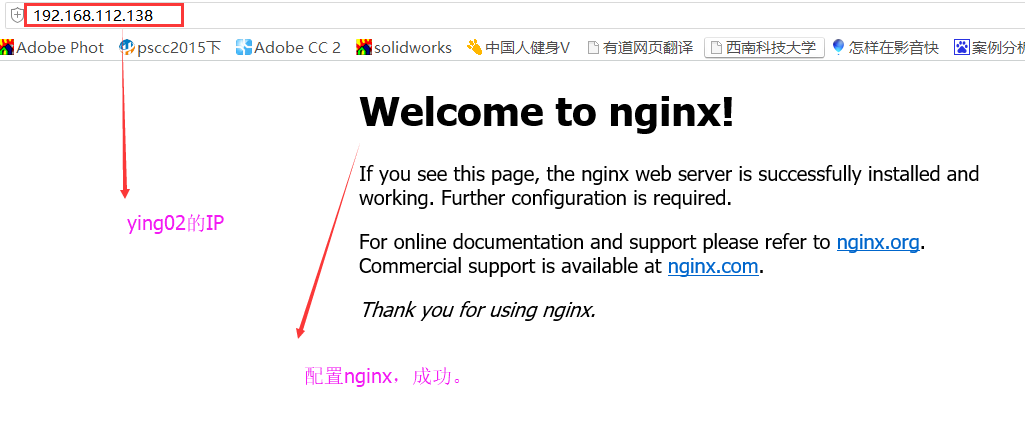
backup 192.168.112.138的页面
现在希望让ying01 master宕机; 关闭keepalived服务即可(关闭它,即连带关闭nginx)。
[root@ying01 ~]# ps aux |grep keep
root      2162  0.0  0.0 118652  1392 ?        Ss   11:24   0:00 /usr/sbin/keepalived -D
root      2163  0.0  0.1 127516  3340 ?        S    11:24   0:00 /usr/sbin/keepalived -D
root      2164  0.0  0.1 127456  2848 ?        S    11:24   0:07 /usr/sbin/keepalived -D
root     39627  0.0  0.0 112720   984 pts/1    S+   16:23   0:00 grep --color=auto keep
[root@ying01 ~]# systemctl stop keepalived
[root@ying01 ~]# ps aux |grep keep
root     39699  0.0  0.0 112720   984 pts/1    R+   16:23   0:00 grep --color=auto keep
在masters查看VIP,发现不在;
[root@ying01 ~]# ip add
1: lo: <LOOPBACK,UP,LOWER_UP> mtu 65536 qdisc noqueue state UNKNOWN qlen 1
link/loopback 00:00:00:00:00:00 brd 00:00:00:00:00:00
inet 127.0.0.1/8 scope host lo
valid_lft forever preferred_lft forever
inet6 ::1/128 scope host
valid_lft forever preferred_lft forever
2: ens33: <BROADCAST,MULTICAST,UP,LOWER_UP> mtu 1500 qdisc pfifo_fast state UP qlen 1000
link/ether 00:0c:29:87:3f:91 brd ff:ff:ff:ff:ff:ff
inet 192.168.112.136/24 brd 192.168.112.255 scope global ens33
valid_lft forever preferred_lft forever
inet 192.168.112.158/24 brd 192.168.112.255 scope global secondary ens33:0
valid_lft forever preferred_lft forever
inet6 fe80::16dc:89c:b761:e115/64 scope link
valid_lft forever preferred_lft forever
3: ens37: <BROADCAST,MULTICAST,UP,LOWER_UP> mtu 1500 qdisc pfifo_fast state UP qlen 1000
link/ether 00:0c:29:87:3f:9b brd ff:ff:ff:ff:ff:ff
在backup上查看,发现VIP已经移到此机上;
[root@ying02 ~]# ip add
1: lo: <LOOPBACK,UP,LOWER_UP> mtu 65536 qdisc noqueue state UNKNOWN qlen 1
link/loopback 00:00:00:00:00:00 brd 00:00:00:00:00:00
inet 127.0.0.1/8 scope host lo
valid_lft forever preferred_lft forever
inet6 ::1/128 scope host
valid_lft forever preferred_lft forever
2: ens33: <BROADCAST,MULTICAST,UP,LOWER_UP> mtu 1500 qdisc pfifo_fast state UP qlen 1000
link/ether 00:0c:29:c6:2c:24 brd ff:ff:ff:ff:ff:ff
inet 192.168.112.138/24 brd 192.168.112.255 scope global ens33
valid_lft forever preferred_lft forever
inet 192.168.112.100/32 scope global ens33
valid_lft forever preferred_lft forever
inet6 fe80::964f:be22:ddf2:54b7/64 scope link
valid_lft forever preferred_lft forever
3: ens37: <BROADCAST,MULTICAST,UP,LOWER_UP> mtu 1500 qdisc pfifo_fast state UP qlen 1000
link/ether 00:0c:29:c6:2c:2e brd ff:ff:ff:ff:ff:ff
inet6 fe80::19f6:ebf0:2c32:5b7c/64 scope link
valid_lft forever preferred_lft forever
那么用windouw浏览器 观测,与前面对比;
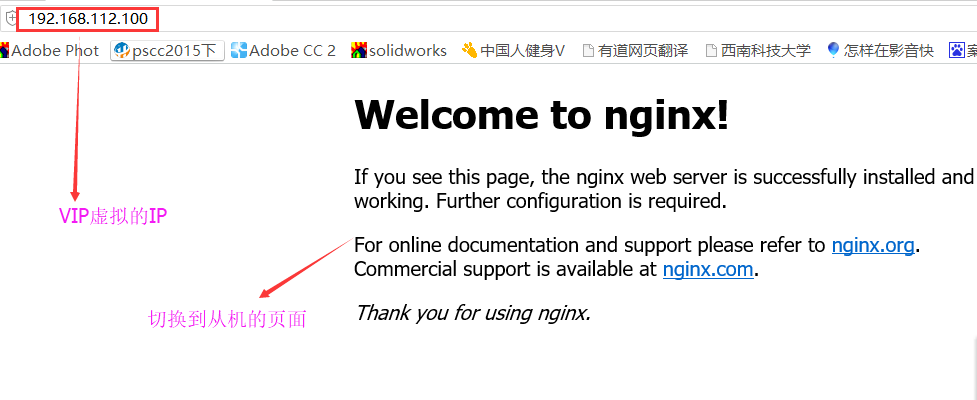
此时VIP完美转移到backup上面,不影响用户使用;
四、负载均衡集群介绍
负载均衡软件分类:主流的负载均衡开源软件:LVS、keepalived、haproxy、nginx等
其中,LVS属于4层(网络OSI7层模型),nginx属于7层,haproxy即可以是4层,也可以是7层。
keepalived的负载均衡功能其实就是lvs
lvs这种4层的负载均衡是可以分发除80外的其他端口通信,比如mysql,而nginx仅仅支持http、https、mail
haproxy也可以支持mysql
4层和7层负载比较:
LVS4层的更稳定,能承受更多的请求
nginx 7层的更加灵活,能实现更多的个性化需要
五、lvs介绍
LVS:Linux Virtuer Server,即Linux虚拟服务器,是一个虚拟的服务器集群系统,基于TCP/IP做的路由和转发,稳定性和效率很高。本项目在1998年5月由章文嵩博士成立,是中国国内最早出现的自由软件项目之一。LVS集群采用IP负载均衡技术和基于内容请求分发技术。调度器具有很好的吞吐率,将请求均衡地转移到不同的服务器上执行,且调度器自动屏蔽掉服务器的故障,从而将一组服务器构成一个高性能的、高可用的虚拟服务器。整个服务器集群的结构对客户是透明的,而且无需修改客户端和服务器端的程序。为此,在设计时需要考虑系统的透明性、可伸缩性、高可用性和易管理性。
一般来说,LVS集群采用三层结构
A、负载调度器(load balancer)或者叫分发器(Load Runner),它是整个集群对外面的前端机,负责将客户的请求发送到一组服务器上执行,而客户认为服务是来自一个IP地址(我们可称之为虚拟IP地址)上的。
B、服务器池(server pool),是一组真正执行客户请求的服务器,执行的服务有WEB、MAIL、FTP和DNS等。
C、共享存储(shared storage),它为服务器池提供一个共享的存储区,这样很容易使得服务器池拥有相同的内容,提供相同的服务。
六、LVS调度算法
lvs支持的算法有:轮询:Round-Robin,简称:rr
加权轮询:Weight Round-Robin,简称:wrr
最小连接:Least-Connection,简称:lc
加权最小连接:Weight Least-Connection,简称:wlc
基于局部性的最小连接:Locality-Based Least Connections,简称:lblc
带复制的基于局部性最小连接:Locality-Based Least Connections with Replication,简称:lblcr
目标地址散列调度:Destination Hashing,简称:dh
源地址散列调度:Source Hashing,简称:sh
七、LVS NAT模式搭建
试验原理:LVS NAT模式借助iptables的nat表来实现:
用户的请求到分发器后,通过预设的iptables规则,把请求的数据包转发到后端的rs上去
rs需要设定网关为分发器的内网ip
用户请求的数据包和返回给用户的数据包全部经过分发器,所以分发器成为瓶颈
在nat模式中,只需要分发器有公网ip即可,所以比较节省公网ip资源
试验准备:
三台机器:
分发器,也叫调度器(简写为dir)
内网:192.168.112.136,外网:192.168.24.128(vmware仅主机模式)
rs1
内网:192.168.112.138,设置网关为192.168.112.136
rs2
内网:192.168.112.139,设置网关为192.168.112.136
三台机器上都执行执行
systemctl stop firewalld; systemc disable firewalld;
systemctl start iptables-services; iptables -F; service iptables save
注意:ying01和ying02机器已经存在,现在需要克隆一台ying03机器;其IP定位:192.168.112.139。此处不详细介绍;
在ying01上
分发器需要,两个网卡,也就是ying01机器上需要两个网卡;
[root@ying01 ~]# ifconfig
ens33: flags=4163<UP,BROADCAST,RUNNING,MULTICAST>  mtu 1500
inet 192.168.112.136  netmask 255.255.255.0  broadcast 192.168.112.255
inet6 fe80::16dc:89c:b761:e115  prefixlen 64  scopeid 0x20<link>
ether 00:0c:29:87:3f:91  txqueuelen 1000  (Ethernet)
RX packets 20512  bytes 6845743 (6.5 MiB)
RX errors 0  dropped 0  overruns 0  frame 0
TX packets 25704  bytes 4194777 (4.0 MiB)
TX errors 0  dropped 0 overruns 0  carrier 0  collisions 0

ens33:0: flags=4163<UP,BROADCAST,RUNNING,MULTICAST>  mtu 1500
inet 192.168.112.158  netmask 255.255.255.0  broadcast 192.168.112.255
ether 00:0c:29:87:3f:91  txqueuelen 1000  (Ethernet)

ens37: flags=4163<UP,BROADCAST,RUNNING,MULTICAST>  mtu 1500
ether 00:0c:29:87:3f:9b  txqueuelen 1000  (Ethernet)
RX packets 1335  bytes 456570 (445.8 KiB)
RX errors 0  dropped 0  overruns 0  frame 0
TX packets 3646  bytes 647124 (631.9 KiB)
TX errors 0  dropped 0 overruns 0  carrier 0  collisions 0

lo: flags=73<UP,LOOPBACK,RUNNING>  mtu 65536
inet 127.0.0.1  netmask 255.0.0.0
inet6 ::1  prefixlen 128  scopeid 0x10<host>
loop  txqueuelen 1  (Local Loopback)
RX packets 118  bytes 10696 (10.4 KiB)
RX errors 0  dropped 0  overruns 0  frame 0
TX packets 118  bytes 10696 (10.4 KiB)
TX errors 0  dropped 0 overruns 0  carrier 0  collisions 0
在ying01机器,vmware上配置仅主机模式;
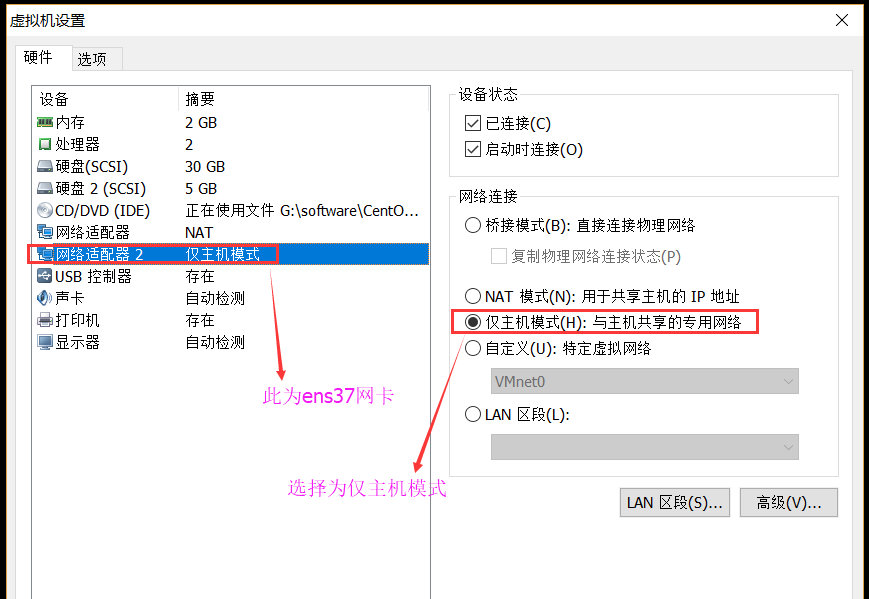
此时查看ens37网卡的IP为192.168.24.128;
[root@ying01 ~]# ifconfig
ens33: flags=4163<UP,BROADCAST,RUNNING,MULTICAST>  mtu 1500
inet 192.168.112.136  netmask 255.255.255.0  broadcast 192.168.112.255
inet6 fe80::16dc:89c:b761:e115  prefixlen 64  scopeid 0x20<link>
ether 00:0c:29:87:3f:91  txqueuelen 1000  (Ethernet)
RX packets 20749  bytes 6864991 (6.5 MiB)
RX errors 0  dropped 0  overruns 0  frame 0
TX packets 25824  bytes 4211329 (4.0 MiB)
TX errors 0  dropped 0 overruns 0  carrier 0  collisions 0

ens33:0: flags=4163<UP,BROADCAST,RUNNING,MULTICAST>  mtu 1500
inet 192.168.112.158  netmask 255.255.255.0  broadcast 192.168.112.255
ether 00:0c:29:87:3f:91  txqueuelen 1000  (Ethernet)

ens37: flags=4163<UP,BROADCAST,RUNNING,MULTICAST>  mtu 1500
inet 192.168.24.128  netmask 255.255.255.0  broadcast 192.168.24.255
inet6 fe80::ad38:a02e:964e:1b93  prefixlen 64  scopeid 0x20<link>
ether 00:0c:29:87:3f:9b  txqueuelen 1000  (Ethernet)
RX packets 1360  bytes 464840 (453.9 KiB)
RX errors 0  dropped 0  overruns 0  frame 0
TX packets 3670  bytes 651388 (636.1 KiB)
TX errors 0  dropped 0 overruns 0  carrier 0  collisions 0

lo: flags=73<UP,LOOPBACK,RUNNING>  mtu 65536
inet 127.0.0.1  netmask 255.0.0.0
inet6 ::1  prefixlen 128  scopeid 0x10<host>
loop  txqueuelen 1  (Local Loopback)
RX packets 118  bytes 10696 (10.4 KiB)
RX errors 0  dropped 0  overruns 0  frame 0
TX packets 118  bytes 10696 (10.4 KiB)
TX errors 0  dropped 0 overruns 0  carrier 0  collisions 0
查看网卡网关
[root@ying01 ~]# route -n
Kernel IP routing table
Destination     Gateway         Genmask         Flags Metric Ref    Use Iface
0.0.0.0         192.168.112.2   0.0.0.0         UG    100    0        0 ens33
192.168.24.0    0.0.0.0         255.255.255.0   U     100    0        0 ens37
192.168.112.0   0.0.0.0         255.255.255.0   U     100    0        0 ens33
保存清空的规则
[root@ying01 ~]# service iptables save
iptables: Saving firewall rules to /etc/sysconfig/iptables:[  确定  ]
[root@ying01 ~]# iptables -nvL
Chain INPUT (policy ACCEPT 8531 packets, 6290K bytes)
pkts bytes target     prot opt in     out     source               destination

Chain FORWARD (policy ACCEPT 0 packets, 0 bytes)
pkts bytes target     prot opt in     out     source               destination

Chain OUTPUT (policy ACCEPT 22987 packets, 1814K bytes)
pkts bytes target     prot opt in     out     source               destination
ying02上
停止防火墙;
[root@ying02 ~]# systemctl stop firewalld
[root@ying02 ~]# iptables -nvL
Chain INPUT (policy ACCEPT 0 packets, 0 bytes)
pkts bytes target     prot opt in     out     source               destination

Chain FORWARD (policy ACCEPT 0 packets, 0 bytes)
pkts bytes target     prot opt in     out     source               destination

Chain OUTPUT (policy ACCEPT 0 packets, 0 bytes)
pkts bytes target     prot opt in     out     source               destination
安装iptables-services服务;
[root@ying02 ~]# yum list |grep iptables-service
iptables-services.x86_64                  1.4.21-24.1.el7_5            updates
[root@ying02 ~]# yum install -y iptables-services
开启iptables服务,清空规则后,保存规则;
[root@ying02 ~]# systemctl enable iptables
Created symlink from /etc/systemd/system/basic.target.wants/iptables.service to /usr/lib/systemd/system/iptables.service.
[root@ying02 ~]# systemctl start iptables
[root@ying02 ~]# iptables -nvL
Chain INPUT (policy ACCEPT 0 packets, 0 bytes)
pkts bytes target     prot opt in     out     source               destination
20  1468 ACCEPT     all  --  *      *       0.0.0.0/0            0.0.0.0/0            state RELATED,ESTABLISHED
0     0 ACCEPT     icmp --  *      *       0.0.0.0/0            0.0.0.0/0
0     0 ACCEPT     all  --  lo     *       0.0.0.0/0            0.0.0.0/0
0     0 ACCEPT     tcp  --  *      *       0.0.0.0/0            0.0.0.0/0            state NEW tcp dpt:22
0     0 REJECT     all  --  *      *       0.0.0.0/0            0.0.0.0/0            reject-with icmp-host-prohibited

Chain FORWARD (policy ACCEPT 0 packets, 0 bytes)
pkts bytes target     prot opt in     out     source               destination
0     0 REJECT     all  --  *      *       0.0.0.0/0            0.0.0.0/0            reject-with icmp-host-prohibited

Chain OUTPUT (policy ACCEPT 12 packets, 1680 bytes)
pkts bytes target     prot opt in     out     source               destination
[root@ying02 ~]# iptables -F
[root@ying02 ~]# service iptables save
iptables: Saving firewall rules to /etc/sysconfig/iptables:[  确定  ]
此时把ying02上的IP网关改为192.168.112.136
[root@ying02 ~]# vim /etc/sysconfig/network-scripts/ifcfg-ens33

IPADDR=192.168.112.138
NETMASK=255.255.255.0
GATEWAY=192.168.112.136         //更改为136
DNS1=119.29.29.29
重启网络服务,查看其网关
[root@ying02 ~]# systemctl restart network
[root@ying02 ~]# route -n
Kernel IP routing table
Destination     Gateway         Genmask         Flags Metric Ref    Use Iface
0.0.0.0         192.168.112.136 0.0.0.0         UG    100    0        0 ens33
192.168.112.0   0.0.0.0         255.255.255.0   U     100    0        0 ens33
在ying03的上
安装iptables-services服务;
[root@ying03 ~]# yum list |grep iptables-service
iptables-services.x86_64                  1.4.21-24.1.el7_5            updates
[root@ying03 ~]# yum install -y iptables-service
开启iptables服务,清空规则后,保存规则;
[root@ying03 ~]# iptables -nvL
Chain INPUT (policy ACCEPT 499 packets, 531K bytes)
pkts bytes target     prot opt in     out     source               destination

Chain FORWARD (policy ACCEPT 0 packets, 0 bytes)
pkts bytes target     prot opt in     out     source               destination

Chain OUTPUT (policy ACCEPT 471 packets, 49395 bytes)
pkts bytes target     prot opt in     out     source               destination
[root@ying03 ~]#
[root@ying03 ~]# systemctl enable iptables
Created symlink from /etc/systemd/system/basic.target.wants/iptables.service to /usr/lib/systemd/system/iptables.service.
[root@ying03 ~]# systemctl start iptables
[root@ying03 ~]# iptables -nvL
Chain INPUT (policy ACCEPT 0 packets, 0 bytes)
pkts bytes target     prot opt in     out     source               destination
8   576 ACCEPT     all  --  *      *       0.0.0.0/0            0.0.0.0/0            state RELATED,ESTABLISHED
0     0 ACCEPT     icmp --  *      *       0.0.0.0/0            0.0.0.0/0
0     0 ACCEPT     all  --  lo     *       0.0.0.0/0            0.0.0.0/0
0     0 ACCEPT     tcp  --  *      *       0.0.0.0/0            0.0.0.0/0            state NEW tcp dpt:22
0     0 REJECT     all  --  *      *       0.0.0.0/0            0.0.0.0/0            reject-with icmp-host-prohibited

Chain FORWARD (policy ACCEPT 0 packets, 0 bytes)
pkts bytes target     prot opt in     out     source               destination
0     0 REJECT     all  --  *      *       0.0.0.0/0            0.0.0.0/0            reject-with icmp-host-prohibited

Chain OUTPUT (policy ACCEPT 5 packets, 684 bytes)
pkts bytes target     prot opt in     out     source               destination
[root@ying03 ~]# iptables -F
[root@ying03 ~]# service iptables save
iptables: Saving firewall rules to /etc/sysconfig/iptables:[  确定  ]
此时把ying02上的IP网关改为192.168.112.136
[root@ying03 ~]# vim /etc/sysconfig/network-scripts/ifcfg-ens33

IPADDR=192.168.112.139
NETMASK=255.255.255.0
GATEWAY=192.168.112.136         //更改为136
DNS1=119.29.29.29
重启网络服务,查看其网关
[root@ying03 ~]# systemctl restart network
[root@ying03 ~]# route -n
Kernel IP routing table
Destination     Gateway         Genmask         Flags Metric Ref    Use Iface
0.0.0.0         192.168.112.136 0.0.0.0         UG    100    0        0 ens33
192.168.112.0   0.0.0.0         255.255.255.0   U     100    0        0 ens33
**回到ying01上设置 **
安装ipvsadm包
[root@ying01 ~]# yum install -y ipvsadm
编辑lvs_nat.sh脚本
[root@ying01 ~]# vim /usr/local/sbin/lvs_nat.sh

#! /bin/bash
# director 服务器上开启路由转发功能
echo 1 > /proc/sys/net/ipv4/ip_forward
# 关闭icmp的重定向
echo 0 > /proc/sys/net/ipv4/conf/all/send_redirects
echo 0 > /proc/sys/net/ipv4/conf/default/send_redirects
# 注意区分网卡名字,ying01机器两个网卡分别为ens33和ens37
echo 0 > /proc/sys/net/ipv4/conf/ens33/send_redirects
echo 0 > /proc/sys/net/ipv4/conf/ens37/send_redirects
# director 设置nat防火墙
iptables -t nat -F
iptables -t nat -X
iptables -t nat -A POSTROUTING -s 192.168.112.0/24  -j MASQUERADE
# director设置ipvsadm
IPVSADM='/usr/sbin/ipvsadm'
$IPVSADM -C
$IPVSADM -A -t 192.168.24.128:80 -s wlc -p 3
$IPVSADM -a -t 192.168.24.128:80 -r 192.168.112.138:80 -m -w 1
$IPVSADM -a -t 192.168.24.128:80 -r 192.168.112.139:80 -m -w 1
ying02上
ying02上开启nginx,把其主页重新定义;
[root@ying02 ~]# ps aux |grep nginx
root      1028  0.0  0.0  24844   780 ?        Ss   22:13   0:00 nginx: master process /usr/local/nginx/sbin/nginx -c /usr/local/nginx/conf/nginx.conf
nobody    1029  0.0  0.1  27148  3356 ?        S    22:13   0:00 nginx: worker process
nobody    1030  0.0  0.1  27148  3356 ?        S    22:13   0:00 nginx: worker process
root      1576  0.0  0.0 112724   984 pts/0    S+   23:10   0:00 grep --color=auto nginx
[root@ying02 ~]# echo 'ying02 192.168.112.138' > /usr/local/nginx/html/index.html
[root@ying02 ~]# curl localhost
ying02 192.168.112.138           //ying02上的 网页内容
ying03上
ying03同ying02一样,开启nginx服务,并重新定义网页内容
[root@ying03 ~]# ps aux |grep nginx
root      1056  0.0  0.0  24844   788 ?        Ss   22:14   0:00 nginx: master process /usr/local/nginx/sbin/nginx -c /usr/local/nginx/conf/nginx.conf
nobody    1058  0.0  0.1  27148  3360 ?        S    22:14   0:00 nginx: worker process
nobody    1059  0.0  0.1  27148  3360 ?        S    22:14   0:00 nginx: worker process
root      1612  0.0  0.0 112720   980 pts/0    R+   23:23   0:00 grep --color=auto nginx
[root@ying03 ~]# echo 'ying03 192.168.112.139' > /usr/local/nginx/html/index.html
[root@ying03 ~]# curl localhost
ying03 192.168.112.139             //定义的网页内容;
ying01上
执行脚本,查看nat规则,发现有网段出现;
[root@ying01 ~]# sh /usr/local/sbin/lvs_nat.sh
[root@ying01 ~]# iptables -t nat -nvL
Chain PREROUTING (policy ACCEPT 264 packets, 26088 bytes)
pkts bytes target     prot opt in     out     source               destination

Chain INPUT (policy ACCEPT 3 packets, 236 bytes)
pkts bytes target     prot opt in     out     source               destination

Chain OUTPUT (policy ACCEPT 17 packets, 1608 bytes)
pkts bytes target     prot opt in     out     source               destination

Chain POSTROUTING (policy ACCEPT 1 packets, 328 bytes)
pkts bytes target     prot opt in     out     source               destination
158 11991 MASQUERADE  all  --  *      *       192.168.112.0/24     0.0.0.0/0
测试192.168.24.128的主页,发现显示单位为ying02上的主页;
[root@ying01 ~]# curl 192.168.24.128
ying02 192.168.112.138
[root@ying01 ~]# curl 192.168.24.128
ying02 192.168.112.138
[root@ying01 ~]# curl 192.168.24.128
ying02 192.168.112.138
进入脚本,把延迟时间去掉;
[root@ying01 ~]# vim /usr/local/sbin/lvs_nat.sh

$IPVSADM -A -t 192.168.24.128:80 -s wlc  //把延迟3s去掉
重新执行脚本,此时每测试一次,显示的主页为ying02、ying03;很均衡的显示;
[root@ying01 ~]# sh /usr/local/sbin/lvs_nat.sh
[root@ying01 ~]# curl 192.168.24.128
ying03 192.168.112.139
[root@ying01 ~]# curl 192.168.24.128
ying02 192.168.112.138
[root@ying01 ~]# curl 192.168.24.128
ying03 192.168.112.139
[root@ying01 ~]# curl 192.168.24.128
ying02 192.168.112.138
[root@ying01 ~]# curl 192.168.24.128
ying03 192.168.112.139
[root@ying01 ~]# curl 192.168.24.128
ying02 192.168.112.138
ipvsadm -ln 查看其规则
[root@ying01 ~]# ipvsadm -ln
IP Virtual Server version 1.2.1 (size=4096)
Prot LocalAddress:Port Scheduler Flags
-> RemoteAddress:Port           Forward Weight ActiveConn InActConn
TCP  192.168.24.128:80 wlc
-> 192.168.112.138:80           Masq    1      0          3
-> 192.168.112.139:80           Masq    1      0          3
[root@ying01 ~]# curl 192.168.24.128
ying03 192.168.112.139
[root@ying01 ~]# ipvsadm -ln
IP Virtual Server version 1.2.1 (size=4096)
Prot LocalAddress:Port Scheduler Flags
-> RemoteAddress:Port           Forward Weight ActiveConn InActConn
TCP  192.168.24.128:80 wlc
-> 192.168.112.138:80           Masq    1      0          3
-> 192.168.112.139:80           Masq    1      0          4

相关文章推荐
- 【Linux集群架构】LVS DR模式搭建和keepalived + LVS
- Linux集群、Keepalived—Nginx高可用集群架构搭建
- linux集群架构(一),集群概述、高可用配置
- 【237期门诊集锦】揭秘Linux集群与架构设计
- Linux集群架构之Keepalived
- 【Linux集群架构】负载均衡集群介绍、LVS介绍、LVS调度算法和LVS NAT模式搭建
- 分布式架构学习之:Redis3集群的Linux安装、配置、高可用测试
- Linux集群、Keepalived—Nginx高可用集群架构搭建
- linux集群架构一
- Linux负载均衡集群之LVS原理 分类: 系统架构 Linux 2015-05-27 22:16 61人阅读 评论(0) 收藏
- linux运维进阶-基于RHCS+iSCSI+CLVM实现Web服务的共享存储集群架构
- Linux集群架构介绍
- 基于Windows/Linux混合搭建Docker集群架构
- Linux负载均衡集群之LVS原理 分类: 系统架构 Linux 2015-05-27 22:16 60人阅读 评论(0) 收藏
- [18] Linux集群架构
- linux集群架构(一),集群概述、高可用配置
- linux 开源集群架构
- Linux 企业网站集群架构
- Linux集群、Keepalived—Nginx高可用集群架构搭建