Mybatis源码-XXXmapper.xml中的resultMap标签解析过程
2018-05-22 12:47
726 查看
Mybatis源码-XXXmapper.xml中的resultMap标签解析过程
前提:之前讲过Spring在解析applicationcontext.xml会将该配置文件中所有的bean标签注册成BeanDefinition,具体的注册流程这里就不再重复了,还讲到过一个实现InitializingBean接口的afterPropertiesSet方法,该方法会在Spring实例化Bean的时候调用,bean配置和InitializingBean扩展参考如下:
bean配置,该bean配置也算是Mybatis的入口,切记
InitializingBean扩展源码AbstractAutowireCapableBeanFactory#invokeInitMethods
看完如上Spring给我们扩展接口,我们就结合如上的bean一起分析Mybatis到底是如何解析XXXmapper.xml文件的。
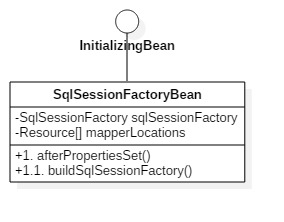
1. 首先看到在配置文件配置的bean所在的class是SqlSessionFactoryBean这个类,进入这个类中,会发现SqlSessionFactoryBean也是实现了InitializingBean接口的,并实现了接口的afterPropertiesSet方法,证明在Spring和Mybatis的整合中,Spring启动实例化时就会进行XXXmapper.xml文件的解析。紧接着在afterPropertiesSet又调用了buildSqlSessionFactory方法。
2. 在看源码的时候,我们要先了解Mybatis的一些组件,下面是mybatis的主要构件功能介绍。
3. 在这个方法中会涉及到一个全局的配置文件(configurationProperties)加载解析的过程,在早期ibatis用的比较多,在现今的Mybatis其实用的挺少。
4. 紧接着我们就到了XXXmapper.xml解析的核心部分了,可以看到该代码循环了所有的Mapper资源文件,将资源文件一个一个的用SAX解析方式进行解析。
5. 现在我们就XMLMapperBuilder#parse到底是如何解析XXXmapper.xml的,可以看出是从当前这个XXXmapper..xml文件中取出<mapper>标签,并进行该标签的解析。
拿到了<mapper>标签后紧接着进行子标签<resultMap>、<sql>、<update>等等标签的分类解析。
6. 下面我们就先看看Mybatis是这么去解析<resultMap>标签的。为了更好的演示效果,下面我先贴出一个简单AdminMapper.xml配置文件。
AdminMapper.xml 只包含了一个resultMap和update标签。
在解析<resultMap>标签的时候,首先会以数组的形式拿到所有<resultMap>标签,并循环遍历方式一个一个的去解析,这里我只配置了一个<resultMap>,所以数组中只有一个元素。
将当前的<resultMap>标签解析包装成ResultMap对象。
resultMaps 的id就是<resultMap id="BaseResultMap">的id,且一个id就对应了一个ResultMap对象。
整体包装类图结构
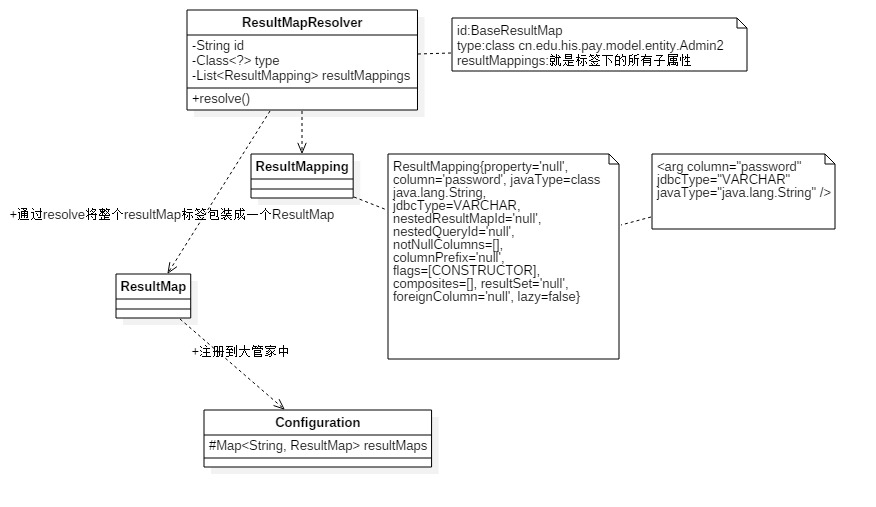
从上面的源代码和类图发现,其实最终就是将所有的<resultMap>中的配置属性解析包装成ResultMap,并将保存后的实体注册到大管家(Configuration)中,主要目的就是为了之后大管家能在使用的时候直接从内存中获取对应的配置信息,而不用重新去解析配置文件。
前提:之前讲过Spring在解析applicationcontext.xml会将该配置文件中所有的bean标签注册成BeanDefinition,具体的注册流程这里就不再重复了,还讲到过一个实现InitializingBean接口的afterPropertiesSet方法,该方法会在Spring实例化Bean的时候调用,bean配置和InitializingBean扩展参考如下:
bean配置,该bean配置也算是Mybatis的入口,切记
<bean id="hispaySqlSessionFactory" class="org.mybatis.spring.SqlSessionFactoryBean">
<property name="dataSource" ref="hispayDataSource" />
<!-- mapperLocations 的value 值可以配置多个,用“,”来分隔 -->
<property name="mapperLocations" value="classpath:mybatis/xml/hispay/*Mapper.xml" />
</bean>
InitializingBean扩展源码AbstractAutowireCapableBeanFactory#invokeInitMethods
protected void invokeInitMethods(String beanName, final Object bean, RootBeanDefinition mbd)
throws Throwable {
// 判断当前bean是否实现了InitializingBean接口,实现了就进行afterPropertiesSet方法的调用
boolean isInitializingBean = (bean instanceof InitializingBean);
if (isInitializingBean && (mbd == null || !mbd.isExternallyManagedInitMethod("afterPropertiesSet"))) {
if (logger.isDebugEnabled()) {
logger.debug("Invoking afterPropertiesSet() on bean with name '" + beanName + "'");
}
if (System.getSecurityManager() != null) {
try {
AccessController.doPrivileged(new PrivilegedExceptionAction<Object>() {
@Override
public Object run() throws Exception {
((InitializingBean) bean).afterPropertiesSet();
return null;
}
}, getAccessControlContext());
}
catch (PrivilegedActionException pae) {
throw pae.getException();
}
}
else {
((InitializingBean) bean).afterPropertiesSet();
}
}
if (mbd != null) {
String initMethodName = mbd.getInitMethodName();
// 同时也判断xml中的init-method属性是否afterPropertiesSet,是就不再进行afterPropertiesSet的调用
if (initMethodName != null && !(isInitializingBean && "afterPropertiesSet".equals(initMethodName)) &&
!mbd.isExternallyManagedInitMethod(initMethodName)) {
invokeCustomInitMethod(beanName, bean, mbd);
}
}
}
看完如上Spring给我们扩展接口,我们就结合如上的bean一起分析Mybatis到底是如何解析XXXmapper.xml文件的。
1. 首先看到在配置文件配置的bean所在的class是SqlSessionFactoryBean这个类,进入这个类中,会发现SqlSessionFactoryBean也是实现了InitializingBean接口的,并实现了接口的afterPropertiesSet方法,证明在Spring和Mybatis的整合中,Spring启动实例化时就会进行XXXmapper.xml文件的解析。紧接着在afterPropertiesSet又调用了buildSqlSessionFactory方法。
2. 在看源码的时候,我们要先了解Mybatis的一些组件,下面是mybatis的主要构件功能介绍。
SqlSession            作为MyBatis工作的主要顶层API,表示和数据库交互的会话,完成必要数据库增删改查功能
Executor              MyBatis执行器,是MyBatis 调度的核心,负责SQL语句的生成和查询缓存的维护
StatementHandler   封装了JDBC Statement操作,负责对JDBC statement 的操作,如设置参数、将Statement结果集转换成List集合。
ParameterHandler   负责对用户传递的参数转换成JDBC Statement 所需要的参数,
ResultSetHandler    负责将JDBC返回的ResultSet结果集对象转换成List类型的集合;
TypeHandler          负责java数据类型和jdbc数据类型之间的映射和转换
MappedStatement   MappedStatement维护了一条<select|update|delete|insert>节点的封装,
SqlSource            负责根据用户传递的parameterObject,动态地生成SQL语句,将信息封装到BoundSql对象中,并返回
BoundSql             表示动态生成的SQL语句以及相应的参数信息
Configuration        MyBatis所有的配置信息都维持在Configuration对象之中。
3. 在这个方法中会涉及到一个全局的配置文件(configurationProperties)加载解析的过程,在早期ibatis用的比较多,在现今的Mybatis其实用的挺少。
xmlConfigBuilder = new XMLConfigBuilder(this.configLocation.getInputStream(), null, this.configurationProperties);
if (xmlConfigBuilder != null) {
xmlConfigBuilder.parse();
}4. 紧接着我们就到了XXXmapper.xml解析的核心部分了,可以看到该代码循环了所有的Mapper资源文件,将资源文件一个一个的用SAX解析方式进行解析。
# 加载mapperLocations配置资源进行解析
SqlSessionFactoryBean#buildSqlSessionFactory(){
for (Resource mapperLocation : this.mapperLocations) {
if (mapperLocation == null) {
continue;
}
try {
XMLMapperBuilder xmlMapperBuilder = new XMLMapperBuilder(mapperLocation.getInputStream(),
configuration, mapperLocation.toString(), configuration.getSqlFragments());
// 拿到XXXmapper.xml文件流进行解析
xmlMapperBuilder.parse();
}
}5. 现在我们就XMLMapperBuilder#parse到底是如何解析XXXmapper.xml的,可以看出是从当前这个XXXmapper..xml文件中取出<mapper>标签,并进行该标签的解析。
public void parse() {
if (!configuration.isResourceLoaded(resource)) {
// parser.evalNode("/mapper") 当前Mapper.xml文件流中的mapper标签解析成可直接操作对象
configurationElement(parser.evalNode("/mapper"));
}
}
拿到了<mapper>标签后紧接着进行子标签<resultMap>、<sql>、<update>等等标签的分类解析。
private void configurationElement(XNode context) {
try {
String namespace = context.getStringAttribute("namespace");
if (namespace == null || namespace.equals("")) {
throw new BuilderException("Mapper's namespace cannot be empty");
}
builderAssistant.setCurrentNamespace(namespace);
cacheRefElement(context.evalNode("cache-ref"));
cacheElement(context.evalNode("cache"));
parameterMapElement(context.evalNodes("/mapper/parameterMap")); // 解析parameterMap标签
resultMapElements(context.evalNodes("/mapper/resultMap")); //解析resultMap标签
sqlElement(context.evalNodes("/mapper/sql")); //解析sql标签
buildStatementFromContext(context.evalNodes("select|insert|update|delete")); //解析select|insert|update|delete标签
} catch (Exception e) {
throw new BuilderException("Error parsing Mapper XML. Cause: " + e, e);
}
}6. 下面我们就先看看Mybatis是这么去解析<resultMap>标签的。为了更好的演示效果,下面我先贴出一个简单AdminMapper.xml配置文件。
AdminMapper.xml 只包含了一个resultMap和update标签。
<?xml version="1.0" encoding="UTF-8" ?>
<!DOCTYPE mapper PUBLIC "-//mybatis.org//DTD Mapper 3.0//EN" "http://mybatis.org/dtd/mybatis-3-mapper.dtd" >
<mapper namespace="cn.edu.his.pay.mapper.hispay.AdminMapper">
<resultMap id="BaseResultMap" type="cn.edu.his.pay.model.entity.Admin2">
<constructor>
<idArg column="id" jdbcType="INTEGER" javaType="java.lang.Integer" />
<arg column="account" jdbcType="VARCHAR" javaType="java.lang.String" />
<arg column="password" jdbcType="VARCHAR" javaType="java.lang.String" />
</constructor>
</resultMap>
<update id="updateByPrimaryKeySelective" parameterType="cn.edu.his.pay.model.entity.Admin">
update admin
<set>
<if test="account != null">
account = #{account,jdbcType=VARCHAR},
</if>
<if test="password != null">
password = #{password,jdbcType=VARCHAR},
</if>
</set>
where id = #{id}
</update>
</mapper>
在解析<resultMap>标签的时候,首先会以数组的形式拿到所有<resultMap>标签,并循环遍历方式一个一个的去解析,这里我只配置了一个<resultMap>,所以数组中只有一个元素。
private void resultMapElements(List<XNode> list) throws Exception {
for (XNode resultMapNode : list) {
try {
resultMapElement(resultMapNode);
} catch (IncompleteElementException e) {
// ignore, it will be retried
}
}
}
将当前的<resultMap>标签解析包装成ResultMap对象。
private ResultMap resultMapElement(XNode resultMapNode, List<ResultMapping> additionalResultMappings) throws Exception {
ErrorContext.instance().activity("processing " + resultMapNode.getValueBasedIdentifier());
// 拿到当前resultMap标签id属性为:BaseResultMap
String id = resultMapNode.getStringAttribute("id",
resultMapNode.getValueBasedIdentifier());
// type 属性:cn.edu.his.pay.model.entity.Admin2
String type = resultMapNode.getStringAttribute("type",
resultMapNode.getStringAttribute("ofType",
resultMapNode.getStringAttribute("resultType",
resultMapNode.getStringAttribute("javaType"))));
String extend = resultMapNode.getStringAttribute("extends");
Boolean autoMapping = resultMapNode.getBooleanAttribute("autoMapping");
// 拿到cn.edu.his.pay.model.entity.Admin2类Class对象
Class<?> typeClass = resolveClass(type);
Discriminator discriminator = null;
List<ResultMapping> resultMappings = new ArrayList<ResultMapping>();
resultMappings.addAll(additionalResultMappings);
// 拿到resultMap标签子元素resultChildren
/*
[<constructor>
<idArg jdbcType="INTEGER" column="id" javaType="java.lang.Integer"/>
<arg jdbcType="VARCHAR" column="account" javaType="java.lang.String"/>
<arg jdbcType="VARCHAR" column="password" javaType="java.lang.String"/>
</constructor>]
*/
List<XNode> resultChildren = resultMapNode.getChildren();
// 遍历所有的子元素<constructor>
for (XNode resultChild : resultChildren) {
if ("constructor".equals(resultChild.getName())) {
processConstructorElement(resultChild, typeClass, resultMappings);
// 判断是否是<constructor>标签
} else if ("discriminator".equals(resultChild.getName())) {
discriminator = processDiscriminatorElement(resultChild, typeClass, resultMappings);
} else {
List<ResultFlag> flags = new ArrayList<ResultFlag>();
if ("id".equals(resultChild.getName())) {
flags.add(ResultFlag.ID);
}
resultMappings.add(buildResultMappingFromContext(resultChild, typeClass, flags));
}
}
// 拿到当前<constructor>下子元素封装好的resultMappings,将其包装到ResultMapResolver中
ResultMapResolver resultMapResolver = new ResultMapResolver(builderAssistant, id, typeClass, extend, discriminator, resultMappings, autoMapping);
try {
// 调用包装类的resolve方法,并将resultMappings包装成ResultMap
return resultMapResolver.resolve();
} catch (IncompleteElementException  e) {
configuration.addIncompleteResultMap(resultMapResolver);
throw e;
}
}

private void processConstructorElement(XNode resultChild, Class<?> resultType, List<ResultMapping> resultMappings) throws Exception {
// 拿到<constructor>标签下所有子标签
/*
[ <idArg jdbcType="INTEGER" column="id" javaType="java.lang.Integer"/>
, <arg jdbcType="VARCHAR" column="account" javaType="java.lang.String"/>
, <arg jdbcType="VARCHAR" column="password" javaType="java.lang.String"/>]
*/
List<XNode> argChildren = resultChild.getChildren();
// 循环遍历所有的子标签
for (XNode argChild : argChildren) {
List<ResultFlag> flags = new ArrayList<ResultFlag>();
flags.add(ResultFlag.CONSTRUCTOR);
if ("idArg".equals(argChild.getName())) {
flags.add(ResultFlag.ID);
}
// 将每一个属性都标签都构造成一个ResultMapping,并加入到resultMappings中
// resultMappings就是一个Map
resultMappings.add(buildResultMappingFromContext(argChild, resultType, flags));
}
}
resultMaps 的id就是<resultMap id="BaseResultMap">的id,且一个id就对应了一个ResultMap对象。
public void addResultMap(ResultMap rm) {
resultMaps.put(rm.getId(), rm);
checkLocallyForDiscriminatedNestedResultMaps(rm);
checkGloballyForDiscriminatedNestedResultMaps(rm);
}
整体包装类图结构
从上面的源代码和类图发现,其实最终就是将所有的<resultMap>中的配置属性解析包装成ResultMap,并将保存后的实体注册到大管家(Configuration)中,主要目的就是为了之后大管家能在使用的时候直接从内存中获取对应的配置信息,而不用重新去解析配置文件。

相关文章推荐
- Mybatis源码-XXXmapper.xml中的sel|ins|update|del标签解析过程
- mybatis源码学习之执行过程分析(2)——config.xml配置文件和mapper.xml映射文件解析过程
- Mybatis3源码分析(04)-加载Configuration-XMLMapperBuilder加载ResultMap
- 03_MyBatis基本查询,mapper文件的定义,测试代码的编写,resultMap配置返回值,sql片段配置,select标签标签中的内容介绍,配置使用二级缓存,使用别名的数据类型,条件查询ma
- MyBatis-3.4.2-源码分析12:XML解析之mapperElement(root.evalNode("mappers"))
- 03_MyBatis基本查询,mapper文件的定义,测试代码的编写,resultMap配置返回值,sql片段配置,select标签标签中的内容介绍,配置使用二级缓存,使用别名的数据类型,条件查询ma
- mybatis源码-原来resultMap解析完是这样
- Mybatis 源码解析三、Mapper接口与mapper.xml文件绑定
- Mybatis中resultMap是否可以共享(每个mapper.xml中都要重复定义相同的resultMap吗)
- mybatis绑定多个mapper,@ResultMap 报错: Mapped Statements collection already contains value for xxx
- MyBatis知识系列之三:MyBatis的配置文件:mybatis.cfg.xml和xxx.mapper.xml文件的解析
- MyBatis-3.4.2-源码分析18:XML解析之RoleMapper userMapper = sqlSession.getMapper(RoleMapper.class)
- Mybatis mapper.xml 中的resultMap用法
- MyBatis-3.4.2-源码分析14:XML解析之sqlElement(context.evalNodes("/mapper/sql"))
- Mybatis3源码分析(三):解析mapper的xml配置文件
- mybatis源码解析(四)-Mapper方法调用过程
- Mybatis 源码解析二、Mapper接口的代理实现过程 MapperScannerConfigurer 解析
- MyBatis-3.4.2-源码分析17:XML解析之bindMapperForNamespace
- Mybatis3源码分析(三):解析mapper的xml配置文件
- 博为峰JavaEE技术文章 ——MyBatis Mapper ResultMap(5)constructor (介绍resultMap中constructor标签的用法)