写一百题程序学Python 【 21-30】
2018-03-30 16:44
537 查看
这次通过编写程序对iris数据进行进行处理,得到了可以作为数据集的iris数组,使用这个数组来训练神经网络。
21.读取文件并存储为数组
22.使用tensorflow训练基于iris数据集的神经网络
23.输出目录下的所有文件
24.将GIF动态图片分解并将每帧保存为png文件

参考:点击打开链接
25.在图片上添加文字
def addTextToImage(file,x,y,str):
im = Image.open(file)
draw = ImageDraw.Draw(im)
draw.text((x,y),str,(0,0,0))
draw = ImageDraw.Draw(im)
shutil.copyfile(file, file+".bak")
im.save(file)
addTextToImage("resolve//load-0.png",10,20,"Loading..")#在10,10位置添加一个Loading

使用默认字体,这里有个缺点是,使用PIL不能输入中文
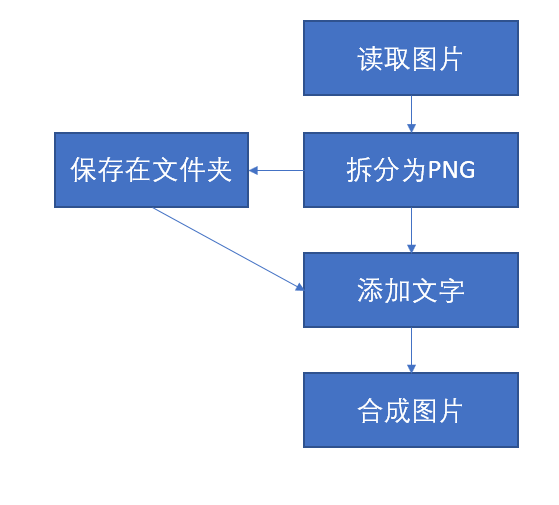
26.向GIF动态图片上添加文字通过24和25的函数,目前可以拆解图片以及添加文字,因此再编写一个合成为gif图片的函数即可
# -*- coding: UTF-8 -*-
import imageio
import os
import shutil
import glob
from PIL import Image
from PIL import ImageDraw
from PIL import ImageFont
def resolveGifImage(filepath):
im = Image.open(filepath)
mode = 'partial' #图片模式
i = 0
p = im.getpalette() #获取调色板信息
last_frame = im.convert('RGBA')#转换图片色彩模式
if os.path.exists('resolve') == False:
os.mkdir("resolve")
try:
while True:
print( "mode:%s No.%s size:%s tile:%s" % ( mode, i, im.size, im.tile))
if not im.getpalette():#如果不存在调色板
im.putpalette(p)#添加一个调色板
new_frame = Image.new('RGBA', im.size)
if mode == 'partial':
new_frame.paste(last_frame)
new_frame.paste(im, (0, 0), im.convert('RGBA'))
new_frame.save('resolve//%s-%d.png' % (''.join(os.path.basename(filepath).split('.')[:-1]), i), 'PNG')
i += 1
last_frame = new_frame
im.seek(im.tell() + 1)
except EOFError:
pass
def addTextToImage(file,x,y,str):
im = Image.open(file)
draw = ImageDraw.Draw(im)
draw.text((x,y),str,(0,0,0))
draw = ImageDraw.Draw(im)
if os.path.exists('change') == False:
os.mkdir("change")
im.save("change//"+file)
#构建GIF文件
def buildGifImage(buffer,targetfile,speed):
frames = []
for image in buffer:
frames.append(imageio.imread(image))
imageio.mimsave(targetfile, frames, 'GIF', duration= 0.1)
#查找目录下的所有png文件
def find_all_png(path):
png_filenames = glob.glob(path+"*.png")
buf=[]
for png_file in png_filenames:
buf.append(png_file)
return buf
#添加文字到GIF图
def addTextToGif(file,x,y,str):
resolveGifImage(file)
if os.path.exists('resolve') == False:
os.mkdir("resolve")
for image in os.listdir("resolve"):
addTextToImage("resolve/"+image,x,y,str)
buildGifImage(find_all_png("change/resolve/"),"1.gif",0.1)
addTextToGif("load.gif",100,100,"Loading")原图:

修改后:

27.建立一个线程并运行import _thread
import time
def printCurTime():
threadname = "print"
count = 0
while count < 5:
time.sleep(1)
print("%s: %s" % (threadname, time.ctime(time.time())))
try:
_thread.start_new_thread(printCurTime())
except:
print("Create thread failed.")
while True:
pass
28.传递参数给线程并打印日期
29.使用Tkinter创建一个GUI,有Button和Listbox控件
21.读取文件并存储为数组
filename = '/home/farell/pythonProject/iris_change.data'
input = [[0.0 for i in range(4)] for i in range(150)]
output = [[0.0 for i in range(3)] for i in range(150)]
i=0

with open(filename, 'r') as file_to_read:
while True:
lines = file_to_read.readline()
lines = lines.strip('\n')
# print(lines)
if not lines :
break
input[i][0], input[i][1],input[i][2],input[i][3],output[i][0],output[i][1],\
output[i][2] = [float(j) for j  in lines.split(',',6)]
i=i+1
print(input)
print(output)
22.使用tensorflow训练基于iris数据集的神经网络
import time
import tensorflow as tf
filename = '/home/farell/pythonProject/iris_change.data'

#初始化一个数组,大小依照读取的文件来决定
input = [[0.0 for i in range(4)] for i in range(150)]
output = [[0.0 for i in range(3)] for i in range(150)]
i=0

#添加层函数
def add_layer(inputs,in_size,out_size,activation_function=None):
Weights = tf.Variable(tf.random_normal([in_size, out_size]))
biases = tf.Variable(tf.zeros([1, out_size]) + 0.1)
Wx_plus_b = tf.matmul(inputs, Weights) + biases
if activation_function is None:
outputs = Wx_plus_b
else:
outputs = activation_function(Wx_plus_b)
return outputs

#文件打开处理,将每行的数据保存到数组中
with open(filename, 'r') as file_to_read:#消除换行符对于切割造成的影响
while True:
#读取一行
lines = file_to_read.readline()
lines = lines.strip('\n')
if not lines :
break
#切割并存储到数组中
input[i][0], input[i][1],input[i][2],input[i][3],output[i][0],output[i][1],\
output[i][2] = [float(j) for j  in lines.split(',',6)]
i=i+1
# print(input)
# print(output)

#输入层设置
xs = tf.placeholder(tf.float32,[None,4])
ys = tf.placeholder(tf.float32,[None,3])

#添加输入层,定义输入为4,隐藏层为10
l1 = add_layer(xs,4,10,activation_function=tf.nn.sigmoid)
#添加输出层,定义隐藏层为10,输出为3
prediction = add_layer(l1,10,3,activation_function=None)

#错误率计算
loss = tf.reduce_mean(tf.reduce_sum(tf.square(ys - prediction),
reduction_indices=[1]))

#定义步长和优化器
train_step = tf.train.GradientDescentOptimizer(0.1).minimize(loss)
init = tf.global_variables_initializer()

#初始化tensorflow
sess= tf.Session()
sess.run(init)

i=0
curloss = 1;
start = time.time()

#在错误率高于0.03之前持续计算
while curloss>0.03:
sess.run(train_step,feed_dict={xs:input,ys:output})
if i%500 == 0:
prediction_value = sess.run(prediction, feed_dict={xs: input})
curloss = sess.run(loss,feed_dict={xs:input,ys:output})
print(curloss)
i = i + 1

#输出训练神经网络所用的时间
end = time.time()
print("Using time: ",(end-start))
23.输出目录下的所有文件
import os.path
import os
import PIL
path = r"E:\qqtemp"
print("Fuck you mother,sb python")
dirs = os.listdir(path)
for file in dirs:
temp = path + '\\' + file
print(temp)
24.将GIF动态图片分解并将每帧保存为png文件
def resolveGifImage(filepath):
im = Image.open(filepath)
mode = 'partial' #图片模式
i = 0
p = im.getpalette() #获取调色板信息
last_frame = im.convert('RGBA')#转换图片色彩模式
try:
while True:
print( "mode:%s No.%s size:%s tile:%s" % ( mode, i, im.size, im.tile))
if not im.getpalette():#如果不存在调色板
im.putpalette(p)#添加一个调色板
new_frame = Image.new('RGBA', im.size)
if mode == 'partial':
new_frame.paste(last_frame)

new_frame.paste(im, (0, 0), im.convert('RGBA'))
new_frame.save('resolve//%s-%d.png' % (''.join(os.path.basename(filepath).split('.')[:-1]), i), 'PNG')

i += 1
last_frame = new_frame
im.seek(im.tell() + 1)
except EOFError:
pass

resolveGifImage("load.gif")参考:点击打开链接
25.在图片上添加文字
def addTextToImage(file,x,y,str):
im = Image.open(file)
draw = ImageDraw.Draw(im)
draw.text((x,y),str,(0,0,0))
draw = ImageDraw.Draw(im)
shutil.copyfile(file, file+".bak")
im.save(file)
addTextToImage("resolve//load-0.png",10,20,"Loading..")#在10,10位置添加一个Loading
使用默认字体,这里有个缺点是,使用PIL不能输入中文
26.向GIF动态图片上添加文字通过24和25的函数,目前可以拆解图片以及添加文字,因此再编写一个合成为gif图片的函数即可
# -*- coding: UTF-8 -*-
import imageio
import os
import shutil
import glob
from PIL import Image
from PIL import ImageDraw
from PIL import ImageFont
def resolveGifImage(filepath):
im = Image.open(filepath)
mode = 'partial' #图片模式
i = 0
p = im.getpalette() #获取调色板信息
last_frame = im.convert('RGBA')#转换图片色彩模式
if os.path.exists('resolve') == False:
os.mkdir("resolve")
try:
while True:
print( "mode:%s No.%s size:%s tile:%s" % ( mode, i, im.size, im.tile))
if not im.getpalette():#如果不存在调色板
im.putpalette(p)#添加一个调色板
new_frame = Image.new('RGBA', im.size)
if mode == 'partial':
new_frame.paste(last_frame)
new_frame.paste(im, (0, 0), im.convert('RGBA'))
new_frame.save('resolve//%s-%d.png' % (''.join(os.path.basename(filepath).split('.')[:-1]), i), 'PNG')
i += 1
last_frame = new_frame
im.seek(im.tell() + 1)
except EOFError:
pass
def addTextToImage(file,x,y,str):
im = Image.open(file)
draw = ImageDraw.Draw(im)
draw.text((x,y),str,(0,0,0))
draw = ImageDraw.Draw(im)
if os.path.exists('change') == False:
os.mkdir("change")
im.save("change//"+file)
#构建GIF文件
def buildGifImage(buffer,targetfile,speed):
frames = []
for image in buffer:
frames.append(imageio.imread(image))
imageio.mimsave(targetfile, frames, 'GIF', duration= 0.1)
#查找目录下的所有png文件
def find_all_png(path):
png_filenames = glob.glob(path+"*.png")
buf=[]
for png_file in png_filenames:
buf.append(png_file)
return buf
#添加文字到GIF图
def addTextToGif(file,x,y,str):
resolveGifImage(file)
if os.path.exists('resolve') == False:
os.mkdir("resolve")
for image in os.listdir("resolve"):
addTextToImage("resolve/"+image,x,y,str)
buildGifImage(find_all_png("change/resolve/"),"1.gif",0.1)
addTextToGif("load.gif",100,100,"Loading")原图:
修改后:
27.建立一个线程并运行import _thread
import time
def printCurTime():
threadname = "print"
count = 0
while count < 5:
time.sleep(1)
print("%s: %s" % (threadname, time.ctime(time.time())))
try:
_thread.start_new_thread(printCurTime())
except:
print("Create thread failed.")
while True:
pass
28.传递参数给线程并打印日期
#!/usr/bin/python3

import _thread
import time

def printCurTime():
threadname = "print"
count = 0
while count < 5:
time.sleep(1)
print("%s: %s" % (threadname, time.ctime(time.time())))
count = count +1

def printAstring(i):
count = 0
while count < 2:
time.sleep(2)
print("%d" %(i))

try:
_thread.start_new_thread(printCurTime,())
_thread.start_new_thread(printAstring,(1,))
except:
print("Create thread failed.")

while True:
pass
这里需要注意的是_thread.start_new_thread 函数的参数,第一个是函数的名称,第二个是参数,如果没有参数也需要有一组括号29.使用Tkinter创建一个GUI,有Button和Listbox控件
#!/usr/bin/python3
from tkinter import *

def bt1():
print("Button pressed")

r
b2e2
oot = Tk()
listb = Listbox(root)
btAction = Button(root,text="Hello button",relief=FLAT,command=bt1()).pack()
listb.pack()
root.mainloop()30.python建立简单的服务端#!/usr/bin/python3
import socket
import wx
ip_port= ('192.168.1.161',9999)
web = socket.socket()
web.bind(ip_port)
web.listen(5)
while True:
print("System running")
conn, addr = web.accept()
data = conn.recv(1024)
print(data)
conn.sendall(str('<h1>Welcome</h1>'))
conn.close()

相关文章推荐
- 算法导论程序21--链表(Python)
- python练习题 21-30
- 算法导论程序30--红黑树的旋转(Python)
- 写一百题程序学Python 【 11-20】
- 经典c程序100例==21--30
- python练习程序(c100经典例21)
- pythontip 挑战python 21-30 题解
- python简单实例训练(21~30)
- python简单实例训练(21~30)
- 经典c程序100例(21--30)
- 写一百题程序学Python 【 1-10】
- 经典c程序100例==21--30
- 【浅谈守护进程】Demo:后台监控程序-- Python实现
- python中估算程序运行时间 - udacity计算机科学导论18-6
- python练习程序批量修改文件名
- 用Python给小宝做的数学四则运算_算术口算练习程序(后添加减乘除)
- 在Editplus运行Python程序
- 使用PDB调试python程序
- 终止python程序
- 【程序30】一个5位数,判断它是不是回文数