写一百题程序学Python 【 11-20】
2018-03-28 16:44
316 查看
这次我试着利用python对qq群聊接收的图片进行了分类,还尝试涉及了下tensorflow(尽管目前我还是没想到哪里能用上)
11.int和string数据类型转换
file变量只会保存文件名称但是并不会保存完整路径,之前没了解清楚结果以为是文件有特殊字符
13.基于12,追加判断是文件还是文件夹,如果是文件夹则不处理
14.基于13,追加判断图片的主要色彩,主要用于删除掉网页截图和二维码还有qq截图
主要步骤是,先尝试转图片为HSV,然后按照比重,获取最主要的颜色,依照颜色是否一致(说明是纯色,可能是背景),颜色是否低于高于一定值(同样比较可能是背景),来择选图片
当然在主要步骤之前,依然会进行图片大小的筛选
参考:
http://www.jb51.net/article/68958.htm python获取文件扩展名的方法
https://blog.csdn.net/lhh31/article/details/52015500 python图像主色调(主颜色)提取
http://www.jb51.net/article/62526.htm Python通过PIL获取图片主要颜色并和颜色库进行对比的方法
15.使用tensorflow运算矩阵
参考:https://morvanzhou.github.io/tutorials/machine-learning/tensorflow/2-4-variable/
16.tensorflow中实现 x=x+1
17.tensorflow外部赋值
主要应用placeholder函数,使用这个函数可以定义支持外部传值的变量,配合feed_dict=
传值
18.python按照顺序批量重命名文件
19.创建等差数列
如果在linespace函数后加上[:, np.newaxis] ,则每次生成等差数存储时都会创建新的轴(列)

20.产生正态分布的随机数
产生100个
产生1个
11.int和string数据类型转换
t = input()
r = input()
res = int(t)*int(r)
print(res)

stringA = str(res)
stringA += " is worth"
print(stringA)
12-14 是通过一系列函数,来处理qq群聊收到的图片
12.读取文件夹下所有图片并获取宽度和高度,删除小于400pixel的图片from PIL import Image import os path = "/media/Image/Group/test/" for file in os.listdir(path): fp = open(path+"/"+file, 'rb') img = Image.open(fp) fp.close() x,y = img.size print(x,y) if x<400 or y<400: os.remove(path+"/"+file)
file变量只会保存文件名称但是并不会保存完整路径,之前没了解清楚结果以为是文件有特殊字符
13.基于12,追加判断是文件还是文件夹,如果是文件夹则不处理
from PIL import Image
import os
path = "/media/Image/Group"
i = 0
for file in os.listdir(path):
if os.path.isdir(path+"/"+file) :
break
else:
fp = open(path+"/"+file, 'rb')
img = Image.open(fp)
fp.close()
x,y = img.size
print(x,y)
if x<400 or y<400:
os.remove(path+"/"+file)
i = i+1
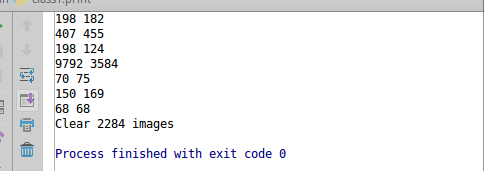
print("Clear "+str(i)+" images")14.基于13,追加判断图片的主要色彩,主要用于删除掉网页截图和二维码还有qq截图
主要步骤是,先尝试转图片为HSV,然后按照比重,获取最主要的颜色,依照颜色是否一致(说明是纯色,可能是背景),颜色是否低于高于一定值(同样比较可能是背景),来择选图片
当然在主要步骤之前,依然会进行图片大小的筛选
from PIL import Image
import os
import shutil
import colorsys
path = "/media/Image/Group"
path1 = "/media/Image/Group/Image1"
path2 = "/media/Image/Group/Image2"
path3 = "/media/Image/Group/Image3"
samepath = "/media/Image/Group/xysame"
testpath = "/media/Image/Group/test"
notpath = "/media/Image/Group/bedelete/"
def qqimage_getcolor(filepath):
image = Image.open(filepath)
image.thumbnail((512,512))
max_score = 0.0001
dominant_color = None
for count, (r, g, b) in image.getcolors(image.size[0] * image.size[1]):
saturation = colorsys.rgb_to_hsv(r / 255.0, g / 255.0, b / 255.0)[1]
y = min(abs(r * 2104 + g * 4130 + b * 802 + 4096 + 131072) >> 13, 235)
y = (y - 16.0) / (235 - 16)
if y > 0.9:
continue
score = (saturation + 0.1) * count
if score > max_scor
4000
e:
max_score = score
dominant_color = (r, g, b)
return dominant_color

def qqimage_move(path1,path2):
shutil.copy(path1, path2)
os.remove(path1)

def qqimage_processer(path,xypath,recyclepath):
i = 0
j = 0
for file in os.listdir(path):
if os.path.isdir(path+"/"+file) :
break
else:
fp = open(path+"/"+file, 'rb')
img = Image.open(fp)
fp.close()
x,y = img.size
#print(x,y)
if x<400 or y<400:
qqimage_move(path + "/" + file, recyclepath)
i = i+1
elif x == y:
j = j+1
qqimage_move(path+"/"+file,xypath)
else:
try:
color = qqimage_getcolor(path+"/"+file)
print(file)
print(color)
if color[0] == color[1] and color[1] == color[2] and (color[0] <= 10 or color[0] >= 240):
qqimage_move(path + "/" + file, recyclepath)
i = i + 1
except:
print("image not support")
print("+++++++++++++++++++++++++++++++++++++++++")
print("Clear "+str(i)+" images which smaller than 400 pixel")
print("Have "+str(j)+" height and width are same")
print("+++++++++++++++++++++++++++++++++++++++++")

qqimage_processer(path,samepath,notpath)
参考:
http://www.jb51.net/article/68958.htm python获取文件扩展名的方法
https://blog.csdn.net/lhh31/article/details/52015500 python图像主色调(主颜色)提取
http://www.jb51.net/article/62526.htm Python通过PIL获取图片主要颜色并和颜色库进行对比的方法
15.使用tensorflow运算矩阵
import os
import numpy as np
import tensorflow as tf

#一对括号表示的是列表,两对括号才表示矩阵
matrix1 = tf.constant([[3,3]])
matrix2 = tf.constant([[2],
[2]])#这个不太懂为什么要这样写
product = tf.matmul(matrix1,matrix2)

sess= tf.Session()
result = sess.run(product)
print(result)
sess.close()
参考:https://morvanzhou.github.io/tutorials/machine-learning/tensorflow/2-4-variable/
16.tensorflow中实现 x=x+1
import os
import numpy as np
import tensorflow as tf

#set a variable
state = tf.Variable(0, name='counter')

 #set a constant
one = tf.constant(1)

 #set a algorithm with tensorflow
new_value = tf.add(state,one)

 #make value save to "state" variable
update = tf.assign(state,new_value)

#init all variable
init = tf.global_variables_initializer()

 #run session
with tf.Session() as sess:
sess.run(init)
for _ in range(10):
sess.run(update)
print(sess.run(state))
17.tensorflow外部赋值
主要应用placeholder函数,使用这个函数可以定义支持外部传值的变量,配合feed_dict=
传值
import os
import numpy as np
import tensorflow as tf

input1 = tf.placeholder(tf.float32)
input2 = tf.placeholder(tf.float32)

output = tf.multiply(input1,input2)

i = 10
j = 20
with tf.Session() as sess:
print(sess.run(output,feed_dict={input1:[7,8,10,i],input2:[2,4,11,j]}))
18.python按照顺序批量重命名文件
def serialrenamed(path1,path2):
i = 0
for file in os.listdir(path1):
if path1 + "/" + file != path2 + "/" + str(i) + os.path.splitext(file)[1]: #如果名称不重复才进行处理,否则跳过
shutil.copy(path1 + "/" + file,path2 + "/" + str(i) + os.path.splitext(file)[1] )
os.remove(path1+ "/" + file)
i = i + 1
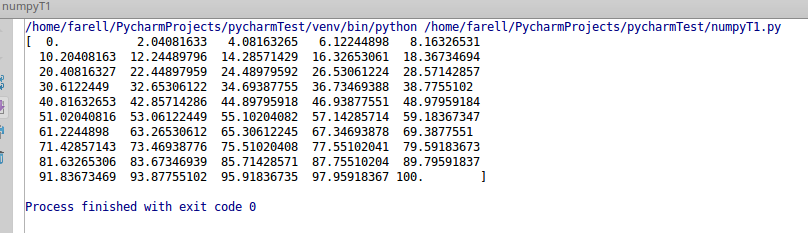
19.创建等差数列
import numpy as np
group = np.linspace(0,100,50)
print(group)
如果在linespace函数后加上[:, np.newaxis] ,则每次生成等差数存储时都会创建新的轴(列)
import numpy as np
group = np.linspace(0,100,50)[:, np.newaxis]
print(group)
20.产生正态分布的随机数
产生100个
import numpy as np

s = np.random.normal(loc = 0,scale = 1.0, size=100)

print(s)
产生1个
import numpy as np

s = np.random.normal(loc = 0,scale = 1.0)

print(s)

相关文章推荐
- C#程序设计基础》习题库程序11--20
- 《编写高质量代码 : 改善C#程序的157个建议》读书笔记 11-20
- 算法导论程序20--栈和队列(Python)
- python练习题 11-20
- 【机器学习实战】11.使用Apriori算法进行关联分析——python3程序
- 11/24 C/C++/Python程序bainchen
- 经典c程序100例==11--20
- pythontip 挑战python (11-20)
- 我与python约个会:11程序编程基础5:输入输出
- 用Apache+mod_wsgi部署python程序 作者:leven | 日期2010-11-29 00:09:37
- python公开课视频(11~20)
- 20非常有用的Java程序片段(11-15)
- python练习程序(c100经典例11)
- python数据分析及处理案例技巧11-20(基于jupyter)
- 如何用python制作一个锻炼计算能力的exe小程序-学习笔记11-pyinstaller
- 写一百题程序学Python 【 21-30】
- python练习程序(c100经典例20)
- 算法导论程序11--堆排序算法(Python)
- 11-20 Python 字符串练习 ——“大数字”
- 【CodeCombat-Python】边远地区的森林 11~20