深度学习框架-tensorflow进阶项目
2018-02-18 19:44
387 查看
打算把这篇博客记录完之后,写一篇使用深度学习完成图像风格转换的博客,先立个FLAG,这篇博客希望能在春节期间完成,年后估计还有的忙。
保存和载入模型,使用Google的图像识别网络inception-v3进行图像识别
saver_save
save_restore
保存模型参数和结构
载入模型参数和结构
下载Google图像识别网络inception-v3并查看其结构
使用Inception-v3做各种图像的识别
Tensorflow的GPU版本安装。设计自己的网络模型,并训练自己的网络模型进行图像识别
GPU版本的tensorflow安装
安装CUDA
安装cuDNN
安装tensorflow gpu
retrain图像识别模式
TF-RECORD的使用以及从头训练图像识别模型
多任务学习以及验证码识别
验证码生成
生成tf_record文件
验证码识别
captcha_test
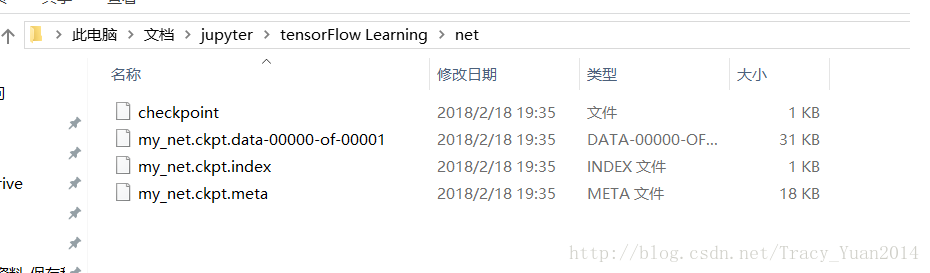
此时在当前路径会生成模型文件
Extracting MNIST_data\train-images-idx3-ubyte.gz
Extracting MNIST_data\train-labels-idx1-ubyte.gz
Extracting MNIST_data\t10k-images-idx3-ubyte.gz
Extracting MNIST_data\t10k-labels-idx1-ubyte.gz
0.098
INFO:tensorflow:Restoring parameters from net/my_net.ckpt
0.9174
本节介绍同时保存模型参数和结构的方法。
Extracting MNIST_data\train-images-idx3-ubyte.gz
Extracting MNIST_data\train-labels-idx1-ubyte.gz
Extracting MNIST_data\t10k-images-idx3-ubyte.gz
Extracting MNIST_data\t10k-labels-idx1-ubyte.gz
Iter 0,Testing Accuracy 0.824
Iter 1,Testing Accuracy 0.8895
Iter 2,Testing Accuracy 0.8992
Iter 3,Testing Accuracy 0.9053
Iter 4,Testing Accuracy 0.9084
Iter 5,Testing Accuracy 0.9112
Iter 6,Testing Accuracy 0.9116
Iter 7,Testing Accuracy 0.9135
Iter 8,Testing Accuracy 0.9146
Iter 9,Testing Accuracy 0.9155
Iter 10,Testing Accuracy 0.918
INFO:tensorflow:Froze 2 variables.
Converted 2 variables to const ops.
Extracting MNIST_data\train-images-idx3-ubyte.gz
Extracting MNIST_data\train-labels-idx1-ubyte.gz
Extracting MNIST_data\t10k-images-idx3-ubyte.gz
Extracting MNIST_data\t10k-labels-idx1-ubyte.gz
0.918
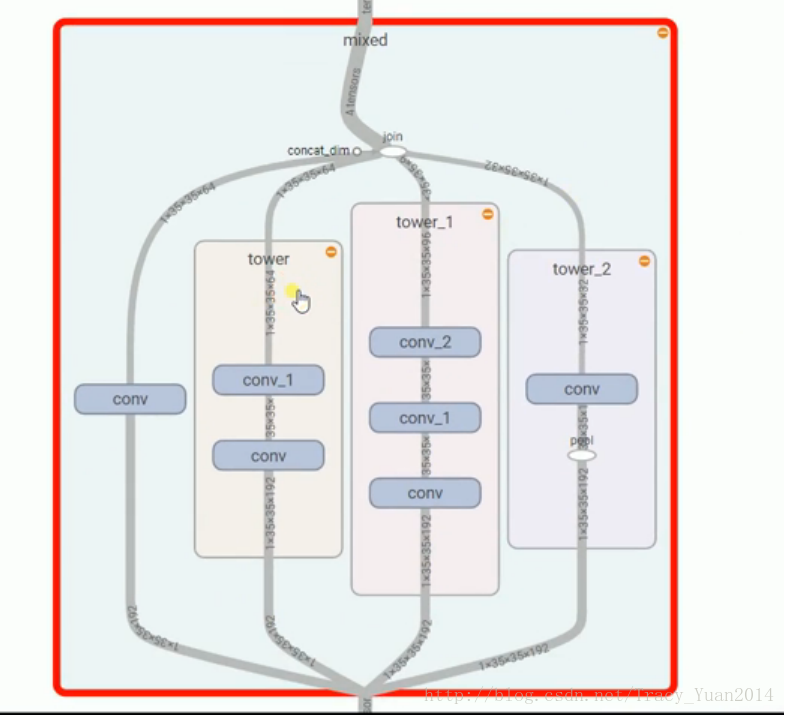
inception网络结果中比较特别的MIXED的结构
安装好之后把CUDA安装目录下的bin和lib\x64添加到Path环境变量中 把CUDA安装目录下的extras\CUPTI\libx64也添加到Path环境变量中
解压压缩包,把压缩包中bin,include,lib中的文件分别拷贝到C:\Program Files\NVIDIA GPU Computing Toolkit\CUDA\v8.0目录下对应目录中
把C:\Program Files\NVIDIA GPU Computing Toolkit\CUDA\v8.0\extras\CUPTI\libx64\cupti64_80.dll 拷贝到C:\Program Files\NVIDIA GPU Computing Toolkit\CUDA\v8.0\bi
pip install tensorflow-gpu
进行重训练需要使用上面压缩包解压后的这个路径下的文件
英国牛津VGG数据集
将要分类的图片从上述网址上进行下载后按此方式进行存放
验证这个模型的识别率
将验证集存放在retrain/images下。
本次使用slim
在这个程序里遇到这个问题:
UnicodeDecodeError: ‘utf-8’ codec can’t decode byte 0xff in position 0: invalid start
出错点:
image_data = tf.gfile.FastGFile(filename, ‘r’).read()
改成:
image_data = tf.gfile.FastGFile(filename, ‘rb’).read()
上面的程序是修改后没有问题的版本。
下面将tf-record文件读取到内存中:
进入slim/datasets/
对文件dataset_factory.py进行修改
在上述代码段中加入自己的训练集
在相同路径下创建myimages.py
pip install captcha
如果提示request拒绝访问,则使用管理员打开cmd
captcha 是用 python 写的生成验证码的库,它支持图片验证码和语音验证码,我们使用的是它生成图片验证码的功能。
然后使用nets目录下的alexnet
目录
目录保存和载入模型,使用Google的图像识别网络inception-v3进行图像识别
saver_save
save_restore
保存模型参数和结构
载入模型参数和结构
下载Google图像识别网络inception-v3并查看其结构
使用Inception-v3做各种图像的识别
Tensorflow的GPU版本安装。设计自己的网络模型,并训练自己的网络模型进行图像识别
GPU版本的tensorflow安装
安装CUDA
安装cuDNN
安装tensorflow gpu
retrain图像识别模式
TF-RECORD的使用以及从头训练图像识别模型
多任务学习以及验证码识别
验证码生成
生成tf_record文件
验证码识别
captcha_test
保存和载入模型,使用Google的图像识别网络inception-v3进行图像识别
saver_save
保存模型import tensorflow as tf from tensorflow.examples.tutorials.mnist import input_data
#载入数据集
mnist = input_data.read_data_sets("MNIST_data",one_hot=True)
#每个批次100张照片
batch_size = 100
#计算一共有多少个批次
n_batch = mnist.train.num_examples // batch_size
#定义两个placeholder
x = tf.placeholder(tf.float32,[None,784])
y = tf.placeholder(tf.float32,[None,10])
#创建一个简单的神经网络,输入层784个神经元,输出层10个神经元
W = tf.Variable(tf.zeros([784,10]))
b = tf.Variable(tf.zeros([10]))
prediction = tf.nn.softmax(tf.matmul(x,W)+b)
#二次代价函数
# loss = tf.reduce_mean(tf.square(y-prediction))
loss = tf.reduce_mean(tf.nn.softmax_cross_entropy_with_logits(labels=y,logits=prediction))
#使用梯度下降法
train_step = tf.train.GradientDescentOptimizer(0.2).minimize(loss)
#初始化变量
init = tf.global_variables_initializer()
#结果存放在一个布尔型列表中
correct_prediction = tf.equal(tf.argmax(y,1),tf.argmax(prediction,1))#argmax返回一维张量中最大的值所在的位置
#求准确率
accuracy = tf.reduce_mean(tf.cast(correct_prediction,tf.float32))
####
saver = tf.train.Saver()
with tf.Session() as sess:
sess.run(init)
for epoch in range(11):
for batch in range(n_batch):
batch_xs,batch_ys = mnist.train.next_batch(batch_size)
sess.run(train_step,feed_dict={x:batch_xs,y:batch_ys})
acc = sess.run(accuracy,feed_dict={x:mnist.test.images,y:mnist.test.labels})
print("Iter " + str(epoch) + ",Testing Accuracy " + str(acc))
#保存模型
saver.save(sess,'net/my_net.ckpt')此时在当前路径会生成模型文件
save_restore
加载模型import tensorflow as tf from tensorflow.examples.tutorials.mnist import input_data
#载入数据集
mnist = input_data.read_data_sets("MNIST_data",one_hot=True)
#每个批次100张照片
batch_size = 100
#计算一共有多少个批次
n_batch = mnist.train.num_examples // batch_size
#定义两个placeholder
x = tf.placeholder(tf.float32,[None,784])
y = tf.placeholder(tf.float32,[None,10])
#创建一个简单的神经网络,输入层784个神经元,输出层10个神经元
W = tf.Variable(tf.zeros([784,10]))
b = tf.Variable(tf.zeros([10]))
prediction = tf.nn.softmax(tf.matmul(x,W)+b)
#二次代价函数
# loss = tf.reduce_mean(tf.square(y-prediction))
loss = tf.reduce_mean(tf.nn.softmax_cross_entropy_with_logits(labels=y,logits=prediction))
#使用梯度下降法
train_step = tf.train.GradientDescentOptimizer(0.2).minimize(loss)
#初始化变量
init = tf.global_variables_initializer()
#结果存放在一个布尔型列表中
correct_prediction = tf.equal(tf.argmax(y,1),tf.argmax(prediction,1))#argmax返回一维张量中最大的值所在的位置
#求准确率
accuracy = tf.reduce_mean(tf.cast(correct_prediction,tf.float32))
saver = tf.train.Saver()
with tf.Session() as sess:
sess.run(init)
print(sess.run(accuracy,feed_dict={x:mnist.test.images,y:mnist.test.labels}))
saver.restore(sess,'net/my_net.ckpt')
print(sess.run(accuracy,feed_dict={x:mnist.test.images,y:mnist.test.labels}))Extracting MNIST_data\train-images-idx3-ubyte.gz
Extracting MNIST_data\train-labels-idx1-ubyte.gz
Extracting MNIST_data\t10k-images-idx3-ubyte.gz
Extracting MNIST_data\t10k-labels-idx1-ubyte.gz
0.098
INFO:tensorflow:Restoring parameters from net/my_net.ckpt
0.9174
保存模型参数和结构
上面的方法只能保存模型的参数,不能保存模型的结构,所以下次使用必须先定义模型的结构,再加载模型参数使用。本节介绍同时保存模型参数和结构的方法。
import tensorflow as tf
from tensorflow.examples.tutorials.mnist import input_data
#载入数据集
mnist = input_data.read_data_sets("MNIST_data",one_hot=True)
#每个批次100张照片
batch_size = 100
#计算一共有多少个批次
n_batch = mnist.train.num_examples // batch_size
#定义两个placeholder
x = tf.placeholder(tf.float32,[None,784],name='x-input')
y = tf.placeholder(tf.float32,[None,10])
#创建一个简单的神经网络,输入层784个神经元,输出层10个神经元
W = tf.Variable(tf.zeros([784,10]))
b = tf.Variable(tf.zeros([10]))
prediction = tf.nn.softmax(tf.matmul(x,W)+b, name='output')
#二次代价函数
# loss = tf.reduce_mean(tf.square(y-prediction))
loss = tf.reduce_mean(tf.nn.softmax_cross_entropy_with_logits(labels=y,logits=prediction))
#使用梯度下降法
train_step = tf.train.GradientDescentOptimizer(0.2).minimize(loss)
#初始化变量
init = tf.global_variables_initializer()
#结果存放在一个布尔型列表中
correct_prediction = tf.equal(tf.argmax(y,1),tf.argmax(prediction,1))#argmax返回一维张量中最大的值所在的位置
#求准确率
accuracy = tf.reduce_mean(tf.cast(correct_prediction,tf.float32))
with tf.Session() as sess:
sess.run(init)
for epoch in range(11):
for batch in range(n_batch):
batch_xs,batch_ys = mnist.train.next_batch(batch_size)
sess.run(train_step,feed_dict={x:batch_xs,y:batch_ys})
acc = sess.run(accuracy,feed_dict={x:mnist.test.images,y:mnist.test.labels})
print("Iter " + str(epoch) + ",Testing Accuracy " + str(acc))
#保存模型参数和结构
output_graph_def = tf.graph_util.convert_variables_to_constants(sess, sess.graph_def, output_node_names=['output'])
# 保存模型到目录下的model文件夹中
with tf.gfile.FastGFile('./models/tfmodel.pb',mode='wb') as f:
f.write(output_graph_def.SerializeToString())Extracting MNIST_data\train-images-idx3-ubyte.gz
Extracting MNIST_data\train-labels-idx1-ubyte.gz
Extracting MNIST_data\t10k-images-idx3-ubyte.gz
Extracting MNIST_data\t10k-labels-idx1-ubyte.gz
Iter 0,Testing Accuracy 0.824
Iter 1,Testing Accuracy 0.8895
Iter 2,Testing Accuracy 0.8992
Iter 3,Testing Accuracy 0.9053
Iter 4,Testing Accuracy 0.9084
Iter 5,Testing Accuracy 0.9112
Iter 6,Testing Accuracy 0.9116
Iter 7,Testing Accuracy 0.9135
Iter 8,Testing Accuracy 0.9146
Iter 9,Testing Accuracy 0.9155
Iter 10,Testing Accuracy 0.918
INFO:tensorflow:Froze 2 variables.
Converted 2 variables to const ops.
载入模型参数和结构
import tensorflow as tf
from tensorflow.examples.tutorials.mnist import input_data
#载入数据集
mnist = input_data.read_data_sets("MNIST_data",one_hot=True)

#定义一个placeholder
y = tf.placeholder(tf.float32,[None,10])

#载入模型
with tf.gfile.FastGFile('./models/tfmodel.pb', 'rb') as f:
graph_def = tf.GraphDef()
graph_def.ParseFromString(f.read())
tf.import_graph_def(graph_def, name='')

with tf.Session() as sess:
output = sess.graph.get_tensor_by_name('output:0')
#结果存放在一个布尔型列表中
correct_prediction = tf.equal(tf.argmax(y,1),tf.argmax(output,1))#argmax返回一维张量中最大的值所在的位置
#求准确率
accuracy = tf.reduce_mean(tf.cast(correct_prediction,tf.float32))
print(sess.run(accuracy,feed_dict={'x-input:0':mnist.test.images,y:mnist.test.labels}))
Extracting MNIST_data\train-images-idx3-ubyte.gz
Extracting MNIST_data\train-labels-idx1-ubyte.gz
Extracting MNIST_data\t10k-images-idx3-ubyte.gz
Extracting MNIST_data\t10k-labels-idx1-ubyte.gz
0.918
下载Google图像识别网络inception-v3并查看其结构
import tensorflow as tf
import os
import tarfile
import requests
#inception模型下载地址
inception_pretrain_model_url = 'http://download.tensorflow.org/models/image/imagenet/inception-2015-12-05.tgz'

#模型存放地址
inception_pretrain_model_dir = "inception_model"
if not os.path.exists(inception_pretrain_model_dir):
os.makedirs(inception_pretrain_model_dir)

#获取文件名,以及文件路径
filename = inception_pretrain_model_url.split('/')[-1]
filepath = os.path.join(inception_pretrain_model_dir, filename)

#下载模型
if not os.path.exists(filepath):
print("download: ", filename)
r = requests.get(inception_pretrain_model_url, stream=True)
with open(filepath, 'wb') as f:
for chunk in r.iter_content(chunk_size=1024):
if chunk:
f.write(chunk)
print("finish: ", filename)
#解压文件
tarfile.open(filepath, 'r:gz').extractall(inception_pretrain_model_dir)

#模型结构存放文件
log_dir = 'inception_log'
if not os.path.exists(log_dir):
os.makedirs(log_dir)

#classify_image_graph_def.pb为google训练好的模型
inception_graph_def_file = os.path.join(inception_pretrain_model_dir, 'classify_image_graph_def.pb')
with tf.Session() as sess:
#创建一个图来存放google训练好的模型
with tf.gfile.FastGFile(inception_graph_def_file, 'rb') as f:
graph_def = tf.GraphDef()
graph_def.ParseFromString(f.read())
tf.import_graph_def(graph_def, name='')
#保存图的结构
writer = tf.summary.FileWriter(log_dir, sess.graph)
writer.close()
inception网络结果中比较特别的MIXED的结构
使用Inception-v3做各种图像的识别
import tensorflow as tf
import os
import numpy as np
import re
from PIL import Image
import matplotlib.pyplot as plt
class NodeLookup(object):
def __init__(self):
label_lookup_path = 'inception_model/imagenet_2012_challenge_label_map_proto.pbtxt'
uid_lookup_path = 'inception_model/imagenet_synset_to_human_label_map.txt'
self.node_lookup = self.load(label_lookup_path, uid_lookup_path)
def load(self, label_lookup_path, uid_lookup_path):
# 加载分类字符串n********对应分类名称的文件
proto_as_ascii_lines = tf.gfile.GFile(uid_lookup_path).readlines()
uid_to_human = {}
#一行一行读取数据
for line in proto_as_ascii_lines :
#去掉换行符
line=line.strip('\n')
#按照'\t'分割
parsed_items = line.split('\t')
#获取分类编号
uid = parsed_items[0]
#获取分类名称
human_string = parsed_items[1]
#保存编号字符串n********与分类名称映射关系
uid_to_human[uid] = human_string
# 加载分类字符串n********对应分类编号1-1000的文件
proto_as_ascii = tf.gfile.GFile(label_lookup_path).readlines()
node_id_to_uid = {}
for line in proto_as_ascii:
if line.startswith(' target_class:'):
#获取分类编号1-1000
target_class = int(line.split(': ')[1])
if line.startswith(' target_class_string:'):
#获取编号字符串n********
target_class_string = line.split(': ')[1]
#保存分类编号1-1000与编号字符串n********映射关系
node_id_to_uid[target_class] = target_class_string[1:-2]
#建立分类编号1-1000对应分类名称的映射关系
node_id_to_name = {}
for key, val in node_id_to_uid.items():
#获取分类名称
name = uid_to_human[val]
#建立分类编号1-1000到分类名称的映射关系
node_id_to_name[key] = name
return node_id_to_name
#传入分类编号1-1000返回分类名称
def id_to_string(self, node_id):
if node_id not in self.node_lookup:
return ''
return self.node_lookup[node_id]
#创建一个图来存放google训练好的模型
with tf.gfile.FastGFile('inception_model/classify_image_graph_def.pb', 'rb') as f:
graph_def = tf.GraphDef()
graph_def.ParseFromString(f.read())
tf.import_graph_def(graph_def, name='')
with tf.Session() as sess:
softmax_tensor = sess.graph.get_tensor_by_name('softmax:0')
#遍历目录
for root,dirs,files in os.walk('images/'):
for file in files:
#载入图片
image_data = tf.gfile.FastGFile(os.path.join(root,file), 'rb').read()
predictions = sess.run(softmax_tensor,{'DecodeJpeg/contents:0': image_data})#图片格式是jpg格式
predictions = np.squeeze(predictions)#把结果转为1维数据
#打印图片路径及名称
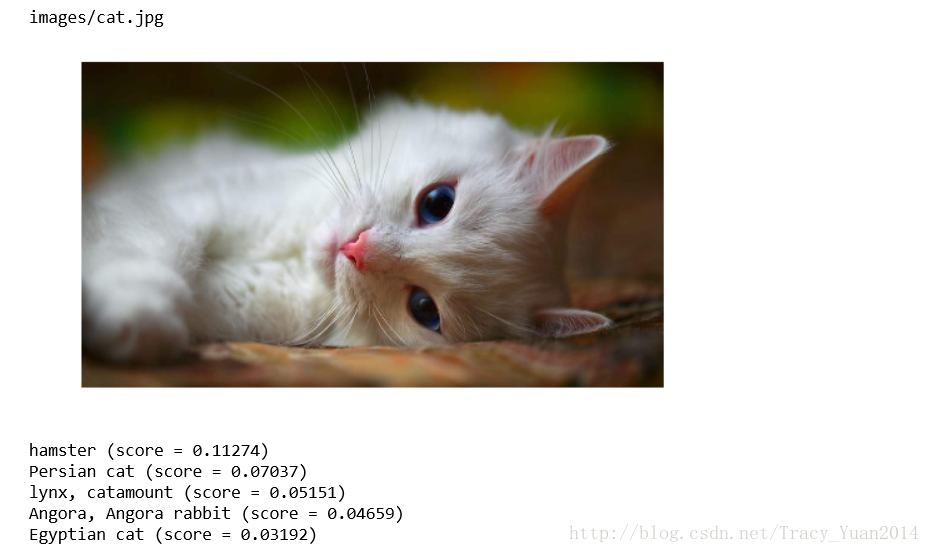
image_path = os.path.join(root,file)
print(image_path)
#显示图片
img=Image.open(image_path)
plt.imshow(img)
plt.axis('off')
plt.show()
#排序
top_k = predictions.argsort()[-5:][::-1]
node_lookup = NodeLookup()
for node_id in top_k:
#获取分类名称
human_string = node_lookup.id_to_string(node_id)
#获取该分类的置信度
score = predictions[node_id]
print('%s (score = %.5f)' % (human_string, score))
print()Tensorflow的GPU版本安装。设计自己的网络模型,并训练自己的网络模型进行图像识别
GPU版本的tensorflow安装
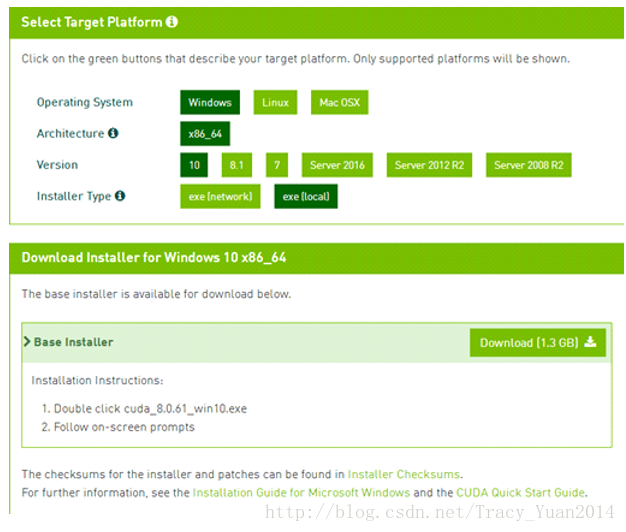
安装CUDA
准备好NVIDIA的显卡,下载安装CUDA https://developer.nvidia.com/cuda-downloads安装好之后把CUDA安装目录下的bin和lib\x64添加到Path环境变量中 把CUDA安装目录下的extras\CUPTI\libx64也添加到Path环境变量中
安装cuDNN
cuDNN下载 https://developer.nvidia.com/rdp/cudnn-download解压压缩包,把压缩包中bin,include,lib中的文件分别拷贝到C:\Program Files\NVIDIA GPU Computing Toolkit\CUDA\v8.0目录下对应目录中
把C:\Program Files\NVIDIA GPU Computing Toolkit\CUDA\v8.0\extras\CUPTI\libx64\cupti64_80.dll 拷贝到C:\Program Files\NVIDIA GPU Computing Toolkit\CUDA\v8.0\bi
安装tensorflow gpu
pip uninstall tensorflowpip install tensorflow-gpu
retrain图像识别模式
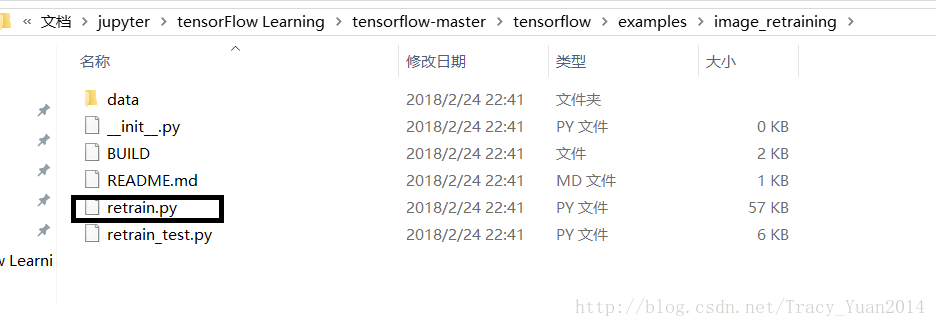
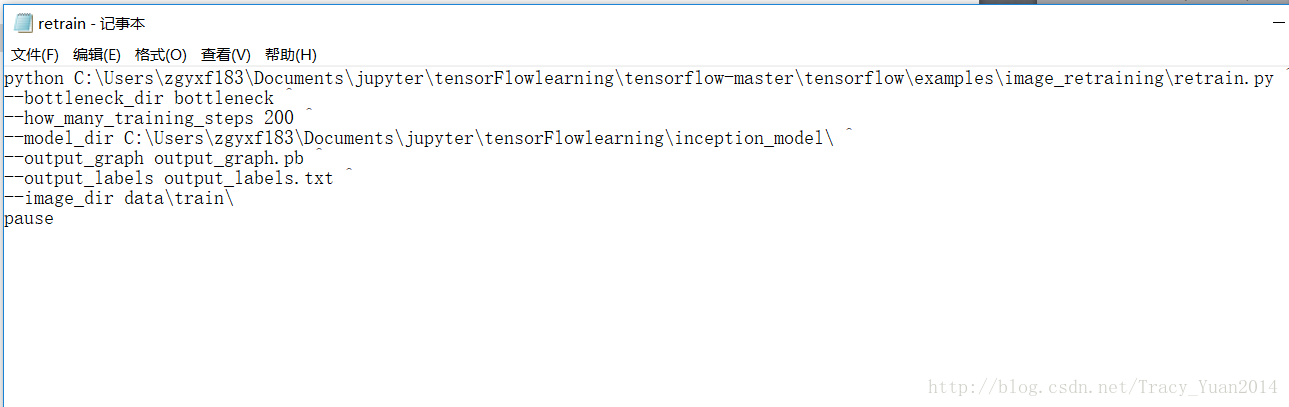
进行重训练需要使用上面压缩包解压后的这个路径下的文件
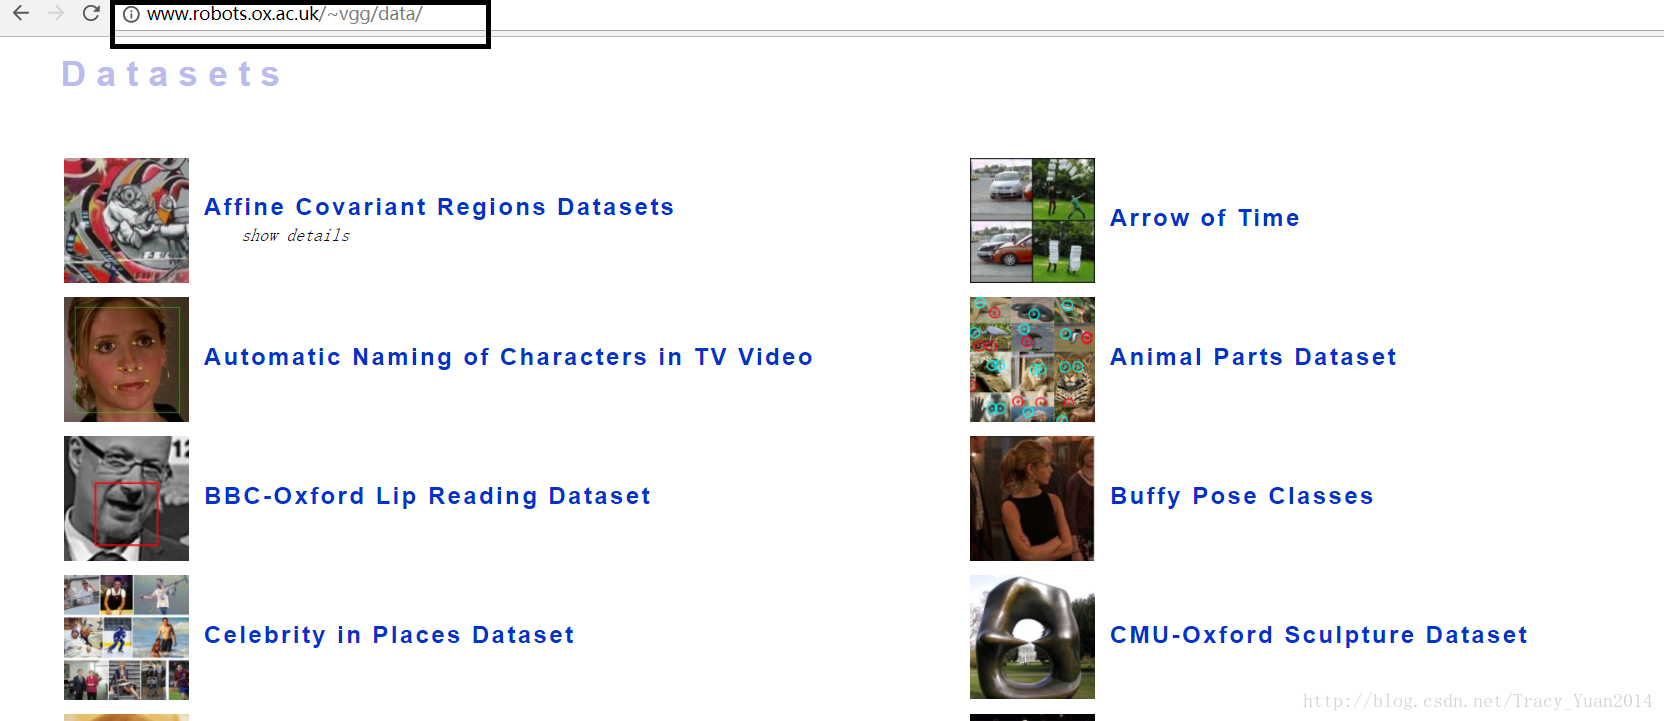
英国牛津VGG数据集
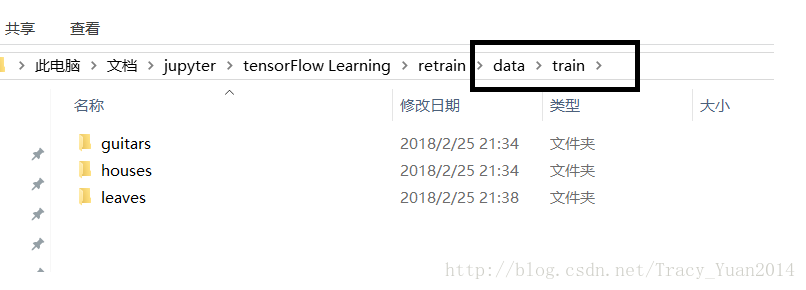
将要分类的图片从上述网址上进行下载后按此方式进行存放
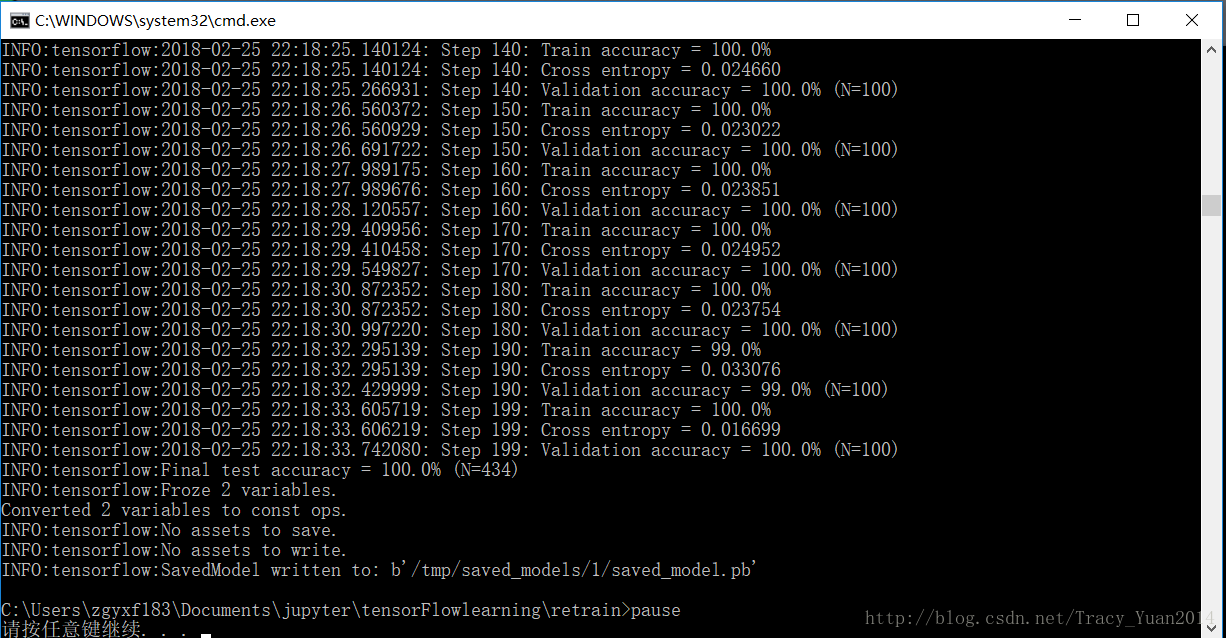
python D:/Tensorflow/tensorflow-master/tensorflow/examples/image_retraining/retrain.py ^
--bottleneck_dir bottleneck ^
--how_many_training_steps 200 ^
--model_dir D:/Tensorflow/inception_model/ ^
--output_graph output_graph.pb ^
--output_labels output_labels.txt ^
--image_dir data/train/
pause
验证这个模型的识别率
import tensorflow as tf
import os
import numpy as np
import re
from PIL import Image
import matplotlib.pyplot as plt
lines = tf.gfile.GFile('retrain/output_labels.txt').readlines()
uid_to_human = {}
#一行一行读取数据
for uid,line in enumerate(lines) :
#去掉换行符
line=line.strip('\n')
uid_to_human[uid] = line

def id_to_string(node_id):
if node_id not in uid_to_human:
return ''
return uid_to_human[node_id]

#创建一个图来存放google训练好的模型
with tf.gfile.FastGFile('retrain/output_graph.pb', 'rb') as f:
graph_def = tf.GraphDef()
graph_def.ParseFromString(f.read())
tf.import_graph_def(graph_def, name='')

with tf.Session() as sess:
softmax_tensor = sess.graph.get_tensor_by_name('final_result:0')
#遍历目录
for root,dirs,files in os.walk('retrain/images/'):
for file in files:
#载入图片
image_data = tf.gfile.FastGFile(os.path.join(root,file), 'rb').read()
predictions = sess.run(softmax_tensor,{'DecodeJpeg/contents:0': image_data})#图片格式是jpg格式
predictions = np.squeeze(predictions)#把结果转为1维数据

#打印图片路径及名称
image_path = os.path.join(root,file)
print(image_path)
#显示图片
img=Image.open(image_path)
plt.imshow(img)
plt.axis('off')
plt.show()

#排序
top_k = predictions.argsort()[::-1]
print(top_k)
for node_id in top_k:
#获取分类名称
human_string = id_to_string(node_id)
#获取该分类的置信度
score = predictions[node_id]
print('%s (score = %.5f)' % (human_string, score))
print()
将验证集存放在retrain/images下。
TF-RECORD的使用以及从头训练图像识别模型
在github中下载tensorflow/models的压缩文件本次使用slim
import tensorflow as tf
import os
import random
import math
import sys
#验证集数量
_NUM_TEST = 300
#随机种子
_RANDOM_SEED = 0
#数据块,图片集有多少个类型
_NUM_SHARDS = 2
#数据集路径
DATASET_DIR ="C:/Users/zgyxf183/Documents/jupyter/tensorFlowlearning/slim/images"
#标签文件名字
LABELS_FILENAME ="C:/Users/zgyxf183/Documents/jupyter/tensorFlowlearning/slim/images/labels.txt"

#定义tfrecord文件的路径+名字
def _get_dataset_filename(dataset_dir, split_name, shard_id):
output_filename = 'image_%s_%05d-of-%05d.tfrecord' % (split_name, shard_id, _NUM_SHARDS)
return os.path.join(dataset_dir, output_filename)

#判断tfrecord文件是否存在
def _dataset_exists(dataset_dir):
for split_name in ['train', 'test']:
for shard_id in range(_NUM_SHARDS):
#定义tfrecord文件的路径+名字
output_filename = _get_dataset_filename(dataset_dir, split_name, shard_id)
if not tf.gfile.Exists(output_filename):
return False
return True

#获取所有文件以及分类
def _get_filenames_and_classes(dataset_dir):
#数据目录
directories = []
#分类名称
class_names = []
for filename in os.listdir(dataset_dir):
#合并文件路径
path = os.path.join(dataset_dir, filename)
#判断该路径是否为目录
if os.path.isdir(path):
#加入数据目录
directories.append(path)
#加入类别名称
class_names.append(filename)

photo_filenames = []
#循环每个分类的文件夹
for directory in directories:
for filename in os.listdir(directory):
path = os.path.join(directory, filename)
#把图片加入图片列表
photo_filenames.append(path)

return photo_filenames, class_names

def int64_feature(values):
if not isinstance(values, (tuple, list)):
values = [values]
return tf.train.Feature(int64_list=tf.train.Int64List(value=values))

def bytes_feature(values):
return tf.train.Feature(bytes_list=tf.train.BytesList(value=[values]))

def image_to_tfexample(image_data, image_format, class_id):
#Abstract base class for protocol messages.
return tf.train.Example(features=tf.train.Features(feature={
'image/encoded': bytes_feature(image_data),
'image/format': bytes_feature(image_format),
'image/class/label': int64_feature(class_id),
}))

def write_label_file(labels_to_class_names, dataset_dir,filename=LABELS_FILENAME):
labels_filename = os.path.join(dataset_dir, filename)
with tf.gfile.Open(labels_filename, 'w') as f:
for label in labels_to_class_names:
class_name = labels_to_class_names[label]
f.write('%d:%s\n' % (label, class_name))

#把数据转为TFRecord格式
def _convert_dataset(split_name, filenames, class_names_to_ids, dataset_dir):
assert split_name in ['train', 'test']
#计算每个数据块有多少数据
num_per_shard = int(len(filenames) / _NUM_SHARDS)
with tf.Graph().as_default():
with tf.Session() as sess:
for shard_id in range(_NUM_SHARDS):
#定义tfrecord文件的路径+名字
output_filename = _get_dataset_filename(dataset_dir, split_name, shard_id)
with tf.python_io.TFRecordWriter(output_filename) as tfrecord_writer:
#每一个数据块开始的位置
start_ndx = shard_id * num_per_shard
#每一个数据块最后的位置
end_ndx = min((shard_id+1) * num_per_shard, len(filenames))
for i in range(start_ndx, end_ndx):
try:
sys.stdout.write('\r>> Converting image %d/%d shard %d' % (i+1, len(filenames), shard_id))
sys.stdout.flush()
#读取图片
image_data = tf.gfile.FastGFile(filenames[i], 'rb').read()
#获得图片的类别名称
class_name = os.path.basename(os.path.dirname(filenames[i]))
#找到类别名称对应的id
class_id = class_names_to_ids[class_name]
#生成tfrecord文件
example = image_to_tfexample(image_data, b'jpg', class_id)
tfrecord_writer.write(example.SerializeToString())
except IOError as e:
print("Could not read:",filenames[i])
print("Error:",e)
print("Skip it\n")

sys.stdout.write('\n')
sys.stdout.flush()

if __name__ == '__main__':
#判断tfrecord文件是否存在
if _dataset_exists(DATASET_DIR):
print('tfcecord文件已存在')
else:
#获得所有图片以及分类
photo_filenames, class_names = _get_filenames_and_classes(DATASET_DIR)
#把分类转为字典格式,类似于{'house': 3, 'flower': 1, 'plane': 4, 'guitar': 2, 'animal': 0}
class_names_to_ids = dict(zip(class_names, range(len(class_names))))

#把数据切分为训练集和测试集
random.seed(_RANDOM_SEED)
random.shuffle(photo_filenames)
training_filenames = photo_filenames[_NUM_TEST:]
testing_filenames = photo_filenames[:_NUM_TEST]

#数据转换
_convert_dataset('train', training_filenames, class_names_to_ids, DATASET_DIR)
_convert_dataset('test', testing_filenames, class_names_to_ids, DATASET_DIR)

#输出labels文件
labels_to_class_names = dict(zip(range(len(class_names)), class_names))
write_label_file(labels_to_class_names, DATASET_DIR)
在这个程序里遇到这个问题:
UnicodeDecodeError: ‘utf-8’ codec can’t decode byte 0xff in position 0: invalid start
出错点:
image_data = tf.gfile.FastGFile(filename, ‘r’).read()
改成:
image_data = tf.gfile.FastGFile(filename, ‘rb’).read()
上面的程序是修改后没有问题的版本。
下面将tf-record文件读取到内存中:
进入slim/datasets/
对文件dataset_factory.py进行修改
datasets_map = {
'cifar10': cifar10,
'flowers': flowers,
'imagenet': imagenet,
'mnist': mnist,
}
在上述代码段中加入自己的训练集
datasets_map = {
'cifar10': cifar10,
'flowers': flowers,
'imagenet': imagenet,
'mnist': mnist,
'myimages':myimages,
}
在相同路径下创建myimages.py
# Copyright 2016 The TensorFlow Authors. All Rights Reserved.
#
# Licensed under the Apache License, Version 2.0 (the "License");
# you may not use this file except in compliance with the License.
# You may obtain a copy of the License at
#
# http://www.apache.org/licenses/LICENSE-2.0 #
# Unless required by applicable law or agreed to in writing, software
# distributed under the License is distributed on an "AS IS" BASIS,
# WITHOUT WARRANTIES OR CONDITIONS OF ANY KIND, either express or implied.
# See the License for the specific language governing permissions and
# limitations under the License.
# ==============================================================================
"""Provides data for the flowers dataset.

The dataset scripts used to create the dataset can be found at:
tensorflow/models/slim/datasets/download_and_convert_flowers.py
"""

from __future__ import absolute_import
from __future__ import division
from __future__ import print_function

import os
import tensorflow as tf

from datasets import dataset_utils

slim = tf.contrib.slim

_FILE_PATTERN = 'image_%s_*.tfrecord'

SPLITS_TO_SIZES = {'train': 300, 'test': 300}

_NUM_CLASSES = 2

_ITEMS_TO_DESCRIPTIONS = {
'image': 'A color image of varying size.',
'label': 'A single integer between 0 and 4',
}

def get_split(split_name, dataset_dir, file_pattern=None, reader=None):
"""Gets a dataset tuple with instructions for reading flowers.

Args:
split_name: A train/validation split name.
dataset_dir: The base directory of the dataset sources.
file_pattern: The file pattern to use when matching the dataset sources.
It is assumed that the pattern contains a '%s' string so that the split
name can be inserted.
reader: The TensorFlow reader type.

Returns:
A `Dataset` namedtuple.

Raises:
ValueError: if `split_name` is not a valid train/validation split.
"""
if split_name not in SPLITS_TO_SIZES:
raise ValueError('split name %s was not recognized.' % split_name)

if not file_pattern:
file_pattern = _FILE_PATTERN
file_pattern = os.path.join(dataset_dir, file_pattern % split_name)

# Allowing None in the signature so that dataset_factory can use the default.
if reader is None:
reader = tf.TFRecordReader

keys_to_features = {
'image/encoded': tf.FixedLenFeature((), tf.string, default_value=''),
'image/format': tf.FixedLenFeature((), tf.string, default_value='png'),
'image/class/label': tf.FixedLenFeature(
[], tf.int64, default_value=tf.zeros([], dtype=tf.int64)),
}

items_to_handlers = {
'image': slim.tfexample_decoder.Image(),
'label': slim.tfexample_decoder.Tensor('image/class/label'),
}

decoder = slim.tfexample_decoder.TFExampleDecoder(
keys_to_features, items_to_handlers)

labels_to_names = None
if dataset_utils.has_labels(dataset_dir):
labels_to_names = dataset_utils.read_label_file(dataset_dir)

return slim.dataset.Dataset(
data_sources=file_pattern,
reader=reader,
decoder=decoder,
num_samples=SPLITS_TO_SIZES[split_name],
items_to_descriptions=_ITEMS_TO_DESCRIPTIONS,
num_classes=_NUM_CLASSES,
labels_to_names=labels_to_names)
python xxxx\slim\train_image_classifier.py ^
--train_dir= xxxx\tensorFlowlearning\slim\model ^
--dataset_name=myimages ^
--dataset_split_name=train ^
--dataset_dir=xxxx\tensorFlowlearning\slim\images^
--batch_size=10 ^
--max_number_of_steps=10000 ^
--model_name=inception_v3 ^
pause
多任务学习以及验证码识别
验证码生成
打开cmd窗口,下载captchapip install captcha
如果提示request拒绝访问,则使用管理员打开cmd
captcha 是用 python 写的生成验证码的库,它支持图片验证码和语音验证码,我们使用的是它生成图片验证码的功能。
# 验证码生成库
from captcha.image import ImageCaptcha  # pip install captcha
import numpy as np
from PIL import Image
import random
import sys

number = ['0','1','2','3','4','5','6','7','8','9']
# alphabet = ['a','b','c','d','e','f','g','h','i','j','k','l','m','n','o','p','q','r','s','t','u','v','w','x','y','z']
# ALPHABET = ['A','B','C','D','E','F','G','H','I','J','K','L','M','N','O','P','Q','R','S','T','U','V','W','X','Y','Z']

def random_captcha_text(char_set=number, captcha_size=4):
# 验证码列表
captcha_text = []
for i in range(captcha_size):
#随机选择
c = random.choice(char_set)
#加入验证码列表
captcha_text.append(c)
return captcha_text

# 生成字符对应的验证码
def gen_captcha_text_and_image():
image = ImageCaptcha()
#获得随机生成的验证码
captcha_text = random_captcha_text()
#把验证码列表转为字符串
captcha_text = ''.join(captcha_text)
#生成验证码
captcha = image.generate(captcha_text)
image.write(captcha_text, 'captcha/images/' + captcha_text + '.jpg')  # 写到文件

#数量少于10000,因为重名
num = 10000
if __name__ == '__main__':
for i in range(num):
gen_captcha_text_and_image()
sys.stdout.write('\r>> Creating image %d/%d' % (i+1, num))
sys.stdout.flush()
sys.stdout.write('\n')
sys.stdout.flush()

print("生成完毕")
生成tf_record文件
import tensorflow as tf
import os
import random
import math
import sys
from PIL import Image
import numpy as np
#验证集数量
_NUM_TEST = 500

#随机种子
_RANDOM_SEED = 0

#数据集路径
DATASET_DIR = "XXXXX\tensorFlowlearning\captcha\images"

#tfrecord文件存放路径
TFRECORD_DIR = "XXXXX\tensorFlowlearning\captcha"

#判断tfrecord文件是否存在
def _dataset_exists(dataset_dir):
for split_name in ['train', 'test']:
output_filename = os.path.join(dataset_dir,split_name + '.tfrecords')
if not tf.gfile.Exists(output_filename):
return False
return True

#获取所有验证码图片
def _get_filenames_and_classes(dataset_dir):
photo_filenames = []
for filename in os.listdir(dataset_dir):
#获取文件路径
path = os.path.join(dataset_dir, filename)
photo_filenames.append(path)
return photo_filenames

def int64_feature(values):
if not isinstance(values, (tuple, list)):
values = [values]
return tf.train.Feature(int64_list=tf.train.Int64List(value=values))

def bytes_feature(values):
return tf.train.Feature(bytes_list=tf.train.BytesList(value=[values]))

def image_to_tfexample(image_data, label0, label1, label2, label3):
#Abstract base class for protocol messages.
return tf.train.Example(features=tf.train.Features(feature={
'image': bytes_feature(image_data),
'label0': int64_feature(label0),
'label1': int64_feature(label1),
'label2': int64_feature(label2),
'label3': int64_feature(label3),
}))

#把数据转为TFRecord格式
def _convert_dataset(split_name, filenames, dataset_dir):
assert split_name in ['train', 'test']

with tf.Session() as sess:
#定义tfrecord文件的路径+名字
output_filename = os.path.join(TFRECORD_DIR,split_name + '.tfrecords')
with tf.python_io.TFRecordWriter(output_filename) as tfrecord_writer:
for i,filename in enumerate(filenames):
try:
sys.stdout.write('\r>> Converting image %d/%d' % (i+1, len(filenames)))
sys.stdout.flush()

#读取图片
image_data = Image.open(filename)
#根据模型的结构resize
image_data = image_data.resize((224, 224))
#灰度化
image_data = np.array(image_data.convert('L'))
#将图片转化为bytes
image_data = image_data.tobytes()

#获取label
labels = filename.split('/')[-1][0:4]
num_labels = []
for j in range(4):
num_labels.append(int(labels[j]))

#生成protocol数据类型
example = image_to_tfexample(image_data, num_labels[0], num_labels[1], num_labels[2], num_labels[3])
tfrecord_writer.write(example.SerializeToString())

except IOError as e:
print('Could not read:',filename)
print('Error:',e)
print('Skip it\n')
sys.stdout.write('\n')
sys.stdout.flush()

#判断tfrecord文件是否存在
if _dataset_exists(TFRECORD_DIR):
print('tfcecord文件已存在')
else:
#获得所有图片
photo_filenames = _get_filenames_and_classes(DATASET_DIR)

#把数据切分为训练集和测试集,并打乱
random.seed(_RANDOM_SEED)
random.shuffle(photo_filenames)
training_filenames = photo_filenames[_NUM_TEST:]
testing_filenames = photo_filenames[:_NUM_TEST]

#数据转换
_convert_dataset('train', training_filenames, DATASET_DIR)
_convert_dataset('test', testing_filenames, DATASET_DIR)
print('生成tfcecord文件')
验证码识别
其中nets的包是tensorflow/models-master里面有个nets的包,直接拷贝到下面代码文件的相同目录下即可然后使用nets目录下的alexnet
import os
import tensorflow as tf
from PIL import Image
from nets import nets_factory
import numpy as np
# 不同字符数量
CHAR_SET_LEN = 10
# 图片高度
IMAGE_HEIGHT = 60
# 图片宽度
IMAGE_WIDTH = 160
# 批次
BATCH_SIZE = 25
# tfrecord文件存放路径
TFRECORD_FILE = "xxxx/tensorFlowlearning/captcha/"

# placeholder
x = tf.placeholder(tf.float32, [None, 224, 224])
y0 = tf.placeholder(tf.float32, [None])
y1 = tf.placeholder(tf.float32, [None])
y2 = tf.placeholder(tf.float32, [None])
y3 = tf.placeholder(tf.float32, [None])

# 学习率
lr = tf.Variable(0.003, dtype=tf.float32)

# 从tfrecord读出数据
def read_and_decode(filename):
# 根据文件名生成一个队列
filename_queue = tf.train.string_input_producer([filename])
reader = tf.TFRecordReader()
# 返回文件名和文件
_, serialized_example = reader.read(filename_queue)
features = tf.parse_single_example(serialized_example,
features={
'image' : tf.FixedLenFeature([], tf.string),
'label0': tf.FixedLenFeature([], tf.int64),
'label1': tf.FixedLenFeature([], tf.int64),
'label2': tf.FixedLenFeature([], tf.int64),
'label3': tf.FixedLenFeature([], tf.int64),
})
# 获取图片数据
image = tf.decode_raw(features['image'], tf.uint8)
# tf.train.shuffle_batch必须确定shape
image = tf.reshape(image, [224, 224])
# 图片预处理
image = tf.cast(image, tf.float32) / 255.0
image = tf.subtract(image, 0.5)
image = tf.multiply(image, 2.0)
# 获取label
label0 = tf.cast(features['label0'], tf.int32)
label1 = tf.cast(features['label1'], tf.int32)
label2 = tf.cast(features['label2'], tf.int32)
label3 = tf.cast(features['label3'], tf.int32)

return image, label0, label1, label2, label3
# 获取图片数据和标签
image, label0, label1, label2, label3 = read_and_decode(TFRECORD_FILE)
#使用shuffle_batch可以随机打乱
image_batch, label_batch0, label_batch1, label_batch2, label_batch3 = tf.train.shuffle_batch(
[image, label0, label1, label2, label3], batch_size = BATCH_SIZE,
capacity = 50000, min_after_dequeue=10000, num_threads=1)
#定义网络结构
train_network_fn = nets_factory.get_network_fn(
'alexnet_v2',
num_classes=CHAR_SET_LEN,
weight_decay=0.0005,
is_training=True)
with tf.Session() as sess:
# inputs: a tensor of size [batch_size, height, width, channels]
X = tf.reshape(x, [BATCH_SIZE, 224, 224, 1])
# 数据输入网络得到输出值
logits0,logits1,logits2,logits3,end_points = train_network_fn(X)
# 把标签转成one_hot的形式
one_hot_labels0 = tf.one_hot(indices=tf.cast(y0, tf.int32), depth=CHAR_SET_LEN)
one_hot_labels1 = tf.one_hot(indices=tf.cast(y1, tf.int32), depth=CHAR_SET_LEN)
one_hot_labels2 = tf.one_hot(indices=tf.cast(y2, tf.int32), depth=CHAR_SET_LEN)
one_hot_labels3 = tf.one_hot(indices=tf.cast(y3, tf.int32), depth=CHAR_SET_LEN)
# 计算loss
loss0 = tf.reduce_mean(tf.nn.softmax_cross_entropy_with_logits(logits=logits0,labels=one_hot_labels0))
loss1 = tf.reduce_mean(tf.nn.softmax_cross_entropy_with_logits(logits=logits1,labels=one_hot_labels1))
loss2 = tf.reduce_mean(tf.nn.softmax_cross_entropy_with_logits(logits=logits2,labels=one_hot_labels2))
loss3 = tf.reduce_mean(tf.nn.softmax_cross_entropy_with_logits(logits=logits3,labels=one_hot_labels3))
# 计算总的loss
total_loss = (loss0+loss1+loss2+loss3)/4.0
# 优化total_loss
optimizer = tf.train.AdamOptimizer(learning_rate=lr).minimize(total_loss)
# 计算准确率
correct_prediction0 = tf.equal(tf.argmax(one_hot_labels0,1),tf.argmax(logits0,1))
accuracy0 = tf.reduce_mean(tf.cast(correct_prediction0,tf.float32))
correct_prediction1 = tf.equal(tf.argmax(one_hot_labels1,1),tf.argmax(logits1,1))
accuracy1 = tf.reduce_mean(tf.cast(correct_prediction1,tf.float32))
correct_prediction2 = tf.equal(tf.argmax(one_hot_labels2,1),tf.argmax(logits2,1))
accuracy2 = tf.reduce_mean(tf.cast(correct_prediction2,tf.float32))
correct_prediction3 = tf.equal(tf.argmax(one_hot_labels3,1),tf.argmax(logits3,1))
accuracy3 = tf.reduce_mean(tf.cast(correct_prediction3,tf.float32))
# 用于保存模型
saver = tf.train.Saver()
# 初始化
sess.run(tf.global_variables_initializer())
# 创建一个协调器,管理线程
coord = tf.train.Coordinator()
# 启动QueueRunner, 此时文件名队列已经进队
threads = tf.train.start_queue_runners(sess=sess, coord=coord)
for i in range(6001):
# 获取一个批次的数据和标签
b_image, b_label0, b_label1 ,b_label2 ,b_label3 = sess.run([image_batch, label_batch0, label_batch1, label_batch2, label_batch3])
# 优化模型
sess.run(optimizer, feed_dict={x: b_image, y0:b_label0, y1: b_label1, y2: b_label2, y3: b_label3})
# 每迭代20次计算一次loss和准确率
if i % 20 == 0:
# 每迭代2000次降低一次学习率
if i%2000 == 0:
sess.run(tf.assign(lr, lr/3))
acc0,acc1,acc2,acc3,loss_ = sess.run([accuracy0,accuracy1,accuracy2,accuracy3,total_loss],feed_dict={x: b_image,
y0: b_label0,
y1: b_label1,
y2: b_label2,
y3: b_label3})
learning_rate = sess.run(lr)
print ("Iter:%d Loss:%.3f Accuracy:%.2f,%.2f,%.2f,%.2f Learning_rate:%.4f" % (i,loss_,acc0,acc1,acc2,acc3,learning_rate))
# 保存模型
# if acc0 > 0.90 and acc1 > 0.90 and acc2 > 0.90 and acc3 > 0.90:
if i==6000:
saver.save(sess, "./captcha/models/crack_captcha.model", global_step=i)
break
# 通知其他线程关闭
coord.request_stop()
# 其他所有线程关闭之后,这一函数才能返回
coord.join(threads)captcha_test
import os
import tensorflow as tf
from PIL import Image
from nets import nets_factory
import numpy as np
import matplotlib.pyplot as plt
# 不同字符数量
CHAR_SET_LEN = 10
# 图片高度
IMAGE_HEIGHT = 60
# 图片宽度
IMAGE_WIDTH = 160
# 批次
BATCH_SIZE = 1
# tfrecord文件存放路径
TFRECORD_FILE = "xxxx/tensorFlowlearning/captcha/"

# placeholder
x = tf.placeholder(tf.float32, [None, 224, 224])

# 从tfrecord读出数据
def read_and_decode(filename):
# 根据文件名生成一个队列
filename_queue = tf.train.string_input_producer([filename])
reader = tf.TFRecordReader()
# 返回文件名和文件
_, serialized_example = reader.read(filename_queue)
features = tf.parse_single_example(serialized_example,
features={
'image' : tf.FixedLenFeature([], tf.string),
'label0': tf.FixedLenFeature([], tf.int64),
'label1': tf.FixedLenFeature([], tf.int64),
'label2': tf.FixedLenFeature([], tf.int64),
'label3': tf.FixedLenFeature([], tf.int64),
})
# 获取图片数据
image = tf.decode_raw(features['image'], tf.uint8)
# 没有经过预处理的灰度图
image_raw = tf.reshape(image, [224, 224])
# tf.train.shuffle_batch必须确定shape
image = tf.reshape(image, [224, 224])
# 图片预处理
image = tf.cast(image, tf.float32) / 255.0
image = tf.subtract(image, 0.5)
image = tf.multiply(image, 2.0)
# 获取label
label0 = tf.cast(features['label0'], tf.int32)
label1 = tf.cast(features['label1'], tf.int32)
label2 = tf.cast(features['label2'], tf.int32)
label3 = tf.cast(features['label3'], tf.int32)

return image, image_raw, label0, label1, label2, label3
# 获取图片数据和标签
image, image_raw, label0, label1, label2, label3 = read_and_decode(TFRECORD_FILE)
#使用shuffle_batch可以随机打乱
image_batch, image_raw_batch, label_batch0, label_batch1, label_batch2, label_batch3 = tf.train.shuffle_batch(
[image, image_raw, label0, label1, label2, label3], batch_size = BATCH_SIZE,
capacity = 50000, min_after_dequeue=10000, num_threads=1)
#定义网络结构
train_network_fn = nets_factory.get_network_fn(
'alexnet_v2',
num_classes=CHAR_SET_LEN,
weight_decay=0.0005,
is_training=False)
with tf.Session() as sess:
# inputs: a tensor of size [batch_size, height, width, channels]
X = tf.reshape(x, [BATCH_SIZE, 224, 224, 1])
# 数据输入网络得到输出值
logits0,logits1,logits2,logits3,end_points = train_network_fn(X)
# 预测值
predict0 = tf.reshape(logits0, [-1, CHAR_SET_LEN])
predict0 = tf.argmax(predict0, 1)
predict1 = tf.reshape(logits1, [-1, CHAR_SET_LEN])
predict1 = tf.argmax(predict1, 1)
predict2 = tf.reshape(logits2, [-1, CHAR_SET_LEN])
predict2 = tf.argmax(predict2, 1)
predict3 = tf.reshape(logits3, [-1, CHAR_SET_LEN])
predict3 = tf.argmax(predict3, 1)
# 初始化
sess.run(tf.global_variables_initializer())
# 载入训练好的模型
saver = tf.train.Saver()
saver.restore(sess,'./captcha/models/crack_captcha.model-6000')
# 创建一个协调器,管理线程
coord = tf.train.Coordinator()
# 启动QueueRunner, 此时文件名队列已经进队
threads = tf.train.start_queue_runners(sess=sess, coord=coord)
for i in range(10):
# 获取一个批次的数据和标签
b_image, b_image_raw, b_label0, b_label1 ,b_label2 ,b_label3 = sess.run([image_batch,
image_raw_batch,
label_batch0,
label_batch1,
label_batch2,
label_batch3])
# 显示图片
img=Image.fromarray(b_image_raw[0],'L')
plt.imshow(img)
plt.axis('off')
plt.show()
# 打印标签
print('label:',b_label0, b_label1 ,b_label2 ,b_label3)
# 预测
label0,label1,label2,label3 = sess.run([predict0,predict1,predict2,predict3], feed_dict={x: b_image})
# 打印预测值
print('predict:',label0,label1,label2,label3)
# 通知其他线程关闭
coord.request_stop()
# 其他所有线程关闭之后,这一函数才能返回
coord.join(threads)

相关文章推荐
- 深度学习框架-tensorflow进阶项目
- 机器学习/深度学习个人进阶日志-基于Tensorflow的手写数字识别项目最终篇
- TensorFlow 深度学习框架(9)-- 经典卷积网络模型 : LeNet-5 模型 & Inception-v3 模型
- TensorFlow 深度学习框架(9)-- 经典卷积网络模型 : LeNet-5 模型 & Inception-v3 模型
- TensorFlow 深度学习框架 (1)-- 神经网络与前向传播
- TensorFlow 深度学习框架 (2)-- 反向传播优化神经网络
- 深度学习框架Tensorflow介绍与各大DL框架对比(还在犹豫用什么框架的同学们快看过来!)
- TensorFlow-实战Google深度学习框架 笔记(上)
- TensorFlow 深度学习框架(4)-- 损失函数
- 深度学习(五十六)tensorflow项目构建流程
- TensorFlow 深度学习框架(6)-- mnist 数字识别及不同模型效果比较
- TensorFlow 深度学习框架(6)-- mnist 数字识别及不同模型效果比较
- 迁移学习源码全注释 - 《Tensorflow 实战 Google 深度学习框架》源码注释
- 深度学习框架的介绍与比较(Caffe, TensorFlow, MXNet, Torch, Theano)
- 从TensorFlow到Theano:横向对比七大深度学习框架
- TensorFlow 深度学习框架(7)-- 变量管理及训练模型的保存与加载
- TensorFlow 深度学习框架(9)-- 经典卷积网络模型 : LeNet-5 模型 & Inception-v3 模型
- TensorFlow 深度学习框架(9)-- 经典卷积网络模型 : LeNet-5 模型 & Inception-v3 模型
- TensorFlow 深度学习框架 (1)-- 神经网络与前向传播
- Tensorflow 实战google深度学习框架 10 pb文件的保存&加载