CAS之5.2x版本自定义登录,多数据源登录-yellowcong
2018-02-02 19:19
357 查看
通过自定义登录的策略,可以根据传递过来的参数,来确定使用那个数据库查询用户信息。这种方式,可以说是,爽歪歪啊。可以自己登录,设定数据源来访问。我后期加jdbctemplate的配置,将jdbc集成springboot里面,这样用的是springboot里面数据源。
插件版本是3.1.0的,默认是2点几的版本,就是由于这个才导致报错的,害我找半天,郁闷死我了。
学习要求
需要对于cas和springboot环境搭建有所了解,不然看着,都不知道我说得啥玩意。项目地址
https://gitee.com/yellowcong/springboot_cas/tree/master/cas-server-login
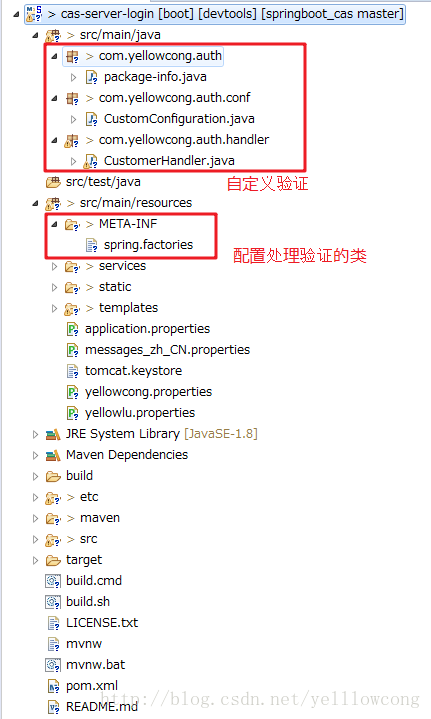
目录结构
添加登录处理类
登录处理类,需要继承AbstractPreAndPostProcessingAuthenticationHandler这个类,复写抽象方法supports和doAuthentication
验证类
登录验证类,这个类用于处理用户登录的请求。大家可以发现,当我是admin的时候,不管是啥情况,俺都返回数据,如果是lock ,我就锁住类。我还可以从数据库中查询数据,判断用户的情况。package com.yellowcong.auth.handler;
import java.security.GeneralSecurityException;
import java.sql.Connection;
import java.sql.DriverManager;
import java.sql.PreparedStatement;
import java.sql.ResultSet;
import java.sql.SQLException;
import java.util.Collections;
import java.util.HashMap;
import java.util.Map;
import javax.security.auth.login.AccountLockedException;
import javax.security.auth.login.FailedLoginException;
import org.apereo.cas.authentication.Credential;
import org.apereo.cas.authentication.HandlerResult;
import org.apereo.cas.authentication.PreventedException;
import org.apereo.cas.authentication.UsernamePasswordCredential;
import org.apereo.cas.authentication.exceptions.AccountDisabledException;
import org.apereo.cas.authentication.exceptions.InvalidLoginLocationException;
import org.apereo.cas.authentication.handler.support.AbstractPreAndPostProcessingAuthenticationHandler;
import org.apereo.cas.authentication.principal.PrincipalFactory;
import org.apereo.cas.services.ServicesManager;
/**
* @author yellowcong
* 创建日期:2018/02/02
*
*/
public class CustomerHandler extends AbstractPreAndPostProcessingAuthenticationHandler {
public CustomerHandler(String name, ServicesManager servicesManager, PrincipalFactory principalFactory,
Integer order) {
super(name, servicesManager, principalFactory, order);
}
/**
* 用于判断用户的Credential(换而言之,就是登录信息),是否是俺能处理的
* 就是有可能是,子站点的登录信息中不止有用户名密码等信息,还有部门信息的情况
*/
@Override
public boolean supports(Credential credential) {
//判断传递过来的Credential 是否是自己能处理的类型
return credential instanceof UsernamePasswordCredential;
}
/**
* 用于授权处理
*/
@Override
protected HandlerResult doAuthentication(Credential credential) throws GeneralSecurityException, PreventedException {
UsernamePasswordCredential usernamePasswordCredentia = (UsernamePasswordCredential) credential;
//获取传递过来的用户名和密码
String username = usernamePasswordCredentia.getUsername();
String password = usernamePasswordCredentia.getPassword();
Connection conn = null;
try {
Class.forName("com.mysql.jdbc.Driver");
//直接是原生的数据库配置啊
String url = "jdbc:mysql://127.0.0.1:3306/yellowcong";
String user = "root";
String pass = "root";
conn = DriverManager.getConnection(url,user, pass);
//查询语句
String sql = "SELECT * FROM cas_user WHERE username =? AND PASSWORD = ?";
PreparedStatement ps = conn.prepareStatement(sql);
ps.setString(1, username);
ps.setString(2, password);
ResultSet rs = ps.executeQuery();
if(rs.next()) {
//允许登录,并且通过this.principalFactory.createPrincipal来返回用户属性
return createHandlerResult(credential, this.principalFactory.createPrincipal(username, Collections.emptyMap()), null);
}
} catch (Exception e) {
// TODO Auto-generated catch block
e.printStackTrace();
}finally {
if(conn != null) {
try {
conn.close();
} catch (SQLException e) {
e.printStackTrace();
}
}
}
//当是admin用户的情况,直接就登录了,谁叫他是admin用户呢
if(username.startsWith("admin")) {
//直接返回去了
return createHandlerResult(credential, this.principalFactory.createPrincipal(username, Collections.emptyMap()), null);
}else if (username.startsWith("lock")) {
//用户锁定
throw new AccountLockedException();
} else if (username.startsWith("disable")) {
//用户禁用
throw new AccountDisabledException();
} else if (username.startsWith("invali")) {
//禁止登录该工作站登录
throw new InvalidLoginLocationException();
} else if (username.startsWith("passorwd")) {
//密码错误
throw new FailedLoginException();
} else if (username.startsWith("account")) {
//账号错误
throw new AccountLockedException();
}
return null;
}
}配置注入类
我们写好了处理登录的类后,需要注入到springboot,这样我们才可以调用到我们的自定义登录类package com.yellowcong.auth.conf;
import org.apereo.cas.authentication.AuthenticationEventExecutionPlan;
import org.apereo.cas.authentication.AuthenticationEventExecutionPlanConfigurer;
import org.apereo.cas.authentication.AuthenticationHandler;
import org.apereo.cas.authentication.principal.DefaultPrincipalFactory;
import org.apereo.cas.services.ServicesManager;
import org.springframework.beans.factory.annotation.Autowired;
import org.springframework.beans.factory.annotation.Qualifier;
import org.springframework.context.annotation.Bean;
import com.yellowcong.auth.handler.CustomerHandler;
/**
* @author yellowcong
* 创建日期:2018/02/02
*
*/
public class CustomConfiguration implements AuthenticationEventExecutionPlanConfigurer {
@Autowired
@Qualifier("servicesManager")
private ServicesManager servicesManager;
//注册验证器
@Bean
public AuthenticationHandler customAuthenticationHandler() {
//优先验证
return new CustomerHandler("customerHandler",
servicesManager, new DefaultPrincipalFactory(), 1);
}
//注册自定义认证器
@Override
public void configureAuthenticationExecutionPlan(final AuthenticationEventExecutionPlan plan) {
plan.registerAuthenticationHandler(customAuthenticationHandler());
}
}package
用于让springboot知道这个是根目录,下面有类可以扫描注入/** * @author yellowcong * 创建日期:2018/02/02 * */ package com.yellowcong.auth;
配置spring.factories
SpringFactoriesLoader属于Spring框架私有的一种扩展方案,其主要功能就是从指定的配置文件META-INF/spring.factories加载配置。通过这个方法,我们就能将自定义的认证信方法。org.springframework.boot.autoconfigure.EnableAutoConfiguration=com.yellowcong.auth.conf.CustomConfiguration
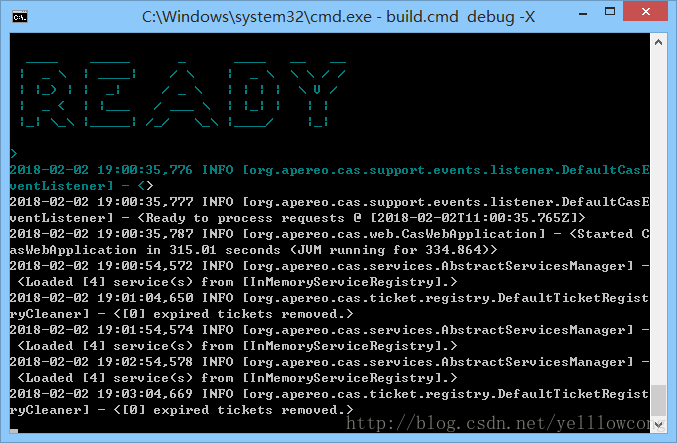
debug方式带详情启动cas
#加上-X 就可以查看详情了
build.cmd debug -X
项目pom.xml
为啥我要把这个单独贴出来,因为我添加了一些依赖,如果不添加这些依赖,咋们就不能愉快的玩耍了。<?xml version="1.0" encoding="UTF-8"?> <project xmlns="http://maven.apache.org/POM/4.0.0" xmlns:xsi="http://www.w3.org/2001/XMLSchema-instance" xsi:schemaLocation="http://maven.apache.org/POM/4.0.0 http://maven.apache.org/xsd/maven-4.0.0.xsd "> <modelVersion>4.0.0</modelVersion> <groupId>org.apereo.cas</groupId> <artifactId>cas-server-login</artifactId> <packaging>war</packaging> <version>1.0</version> <dependencies> <dependency> <groupId>org.apereo.cas</groupId> <artifactId>cas-server-webapp${app.server}</artifactId> <version>${cas.version}</version> <type>war</type> <scope>system</scope> <optional>true</optional> <systemPath>${project.basedir}/src/main/webapp/WEB-INF/lib/cas-server-webapp-tomcat-5.2.1.war</systemPath> </dependency> <!-- 自定义认证的方式 begin --> <dependency> <groupId>org.apereo.cas</groupId> <artifactId>cas-server-core-webflow</artifactId> <version>${cas.version}</version> </dependency> <dependency> <groupId>org.apereo.cas</groupId> <artifactId>cas-server-core-authentication</artifactId> <version>${cas.version}</version> </dependency> <dependency> <groupId>org.apereo.cas</groupId> <artifactId>cas-server-webapp-config</artifactId> <version>${cas.version}</version> <scope>provided</scope> </dependency> <!-- MYSQL --> <!-- 数据库驱动 --> <dependency> <groupId>mysql</groupId> <artifactId>mysql-connector-java</artifactId> <version>5.1.21</version> </dependency> </dependencies> <build> <plugins> <plugin> <groupId>com.rimerosolutions.maven.plugins</groupId> <artifactId>wrapper-maven-plugin</artifactId> <version>0.0.4</version> <configuration> <verifyDownload>true</verifyDownload> <checksumAlgorithm>MD5</checksumAlgorithm> </configuration> </plugin> <plugin> <groupId>org.springframework.boot</groupId> <artifactId>spring-boot-maven-plugin</artifactId> <version>${springboot.version}</version> <configuration> <mainClass>${mainClassName}</mainClass> <addResources>true</addResources> <executable>${isExecutable}</executable> <layout>WAR</layout> </configuration> <executions> <execution> <goals> <goal>repackage</goal> </goals> </execution> </executions> </plugin> <!-- 添加依赖的插件 --> <plugin> <groupId>org.apache.maven.plugins</groupId> <artifactId>maven-dependency-plugin</artifactId> <version>2.10</version> <executions> <execution> <id>copy-dependencies</id> <phase>compile</phase> <goals> <goal>copy-dependencies</goal> </goals> <configuration> <outputDirectory>${project.build.directory}/${project.build.finalName}/WEB-INF/lib</outputDirectory> <includeScope>system</includeScope> </configuration> </execution> </executions> </plugin> <plugin> <groupId>org.apache.maven.plugins</groupId> <artifactId>maven-war-plugin</artifactId> <version>3.1.0</version> <configuration> <warName>cas</warName> <failOnMissingWebXml>false</failOnMissingWebXml> <recompressZippedFiles>false</recompressZippedFiles> <archive> <compress>false</compress> <manifestFile>${manifestFileToUse}</manifestFile> </archive> <overlays> <overlay> <groupId>org.apereo.cas</groupId> <artifactId>cas-server-webapp${app.server}</artifactId> </overlay> </overlays> </configuration> </plugin> <plugin> <groupId>org.apache.maven.plugins</groupId> <artifactId>maven-compiler-plugin</artifactId> <version>3.3</version> </plugin> </plugins> <finalName>cas</finalName> </build> <properties> <cas.version>5.2.2</cas.version> <springboot.version>1.5.8.RELEASE</springboot.version> <!-- app.server could be -jetty, -undertow, -tomcat, or blank if you plan to provide appserver --> <app.server>-tomcat</app.server> <mainClassName>org.springframework.boot.loader.WarLauncher</mainClassName> <isExecutable>false</isExecutable> <manifestFileToUse>${project.build.directory}/war/work/org.apereo.cas/cas-server-webapp${app.server}/META-INF/MANIFEST.MF</manifestFileToUse> <maven.compiler.source>1.8</maven.compiler.source> <maven.compiler.target>1.8</maven.compiler.target> <project.build.sourceEncoding>UTF-8</project.build.sourceEncoding> </properties> <repositories> <repository> <id>sonatype-releases</id> <url>http://oss.sonatype.org/content/repositories/releases/</url> <snapshots> <enabled>false</enabled> </snapshots> <releases> <enabled>true</enabled> </releases> </repository> <repository> <id>sonatype-snapshots</id> <url>https://oss.sonatype.org/content/repositories/snapshots/</url> <snapshots> <enabled>true</enabled> </snapshots> <releases> <enabled>false</enabled> </releases> </repository> <repository> <id>shibboleth-releases</id> <url>https://build.shibboleth.net/nexus/content/repositories/releases</url> </repository> </repositories> <profiles> <profile> <activation> <activeByDefault>true</activeByDefault> </activation> <id>exec</id> <properties> <mainClassName>org.apereo.cas.web.CasWebApplication</mainClassName> <isExecutable>true</isExecutable> <manifestFileToUse></manifestFileToUse> </properties> <build> <plugins> <plugin> <groupId>com.soebes.maven.plugins</groupId> <artifactId>echo-maven-plugin</artifactId> <version>0.3.0</version> <executions> <execution> <phase>prepare-package</phase> <goals> <goal>echo</goal> </goals> </execution> </executions> <configuration> <echos> <echo>Executable profile to make the generated CAS web application executable.</echo></echos> </configuration> </plugin> </plugins> </build> </profile> <profile> <activation> <activeByDefault>false</activeByDefault> </activation> <id>pgp</id> <build> <plugins> <plugin> <groupId>com.github.s4u.plugins</groupId> <artifactId>pgpverify-maven-plugin</artifactId> <version>1.1.0</version> <executions> <execution> <goals> <goal>check</goal> </goals> </execution> </executions> <configuration> <pgpKeyServer>hkp://pool.sks-keyservers.net</pgpKeyServer> <pgpKeysCachePath>${settings.localRepository}/pgpkeys-cache</pgpKeysCachePath> <scope>test</scope> <verifyPomFiles>true</verifyPomFiles> <failNoSignature>false</failNoSignature> </configuration> </plugin> </plugins> </build> </profile> </profiles> </project>
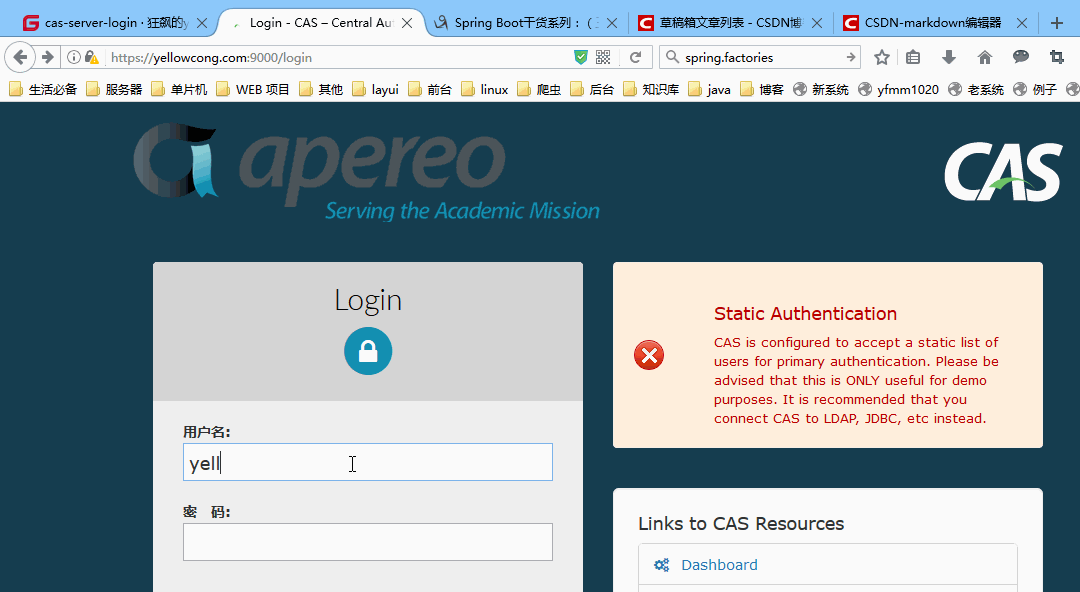
登录验证
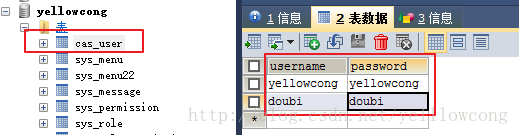
表数据
CREATE DATABASE /*!32312 IF NOT EXISTS*/`yellowcong` /*!40100 DEFAULT CHARACTER SET utf8 */;

USE `yellowcong`;

DROP TABLE IF EXISTS `cas_user`;

CREATE TABLE `cas_user` (
`username` varchar(32) NOT NULL DEFAULT '',
`password` varchar(32) NOT NULL DEFAULT ''
) ENGINE=InnoDB DEFAULT CHARSET=utf8;

insert  into `cas_user`(`username`,`password`) values ('yellowcong','yellowcong'),('doubi','doubi');
登录验证
登录我们的配置,登录后,我将数据源里面添加了一条数据(zhangsan:zhangsan),然后也能挡路上。https://yellowcong.com:9000/
错误集合
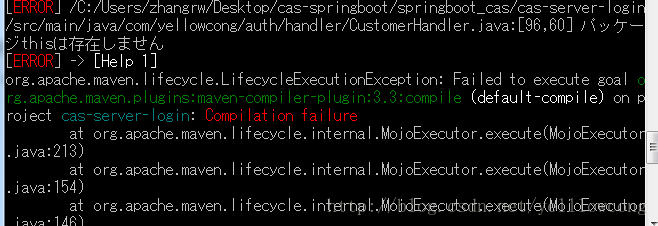
找不到类自定义的类
这个报错,就是没有找到我们默认填写的处理类。我刚开始一脸蒙蔽,后来发现是pom.xml文件中配置的编译版本的问题。插件版本是3.1.0的,默认是2点几的版本,就是由于这个才导致报错的,害我找半天,郁闷死我了。
<plugin>
<groupId>org.apache.maven.plugins</groupId>
<artifactId>maven-war-plugin</artifactId>
<version>3.1.0</version>
<configuration>
<warName>cas</warName>
<failOnMissingWebXml>false</failOnMissingWebXml>
<recompressZippedFiles>false</recompressZippedFiles>
<archive>
<compress>false</compress>
<manifestFile>${manifestFileToUse}</manifestFile>
</archive>
<overlays>
<overlay>
<groupId>org.apereo.cas</groupId>
<artifactId>cas-server-webapp${app.server}</artifactId>
</overlay>
</overlays>
</configuration>
</plugin>
参考文章
http://blog.csdn.net/u010475041/article/details/78420322
相关文章推荐
- CAS之5.2x版本自定义登录页面-yellowcong
- CAS之5.2x版本登录验证码-yellowcong
- CAS之5.2x版本自定义密码验证-yellowcong
- CAS之5.2x版本自定义返回消息-yellowcong
- CAS之5.2x版本自定义JDBC认证-yellowcong
- CAS之5.2x版本自定义错误信息-yellowcong
- CAS之5.2x版本单点登录服务安装-yellowcong
- CAS之5.2x版本之单点登录退出-yellowcong
- Cas之5.2.x版本单点登录自定义REST认证-yellowcong
- CAS之 5.2x版本配置数据库认证-yellowcong
- CAS之5.2x版本之jdbc配置多返回值-yellowcong
- CAS之5.2x版本之中文返回值乱码问题-yellowcong
- CAS之5.2x版本之服务器开发调试(eclipse调试cas)-yellowcong
- CAS之5.2x版本配置密码加密(MD5和SHA)-yellowcong
- CAS之5.2x版本之客户端集成(Springboot)-yellowcong
- CAS之5.2x版本存储Ticket到redis-yellowcong
- CAS 之3.x版本,单点登录服务搭建(Window)-yellowcong
- CAS之3.5版本,单点登录服务搭建(linux)-yellowcong
- CAS之5.2x版本之客户端集成(传统web项目)-yellowcong
- CAS之5.2.x版本自定义表单信息-yellowcong