运维学python之爬虫中级篇(九)Python3 MySQL 数据库连接
2018-01-25 22:25
751 查看
最近因为年底,连续两个项目要投产上线,又赶上公司年会,忙的要死,更新有些慢,见谅。今天要说一说python如何对mysql进行操作。在 Python3.x 版本中用于连接 MySQL 服务器的库与Python2中使用的mysqldb有所不同。本文我将为大家介绍 Python3 使用 PyMySQL库 连接数据库,并实现简单的增删改查。
CPython >= 2.6 or >= 3.3
PyPy >= 4.0
IronPython 2.7
mysql 下列之一
MySQL >= 4.1 (tested with only 5.5~)
MariaDB >= 5.1
我的环境版本如下:
python

Mariadb

pycharm安装与前面类似,如下图:

查看创建完的表结构:
已经创建了数据库 testdb;
在testdb数据库中已经创建了users表;
连接数据库TESTDB使用的用户名为 "testdb" ,密码为 "123456",你也可以自己设定用户名和密码;
主要如果是远程连接阿里云等主机注意grant授权;
已经安装了 Python MySQLdb 模块。
连接数据库并获取版本信息:
输出结果如下:
执行结果:
当然上面的插入代码也可以写成这样:
执行结果是一样的:
返回结果如下:
执行结果如下:
执行结果如下:
中级篇就算结束了,后续会介绍高级篇框架相关知识,敬请关注。
1 PyMySQL介绍
PyMySql包含一个纯python的MySQL客户端库。PyMySQL的目标是成为MySQLdb的替代品,并在CPython、PyPy和IronPython上工作。2 版本要求
python 下列之一CPython >= 2.6 or >= 3.3
PyPy >= 4.0
IronPython 2.7
mysql 下列之一
MySQL >= 4.1 (tested with only 5.5~)
MariaDB >= 5.1
我的环境版本如下:
python
Mariadb
3 安装
直接pip方式安装:# pip install PyMySQL
pycharm安装与前面类似,如下图:
4 数据库增删改查
4.1 创建数据库testdb和表users
首先要先创建一个testdb 数据库,并且创建users表,创建语句如下:MariaDB [(none)]> create database testdb; Query OK, 1 row affected (0.01 sec) MariaDB [(none)]> use testdb # 创建users表命令 CREATE TABLE `users` ( `id` int(11) NOT NULL AUTO_INCREMENT, `email` varchar(255) COLLATE utf8_bin NOT NULL, `password` varchar(255) COLLATE utf8_bin NOT NULL, PRIMARY KEY (`id`) ) ENGINE=InnoDB DEFAULT CHARSET=utf8 COLLATE=utf8_bin AUTO_INCREMENT=1 ;
查看创建完的表结构:
MariaDB [testdb]> describe users;
+----------+--------------+------+-----+---------+----------------+
| Field    | Type         | Null | Key | Default | Extra          |
+----------+--------------+------+-----+---------+----------------+
| id       | int(11)      | NO   | PRI | NULL    | auto_increment |
| email    | varchar(255) | NO   |     | NULL    |                |
| password | varchar(255) | NO   |     | NULL    |                |
+----------+--------------+------+-----+---------+----------------+
3 rows in set (0.00 sec)
4.2 连接数据库
连接数据库之前要确认以下条件是否满足:已经创建了数据库 testdb;
在testdb数据库中已经创建了users表;
连接数据库TESTDB使用的用户名为 "testdb" ,密码为 "123456",你也可以自己设定用户名和密码;
主要如果是远程连接阿里云等主机注意grant授权;
已经安装了 Python MySQLdb 模块。
连接数据库并获取版本信息:
# -*- coding: utf-8 -*-
# 导入模块
import pymysql

# 打开数据库连接
db = pymysql.connect('localhost', 'testdb', '123456', 'testdb')
# 使用cursor()方法创建一个游标对象cursor
cursor = db.cursor()
# 使用execute()方法执行SQL查询
cursor.execute("select version()")
# 使用fetchone()获取单条数据
data = cursor.fetchone()
# 打印获取的内容
print('Vsersion: %s'  % data)
# 关闭连接
db.close()
输出结果如下:
Version: 10.0.33-MariaDB
4.3 数据库插入
# -*- coding: utf-8 -*-
# 导入模块
import pymysql
# 打开数据库连接
db = pymysql.connect('localhost', 'testdb', '123456', 'testdb')
# 使用cursor()方法创建一个游标对象cursor
cursor = db.cursor()
# sql语句
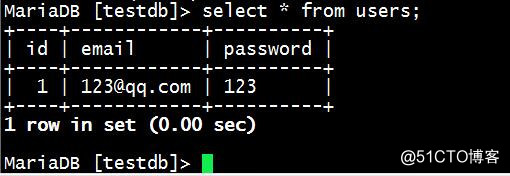
sql = "INSERT INTO users(email, password) VALUES ('123@qq.com', '123');"
try:
# 执行sql语句
cursor.execute(sql)
# 提交到数据库
db.commit()
print('success')
except:
# 如果出错执行回滚
db.rollback()
print('failed')
# 关闭数据库连接
db.close()执行结果:
当然上面的插入代码也可以写成这样:
# -*- coding: utf-8 -*-
# 导入模块
import pymysql
# 打开数据库连接
db = pymysql.connect('localhost', 'testdb', '123456', 'testdb')
# 使用cursor()方法创建一个游标对象cursor
cursor = db.cursor()
# sql语句
# 注意这里是与上面不同的地方
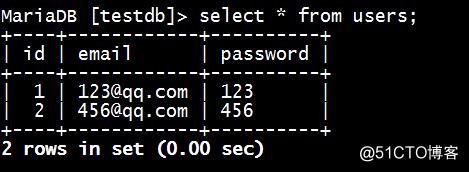
sql = "INSERT INTO users(email, password) VALUES (%s, %s)";
try:
# 执行sql语句
# 注意这里是与上面不同的地方
cursor.execute(sql, ('456@qq.com', '456'))
# 提交到数据库
db.commit()
print('success')
except:
# 如果出错执行回滚
db.rollback()
print('failed')
# 关闭数据库连接
db.close()执行结果是一样的:
4.4 数据库查询
# -*- coding: utf-8 -*-
# 导入模块
import pymysql

# 打开数据库连接
db = pymysql.connect('localhost', 'testdb', '123456', 'testdb')
# 使用cursor()方法创建一个游标对象cursor
cursor = db.cursor()
# sql语句
sql = "select * from users;"

try:
# 执行sql语句
cursor.execute(sql)
# 通过fetchall获取results对象并打印结果
results = cursor.fetchall()
for result in results:
print(result)
except:
print('failed')
# 关闭数据库连接
db.close()
返回结果如下:
(1, '123@qq.com', '123')
(2, '456@qq.com', '456')
4.5 数据库更新操作
# -*- coding: utf-8 -*-
# 导入模块
import pymysql

# 打开数据库连接
db = pymysql.connect('localhost', 'testdb', '123456', 'testdb')
# 使用cursor()方法创建一个游标对象cursor
cursor = db.cursor()
# sql语句
sql = "update users set email = '1234@qq.com' where id = 1;"
sql2 = 'select * from users;'
try:
# 执行sql语句
cursor.execute(sql)
# 提交到数据库
db.commit()
cursor.execute(sql2)
# 获取数据结果
results = cursor.fetchall()
for result in results:
print(result)
except:
# 如果出错执行回滚
db.rollback()
print('failed')
# 关闭数据库连接
db.close()
执行结果如下:
(1, '1234@qq.com', '123')
(2, '456@qq.com', '456')
4.6 删除操作
# -*- coding: utf-8 -*-
# 导入模块
import pymysql

# 打开数据库连接
db = pymysql.connect('localhost', 'testdb', '123456', 'testdb')
# 使用cursor()方法创建一个游标对象cursor
cursor = db.cursor()
# sql语句
sql = "delete from users where id = 1;"
sql2 = "select * from users;"
try:
# 执行sql语句
cursor.execute(sql)
# 提交到数据库
db.commit()
cursor.execute(sql2)
results = cursor.fetchall()
for result in results:
print(result)
except:
# 如果出错执行回滚
db.rollback()
print('failed')
# 关闭数据库连接
db.close()
执行结果如下:
(2, '456@qq.com', '456')
5 总结
通过上面增删改查我们已经可以看出,其实python操作mysql并不复杂,主要步骤为连接数据库,建立游标对象,执行sql语句,获取结果,关闭连接。我们的重点还是要熟悉相关的sql语句,这样才能做到游刃有余。sql教程中级篇就算结束了,后续会介绍高级篇框架相关知识,敬请关注。

相关文章推荐
- python连接mysql/Oracle及读取数据库内容
- python 连接mysql 数据库
- python3+ 连接并操作mysql 数据库,支持读写分离
- Python3 连接各类数据库(Mysql、Mssql、Oracle)
- Python3 MySQL 数据库连接
- Python3 MySQL 数据库连接
- python3 爬虫连接mysql
- python3.6 使用 pymysql 连接 Mysql 数据库及 简单的增删改查操作
- Python3.6 连接mysql 数据库,增删改查,及多线程简单运用
- python操作mysql(二)数据库连接和游标的建立
- python学习之--Django--连接数据库mysql创建model
- Python3 MySQL 数据库连接
- python3.6 使用 pymysql 连接 Mysql 数据库及 简单的增删改查操作
- python下使用mysql.connector 安装以及连接数据库的操作
- python3数据库配置,远程连接mysql服务器
- MySQl-python模块,python连接数据库出现的问题
- python连接sqlite(mysql)数据库以及sqlite数据库基础操作
- python连接数据库操作MySQL
- Python爬虫-爬取xixizhan.com站点的所有电影列表并写入文件和数据库mysql
- 运维学python之爬虫中级篇(六)基础爬虫