Android桌面小部件AppWidget(2)
2018-01-04 00:00
309 查看
Android桌面小部件AppWidget(2)
在附录文章1的基础上,我再写一篇关于Android AppWidget的文章,本篇文章实现一个简单功能,此功能亦是对附录文章1所实现功能的增强和改进,本文的代码实现的功能:假设桌面小部件只包含一个Button和一个TextView,当点击Button后,后台启动一个服务(IntentService实现),该服务每个一秒发送一个简单的字符串消息数据data,然后将此消息数据更新到桌面小部件的TextView里面实时显示。
这次,在Androidmanifest.xml有关receiver的定义中,与附录文章1相比,将增加一个action:action_update。本例中,Button的按击事件将触发后台启动服务,后台服务Service每隔一秒制造一个简单字符串数据,然后将此数据实时的以广播形式发给AppWidge,AppWidge收到后,就更新到桌面小部件的TextView里面。
(1)定义AppWidget。
先在Androidmanifest.xml里面定义APP widget的,以Android广播形式:
两个用于广播接收的action:action_button和action_update,其中action_button用于在桌面小部件接收用户的点击事件,此action_button将随即启动后台服务,而后台启动的服务将发送广播数据,数据中的广播过滤器即是:action_update。
涉及到的res/xml目录下的appwidget.xml代码文件:
(2)上次Java代码实现窗口小部件。
核心的AppWidget.java代码:
RemoteViews用到的appwidget_layout.xml,appwidget_layout.xml即是桌面小部件的布局文件:
(3)后台服务Service。
MyService.java代码文件,此service是一个Android IntentService,具体实现也可以是Service。此service功能简单,是有桌面小部件的button按钮触发,然后在后台启动,启动后在一个for循环里面循环产生一个简单的字符串数据通过广播形式广播出去,注意打进去的广播过滤器是:action_update。
记得要将此service注册到Androidmanifest.xml里面:
(4)公共变量的定义(次要)。
因为涉及到众多公共变量的写入和读出,所以定义了一个单独的Constants.java代码类,专门定义公共的变量定义:
(5)完整的代码结构。
如图所示:

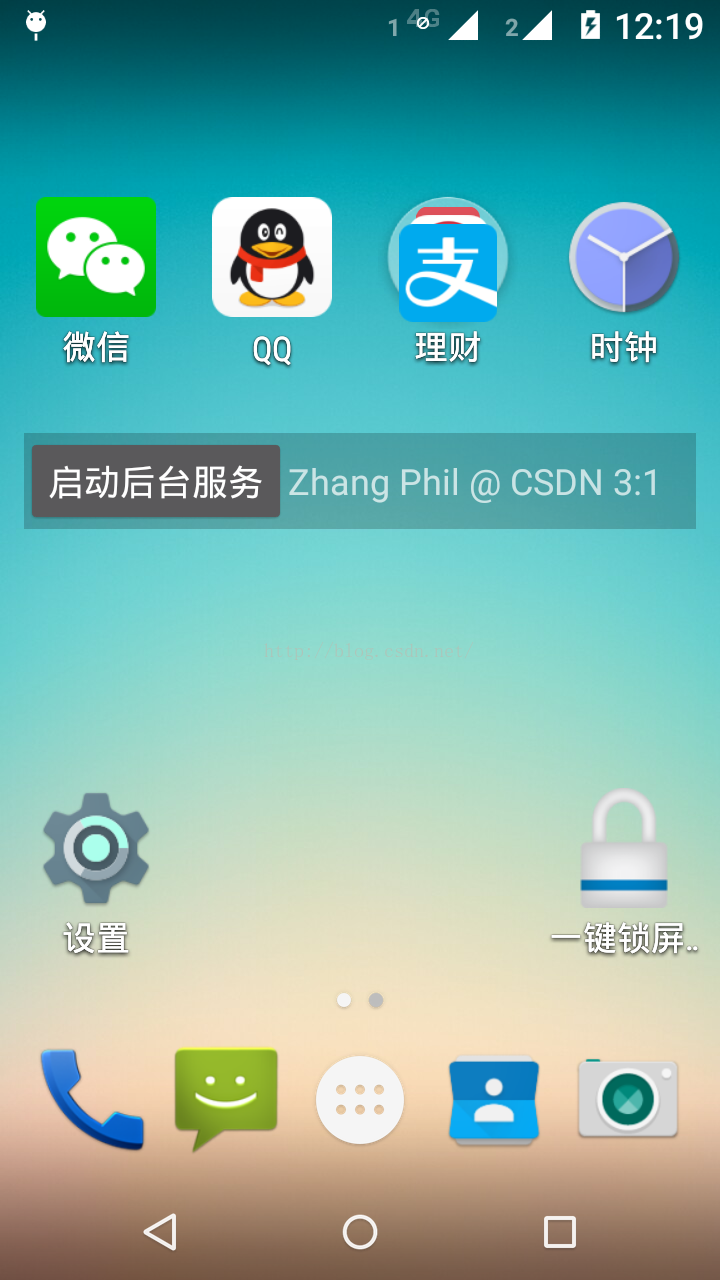
最终,代码运行结果如图所示:
附录文章:
1,《Android桌面小部件AppWidget(1)》链接地址:http://blog.csdn.net/zhangphil/article/details/50457355
Android桌面小部件AppWidget(2)
在附录文章1的基础上,我再写一篇关于Android AppWidget的文章,本篇文章实现一个简单功能,此功能亦是对附录文章1所实现功能的增强和改进,本文的代码实现的功能:假设桌面小部件只包含一个Button和一个TextView,当点击Button后,后台启动一个服务(IntentService实现),该服务每个一秒发送一个简单的字符串消息数据data,然后将此消息数据更新到桌面小部件的TextView里面实时显示。
这次,在Androidmanifest.xml有关receiver的定义中,与附录文章1相比,将增加一个action:action_update。本例中,Button的按击事件将触发后台启动服务,后台服务Service每隔一秒制造一个简单字符串数据,然后将此数据实时的以广播形式发给AppWidge,AppWidge收到后,就更新到桌面小部件的TextView里面。
(1)定义AppWidget。
先在Androidmanifest.xml里面定义APP widget的,以Android广播形式:
<receiver android:name="zhangphil.widget.AppWidget" >

<intent-filter>
<action android:name="action_button" />
</intent-filter>

<intent-filter>
<action android:name="action_update" />
</intent-filter>

<intent-filter>
<action android:name="android.appwidget.action.APPWIDGET_UPDATE" />
</intent-filter>

<meta-data
android:name="android.appwidget.provider"
android:resource="@xml/appwidget" />

</receiver>
两个用于广播接收的action:action_button和action_update,其中action_button用于在桌面小部件接收用户的点击事件,此action_button将随即启动后台服务,而后台启动的服务将发送广播数据,数据中的广播过滤器即是:action_update。
涉及到的res/xml目录下的appwidget.xml代码文件:
<?xml version="1.0" encoding="utf-8"?>
<appwidget-provider xmlns:android="http://schemas.android.com/apk/res/android"
android:initialLayout="@layout/appwidget_layout"
android:minHeight="20dip"
android:minWidth="300dip"
android:previewImage="@drawable/ic_launcher"
android:resizeMode="horizontal|vertical"
android:updatePeriodMillis="0"
android:widgetCategory="home_screen" >

</appwidget-provider>
(2)上次Java代码实现窗口小部件。
核心的AppWidget.java代码:
package zhangphil.widget;

import android.app.PendingIntent;
import android.appwidget.AppWidgetManager;
import android.appwidget.AppWidgetProvider;
import android.content.ComponentName;
import android.content.Context;
import android.content.Intent;
import android.util.Log;
import android.widget.RemoteViews;

public class AppWidget extends AppWidgetProvider {

@Override
public void onReceive(Context context, Intent intent) {
super.onReceive(context, intent);
Log.d(this.getClass().getName(), "onReceive");

if (intent == null)
return;

String action = intent.getAction();

if (action.equals(Constants.ACTION_UPDATE)) {
String data = intent.getStringExtra(Constants.KEY_DATA);
Log.d(Constants.KEY_DATA, data);

RemoteViews remoteViews = new RemoteViews(context.getPackageName(), R.layout.appwidget_layout);
remoteViews.setTextViewText(R.id.text, data);

AppWidgetManager appWidgetManager = AppWidgetManager.getInstance(context);
ComponentName componentName = new ComponentName(context, AppWidget.class);
appWidgetManager.updateAppWidget(componentName, remoteViews);
}

// 点击了按钮,开始启动一个后台服务
if (action.equals(Constants.ACTION_BUTTON)) {
Intent serviceIntent = new Intent(context, MyService.class);
context.startService(serviceIntent);
}
}

@Override
public void onUpdate(Context context, AppWidgetManager appWidgetManager, int[] appWidgetIds) {
Log.d(this.getClass().getName(), "onUpdate");

Intent intent = new Intent(Constants.ACTION_BUTTON);
PendingIntent pendingIntent = PendingIntent.getBroadcast(context, 0, intent, 0);

// 小部件在Launcher桌面的布局
RemoteViews remoteViews = new RemoteViews(context.getPackageName(), R.layout.appwidget_layout);

// 事件
remoteViews.setOnClickPendingIntent(R.id.btn, pendingIntent);

// 更新AppWidget
appWidgetManager.updateAppWidget(appWidgetIds, remoteViews);
}

/**
* 删除AppWidget
*/
@Override
public void onDeleted(Context context, int[] appWidgetIds) {
super.onDeleted(context, appWidgetIds);
Log.d(this.getClass().getName(), "onDeleted");
}

@Override
public void onDisabled(Context context) {
super.onDisabled(context);
Log.d(this.getClass().getName(), "onDisabled");
}

/**
* AppWidget首次创建调用
*/
@Override
public void onEnabled(Context context) {
super.onEnabled(context);
Log.d(this.getClass().getName(), "onEnabled");
}
}
RemoteViews用到的appwidget_layout.xml,appwidget_layout.xml即是桌面小部件的布局文件:
<?xml version="1.0" encoding="utf-8"?>
<LinearLayout xmlns:android="http://schemas.android.com/apk/res/android"
android:layout_width="match_parent"
android:layout_height="wrap_content"
android:orientation="horizontal"
android:background="#33000000" >

<Button
android:id="@+id/btn"
android:layout_width="wrap_content"
android:layout_height="wrap_content"
android:text="启动后台服务" >
</Button>

<TextView
android:id="@+id/text"
android:text="text"
android:layout_width="wrap_content"
android:layout_height="wrap_content" />

</LinearLayout>
(3)后台服务Service。
MyService.java代码文件,此service是一个Android IntentService,具体实现也可以是Service。此service功能简单,是有桌面小部件的button按钮触发,然后在后台启动,启动后在一个for循环里面循环产生一个简单的字符串数据通过广播形式广播出去,注意打进去的广播过滤器是:action_update。
package zhangphil.widget;

import android.app.IntentService;
import android.content.Intent;

public class MyService extends IntentService {

private static int ID = 0;

public MyService() {
super("ZhangPhilService");
}

@Override
public int onStartCommand(Intent intent, int flags, int startId) {
return super.onStartCommand(intent, flags, startId);
}

@Override
protected void onHandleIntent(Intent intent) {
myLongTimeTask(ID++);
}

private void myLongTimeTask(int id) {
for (int i = 0; i < 5; i++) {

Intent intent = new Intent(Constants.ACTION_UPDATE);
intent.putExtra(Constants.KEY_DATA, "Zhang Phil @ CSDN " + id + ":" + i);
sendBroadcast(intent);

try {
Thread.sleep(1000);
} catch (InterruptedException e) {
e.printStackTrace();
}
}
}
}
记得要将此service注册到Androidmanifest.xml里面:
<service android:name="zhangphil.widget.MyService" >
</service>
(4)公共变量的定义(次要)。
因为涉及到众多公共变量的写入和读出,所以定义了一个单独的Constants.java代码类,专门定义公共的变量定义:
package zhangphil.widget;

public class Constants {
public static final String ACTION_BUTTON = "action_button";
public static final String ACTION_UPDATE = "action_update";
public static final String KEY_DATA = "data";
}
(5)完整的代码结构。
如图所示:
最终,代码运行结果如图所示:
附录文章:
1,《Android桌面小部件AppWidget(1)》链接地址:http://blog.csdn.net/zhangphil/article/details/50457355

相关文章推荐
- 桌面小控件_窗口小部件_窗口小工具_android.appwidget
- Android桌面小部件AppWidget(1)
- Android桌面小部件AppWidget:音乐播放器桌面控制部件Widget(3)
- android桌面小部件appwidget使用ListView或者StackView如何刷新
- Android桌面小部件AppWidget(1)
- Android桌面小部件AppWidget
- Android之AppWidget(桌面小部件)开发浅析
- Android桌面小部件AppWidget(2)
- Android:AppWidget、桌面小部件
- android 桌面快捷方式、窗口小部件、文件夹、书签 launcher、appwidget、shortcut、folder、bookmark
- Android桌面小部件AppWidget:音乐播放器桌面控制部件Widget(3)
- Android 窗口小部件--APP Widget
- Android中实现Launcher功能之二 ----- 添加窗口小部件以及AppWidget的创建详解
- Android 桌面组件【app widget】 进阶项目②--心情记录器
- Android之桌面组件App Widget案例
- Android 桌面组件【app widget】 进阶项目--心情记录器
- Android 之窗口小部件高级篇--App Widget 之 RemoteViews
- 理解与应用Android桌面组件AppWidget
- android学习记录(九)AppWidget桌面控件轻松实现
- Android:AppWidget 桌面小控件