一个Android登陆/注册XML布局文件代码
2018-01-04 00:00
274 查看
一个Android登陆/注册XML布局文件代码
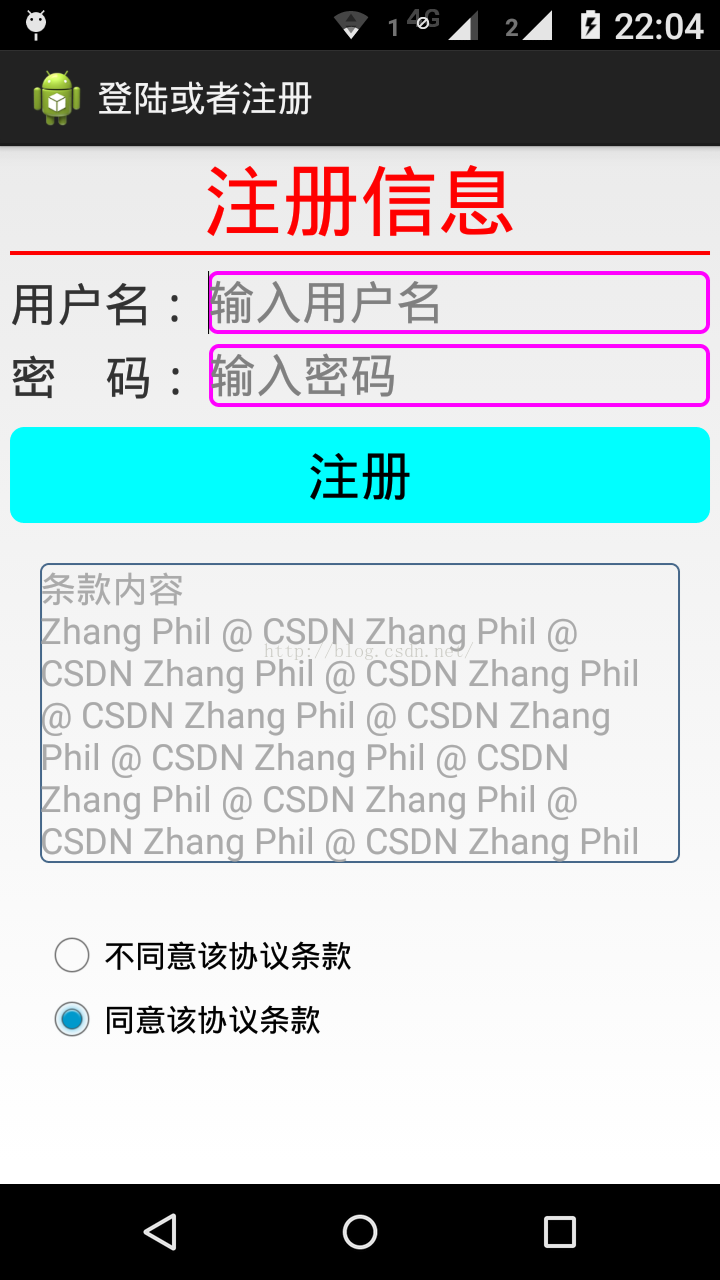
通常在APP开发中不可避免要涉及到登陆/注册xml布局文件的编码实现,这些Android APP登陆/注册XML布局文件代码倒不是很难,但是要在xml布局写代码实现UI设计要求的各种颜色、大小、字体、间距、圆角等等细节设计要求,那么就比较繁琐了,需要不断的细微调整,同时要考虑视屏和匹配不同的Android设备屏幕。还有就是,这类Android登陆/注册XML布局文件代码基本上可以说复用度很高,基本上一次写好,在未来的项目实际开发中可以重复使用或者略加修改即可再次投入代码中。下面是Du Yong Ping同学写出来的这样一个Android登陆/注册UI之XML布局文件代码实现,我把代码重新抽取和整理出来,使之解耦,以达到未来代码开发中的复用,先代码运行结果:
布局文件:
布局文件使用到的、在drawable目录下放置的shape文件,有三个,分别是:
用户名/密码输入框的背景资源edit_background.xml:
登录/注册按钮的背景资源button_background.xml:
协议条款scroll用到的scroll_background.xml:
注意输入框和按钮的背景圆角处理技巧,将shape做成一个矩形(rectangle),然后在四个角(顶部左边topLeft,顶部右边topRight,底部左bottomLeft,底部右bottomRight)的地方处理成圆角。
附录文章:
《仿微信、短信、QQ等消息数目右上角红色小圆球气泡显示(基于Android XML布局文件实现)》链接地址:http://blog.csdn.net/zhangphil/article/details/43702953
通常在APP开发中不可避免要涉及到登陆/注册xml布局文件的编码实现,这些Android APP登陆/注册XML布局文件代码倒不是很难,但是要在xml布局写代码实现UI设计要求的各种颜色、大小、字体、间距、圆角等等细节设计要求,那么就比较繁琐了,需要不断的细微调整,同时要考虑视屏和匹配不同的Android设备屏幕。还有就是,这类Android登陆/注册XML布局文件代码基本上可以说复用度很高,基本上一次写好,在未来的项目实际开发中可以重复使用或者略加修改即可再次投入代码中。下面是Du Yong Ping同学写出来的这样一个Android登陆/注册UI之XML布局文件代码实现,我把代码重新抽取和整理出来,使之解耦,以达到未来代码开发中的复用,先代码运行结果:
布局文件:
<?xml version="1.0" encoding="utf-8"?>
<LinearLayout xmlns:android="http://schemas.android.com/apk/res/android"
android:layout_width="match_parent"
android:layout_height="match_parent"
android:orientation="vertical" >

<TextView
android:layout_width="match_parent"
android:layout_height="wrap_content"
android:gravity="center_horizontal"
android:text="注册信息"
android:textColor="#f00"
android:textSize="30sp" />

<View
android:layout_width="match_parent"
android:layout_height="2dp"
android:layout_marginLeft="5dp"
android:layout_marginRight="5dp"
android:background="#f00" />

<LinearLayout
android:layout_width="match_parent"
android:layout_height="wrap_content"
android:layout_marginLeft="5dp"
android:layout_marginRight="5dp"
android:layout_marginTop="8dp"
android:orientation="horizontal" >

<TextView
android:layout_width="wrap_content"
android:layout_height="wrap_content"
android:layout_marginRight="5dp"
android:text="用户名:"
android:textSize="18sp" />

<EditText
android:id="@+id/userName"
android:layout_width="match_parent"
android:layout_height="wrap_content"
android:background="@drawable/edit_background"
android:ellipsize="start"
android:hint="输入用户名"
android:singleLine="true"
android:textSize="18sp" />
</LinearLayout>

<LinearLayout
android:layout_width="match_parent"
android:layout_height="wrap_content"
android:layout_marginLeft="5dp"
android:layout_marginRight="5dp"
android:layout_marginTop="5dp"
android:orientation="horizontal" >

<TextView
android:layout_width="wrap_content"
android:layout_height="wrap_content"
android:layout_marginRight="5dp"
android:text="密    码:"
android:textSize="18sp" />

<EditText
android:id="@+id/password"
android:layout_width="match_parent"
android:layout_height="wrap_content"
android:background="@drawable/edit_background"
android:ellipsize="start"
android:hint="输入密码"
android:inputType="numberPassword"
android:singleLine="true"
android:textSize="18sp" />
</LinearLayout>

<Button
android:id="@+id/save"
android:layout_width="match_parent"
android:layout_height="wrap_content"
android:layout_marginLeft="5dp"
android:layout_marginRight="5dp"
android:layout_marginTop="10dp"
android:background="@drawable/button_background"
android:gravity="center"
android:text="注册"
android:textSize="20sp" />

<ScrollView
android:layout_width="match_parent"
android:layout_height="150dp"
android:layout_margin="20dp"
android:background="@drawable/scroll_background" >

<TextView
android:layout_width="match_parent"
android:layout_height="match_parent"
android:text="条款内容\nZhang Phil @ CSDN Zhang Phil @ CSDN Zhang Phil @ CSDN Zhang Phil @ CSDN Zhang Phil @ CSDN Zhang Phil @ CSDN Zhang Phil @ CSDN Zhang Phil @ CSDN Zhang Phil @ CSDN Zhang Phil @ CSDN Zhang Phil @ CSDN Zhang Phil @ CSDN Zhang Phil @ CSDN Zhang Phil @ CSDN Zhang Phil @ CSDN Zhang Phil @ CSDN"
android:textColor="@android:color/darker_gray" />
</ScrollView>

<LinearLayout
android:layout_width="match_parent"
android:layout_height="wrap_content"
android:layout_marginLeft="20dp"
android:layout_marginTop="10dp"
android:orientation="vertical" >

<RadioGroup
android:id="@+id/radioGroup"
android:layout_width="match_parent"
android:layout_height="wrap_content" >

<RadioButton
android:id="@+id/radioButton1"
android:layout_width="match_parent"
android:layout_height="wrap_content"
android:text="不同意该协议条款"
android:textSize="12sp" />

<RadioButton
android:id="@+id/radioButton2"
android:layout_width="match_parent"
android:layout_height="wrap_content"
android:checked="true"
android:text="同意该协议条款"
android:textSize="12sp" />
</RadioGroup>
</LinearLayout>

</LinearLayout>
布局文件使用到的、在drawable目录下放置的shape文件,有三个,分别是:
用户名/密码输入框的背景资源edit_background.xml:
<?xml version="1.0" encoding="utf-8"?>
<shape xmlns:android="http://schemas.android.com/apk/res/android"
android:shape="rectangle" >

<stroke
android:width="2dp"
android:color="#f0f" />

<corners
android:bottomLeftRadius="4dp"
android:bottomRightRadius="4dp"
android:topLeftRadius="4dp"
android:topRightRadius="4dp" />

</shape>
登录/注册按钮的背景资源button_background.xml:
<?xml version="1.0" encoding="utf-8"?>
<shape xmlns:android="http://schemas.android.com/apk/res/android"
android:shape="rectangle" >

<stroke
android:width="4dp"
android:color="#0ff" />

<corners
android:bottomLeftRadius="5dp"
android:bottomRightRadius="5dp"
android:topLeftRadius="5dp"
android:topRightRadius="5dp" />

<solid android:color="#0ff" />

</shape>
协议条款scroll用到的scroll_background.xml:
<?xml version="1.0" encoding="utf-8"?>
<shape xmlns:android="http://schemas.android.com/apk/res/android"
android:shape="rectangle" >

<stroke
android:width="1dp"
android:color="#456789" />

<corners
android:bottomLeftRadius="4dp"
android:bottomRightRadius="4dp"
android:topLeftRadius="4dp"
android:topRightRadius="4dp" />

</shape>
注意输入框和按钮的背景圆角处理技巧,将shape做成一个矩形(rectangle),然后在四个角(顶部左边topLeft,顶部右边topRight,底部左bottomLeft,底部右bottomRight)的地方处理成圆角。
附录文章:
《仿微信、短信、QQ等消息数目右上角红色小圆球气泡显示(基于Android XML布局文件实现)》链接地址:http://blog.csdn.net/zhangphil/article/details/43702953

相关文章推荐
- 一个Android登陆/注册XML布局文件代码
- Android同一个xml布局文件在不同中显示效果不同
- Layout inflation在Android环境中是一个专业术语,用于表示某个XML资源布局文件被解析并转化成为一个层级的View对象的过程。
- 新建 一个android工程,res/layout 下的xml布局文件无法预览
- 一个小白从零基础自学Android编程笔记之如何在AndroidManifext.xml文件中注册
- Android eclipse ADT 布局文件 XML 代码全自动补全
- Android在代码中使用布局文件中的一个组件
- 使用XML布局文件和java代码共同控制UI界面做一个简易图片浏览器
- Android初学习 - 以代码方式(非XML)创建一个布局
- android 自定义属性的使用一、在res/values文件下定义一个attrs.xml文件,代码如下
- android findview 自动生成工具 xml布局文件自动转换类模板代码工具
- Android:layout_gravity与gravity的设置与区别(java代码&xml布局文件)
- Android的xml布局文件代码讲解(TextView控件)
- Android Studio XML布局文件设置代码自动补齐快捷键
- XML布局文件在Activity自动生成代码(二)SAX 解析
- 求一个论坛的在线人数,假设有一个论坛,其注册ID有两亿个,每个ID从登陆到退出会向一个日志文件中记下登陆时间和退出时间,要求写一个算法统计一天中论坛的用户在线分布,取样粒度为秒。
- android使用xml布局文件设计提示对话框
- android使用xml布局文件设计提示对话框
- 【Android 如何置底一个View(附 前置声明layout布局文件中的资源ID)】
- android xml布局文件中EditText的属性详解