利用Tensorflow的队列多线程读取数据
2017-12-25 11:06
375 查看
利用Tensorflow的队列多线程读取数据
在tensorflow中,有三种方式输入数据利用feed_dict送入numpy数组
利用队列从文件中直接读取数据
预加载数据
其中第一种方式很常用,在tensorflow的MNIST训练源码中可以看到,通过feed_dict={},可以将任意数据送入tensor中。
第二种方式相比于第一种,速度更快,可以利用多线程的优势把数据送入队列,再以batch的方式出队,并且在这个过程中可以很方便地对图像进行随机裁剪、翻转、改变对比度等预处理,同时可以选择是否对数据随机打乱,可以说是非常方便。该部分的源码在tensorflow官方的CIFAR-10训练源码中可以看到,但是对于刚学习tensorflow的人来说,比较难以理解,本篇博客就当成我调试完成后写的一篇总结,以防自己再忘记具体细节。
读取CIFAR-10数据集
按照第一种方式的话,CIFAR-10的读取只需要写一段非常简单的代码即可将测试集与训练集中的图像分别读取:path = 'E:\Dataset\cifar-10\cifar-10-batches-py' # extract train examples num_train_examples = 50000 x_train = np.empty((num_train_examples, 32, 32, 3), dtype='uint8') y_train = np.empty((num_train_examples), dtype='uint8') for i in range(1, 6): fpath = os.path.join(path, 'data_batch_' + str(i)) (x_train[(i - 1) * 10000: i * 10000, :, :, :], y_train[(i - 1) * 10000: i * 10000]) = load_and_decode(fpath) # extract test examples fpath = os.path.join(path, 'test_batch') x_test, y_test = load_and_decode(fpath) return x_train, y_train, x_test, np.array(y_test)
其中load_and_decode函数只需要按照CIFAR-10官网给出的方式decode就行,最终返回的x_train是一个[50000, 32, 32, 3]的ndarray,但对于ndarray来说,进行预处理就要麻烦很多,为了取mini-SGD的batch,还自己写了一个类,通过调用train_set.next_batch()函数来取,总而言之就是什么都要自己动手,效率确实不高
但对于第二种方式,读取起来就要麻烦很多,但使用起来,又快又方便
首先,把CIFAR-10的测试集文件读取出来,生成文件名列表
path = 'E:\Dataset\cifar-10\cifar-10-batches-py'
filenames = [os.path.join(path, 'data_batch_%d' % i) for i in range(1, 6)]
有了列表以后,利用tf.train.string_input_producer函数生成一个读取队列
filename_queue = tf.train.string_input_producer(filenames)
接下来,我们调用read_cifar10函数,得到一幅一幅的图像,该函数的代码如下:
def read_cifar10(filename_queue):
label_bytes = 1
IMAGE_SIZE = 32
CHANNELS = 3
image_bytes = IMAGE_SIZE*IMAGE_SIZE*3
record_bytes = label_bytes+image_bytes

# define a reader
reader = tf.FixedLengthRecordReader(record_bytes)
key, value = reader.read(filename_queue)
record_bytes = tf.decode_raw(value, tf.uint8)

label = tf.strided_slice(record_bytes, [0], [label_bytes])
depth_major = tf.reshape(tf.strided_slice(record_bytes, [label_bytes],
[label_bytes + image_bytes]),
[CHANNELS, IMAGE_SIZE, IMAGE_SIZE])
image = tf.transpose(depth_major, [1, 2, 0])
return image, label
第9行,定义一个reader,来读取固定长度的数据,这个固定长度是由CIFAR-10数据集图片的存储格式决定的,1byte的标签加上32 *32 *3长度的图像,3代表RGB三通道,由于图片的是按[channel, height, width]的格式存储的,为了变为常用的[height, width, channel]维度,需要在17行reshape一次图像,最终我们提取出了一副完整的图像与对应的标签
对图像进行预处理
我们取出的image与label均为tensor格式,因此预处理将变得非常简单if not distortion: IMAGE_SIZE = 32 else: IMAGE_SIZE = 24 # 随机裁剪为24*24大小 distorted_image = tf.random_crop(tf.cast(image, tf.float32), [IMAGE_SIZE, IMAGE_SIZE, 3]) # 随机水平翻转 distorted_image = tf.image.random_flip_left_right(distorted_image) # 随机调整亮度 distorted_image = tf.image.random_brightness(distorted_image, max_delta=63) # 随机调整对比度 distorted_image = tf.image.random_contrast(distorted_image, lower=0.2, upper=1.8) # 对图像进行白化操作,即像素值转为零均值单位方差 float_image = tf.image.per_image_standardization(distorted_image)
distortion是定义的一个输入布尔型变量,默认为True,表示是否对图像进行处理
填充队列与随机打乱
调用tf.train.shuffle_batch或tf.train.batch函数,以tf.train.shuffle_batch为例,函数的定义如下:def shuffle_batch(tensors, batch_size, capacity, min_after_dequeue, num_threads=1, seed=None, enqueue_many=False, shapes=None, allow_smaller_final_batch=False, shared_name=None, name=None):
tensors表示输入的张量(tensor),batch_size表示要输出的batch的大小,capacity表示队列的容量,即大小,min_after_dequeue表示出队操作后队列中的最小元素数量,这个值是要小于队列的capacity的,通过调整min_after_dequeue与capacity两个变量,可以改变数据被随机打乱的程度,num_threads表示使用的线程数,只要取大于1的数,队列的效率就会高很多。
通常情况下,我们只需要输入以上几个变量即可,在CIFAR-10_input.py中,谷歌给出的代码是这样写的:
if shuffle:
images, label_batch = tf.train.shuffle_batch([image, label], batch_size,                                   min_queue_examples+3*batch_size,
min_queue_examples, num_preprocess_threads)
else:
images, label_batch = tf.train.batch([image, label], batch_size,
num_preprocess_threads,
min_queue_examples + 3 * batch_size)
min_queue_examples由以下方式得到:
min_fraction_of_examples_in_queue = 0.4
min_queue_examples = int(NUM_EXAMPLES_PER_EPOCH_FOR_TRAIN
*min_fraction_of_examples_in_queue)
当然,这些值均可以自己随意设置,
最终得到的images,labels(label_batch),即为shape=[128, 32, 32, 3]的tensor,其中128为默认batch_size。
激活队列与处理异常
得到了images和labels两个tensor后,我们便可以把这两个tensor送入graph中进行运算了# input tensor img_batch, label_batch = cifar10_input.tesnsor_shuffle_input(batch_size) # build graph that computes the logits predictions from the inference model logits, predicts = train.inference(img_batch, keep_prob) # calculate loss loss = train.loss(logits, label_batch)
定义sess=tf.Session()后,运行sess.run(),然而你会发现并没有输出,程序直接挂起了,仿佛死掉了一样
原因是这样的,虽然我们在数据流图中加入了队列,但只有调用tf.train.start_queue_runners()函数后,数据才会动起来,被负责输入管道的线程填入队列,否则队列将会挂起。
OK,我们调用函数,让队列运行起来
with tf.Session(config=run_config) as sess:
sess.run(init_op) # intialization
queue_runner = tf.train.start_queue_runners(sess)
for i in range(10):
b1, b2 = sess.run([img_batch, label_batch])
print(b1.shape)
在这里为了测试,我们取10次输出,看看输出的batch1的维度是否正确
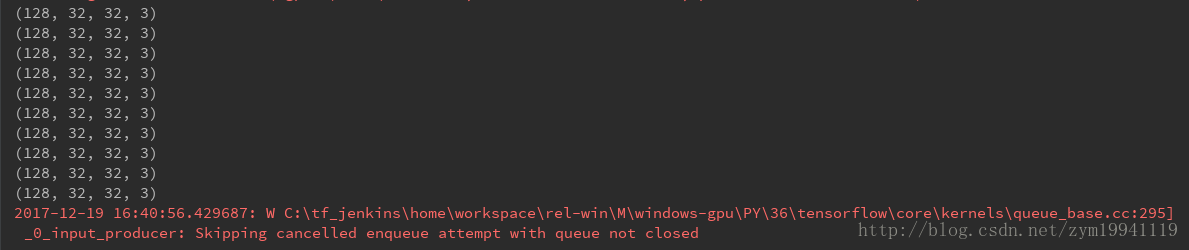
10个batch的维度均为正确的,但是tensorflow却报了错,错误的文字内容如下:
2017-12-19 16:40:56.429687: W C:\tf_jenkins\home\workspace\rel-win\M\windows-gpu\PY\36\tensorflow\core\kernels\queue_base.cc:295] _ 0 _ input_producer: Skipping cancelled enqueue attempt with queue not closed
简单地看一下,大致意思是说我们的队列里还有数据,但是程序结束了,抛出了异常,因此,我们还需要定义一个Coordinator,也就是协调器来处理异常
Coordinator有3个主要方法:
tf.train.Coordinator.should_stop() 如果线程应该停止,返回True
tf.train.Coordinator.request_stop() 请求停止线程
tf.train.Coordinator.join() 等待直到指定线程停止
首先,定义协调器
coord = tf.train.Coordinator()
将协调器应用于QueueRunner
queue_runner = tf.train.start_queue_runners(sess, coord=coord)
结束数据的训练或测试后,关闭线程
coord.request_stop()
coord.join(queue_runner)
最终的sess代码段如下:
coord = tf.train.Coordinator()
with tf.Session(config=run_config) as sess:
sess.run(init_op)
queue_runner = tf.train.start_queue_runners(sess, coord=coord)
for i in range(10):
b1, b2 = sess.run([img_batch, label_batch])
print(b1.shape)
coord.request_stop()
coord.join(queue_runner)
得到的输出结果为:
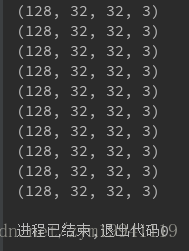
完美解决,利用img_batch与label_batch,把tensor送入graph中,就可以享受tensorflow带来的训练乐趣了

相关文章推荐
- 7.3 TensorFlow笔记(基础篇):加载数据之从队列中读取
- tensorflow读取数据到队列当中
- 【TensorFlow系列】【一】利用TFRecordDataset读取图片数据
- 利用Tensorflow读取二进制CIFAR-10数据集
- tensorflow读取数据到队列当中
- tensorflow读取数据到队列当中
- sharepoint 利用webservice读取数据
- Tensorflow学习教程------tfrecords数据格式生成与读取
- Ubuntu10.04中利用V4L2读取摄像头数据并保存成文件【转】
- 利用webdav从exchange读取数据
- tensorflow读取数据之CSV格式
- 秒杀多线程第十六篇 多线程十大经典案例之一 双线程读写队列数据
- Java如何利用synchronized处理多线程的数据同步问题
- 多线程十大经典案例之一 双线程读写队列数据
- 利用SQL SERVER实现分页读取数据
- tensorflow读取数据
- Tensorflow深度学习之十七:队列与多线程
- JMeter 参数化之利用JDBC Connection Configuration从数据库读取数据并关联变量
- C++利用CStdioFile从txt文件中读取数据
- JMeter 参数化之利用JDBC Connection Configuration从数据库读取数据并关联变量