SaltStack一键自动化部署高可用负载均衡集群
2017-10-17 21:57
726 查看
本节内容涉及的saltstack配置以及各服务的安装包和配置文件均打包上传到了百度云,可自由下载使用
实验环境(rhel6.5 x86_64bit virtual machine)
172.25.5.100 physical machine(for testing)
vim /etc/hosts
2. 各主机需要关闭selinux以及防火墙设置
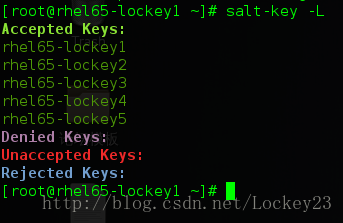
3. 在master端执行salt-key -L发现所有minion,并且通过salt-key -A命令执行认证,得到下面结果:
[root@rhel65-lockey1 ~]# salt-key -L
4. master端取消以下注释并重启服务生效:
负载均衡:haproxy
后端web server:NGINX
[root@rhel65-lockey1 pillar]# tree
[root@rhel65-lockey1 pillar]# cat webservice/web.sls
[root@rhel65-lockey1 pillar]# cat top.sls
运行命令 salt ‘*’ saltutil.refresh_pillar使得选定主机动态参数设置生效
[root@lrhel65-lockey1 _grains]# pwd
/srv/salt/_grains
[root@rhel65-lockey1 _grains]# cat my_grains.py
[root@rhel65-lockey1 salt]# salt rhel65-lockey[5,4] saltutil.sync_grains
#为2和4号主机添加nginx的role,后面部署的时候将通过这个标签匹配进行nginx的安装
[root@rhel65-lockey1 salt]# salt rhel65-lockey[5,4] grains.item roles#查看结果

[root@lockey6 haproxy]# cat install.sls
[root@lockey6 haproxy]# cat service.sls
[root@lockey6 keepalived]# cat install.sls
[root@lockey6 keepalived]# cat service.sls

[root@lockey6 nginx]# cat install.sls
[root@lockey6 nginx]# cat service.sls
[root@lockey6 pkg]# cat nginx-pre.sls
[root@lockey6 salt]# cat top.sls
[root@lockey6 salt]# cat user/nginx.sls
[root@lockey6 salt]# cat user/haproxy.sls
各服务的配置文件以及启动脚本就不贴出了,下面提出几点需要注意的地方:
1.jinja模板调用的格式以及对应的文件中的写法
keepalived.conf 中调用时写法如下
2.对于pillar和grains文件写成后,必须要对特定的主机进行标签的刷新,保证最后运行时能够对应进行软件安装:
3. 对于haproxy的配置文件,务必指定后端主机以及监听:
4.top文件的书写
[root@lockey6 salt]# cat top.sls
5. 确保后端主机的web服务端口80未被占用,以及selinux和防火墙
4.2 测试顺利则执行推送开始自动安装:

停掉master的keepalived服务之后发生ip漂移
3.访问http://vip/admin/stats查看各主机的状态
因为集群部署成功之后是通过VIP(172.25.5.99)提供服务的,我在物理机中加了一条解析记录然后通过curl命令进行负载均衡测试:
vim /etc/hosts
成功结果如下:


实验环境(rhel6.5 x86_64bit virtual machine)
172.25.5.91 salt-master rhel65-lockey1
172.25.5.92 salt-minion rhel65-lockey2 (将自动部署keepalived,haproxy)
172.25.5.93 salt-minion rhel65-lockey3 (将自动部署keepalived,haproxy)
172.25.5.94 salt-minion rhel65-lockey4 (将自动部署nginx)
172.25.5.95 salt-minion rhel65-lockey5 (将自动部署nginx)
172.25.5.100 physical machine(for testing)
一、准备工作
1. 做好各主机的解析vim /etc/hosts
172.25.5.91  rhel65-lockey1
172.25.5.92  rhel65-lockey2
172.25.5.93  rhel65-lockey3
172.25.5.94  rhel65-lockey4
172.25.5.95  rhel65-lockey5
2. 各主机需要关闭selinux以及防火墙设置
3. 在master端执行salt-key -L发现所有minion,并且通过salt-key -A命令执行认证,得到下面结果:
[root@rhel65-lockey1 ~]# salt-key -L
4. master端取消以下注释并重启服务生效:
file_roots:
base:
- /srv/salt

pillar_roots:
base:
- /srv/pillar
二、此高可用负载均衡集群组成
高可用:keepalived负载均衡:haproxy
后端web server:NGINX
三、Get start
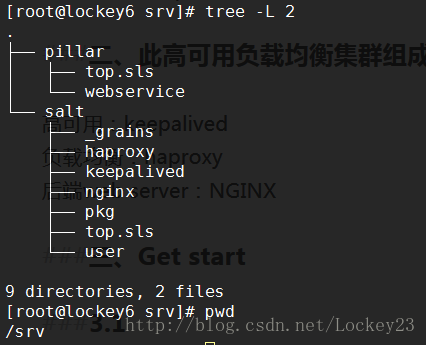
salt自动化部署集群目录结构3.1 pillar目录
为了结合jinja模板实现一些配置文件中参数的动态调整(如keepalived中MASTER与BACKUP以及优先级的值)
[root@rhel65-lockey1 pillar]# tree
.
├── top.sls
└── webservice
└── web.sls

1 directory, 2 files
[root@rhel65-lockey1 pillar]# cat webservice/web.sls
{% if grains['host'] == 'rhel65-lockey2' %}
state: MASTER
priority: 100
{% elif grains['host'] == 'rhel65-lockey3' %}
state: BACKUP
priority: 50
{% endif %}
[root@rhel65-lockey1 pillar]# cat top.sls
base:
'rhel65-lockey2':
- webservice.web
'rhel65-lockey3':
- webservice.web
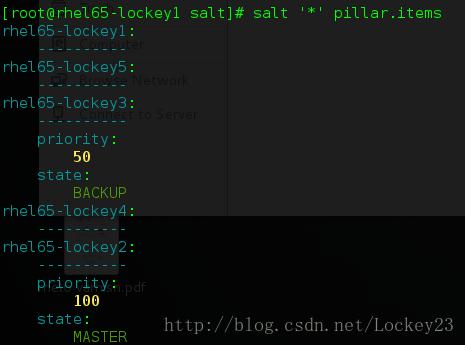
运行命令 salt ‘*’ saltutil.refresh_pillar使得选定主机动态参数设置生效
[root@rhel65-lockey1 pillar]# salt ‘*’ pillar.items#查看结果
3.2 _grains目录
为服务主机添加role设置,用以根据role标签决定主机需要安装的软件
[root@lrhel65-lockey1 _grains]# pwd
/srv/salt/_grains
[root@rhel65-lockey1 _grains]# cat my_grains.py
#!/usr/bin/env python

def my_grains():
grains =  {}
grains['roles'] = 'nginx'
grains['name'] = 'lockey'
return grains
[root@rhel65-lockey1 salt]# salt rhel65-lockey[5,4] saltutil.sync_grains
#为2和4号主机添加nginx的role,后面部署的时候将通过这个标签匹配进行nginx的安装
rhel65-lockey4:
- grains.my_grains
rhel65-lockey5:
- grains.my_grains
[root@rhel65-lockey1 salt]# salt rhel65-lockey[5,4] grains.item roles#查看结果
rhel65-lockey4:
----------
roles:
nginx
rhel65-lockey5:
----------
roles:
nginx
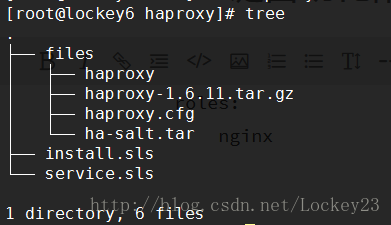
3.3 haproxy目录:
haproxy安装、服务配置文件、启动脚本和安装包
[root@lockey6 haproxy]# cat install.sls
include:
- pkg.nginx-pre
- user.haproxy

haproxy-install:
file.managed:
- name: /mnt/haproxy-1.6.11.tar.gz
- source: salt://haproxy/files/haproxy-1.6.11.tar.gz

cmd.run:
- name: cd /mnt && tar zxf haproxy-1.6.11.tar.gz && cd haproxy-1.6.11 && make TARGET=linux26 USE_PCRE=1 USE_OPENSSL=1 USE_ZLIB=1 PREFIX=/usr/local/haproxy && make TARGET=linux26 USE_PCRE=1 USE_OPENSSL=1 USE_ZLIB=1 PREFIX=/usr/local/haproxy install
- creates: /usr/local/haproxy

/etc/haproxy:
file.directory:
- mode: 755

/etc/haproxy/haproxy.cfg:
file.managed:
- source: salt://haproxy/files/haproxy.cfg

/etc/init.d/haproxy:
file.managed:
- source: salt://haproxy/files/haproxy
- mode: 755
[root@lockey6 haproxy]# cat service.sls
include:
- haproxy.install

haproxy-service:
service.running:
- name: haproxy
- enable: true
- reload: true
- watch:
- file: /etc/haproxy/haproxy.cfg
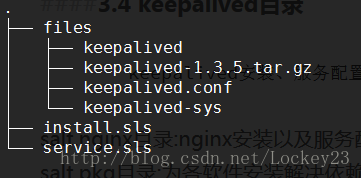
3.4 keepalived目录
keepalived安装、服务配置文件、启动脚本和安装包
[root@lockey6 keepalived]# cat install.sls
include:
- pkg.nginx-pre

keepalived-install:
file.managed:
- name: /mnt/keepalived-1.3.5.tar.gz
- source: salt://keepalived/files/keepalived-1.3.5.tar.gz

cmd.run:
- name: cd /mnt && tar zxf keepalived-1.3.5.tar.gz && cd keepalived-1.3.5 && ./configure --prefix=/usr/local/keepalived --with-init=SYSV && make && make install
- creates: /usr/local/keepalived

/etc/sysconfig/keepalived:
file.managed:
- source: salt://keepalived/files/keepalived-sys
- mode: 644
- user: root

/etc/keepalived:
file.directory:
- mode: 755

/sbin/keepalived:
file.symlink:
- target: /usr/local/keepalived/sbin/keepalived

/etc/keepalived/keepalived.conf:
file.managed:
- source: salt://keepalived/files/keepalived.conf
- mode: 644
- user: root
- group: root
- template: jinja###注意jinja模板的用法
- context:
state: {{ pillar['state'] }}
priority: {{ pillar['priority'] }}

/etc/init.d/keepalived:
file.managed:
- source: salt://keepalived/files/keepalived
- mode: 755
- require:
- file: /etc/sysconfig/keepalived
- file: /etc/keepalived/keepalived.conf
[root@lockey6 keepalived]# cat service.sls
include:
- keepalived.install

keepalived-service:
service.running:
- name: keepalived
- enable: true
- reload: true
- watch:
- file: /etc/keepalived/keepalived.conf
3.5 nginx目录
nginx安装以及服务配置文件和启动脚本、安装包
[root@lockey6 nginx]# cat install.sls
include:
- pkg.nginx-pre

nginx-source-install:
file.managed:
- name: /mnt/nginx-1.12.1.tar.gz
- source: salt://nginx/files/nginx-1.12.1.tar.gz

cmd.run:
- name: cd /mnt && tar zxf nginx-1.12.1.tar.gz && cd nginx-1.12.1 && sed -i.bak 's/#define NGINX_VER          "nginx\/" NGINX_VERSION/#define NGINX_VER          "nginx"/g' src/core/nginx.h && sed -i.bak 's/CFLAGS="$CFLAGS -g"/#CFLAGS="$CFLAGS -g"/g' auto/cc/gcc && ./configure --prefix=/usr/local/nginx --with-http_ssl_module --with-http_stub_status_module && make && make install
- creates: /usr/local/nginx
[root@lockey6 nginx]# cat service.sls
include:
- nginx.install
- user.nginx

/usr/local/nginx/conf/nginx.conf:
file.managed:
- source: salt://nginx/files/nginx.conf
- mode: 644

/etc/init.d/nginx:
file.managed:
- source: salt://nginx/files/nginx
- mode: 755

nginx-service:
service.running:
- name: nginx
- enable: true
- reload: true
- require:
- file: /etc/init.d/nginx
- watch:
- file: /usr/local/nginx/conf/nginx.conf
3.6 pkg目录
为各软件安装解决依赖包问题,需要包含在最先执行的安装文件中
[root@lockey6 pkg]# cat nginx-pre.sls
pkg-init:
pkg.installed:
- pkgs:
- gcc
- gcc-c++
- zlib-devel
- openssl-devel
- pcre-devel
3.7 top.sls
顶级文件,用来进行集群的分节点软件安装
[root@lockey6 salt]# cat top.sls
base:
'rhel65-lockey2':
- keepalived.service
- haproxy.service
'rhel65-lockey3':
- keepalived.service
- haproxy.service
'roles:nginx':
- match: grain
- nginx.service
3.8 user目录
创建部分服务运行的用户和组(如haproxy,nginx)
[root@lockey6 salt]# cat user/nginx.sls
nginx:
user.present:
- uid: 800
- shell: /sbin/nologin
- home: /usr/local/nginx
- createhome: false
[root@lockey6 salt]# cat user/haproxy.sls
haproxy:
group.present:
- gid: 200
user.present:
- uid: 200
- gid: 200
- shell: /sbin/nologin
- home: /usr/local/haproxy
- createhome: false
各服务的配置文件以及启动脚本就不贴出了,下面提出几点需要注意的地方:
1.jinja模板调用的格式以及对应的文件中的写法
- template: jinja#此部分对应keepalived.conf
- context:
state: {{ pillar['state'] }}
priority: {{ pillar['priority'] }}
keepalived.conf 中调用时写法如下
state {{ state }}
priority {{ priority }}
2.对于pillar和grains文件写成后,必须要对特定的主机进行标签的刷新,保证最后运行时能够对应进行软件安装:
salt rhel65-lockey[4,5] saltutil.sync_grains
salt ‘*’ saltutil.refresh_pillar
3. 对于haproxy的配置文件,务必指定后端主机以及监听:
frontend public
bind          www.lockey.com *:80
default_backend dynamic

backend dynamic
balance         roundrobin
server          web1 172.25.5.94:80 cookie s1 check inter 1000
server          web2 172.25.5.95:80 cookie s2 check inter 1000
4.top文件的书写
[root@lockey6 salt]# cat top.sls
base:
'rhel65-lockey2':#2和3主机安装keepalived和haproxy
- keepalived.service
- haproxy.service
'rhel65-lockey3':
- keepalived.service
- haproxy.service
'roles:nginx':#具有nginx标签的主机(4和5)安装nginx服务
- match: grain
- nginx.service
5. 确保后端主机的web服务端口80未被占用,以及selinux和防火墙
四、进行整体自动安装测试然后执行
4.1 首先测试一下,如果有问题解决后再执行安装[root@rhel65-lockey1 salt]# salt ‘*’ state.highstate test=true 注意:如果提示keepalived/haproxy/nginx服务无法启动的错误是正常的,因为启动脚本还未推送过去
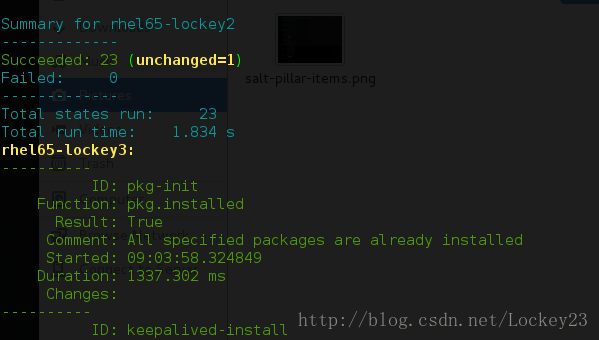
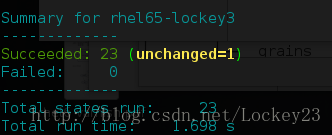
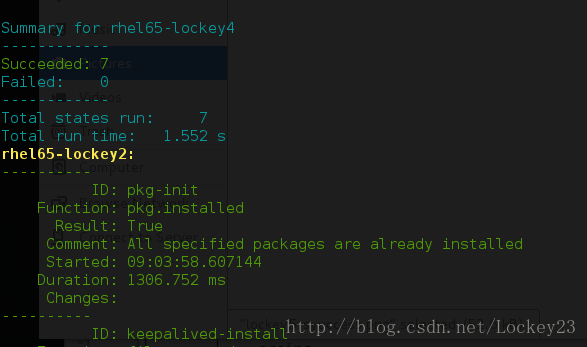
4.2 测试顺利则执行推送开始自动安装:
[root@rhel65-lockey1 salt]# salt ‘*’ state.highstate
五、集群可用性测试
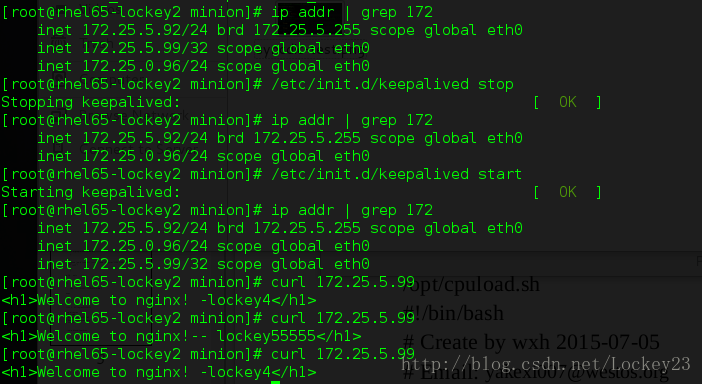
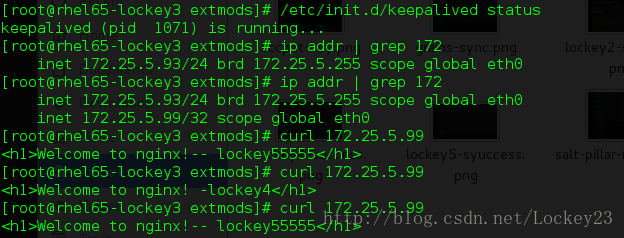
1. 查看vip是否在keepalived定义的MASTER上停掉master的keepalived服务之后发生ip漂移
3.访问http://vip/admin/stats查看各主机的状态
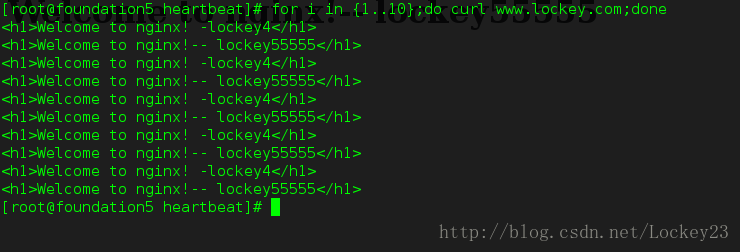
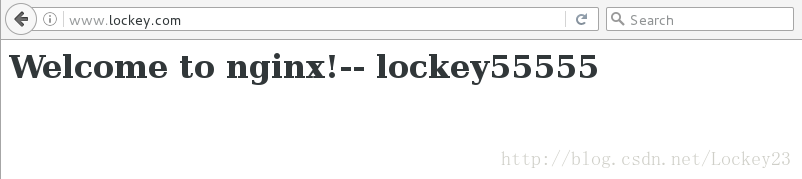
因为集群部署成功之后是通过VIP(172.25.5.99)提供服务的,我在物理机中加了一条解析记录然后通过curl命令进行负载均衡测试:
vim /etc/hosts
172.25.5.99 www.lockey.com
成功结果如下:

相关文章推荐
- 服务自动化部署平台之Saltstack总结
- saltstack自动化部署 - 学习笔记
- 利用saltstack部署高可用集群及负载均衡(keepalived+haproxy+nginx)
- Keepalived + LVS 高可用负载均衡集群部署
- SaltStack实战之配置管理-LAMP自动化部署
- 20分钟一键自动化部署10台服务器网站集群
- 利用saltstack部署高可用集群及负载均衡(keepalived+haproxy+nginx)
- 自动化运维神器之saltstack (一)安装部署
- SaltStack实战之配置管理-LAMP自动化部署
- 利用saltstack部署高可用集群及负载均衡(keepalived+haproxy+nginx)
- 自动化运维之 部署Saltstack 并批量部署 Nginx
- 利用saltstack部署高可用集群及负载均衡(keepalived+haproxy+nginx)
- 利用saltstack部署高可用集群及负载均衡(keepalived+haproxy+nginx)
- [SaltStack] Salt高可用和负载均衡部署
- SaltStack (1)运维自动化部署
- 自动化管理工具Saltstack之nginx部署(12)
- HAProxy+Varnish+LNMP实现高可用负载均衡动静分离集群部署
- SpringBoot + maven + Jenkins + docker 实现docker集群一键自动化部署
- LVS+keepalived高可用负载均衡集群部署(二)---LAMP网站服务器与LVS服务器
- 服务自动化部署平台之Saltstack总结